Category Archives: Cooking

Cooking hardware that makes a difference.

The Sunbeam Radiant Control toaster

A masterpiece of design.

For an index of cooking articles on this blog click here.

Designed and extensively patented in 1949, the Sunbeam Radiant Control toaster was sold from 1949 through 1995. It was made largely in America with a few manufactured in Canada and a few 230-250 volt models made in Australia.


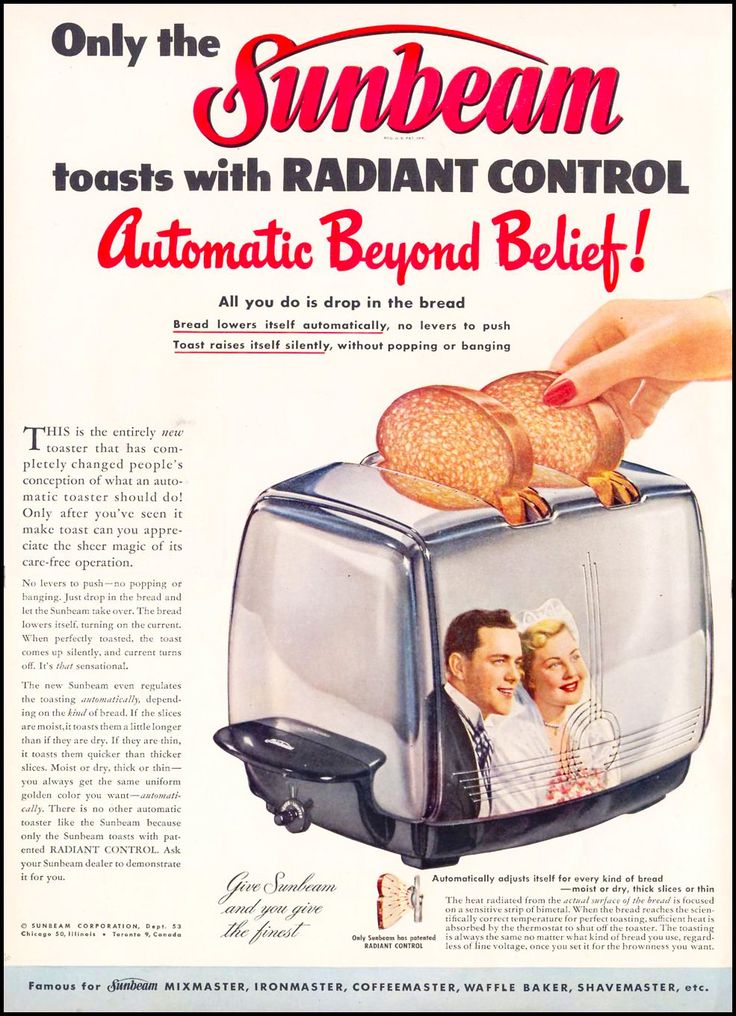
Note the implication that the toaster makes a perfect wedding gift!
Click here for a larger version.

If the Leica M2 is a cult camera and the BMW Airhead is a cult motorcycle, then it’s only fair to add the Sunbeam to the cult population, because there is nothing in the toaster class made in the last seven decades which compares.

There is not one computer chip or electromagnet in the device. Just like in that Leica and BMW. Nor is there a down/up handle. A system of cantilevers sees to it that the weight of inserted bread lowers your future toast into the fires of hell, and at 1375 watts (from the VR-40-1 model; 1275 watts on earlier models) those fires run a great deal warmer than the 900 watts in your Chinese made piece of garbage. The resulting high temperature sees to it that the surface of the bread is seared to a satisfying crispness while the center remains soft and fluffy.


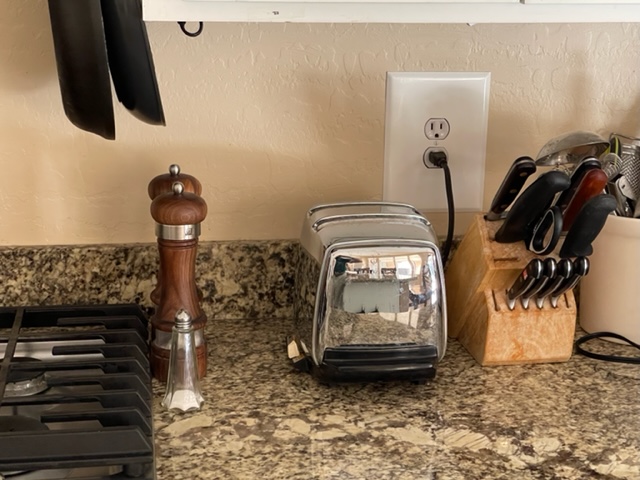
English muffins, toasted to perfection.

Once operational the innards disclose that the external heating coils are vertical while, mysteriously, the inner pair is tightly wound horizontally. Designer whim? Not a bit of it. This is a ‘Radiant Control’ tool. On insertion of the bread, the horizontal coils lengthen, due to thermal expansion, permitting the mechanism to relax and drop the bread into the body. The lengthening of the coils, once heated, is a mere fraction of a millimeter but a system of levers multiplies that some 175 times to effect the desired result. Ingenious. Vertical outside coils? Read on.

‘Radiant Control’? Never was there a more accurate advertising jingle. A bimetallic strip, shielded from the heat of the adjacent outside vertical coils, well remote owing to their vertical configuration, ‘sees’ the radiated heat emanating from the surface of the bread and releases the mechanism and disconnects power once the bread has reached the desired level of doneness. This means that it’s irrelevant whether the inserted bread is frozen or at room temperature, as the switch solves for radiation not for time. This also means that should you reinsert a toasted slice it will not be burned as the mechanism will recognize the high heat radiation rate and quickly release the toasted bread. Again, ‘Radiant Control’. I’m not sure why you would want to reinsert a toasted slice, but is that clever or what? A related benefit is that the mechanism will automatically adjust doneness whatever the thickness of the inserted bread. Again, it’s not timing anything. It’s sensing the heat radiated from the bread.


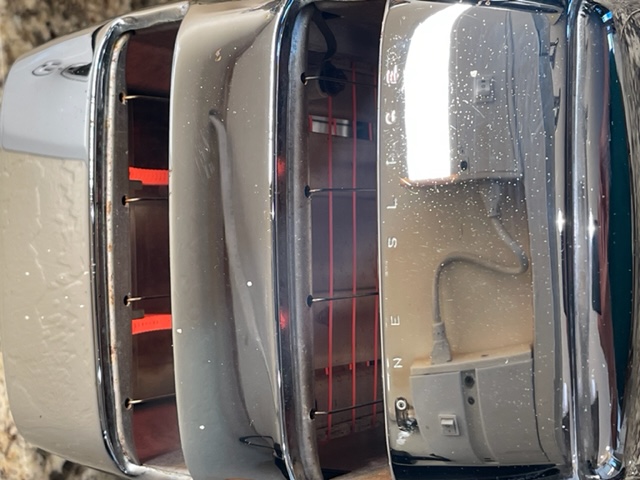
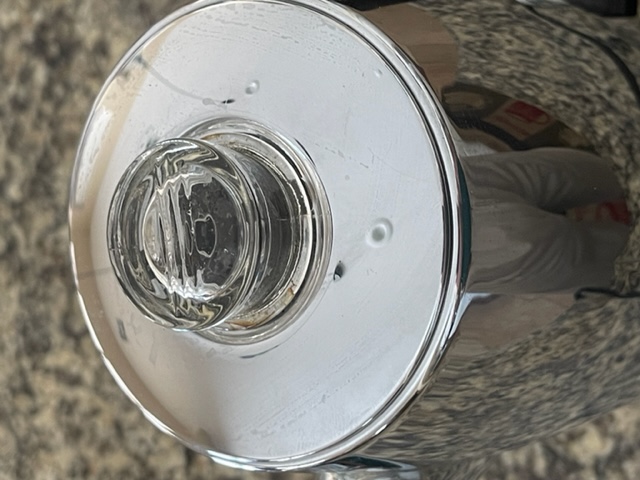
Horizontal and vertical heating coils.

While there were minor model differences over the 47 years this toaster was marketed by the Sunbeam Corporation, I can find no evidence that the related changes had any effect on reliability. Early models had lovely Art Deco scribed lines on the enclosure (T20, T20 A/B/C), some had a garish gold logo plate (T35), the doneness adjuster started as a knob concealed under one of the handles (supremely elegant – see the advertisement, above – through T35) then morphed into a slider on the long side (less elegant, if easier to use – T40 and later). But the patented Radiant Control mechanism remained unchanged. The early hidden adjuster design is optimal as, once you have established the color you like in your bread, it does not need adjusting. Thick, thin, moist, dry, frozen or at room temperature, the toaster will adjust the toasting time for the same result. So that control knob can be hidden from sight as it is rarely used. Move the knob fully counterclockwise or the slider all the way to the left and the toaster is turned off and the toast rises.

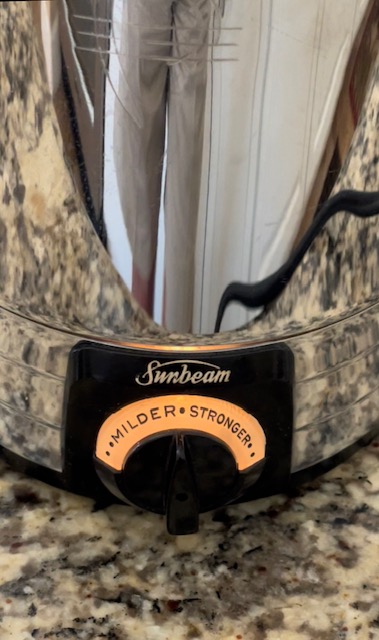
The functioning of the darkness knob or slider is as elegant as everything else in this device. It simply changes the distance of the radiation sensing bimetallic strip from the bread’s surface.

The Sunbeam has been ‘discovered’, largely I suspect owing to this quite special video from The Technology Connection. So unless you are lucky enough to find one at a yard sale from an uninformed seller, you can forget dreaming of picking one up for $10. A good one will run you $225 and up and if you think that is costly the toaster’s 1949 $25/sales price figures to $425 today. For that amount you could buy 17 WalMart specials or almost one Wolf but all would share the same electromagnets and failure-prone timer chips, making them so much recycled waste sooner rather than later. I got lucky and paid $145 after much searching for my early-1970s model in lovely condition (you really do not want a scratched chrome exterior). If the Sunbeam has a failure mode it’s that the retract/raise mechanism can get sluggish or non-operational, in which case a cleaning and a quick tweak on a hidden adjuster screw fixes what ails it. See “Adjustments”, below.


Beauty and engineering design.

Limitations? The Sunbeam cannot toast bagels. The radiant heat sensing bimetallic strip switch is directed at the center of the toast. This means it will ‘see’ the hole in the bagel and thus the heating coils behind that hole, and release the bagel far too early. Well, let’s face it. The bagel is the last word in sub-optimal design. You want a hole in the middle of your bread? What a rip off. And it’s loaded with oil, not to mention a wet cement-like dough consistency. Yecch! But that’s a minor limitation because each time you use the Sunbeam you will marvel at its ingenuity and sheer physical beauty while you anticipate beautifully toasted bread. And yes, it does English muffins perfectly! The British knew better than to leave a hole in the middle.

As regards bread size, it seems that American bread, like Americans, has grown larger since the late 1950s. The Sunbeam’s slot width is just over 5” so you may have to trim your slice a tad to fit.

As regards thickness, my breakfast favorite, the English muffin, needs a tad of ‘thinning’ to fit without shoving, something I accomplish by gently flattening the muffin before halving by pressing it under a cutting board.

But these are minor adaptations for what remains the best toaster in this universe.

Adjustments:

There are two adjusters on the Sunbeam – mine is the AT-W model. Be sure the toaster is unplugged before adjusting either.

The first, underneath the handle opposite to the cable entry, sets the degree of doneness for a particular setting of the darkness slider. In my case the slider had to be moved almost to full darkness for a medium toasted result. The screw can be seen with the aid of a flashlight and for the AT-W model is slotted. (Earlier models use a 3/32″ Allen screw). A half turn clockwise saw to it that medium toasted bread resulted with the darkness slider in the middle of its range. Stated differently, turning the adjuster screw clockwise means you have to move the slider towards the ‘lighter’ end for the same doneness that prevailed before adjustment. If your toast is too dark, turn that screw counterclockwise. My screw was pretty stiff. What is the right way to gauge whether you have adjusted this correctly? With no toast in the machine, depress the drop mechanism on the ‘One Slice’ side with a wooden spatula and count the seconds it remains engaged. Recall that the switch senses radiant heat when determining the heating time. With no bread in the toaster that will be a very short time as the heat falling on the bimetallic strip/switch will be high. You want the toaster to turn off and release the drop mechanism (‘click’) in 7-8 seconds from commencement of the heating cycle.

The second, visible when the crumb tray is swung open, controls the weight sensitivity of the drop mechanism. It’s a small slotted screw in the center of the chassis. My toaster was reluctant to drop the bread and a full turn counterclockwise on this adjuster screw restored its sensitivity. Drop in a piece of bread or an English muffin and down she goes, no poking or pushing required. If you buy a ‘faulty’ example there’s a very good chance that adjustment of this screw will restore an apparently non-functioning drop mechanism. What’s the right adjustment? Insert the slimmest, lightest piece of toast you are likely to use and make sure it drops without prodding. Keep adjusting that screw CCW, half a turn at a time, until it does.

Safety:

No Sunbeam Radiant Control Toaster came with a polarized (directional) electrical plug. From the T-35-1 model on, the electric switch is a double pole model, meaning the positive and neutral wires are switched, an important safety feature with the non-polarized plug used. If the plug is inserted the wrong way in the socket (and how are you to know the right was as it’s reversible?) or, even if you do know, if the electrician installing your power socket was a klutz and reversed the proper orientation of the positive and neutral wires – not unknown – then you can easily get an electrical shock from touching the wires even with the toaster off. For maximum safety with earlier models, where only the positive wire is switched, it’s a good idea to ensure the toaster is plugged into an outlet on a GFCI circuit. This will immediately trigger the GFCI circuit breaker in the event there is an electrical fault which allows current to flow to ground – like a shorted cord, for example, or a finger touching an earlier model’s wires. Installing a GFCI socket is a whole lot easier than opening up the toaster and rewiring early models for a polarized plug. (There’s a YouTube video out there on how to do this, but the presenter/mechanic is a total klutz). I’m not an EE so take your own advice on this one. Electricity, this Mech Eng has long known, is the work of the devil.

Buying advice:

As there were no dogs in the model line, any well priced Sunbeam will add class and design to your kitchen.

The T-20B added a more robust return mechanism. Models through the T-20C have the gorgeous Art Deco design scribed on the sides. The T20-C replaced the lovely cloth covered cord of earlier models with a more utilitarian rubber one. The T-35 replaces those with a gold logo, if that’s your thing. But these early models really should either be fitted with a three-wire polarized plug/cord for safety or used only with a GFCI socket. The T-35-1 was the first to use a two pole switch – safe – and the VT-40-1 increased power from 1275 to 1375 watts for a shorter toasting cycle. But the less attractive – to my eyes – darkness slider replaced the mostly hidden knob on early models. Thereafter variations on the theme were minor.

Mine is a late model AT-W, meaning it has 1,375 watts of power, the safe two-pole electrical switch, a rubber cord, and plain chrome sides with the frontal darkness slider.

A note about the inventor, Ludvik J. Koci:

From his obituary in the Chicago Tribune – the reference to the ‘Toastmaster’ is erroneous. That was a traditional design toaster from Sunbeam’s competitor, McGraw Electric:

INVENTOR, ENGINEER LUDVIK J. KOCI, 91
By G.J. Zemaitis. Special to the Tribune
Chicago Tribune

Sep 29, 1999 at 12:00 am

Ludvik J. Koci obtained his first patent in the mid-1930s and changed the way Americans lived.

The Chicago-born engineer was granted a patent for a thermostat that allowed him to invent numerous household appliances, including the Sunbeam Toastmaster.

A longtime Oak Brook resident, Mr. Koci died Monday in Lexington Health Care Center of Elmhurst. He was 91.

Mr. Koci was the son of Czech immigrants and the first in his family to attend college.

In a period of four years, he obtained electrical and chemical engineering degrees from the University of Illinois at Urbana-Champaign and went to work for the Chicago Flexible Shaft Co. in Chicago. The firm later became the Sunbeam Corp., for which he worked for 37 years.

“The family has a large briefcase filled with his patents,” said his daughter Cynthia Veldman. “But he was most proud of the Toastmaster.”

The Toastmaster stood out for its innovative ability to automatically lower and raise bread once it was toasted.

Mr. Koci also held patents for the first electric iron, the first electric coffee percolator, the first electric frying pan, and electric shavers and blankets.

Mr. Koci taught advanced mathematics at the Illinois Institute of Technology. Though an innovative thinker and inventor, he lacked sales skills, his daughter said.

“For the longest time, in the 1960s, we had prototypes of an electric bicycle and electric car that he built. He just could not get anyone interested in manufacturing them,” she said.

One of his inventions, an electronic turn indicator, was dismissed by several automobile manufacturers, which thought the idea was no better than a driver signaling by extending an arm from a moving car, she said.

“My father also loved music, particularly polka. As a young man, he was known as the king of polka,” said his daughter.

For a review of Koci’s gorgeous Sunbeam AP10 coffee percolator, click here.

The Presto Belgian waffle maker

No mess, great waffles.

For an index of cooking articles on this blog click here.

Apart from the fact that it has some of the worst weather in Western Europe and that its ‘impenetrable’ Ardennes Forest is invaded now and then by Germans en route to the delights of Paris and champagne, Belgium really is not famous for anything. Unless it’s Belgian waffles that is, the thick and crunchy type that better greasy spoons serve with lashings of whatever pleases you. Well, all those unelected Brussels bureaucrats have to have some joy in their miserable lives, I suppose, while dictating silly rules about milk and cheese to the masses of sheep they rule.

My old waffle maker, now having seen some two decades of service, is on its last legs and few machines in the home have given rise to so much bad language. No matter how carefully I measure the volume of waffle mix it will randomly overflow leaving the most awful mess to clean up. And now the heated surfaces have started sticking to the waffle, making removal an exercise in frustration. So replacement was called for.

There are more waffle makers on Amazon than crooks in Congress and prices range from under $30 to $300 or so for home models, much more for commercial duty ones. After sifting through the reviews (I only read the one star ones as no one is likely to be paid to leave those) I settled on the Presto flip type. First, it makes really thick Belgian-style waffles which hold your maple syrup well. Second, there’s only one thing, maybe two, to go wrong. A heating element can fail or the hinge might break. I can’t comment on the likelihood of the first, though the hinge seems robust enough. Yes, there’s a small digital beeping clock but it is unconnected to anything and is battery powered. No microchips or electromagnets in sight. There is not even an on-off switch. Plug it in, pull the plug out.


The Presto Belgian waffle maker. Click the image to go to Amazon.
.
The Presto Corporation was founded in 1905 in Eau Claire, Wisconsin where doubtless many of the workers were sired by Germans with invasion minded intentions. This was back in the day when America actually made the world’s best home appliances, ones to be used and repaired, not used and disposed of. Now, of course, their products are ‘Designed in America’, just like your iPhone, and also made by slave labor in some hell hole in China. Oh well!

How does it work? Very well indeed. If you use exactly one cup of waffle mix, ‘blobby’ not runny, it will not overflow and yes, the waffle looks almost as good as the one on the box cover. Mine came out very evenly toasted on both sides. You flip the maker after the mix has been poured and the lid closed, which Presto claims is the secret to the waffle’s evenness. Reviews suggest never to use any oil or spray on the ceramic surfaces (no Teflon here, no poisons) and to simply wipe the surface with a damp cloth when you first open the machine. After a 3 minute warm-up, when the red light goes out, I found that 3 minutes with Aunt Jemima pancake mix is perfect, the beeper going off the first time when one minute remains and a second time (5 times!) when the waffle is done. The timer does nothing but beep. It does not turn the power off.

Some suggest flipping the irons over part way through the bake, but that makes no sense as the mix will have stiffened by then. I tried it with and without part way flipping and there was no difference. The waffles are perfect. Release is easy, no tools needed. Crisp outside, tender and fluffy inside. One makes for a very filling breakfast. The irons can be locked in the upright position for compact storage. The plastic upright lock is a tad fragile, so take it easy.

Some comments on Amazon state that Presto does not stand behind its product and that warranty claims are a waste of time, so you have been warned. This is a disposable appliance.

Presto has handy recipes here.

I made the maple pecan waffles in that recipe of theirs and they were excellent. By the way, the thickness at center is 1 1/8″. This is a serious waffle.


Click the image for the recipe.

Recommended.

The side-cutting can opener

A better mousetrap.

For an index of cooking articles on this blog click here.

‘Nerd’ is a derogatory term used by the incurious to describe anyone with an inquiring mind. My friends tend to be nerds. Call me one and I want nothing to do with you for yours is a second rate mind. I have the same contempt for users of this noun as I do for people who tell me they cannot set the clock on their electric gadget. Can’t they read the manual?

Note that membership in my exclusive club does not dictate advanced math skills or a postgraduate degree. What it does mandate, however, is curiosity. Show me a successful person and I will show you one who is curious.

As someone who graduated engineering school at the top of his class with ease in the study of ergonomics (we called it ‘occupational psychology’ back then) I have long been interested in understanding how machines work and also greatly frustrated how often they work poorly. So when a better mousetrap comes along, in this case a can opener, I am interested. “With ease” you ask? When something fascinates you, the design of the man-machine interface in this instance, it’s easy.

I would suggest that no commonly encountered field suffers from poorer ergonomic design than the kitchen. Few ‘standard’ tools found therein seem to even be aware of this field of engineering.

You can learn all about the history of cans and openers in this excellent Technology Connection video well presented by someone with an inquiring mind. A fine, inquiring mind.

The presenter relates, in wonderment, the fact that the side-opening can opener has never really caught on. You get that technology in some electric can openers (about as poor a dedication of engineering effort as the electric carving knife) but the humble $10 hand held device is largely unknown. Yet it is superior to the traditional design which cuts into the top of the can leaving deadly edges for your fingers and coating the cutting wheel in the can’s contents.

The design I am referring to can be had for just $10.

And if the traditional cutter exposes nasty sharp edges to your fingers, the pull-off top on cans with a key is even worse. No matter how hard I try I still occasionally cut myself on these and they invariably need great effort to remove, not to mention the need for a tool to pry the key up or risk damaging your manicure. Bad, bad, bad.

You want to get the linked model of the can opener, not the one with the L-shaped extension arm with a magnet attached. First, there is no need for a magnet to remove the severed lid. Second, that magnet interferes with the pull-open key on cans thus equipped, rendering it useless. How do I know this? Please spare me the embarrassment of answering.


No interference with the key.

The cutting wheel makes no contact with the can’s contents:


The cutting wheel.

Note that the contents of the can are nowhere near the cutting wheel.


The arrow indicates marginal contact of the
cutting wheel with the inside of the lid’s seam.

How about those rectangular sardine tins with those deadly pull-off tops?


No problem with rectangular tins.

And be assured, it is impossible – impossible! – to cut yourself on any newly exposed edge on either the lid or can after using this opener.

Few things in a kitchen are more disgusting than traditional can openers with their cutting wheels encrusted with the contents of who knows how many cans past. And that legacy, replete with bacteria, is waiting to infect the contents of the next can you open. Yes, I always washed mine, but really, that should not be necessary in a properly designed tool.

Drawbacks? Because you are cutting through one layer of a seam which is considerably thicker than the surface of the lid (check the video), the torque required to turn the cutting wheel is, I estimate, three times as great as with traditional models. Meaning it’s non-trivial. No problem for me but this may be an issue for those with arthritic joints.

Secondly, because the can opener cuts from the side of the lid not through the top, you cannot see the cut as you operate the tool. Further, it’s very smooth, so you don’t get that ‘click’ at completion that you do with the traditional style of opener. So as to minimize effort, meaning you want to stop turning the handle the minute you have completed a circle, I make a note of where I have started the cut and wait for that start point to come around again.

Overall, this tool is so superior in every conceivable way I do not see going back to the traditional can opener, ever.

Rambo meets Mitsumoto Sakari

A better mousetrap.

For an index of cooking articles on this blog click here.

Five years ago I pretty much gave up on my chef’s knife and transitioned to a cleaver. You can read about that here.

The upgrade demon reared his ugly head the other day and I resolved to try a Japanese edge cleaver for even better cutting. Japanese knives are sharpened to a 12-15 degree angle, much finer than the 20 degrees used in European hardware. Better cutting, the trade-off being faster wear of the finer edge.


A new sharpening tool and a Japanese cleaver – the Rambo. Click the image.

My electric knife sharpener – check the link above – is getting long in the tooth, the grinding wheels are now well worn and you cannot replace them. You have to buy the whole thing again. Boo!

So I thought I would try the Japanese Mitsumoto Sakari sharpener which comes with coarse and fine stones, as well as a scissor sharpener. But the real secret to this tool is that the sharpening angle is adjustable from 14 to 24 degrees. As for the cleaver, it’s a non-stainless forged steel one (I borrowed it from Sylvester Stallone when he was not making Rambo XLI) for a better edge and I immediately sharpened it to a 14 degree angle. First, however, I checked the angles on the Mitsumoto and can confirm they are dead accurate, the 14 degree setting yields a subtended angle of 28 degrees, the 20 degree yields 40 degrees and so on. Nice.

I gave the Rambo ten unidirectional swipes through the 14 degree coarse sharpener, then five more through the fine and can confirm that it’s scary sharp. The hole in the blade is for your forefinger and has nasty burrs when shipped. A few seconds with a Nicholson rat tail file saw those off. The forefinger is inserted there as a further precaution against your finger dipping into your workpiece. The Rambo comes with a sturdy leather belt pouch for those occasions when you feel it’s necessary to wreak havoc outdoors.

The sharpening rods in the Mitsumoto are fairly fine so only time will tell how well they wear. At $25 you can buy five for the price of one Kitchen Chef electrical tool, so it’s not a big concern. Recommended.

As for the Rambo, I have to do a lot more butchering before passing judgment. Suffice it to say that I feel empowered – and dangerous.

Meat cleaver

A superior tool for any cook.

For an index of cooking articles on this blog click here.

Over a decade ago I extolled the benefits of a good chef’s knife, writing like many before me that it’s the key kitchen tool.

Well, for the last three years my chef’s knife has seen very little use and I prepare three meals daily. It has been replaced – nay, obsoleted – by this:


A superior tool.

This tool is superior to the chef’s knife in just about every way imaginable. The cutting edge is much further from the fingers. The leverage that can be applied on the broad-topped blade is an order of magnitude greater. Rocking the cleaver over vegetables, like onions, to dice and chop them up is trivial and safe. But as the dents in mine confirm, the last thing you really want to do with this tool is use it for hacking up bones. Yes, the steel is soft, meaning it both blunts and distorts relatively easily. I will gradually wear through my dents, but they remind me not to be silly. You never hammer this down on anything. Make noise with it and you are using it incorrectly. Want to hack up bones? Use a saw.

The blade is very thick which just helps with the impression of control and yes, it just fits the sharpening machine I have now been using happily for over a decade:


In the Chef’s Choice sharpener.

What about the Mezzaluna, you ask? After all, celebrity TV chefs are all over this tool:


An awful, single-use tool. Dangerous, too.

I have to tell you that this is one of the worst conceived single-use tools ever. First, all you can do with it is rock it back and forth on vegetables. Second, the unprotected blade will slice you up when you retrieve it from the drawer where you placed it, because it was just too large to hang on the wall.

And unlike the cleaver, it cannot scoop up chopped material for placement in the skillet (the chef’s knife’s narrow blade is also sub-optimal in this task), nor can you use it to gently crush garlic cloves to permit easy peeling – and subsequent dicing. Fughedaboutit. It’s a solution looking for a problem, strictly for poseurs. And if you think this is the right way to slice up a pizza pie, think again and get a pizza wheel. It’s nice having ten fingers ….

Brand choice for the cleaver? I don’t think it matters. Just do not waste your $100 on a costly, hard steel German one which will be hell to sharpen. Instead, get something like my $25 choice and make sure you have good sharpening hardware available. And make sure your cleaver of choice has a hanging hole in the blade, as you will want to hang it in an accessible spot. After all, you will find you are using it daily.

The cleaver rules. All I use the vaunted chef’s knife for today is to split open large melons or cantaloupes. Point in first, for safety, then rotate.