Category Archives: Cooking

Cooking hardware that makes a difference.

The side-cutting can opener

A better mousetrap.

For an index of cooking articles on this blog click here.

‘Nerd’ is a derogatory term used by the incurious to describe anyone with an inquiring mind. My friends tend to be nerds. Call me one and I want nothing to do with you for yours is a second rate mind. I have the same contempt for users of this noun as I do for people who tell me they cannot set the clock on their electric gadget. Can’t they read the manual?

Note that membership in my exclusive club does not dictate advanced math skills or a postgraduate degree. What it does mandate, however, is curiosity. Show me a successful person and I will show you one who is curious.

As someone who graduated engineering school at the top of his class with ease in the study of ergonomics (we called it ‘occupational psychology’ back then) I have long been interested in understanding how machines work and also greatly frustrated how often they work poorly. So when a better mousetrap comes along, in this case a can opener, I am interested. “With ease” you ask? When something fascinates you, the design of the man-machine interface in this instance, it’s easy.

I would suggest that no commonly encountered field suffers from poorer ergonomic design than the kitchen. Few ‘standard’ tools found therein seem to even be aware of this field of engineering.

You can learn all about the history of cans and openers in this excellent Technology Connection video well presented by someone with an inquiring mind. A fine, inquiring mind.

The presenter relates, in wonderment, the fact that the side-opening can opener has never really caught on. You get that technology in some electric can openers (about as poor a dedication of engineering effort as the electric carving knife) but the humble $10 hand held device is largely unknown. Yet it is superior to the traditional design which cuts into the top of the can leaving deadly edges for your fingers and coating the cutting wheel in the can’s contents.

The design I am referring to can be had for just $10.

And if the traditional cutter exposes nasty sharp edges to your fingers, the pull-off top on cans with a key is even worse. No matter how hard I try I still occasionally cut myself on these and they invariably need great effort to remove, not to mention the need for a tool to pry the key up or risk damaging your manicure. Bad, bad, bad.

You want to get the linked model of the can opener, not the one with the L-shaped extension arm with a magnet attached. First, there is no need for a magnet to remove the severed lid. Second, that magnet interferes with the pull-open key on cans thus equipped, rendering it useless. How do I know this? Please spare me the embarrassment of answering.


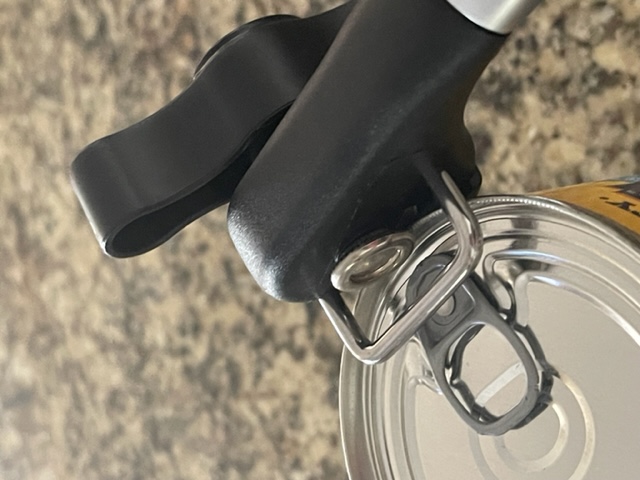
No interference with the key.

The cutting wheel makes no contact with the can’s contents:
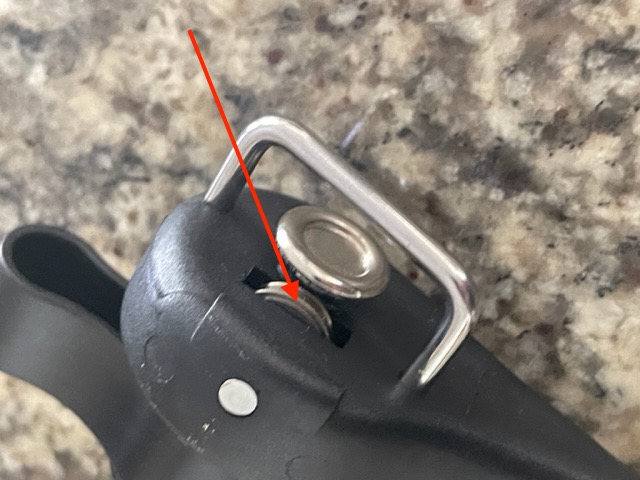

The cutting wheel.

Note that the contents of the can are nowhere near the cutting wheel.


The arrow indicates marginal contact of the
cutting wheel with the inside of the lid’s seam.

How about those rectangular sardine tins with those deadly pull-off tops?


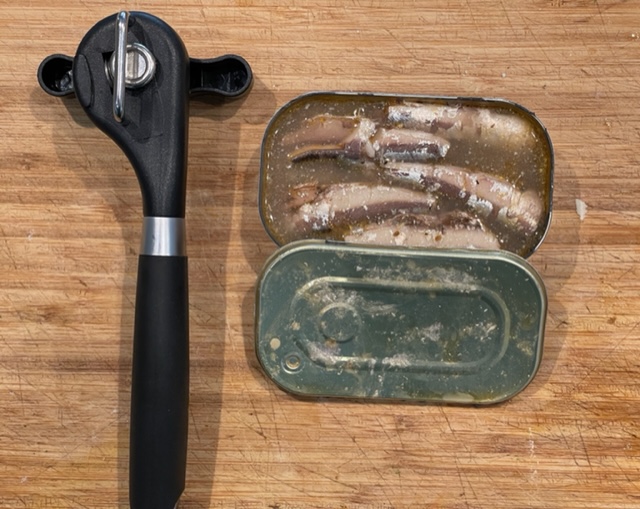
No problem with rectangular tins.

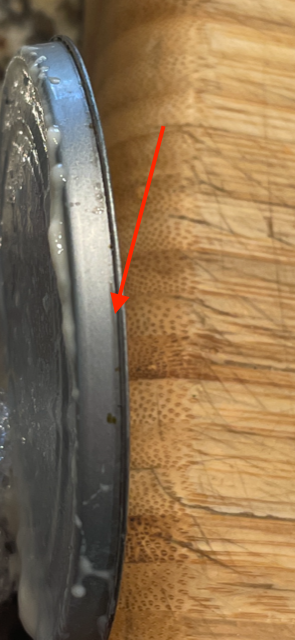
And be assured, it is impossible – impossible! – to cut yourself on any newly exposed edge on either the lid or can after using this opener.

Few things in a kitchen are more disgusting than traditional can openers with their cutting wheels encrusted with the contents of who knows how many cans past. And that legacy, replete with bacteria, is waiting to infect the contents of the next can you open. Yes, I always washed mine, but really, that should not be necessary in a properly designed tool.

Drawbacks? Because you are cutting through one layer of a seam which is considerably thicker than the surface of the lid (check the video), the torque required to turn the cutting wheel is, I estimate, three times as great as with traditional models. Meaning it’s non-trivial. No problem for me but this may be an issue for those with arthritic joints.

Secondly, because the can opener cuts from the side of the lid not through the top, you cannot see the cut as you operate the tool. Further, it’s very smooth, so you don’t get that ‘click’ at completion that you do with the traditional style of opener. So as to minimize effort, meaning you want to stop turning the handle the minute you have completed a circle, I make a note of where I have started the cut and wait for that start point to come around again.

Overall, this tool is so superior in every conceivable way I do not see going back to the traditional can opener, ever.

Rambo meets Mitsumoto Sakari

A better mousetrap.

For an index of cooking articles on this blog click here.

Five years ago I pretty much gave up on my chef’s knife and transitioned to a cleaver. You can read about that here.

The upgrade demon reared his ugly head the other day and I resolved to try a Japanese edge cleaver for even better cutting. Japanese knives are sharpened to a 12-15 degree angle, much finer than the 20 degrees used in European hardware. Better cutting, the trade-off being faster wear of the finer edge.


A new sharpening tool and a Japanese cleaver – the Rambo. Click the image.

My electric knife sharpener – check the link above – is getting long in the tooth, the grinding wheels are now well worn and you cannot replace them. You have to buy the whole thing again. Boo!

So I thought I would try the Japanese Mitsumoto Sakari sharpener which comes with coarse and fine stones, as well as a scissor sharpener. But the real secret to this tool is that the sharpening angle is adjustable from 14 to 24 degrees. As for the cleaver, it’s a non-stainless forged steel one (I borrowed it from Sylvester Stallone when he was not making Rambo XLI) for a better edge and I immediately sharpened it to a 14 degree angle. First, however, I checked the angles on the Mitsumoto and can confirm they are dead accurate, the 14 degree setting yields a subtended angle of 28 degrees, the 20 degree yields 40 degrees and so on. Nice.

I gave the Rambo ten unidirectional swipes through the 14 degree coarse sharpener, then five more through the fine and can confirm that it’s scary sharp. The hole in the blade is for your forefinger and has nasty burrs when shipped. A few seconds with a Nicholson rat tail file saw those off. The forefinger is inserted there as a further precaution against your finger dipping into your workpiece. The Rambo comes with a sturdy leather belt pouch for those occasions when you feel it’s necessary to wreak havoc outdoors.

The sharpening rods in the Mitsumoto are fairly fine so only time will tell how well they wear. At $25 you can buy five for the price of one Kitchen Chef electrical tool, so it’s not a big concern. Recommended.

As for the Rambo, I have to do a lot more butchering before passing judgment. Suffice it to say that I feel empowered – and dangerous.

Meat cleaver

A superior tool for any cook.

For an index of cooking articles on this blog click here.

Over a decade ago I extolled the benefits of a good chef’s knife, writing like many before me that it’s the key kitchen tool.

Well, for the last three years my chef’s knife has seen very little use and I prepare three meals daily. It has been replaced – nay, obsoleted – by this:


A superior tool.

This tool is superior to the chef’s knife in just about every way imaginable. The cutting edge is much further from the fingers. The leverage that can be applied on the broad-topped blade is an order of magnitude greater. Rocking the cleaver over vegetables, like onions, to dice and chop them up is trivial and safe. But as the dents in mine confirm, the last thing you really want to do with this tool is use it for hacking up bones. Yes, the steel is soft, meaning it both blunts and distorts relatively easily. I will gradually wear through my dents, but they remind me not to be silly. You never hammer this down on anything. Make noise with it and you are using it incorrectly. Want to hack up bones? Use a saw.

The blade is very thick which just helps with the impression of control and yes, it just fits the sharpening machine I have now been using happily for over a decade:


In the Chef’s Choice sharpener.

What about the Mezzaluna, you ask? After all, celebrity TV chefs are all over this tool:


An awful, single-use tool. Dangerous, too.

I have to tell you that this is one of the worst conceived single-use tools ever. First, all you can do with it is rock it back and forth on vegetables. Second, the unprotected blade will slice you up when you retrieve it from the drawer where you placed it, because it was just too large to hang on the wall.

And unlike the cleaver, it cannot scoop up chopped material for placement in the skillet (the chef’s knife’s narrow blade is also sub-optimal in this task), nor can you use it to gently crush garlic cloves to permit easy peeling – and subsequent dicing. Fughedaboutit. It’s a solution looking for a problem, strictly for poseurs. And if you think this is the right way to slice up a pizza pie, think again and get a pizza wheel. It’s nice having ten fingers ….

Brand choice for the cleaver? I don’t think it matters. Just do not waste your $100 on a costly, hard steel German one which will be hell to sharpen. Instead, get something like my $25 choice and make sure you have good sharpening hardware available. And make sure your cleaver of choice has a hanging hole in the blade, as you will want to hang it in an accessible spot. After all, you will find you are using it daily.

The cleaver rules. All I use the vaunted chef’s knife for today is to split open large melons or cantaloupes. Point in first, for safety, then rotate.

The Full English

For the Man in you.

For an index of cooking articles on this blog click here.

The ‘Full English’ denotes the traditional English breakfast, one described in great historical detail, with regional variations, by Wikipedia.

Now that I have found a reliable source for smoked mackerel kippers (thank you, Whole Foods) I serve my son a Full English monthly, though I do drop the baked beans – there’s only so much a Man can take – and Winston is no coffee drinker.

I have so many pleasant memories of the Full English.

When a young lad – I would have been 14 or so at the time – in London, I got a summer job at the Habit Diamond Tooling Company. Their byline was “Make it a Habit” and they cranked out machine tools with diamond abrasives for industrial use. I was paid some $20 weekly – this was in 1965 – and was further provided with 5 Luncheon Vouchers. The face value was some 40 cents and yes, that got you a Full English at the local ‘caff’ with money left for a tip. And yes, it was absolutely delicious. The job was incredible fun and I learned to operate a pantograph, a lathe, a mill and an industrial grinder. The lessons garnered in working class attitudes were invaluable, and the many posters of buxom, undressed women on the walls of the factory harken back to a time when men were Men and women were in the kitchen. Or naked on posters.

British Railways used to serve a Full English on their sleeper trains from London to Scotland and it was absolutely delicious also, the kippers floating in a sea of butter. This was always preceded by a gentle knock on the door from the cabin attendant who woke you with an offering of tea, inviting you to the dining car. Another great tradition recently discontinued in a cost saving measure by a nation in terminal decline. Sad. A Full English on a train hauled by the Flying Scotsman was really something, as I can personally attest. (My eldest sister was an undergraduate at St. Andrew’s in Dundee, hence the Scottish trips. Plus, I love Scotland).

When I vacationed in Scotland before immigrating to the US in 1977, the Full Scottish would add black pudding or haggis. Once when overnighting at a B&B in the western Highlands I expressed dismay to the landlady on noticing how much larger my breakfast was than that of the young woman tourist staying in the same home. “Och no, lad” quoth she “Ye have tae go oot and work”. OK.

Anyway, here’s Winston contemplating his Full English the other day:


Bringing the boy up right.
Bacon, eggs, smoked kipper, fried tomatoes, whole wheat toast and milk. No baked beans in sight.

iPhone 11 Pro image processed in Focos.

The perfect egg in a shell

Doing it right.

This is one of an occasional series on cooking devices which make a difference. For an index of cooking articles on this blog click here.

Few things are more satisfying than a properly cooked egg in its shell, be it soft or hard boiled.

The perfect soft boiled egg is a breakfast staple, but often overcooked and poorly presented. Further, it simply does not do to have hard boiled eggs in an egg cup. Decorum and civilization dictate that eggs in cups be soft boiled and runny. And proper presentation is essential to the whole aesthetic.

You can make these in a pot with boiling water but there are so many variables that your chances of consistent success are remote. Thus, an inexpensive tool is called for. Actually, several tools. Tools convert pretense about ‘art’ into the predictable results dictated by scientific method, the core tenet of all good cooking.

First is the egg maker shown at left. Typically holding up to seven eggs – always broad side down, please – this can be had from any number of vendors for under $20. Mine came with an unreadable, graduated plastic measure for determining the correct volume of water required. It was useless. You need a clearly marked, glass laboratory measure and a syringe to get soft boiled eggs right. The larger measuring cup is used for hard boiled eggs only.


Egg maker, large measuring cup, syringe and 250ml graduated measure.

The design of the egg maker is simplicity itself. Water is added to the platen which is then covered with the egg holder plate, eggs are added and the ‘greenhouse’ cover is put in place and the power turned on. The critical thing for a soft boiled, nicely runny egg is the volume of water and ‘critical’ is the right word. The volume of water used determines cooking time. The amount must be right to 5ml or the result will be unsatisfactory. After some experimentation I established that 4 eggs, straight from the refrigerator (forget the gobbledygook about letting them warm up – sheer nonsense) require exactly 175ml of water. That’s where the graduated measure and syringe come in, making accurate measurement of the required volume a simple matter. Your device may vary, so be prepared to experiment.

The key to consistent success is to remove all variables from the equation. Use the same sized eggs from the same source, stored at least overnight in the refrigerator for a consistent starting temperature. And be sure to use the exactly correct volume of water in the egg maker.

The egg maker will pop off after 3-4 minutes when the water has evaporated, thus setting off the thermostat, and you will have four soft boiled eggs. Four perfect soft boiled eggs, every time.

But you are not through.

Topping your eggs to access the runny goodness inside should never, never, never be done with a knife applied to the shell. You will bruise and crack the shell randomly and risk injury into the bargain. The result looks awful. Check the last image below. An egg is one of nature’s most perfect creations and it should be respected as such.

So purchase an ‘egg topper’ – search on those words at Amazon. Mine came in this set – it’s the stainless steel tool removed from its storage cut-out – along with properly sized and shaped spoons. The latter need to be small and slim to properly access the yolk without spillage. Your coffee spoon is not the answer.


Egg cup outfit with topper. The circumference of the topper’s cone acts as an impact cutter.

The cooked egg is placed, broad side down, in the cup and the tool is placed over the top. The sprung plunger, terminated with the alloy sphere, is retracted and released, whereupon it scores/cuts a perfect circular top on the egg shell. Mine has to be retracted only part way to avoid damage to the rest of the shell, (I marked the optimum retraction distance) and the tool must be carefully removed holding the base of the egg with a cloth. A little practice and you will get a perfectly scored shell top. Now get out that sharp knife – a thin fish boning knife is ideal – and slice through the albumen and flesh of the egg white along with the scored shell part. A properly designed cracker will score the shell just above the yolk. You now have the perfect soft boiled egg, along with high job satisfaction.


A perfectly topped egg along with obligatory bacon and home made Italian rosemary bread.

As for hard boiled eggs, these are trivial to prepare. Load up all seven if you like, add 1.7 fl.ozs. of water (or the quantity that experimentation indicates) using the large measuring cup in the first image, let the egg maker tool do its thing and you will have seven perfectly hard boiled eggs with none of that disgusting grey ring around the yolk your spouse creates as a result of over-cooking. Soak them in iced water for 5 minutes and you are ready to make salads of your choosing. I have found that the freshest eggs are also the easiest to peel when hard-boiled.

The water in my area has significant mineral deposits which make the egg holder plate and heated platen go a revolting brown after much use. Some medium stainless steel wool cleans things up nicely.


How not to do it. Albert Finney as Churchill eats his breakfast egg in ‘The Gathering Storm‘. Hacked off top and wrong tool use. Gustatory shortcomings notwithstanding, he did OK otherwise.

Update November, 2025:

To make hard boiled eggs easy to peel I have found that using eggs which have been in the refrigerator a few days is the way to go. Now there’s a better method, attributable to this ‘hack‘. No need to use a spoon to tap the rounded end of the egg. I simply tap it gently on the counter. The change in tone from sharp to dull (the latter sounds as if the shell cracked, though it has not) is impossible to miss and, yes, this works. Event eh freshest eggs are easy to peel once hard boiled.