Category Archives: Leica

All about the wonderful cameras from Wetzlar.

Light Lens Lab 50mm f/2 “Rigid SP-II” lens – Part I

Acid flashback.

For an index of all Leica-related articles click here.

“So what do you do, Mr. Lebowski?
Well, you know, drive around, bowl, the occasional acid flashback.”

Background:

Take a 1945 optical design from long time and still extant English cine lens manufacturer Cooke, mate the optics with the most beautiful housing made for any Leica lens in the 1950s (the Leitz Summicron v2), multicoat the glasses with modern rare earths, then recreate the whole in China and you end up with the Light Lens Lab 50mm f/2 “Rigid SP-II” lens for the Leica M.

Cooke:

Cooke of Leicester, England is still in business and continues to make cine lenses. They also make a revised version of their Speed Panchro which you can find at B&H, with Leica pricing to boot. This one is in Sony E mount and f/2.4.

Light Lens Lab:

Light Lens Lab is a small Chinese lens and accessory maker which specializes in small batch recreations of classic lens designs. Great effort is made to replicate the look and feel of the originals, with special emphasis on classic Leica optics from the 1950s, 1960s and 1970s. In the case of this lens the innards are Cooke and the housing is Leitz, both imitations. The only nods to modernity include the use of multi-coatings to better control flare, half aperture click-stops and a closer minimum focus distance.

The Light Lens Lab clone of the 1940s Cooke Speed Panchro cine lens is set in a clone of the 1960s v2 Leitz Summicron mount, representing about as perfect an acid flashback as these things get. The Speed Panchro was used in many famous movies from late Chaplin through Godfather 2 and Midnight in Paris (in particular, check the opening sequence in the latter).

Two optical versions in the cloned Summicron housing:

LLL makes two lenses set in the Summicron housing – one has the Cooke Speed Panchro seven elements in five groups double Gauss optics, the other has eight elements in six groups from the original Leitz v2 Summicron. It’s pretty much impossible to find an unmolested original Speed Panchro or Summicron without a scratched front element (soft coatings back then), fungus, mold, dust, oil on the diaphragm blades, balsam separation, sticky focus action, you name it, and if you do you are looking at $2,000 for a perfect specimen. By contrast, this Light Lens Lab example is new, with modern coatings and greases. And it costs a lot less from a maker which has developed a high quality reputation. Considering that some 120,000 v2 Summicrons were manufactured it mystifies me that so few good ones survive.


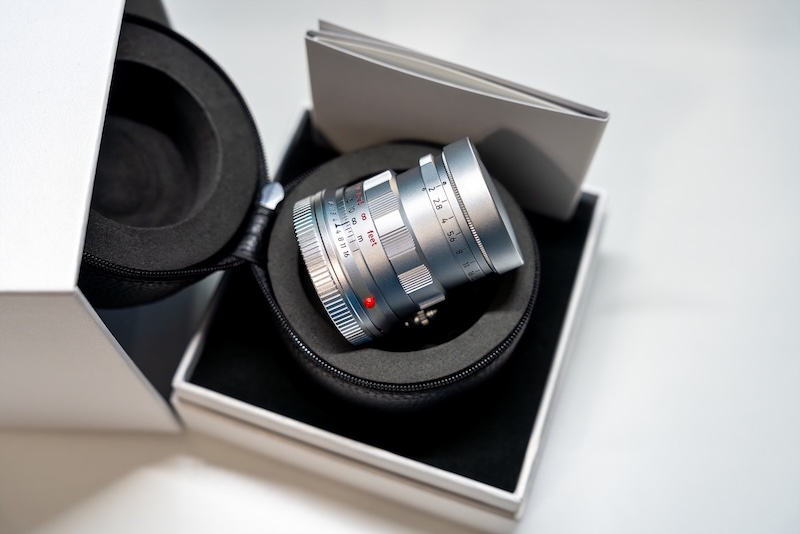
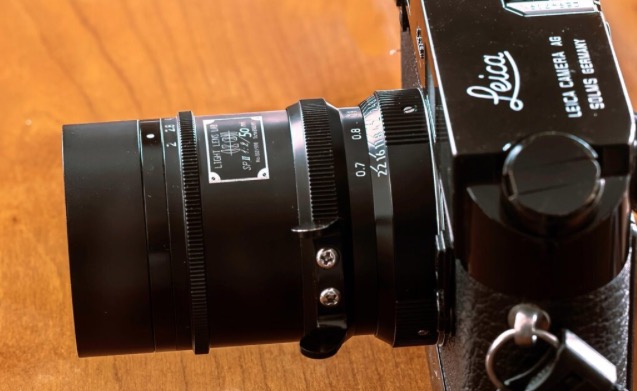
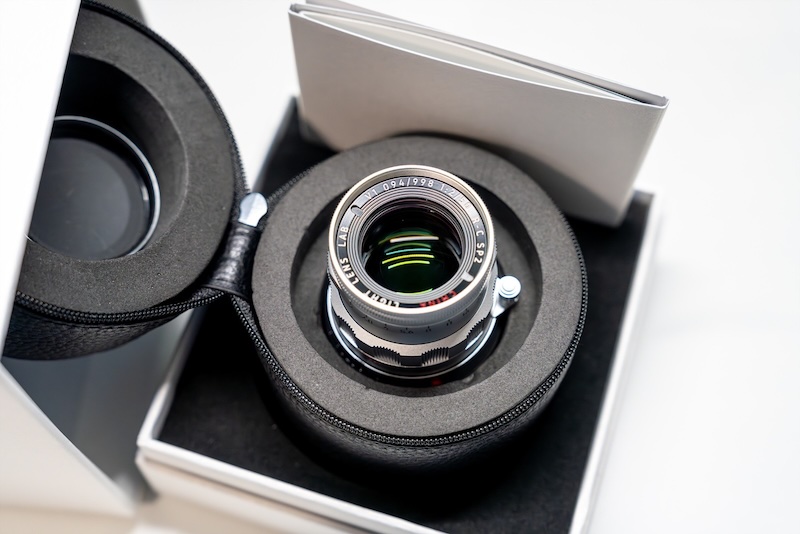
The Light Lens Lab 50mm f/2 Cooke Speed Panchro clone.
The external appearance is identical to the LLL Summicron clone.


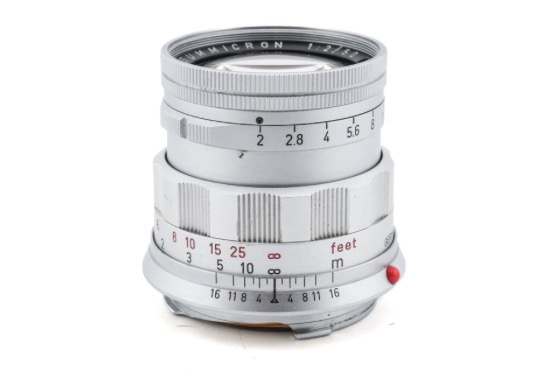
Compare. The Leitz original version of the v2 Summicron.

The lens reviewed here is the Cooke Speed Panchro II version. Here are the optical diagrams:


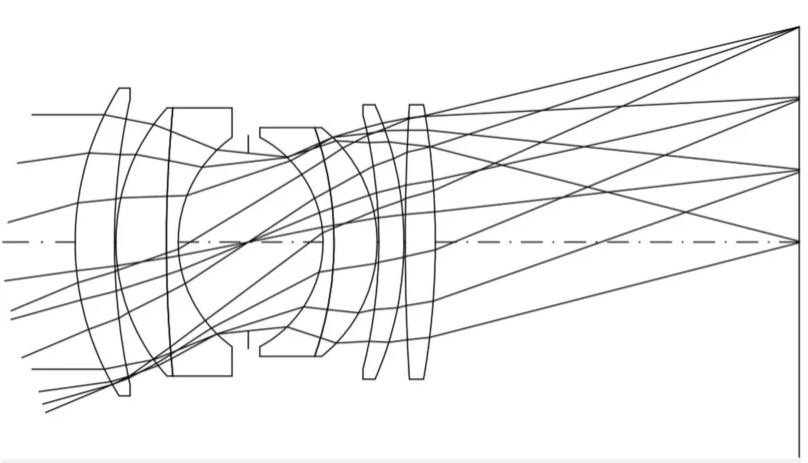
Cooke Speed Panchro optics.


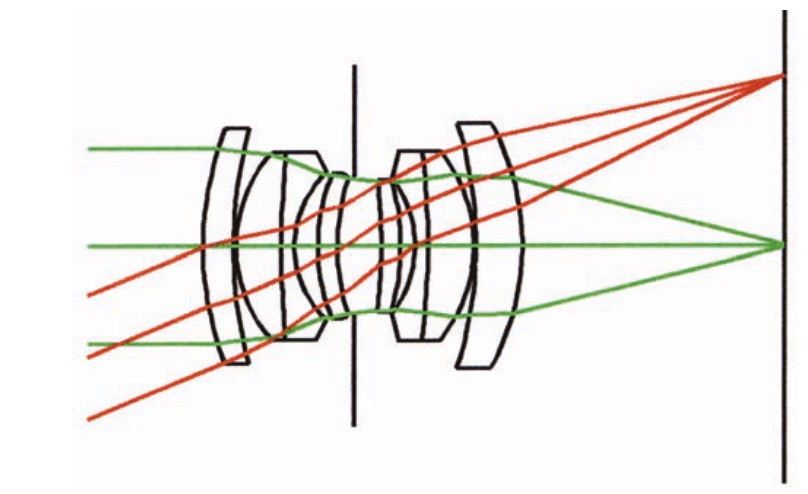
Summicron v2 optics.

The original Cooke Speed Panchro II 50mm f/2 from LLL looks like this:


Ugly duckling. LLL’s first version of the Speed Panchro.

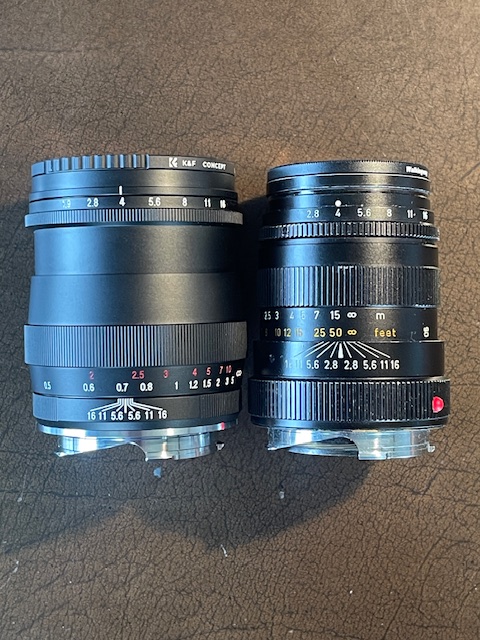
For its second attempt LLL installed the same optics in the classic 1960s Summicron mount and the result is gorgeous. Having used a 1960s v2 Summicron for some three plus decades – all my Leica film hardware was sold when the wonderful Canon 5D came along – I remain of the opinion that there has never been a more beautiful lens made for the Leica M body. As for performance both the Speed Panchro II and the v2 Summicron are renowned for the gentle way in which they render images, especially at larger apertures, with little to choose between the two optical designs. Now that I am well and truly back in nostalgia land with a Leica M10 and a bunch of lenses, it seems only right to complete the journey with an (almost) original Cooke lens in a v2 Summicron body. LLL offers a variety of finishes, including matte black, black with brassing and a kitsch all brass option, in addition to classic satin chrome on brass. For this devotee of classic Leica looks only satin chrome will do.

To distinguish the two LLL offerings, note the different front engravings:


LLL Speed Panchro and LLL Summicron engravings .

Cost and rendering:

Mine cost $800 from a US vendor (no tariffs) and was new, ‘open box’, and while that is a good deal less than a good used 1960s Summicron, it’s still the costliest lens I own for the M10, and that by a considerable margin. (The others range from $120 to $450, all used). I added a multicoated 39mm chrome UV filter for pennies. There’s no need to waste money on an original Leica filter, but no front element should be without a protective filter. It means that only a rear cap is required when you stash the lens in an overcoat pocket. A modern Summicron with all its clinical rendering of detail (like an over sharpened image straight out of the iPhone) will run you over $3,000. And it’s not exactly pretty in appearance or rendering.

By contrast, the Cooke optics, once set in the compact Summicron clone mount, are nothing short of a delight to the eye and the heft of the lens with its use of chrome coated brass is just right, small yet dense.


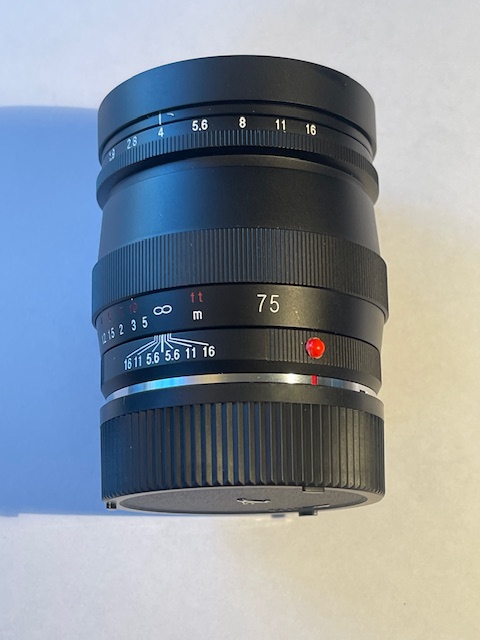
The Cooke lens in a Leitz clone Summicron mount.
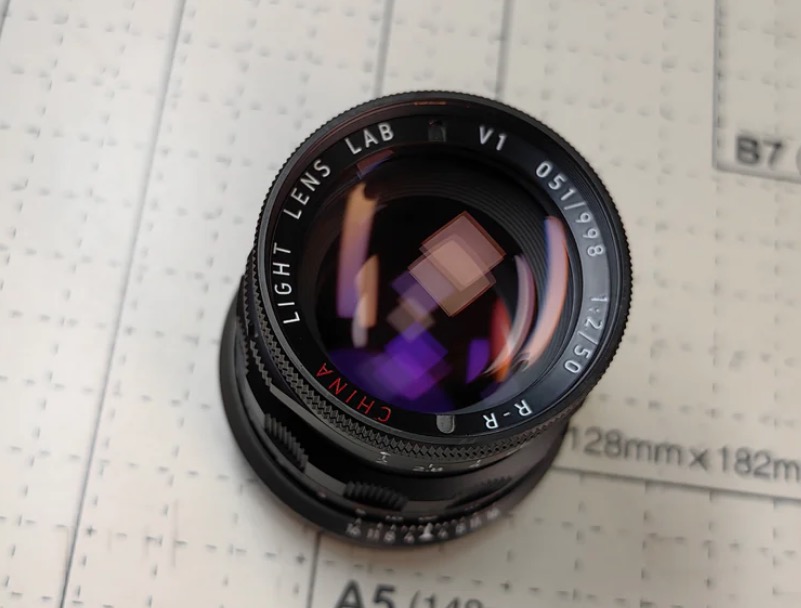
‘S-P’ for Speed-Panchro, ‘R-C’ for ‘Replica-Cooke’.
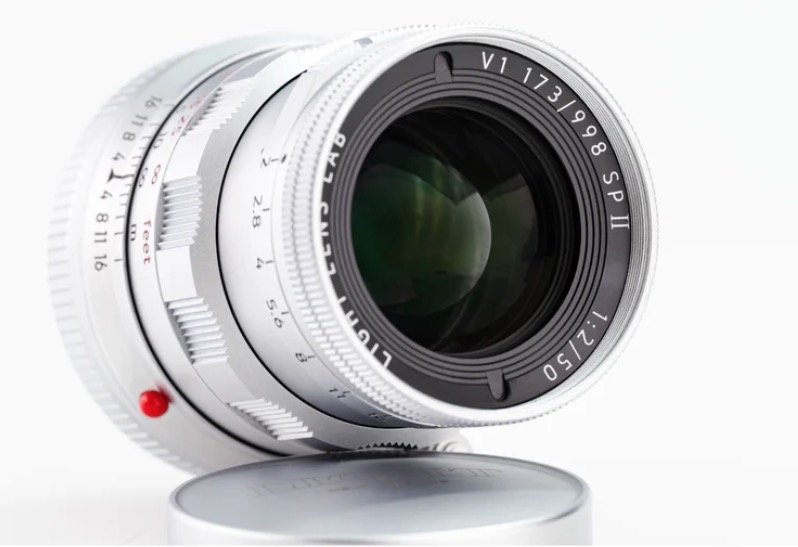
Mine is #094 from a batch of 998 lenses.

How close is the clone to the original?

What are the differences between the original and the clone housings and glasses? This is rather a mixed comparison as I am comparing the Cooke optics in a modern Summicron clone mount with the Leitz optics in the original Summicron mount, but you get the idea:

  • The closest focus distance of the clone is 0.7m compared with 1.0m, coupling with the rangefinder on later film bodies and all digital ones. (Earlier film M bodies only couple down to 1 meter).
  • Half click stops compared with full. I would have preferred the latter.
  • Minimum aperture is f/22 compared with f/16 for the Summicron. Definition at f/22 is surprisingly good – see below. Strangely, the depth-of-field markings on the lens’s barrel only go through f/16.
  • Allegedly modern, tougher lens coatings, compared with soft single ones on the original. Use a protective filter and toughness is irrelevant.
  • Multi-layer (greenish) coatings compared with single (blue). Should result in better flare control into light sources.
  • 8 aperture blades compared with 10 in the original. The ugly duckling first LLL version had 11 aperture blades, and it’s a shame that this was reduced to 8 in the second version, the one reviewed here. More blades mean better sun stars and softer rendering of out of focus areas.
  • No lens hood with the Cooke version, a thumb-screw lens hood with the Summicron version. (Bad – lose the screw and the hood is useless). The Leitz original accepts the 12585 ‘reverse cone’ clip on from Leitz (much better). Track down a used Leitz hood ($100) and it will fit the clone fine or save your money and get a screw-in knock-off from Amazon. The Leitz hood will also clip on in reverse mode for a more compact package – a solution looking for a problem. I don’t bother with lens hoods which is just as well as the Cooke version of the LLL lens comes without one.
  • The lens head of the LLL is not removable. That of the Summicron – regular or dual-range version – is.
  • A metal rear lens cap compared with the chintzy black plastic Leitz one for the Summicron. A high quality item made of chrome plated brass.
  • The Cooke Speed Panchro II LLL variant has a focal length of 50mm whereas the typical Summicron was 51.9mm (they vary, and Leitz used to engrave the last two digits of the true focal length on the barrel to the right of the infinity mark. When they did not do this the true focal length could still be found scratched on the barrel of the removable lens head), meaning the LLL version will have a slightly wider field of view and will probably show sharper out-of-focus areas than the original Leitz optic at the same aperture. Not particularly significant, given the small difference. Click here for an example.
  • The Leitz Summicron weighs 8.9ozs/251grams without filter, with the Dual Range version coming in at a chunky 12.0ozs/340 grams. The LLL without filter weighs 9.25oz/262grams.

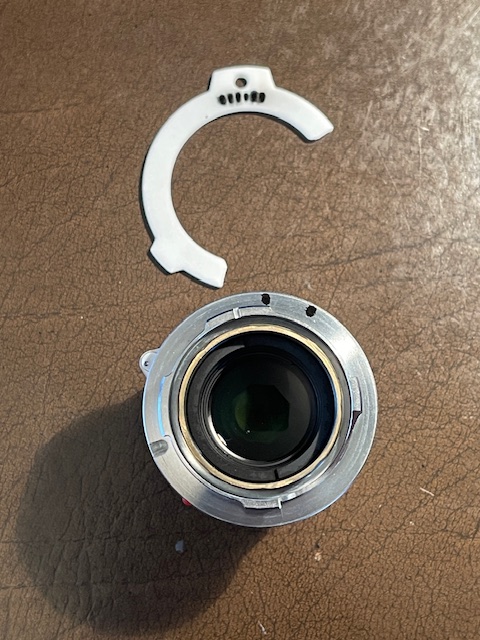
Non-removable lens head:

The lens head of the LLL is non-removable. On the original Summicron v2 (and v3) you could unscrew the lens head for use with a close-up device or for use on a copying attachment. Decades ago I used the lens head with an adapter in my darkroom enlarger and at f/8 the Summicron was a fine optic for this purpose. As darkrooms are a thing of the past, and as the LLL clone focuses to a close 0.7m, the removable lens head is not missed. (The Leitz Summicron was also available in a heavy 340 gram dual-range focusing mount along with accessory ‘spectacles’ for use in the close focus range which spanned 0.45 – 1.0 meters. Sadly this version will not focus to infinity on digital M bodies without expert modification).


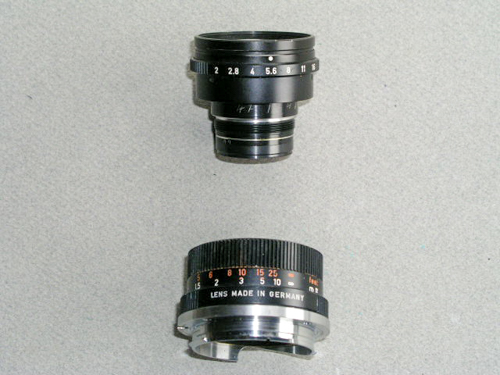
Removable head on the v3 6-element Summicron.

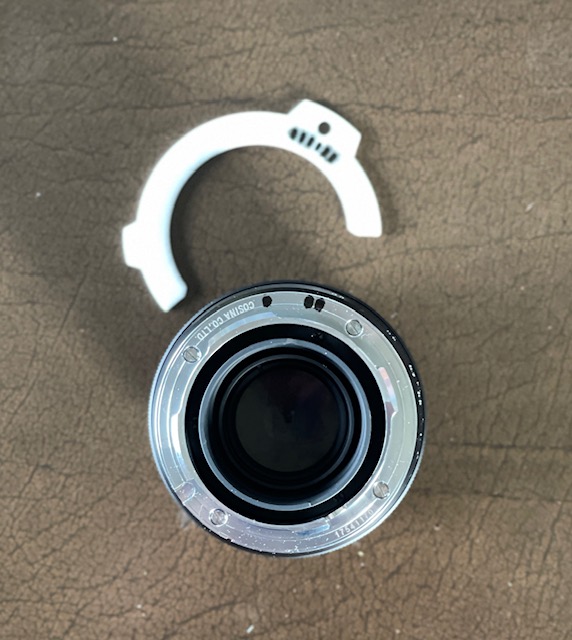
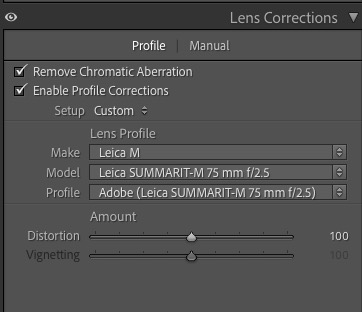
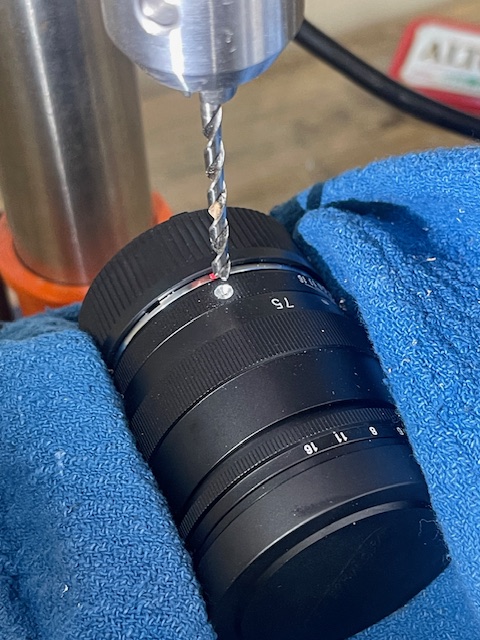
6-bit coding – why you need it and how to add:

Unlike Voigtländer optics whose rear flange comes with a nice recessed groove for 6-bit coding, (the groove precluding wear of the markings), the LLL Speed Panchro comes with a smooth rear flange. Code that with a black ink pen and the codes will eventually wear off, owing to friction between the lens’s flange and the camera’s mount. For now I have conferred the requisite 100001 coding using my coding template on the smooth rear mount, and will see how it wears. If it proves fragile I’ll consider machining code pits in the rear flange to preserve the code ink fills. The right pen for this job is the Uni-Ball. The ink in a Sharpie does not work. Coding the lens matches its characteristics to those of the digital sensor, especially as regards treatment of axial rays. Once done it’s automatic once the lens is mounted, so why not do it?


Smooth rear flange.

First it was necessary to determine the correct codes for the LLL Speed Panchro lens. My Leica M10 body makes provision for no fewer than six 50mm Leica lenses:

  • 50mm f/1 Noctilux (11821/11822)
  • 50mm f/1.4 Summilux (11868/11856/11114)
  • 50mm f/1.4 Summilux Asph (11891/11892) *
  • 50mm f/2 Summicron vIII (11817) *
  • 50mm f/2 Summicron v5 (11819/11825/11826/11816) *
  • 50mm f/2.8 Elmar-M (11831/11823/11824)

* The asterisked choices are also lens distortion correction options in the Develop module of the current version (v15.1) of Lightroom Classic. No LLL lens is currently listed as a lens correction option in Lightroom.

A few test snaps at full aperture disclosed that vignetting (it disappears by f/4) was best controlled using the code for the 50mm f/2 Summicron v5, and this table discloses that the 6-bit code for that optic is 100001 (#36 in the table), so that means that 2 ink codes would have to be added. (In practice the differences as regards vignetting between the 6 lens options are very small. Any one will do).


100001 code added.

Lens correction in Lightroom:

Applying the 50mm Summicron-M lens correction profile in Lightroom sees a very minor amount of barrel distortion corrected. The change is so minor that only the most critical correction of straight lines in, say, architectural photography, would be noticeable.


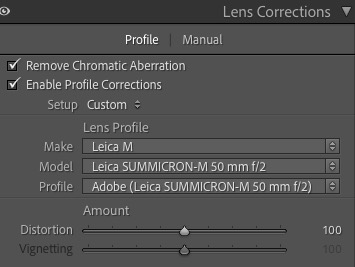
The lens correction profile in Lightroom v15.1.

The ‘glow’:

The key aspect of this lens is the glow it delivers (courtesy of lens aberrations) at full aperture. In the following two images you can see the effect at f/2 and at f/4. By f/4 the glow is gone and center definition is optimal. In the third image, taken at f/22, you can see definition-robbing diffraction setting in (though the corners are further improved over f/4) but given that these are pixel peeps from what would be 40″ wide prints, the result is perfectly useable:


At f/2. Click the image for a larger version.


At f/4. Click the image for a larger version.


At f/22. Click the image for a larger version.
Note the corners are further improved compared with f/4.
This is at ISO3200 so there’s some digital noise when pixel peeping.

Focus accuracy:

I was a tad concerned about lens centering and collimation given some reports that LLL’s QC was sub-optimal at the assembly stage. Maybe I got lucky because my sample focuses accurately at infinity (not that much of a test) but, more importantly, is beyond perfect at 0.7m, the minimum focus distance, at f/2. That is a critical test. Here’s the result. My focus, using the LLL 1.4x eyepiece magnifier, was on the green line. The result shows focus is totally accurate:


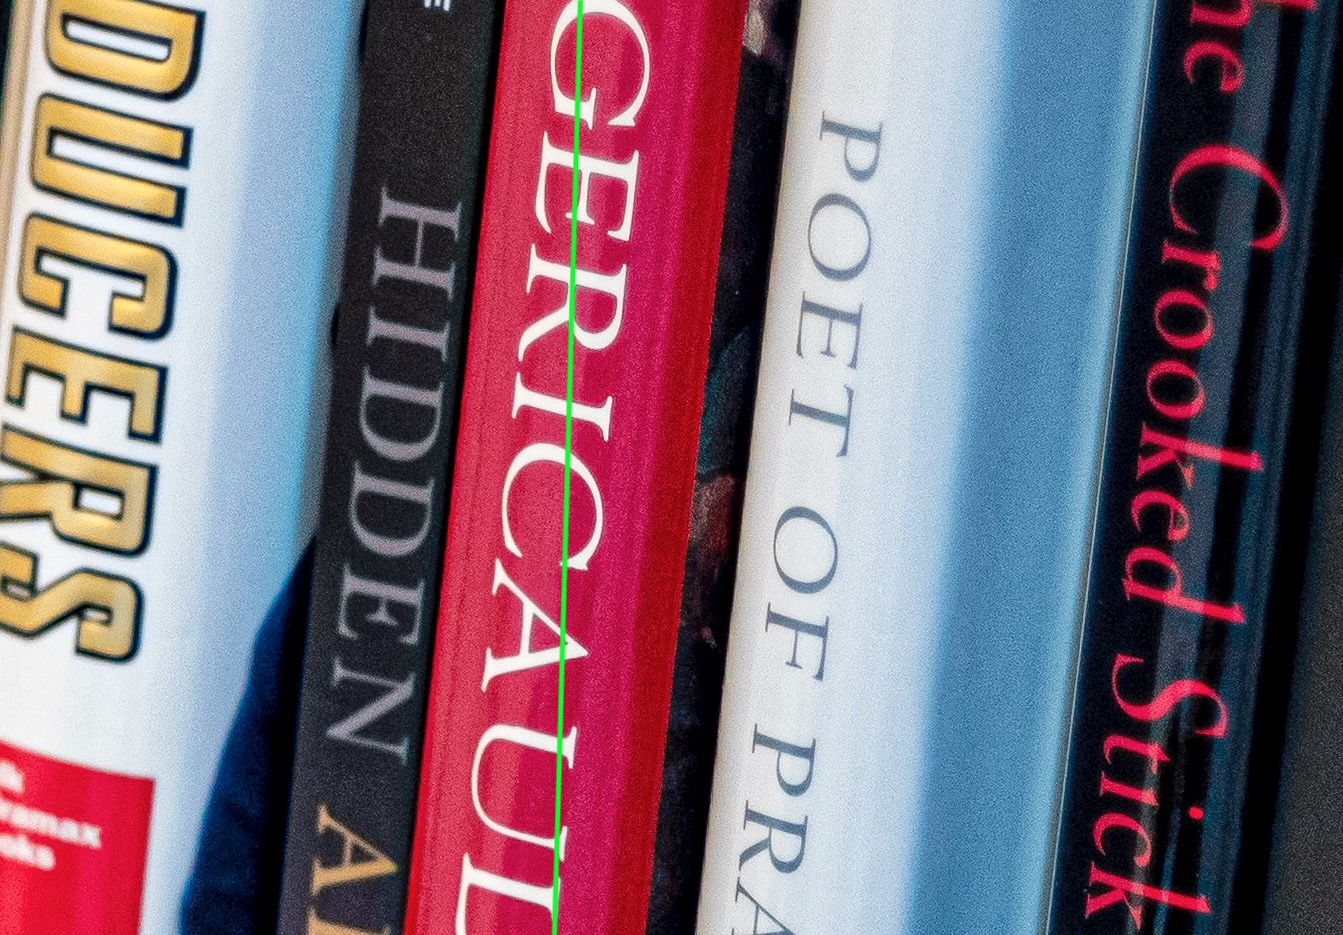
Perfect rangefinder focusing at 0.7m and f/2.

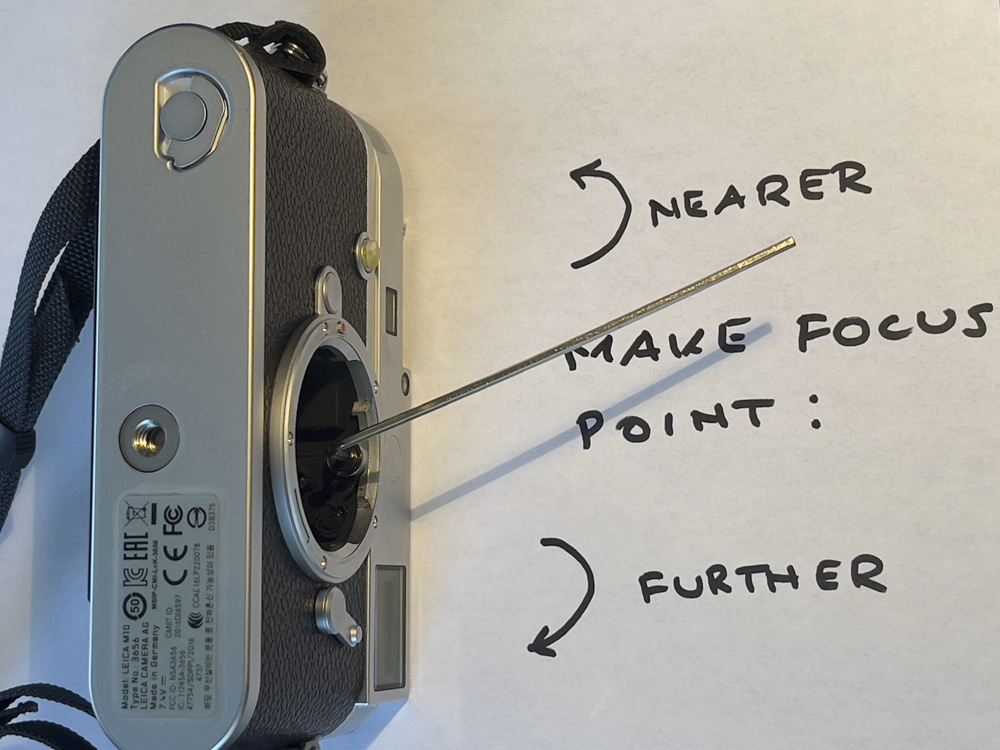
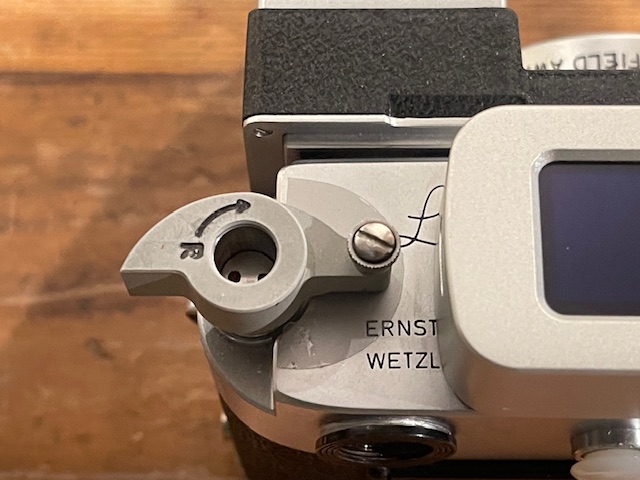
Before you go blaming the lens for poor focus alignment I suggest you check that your body’s rangefinder is properly adjusted, a process I illustrate here. It’s not unknown for even new bodies from the factory to be improperly adjusted in this regard, and it takes little time to get this right and all you need is an Allen wrench and some patience.

Ergonomics:

The classic design of the LLL lens mates well with the Leica M body, be it film or digital. The locking focus tab makes for easy insertion and removal, the generously wide focus collar is comfortable for those who prefer its use over that of the focus tab, the rotation is butter smooth and the aperture click stops are just so. The focus throw at some 180 degrees from infinity to 0.7 meters is long by modern standards but works well for this user. Focus accuracy in my sample is perfect, and the overall look, feel and finish are truly Leica quality. Additionally, I have found the lens easy to operate with gloved hands, the aperture ring being readily grasped. All of this in a compact whole spells perfection. But, best of all, the lens is simply gorgeous to behold and I’m a member of the class which contends that beautiful hardware makes for better pictures. Now I’m feeling better about the financial outlay.

As regards intrusion on the 50mm finder frame, with a slim 39mm filter in place and no lens hood fitted, the lens starts to intrude on the lower right corner of the finder frame at 6 feet and below. Even at the minimum focus distance of 0.7m (28″) the intrusion is so minor as to be of no consequence.

‘China’:

The front ring of the lens bears the word ‘China’ in fairly discreet red, in addition to silver paint filled descriptions of the lens. If that bothers you, fitting a UV filter makes everything disappear:
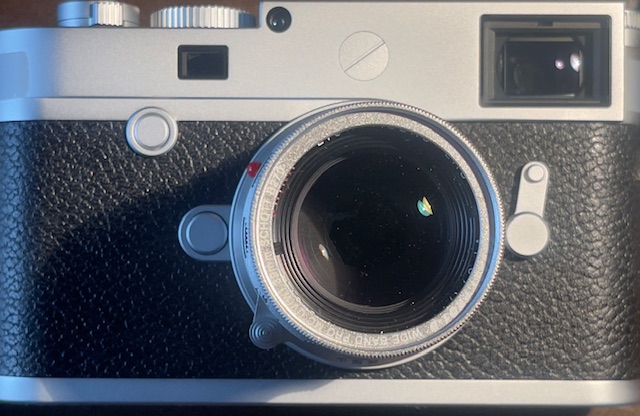


No more ‘China’

Availability:

It seems that LLL accepts orders for small batch production, informing the customer once a lens is manufactured. As I write this the Summicron version with hood is only available in brass (Ugh!) for $899 and the Cooke Speed-Panchro version without a hood is only available in chrome (yippee!), also for $899. Both come with front and rear caps. The ugly duckling original version of the Cooke is available in no fewer than five finishes for $849-$1149. Add import tariffs at 34% from China or 35% for Canadian vendors and things get expensive fast, so I recommend tracking down a lens from a US seller.

In Part II I have published some early results. Meanwhile, feast your eyes on this exercise in mechanical design and beauty:


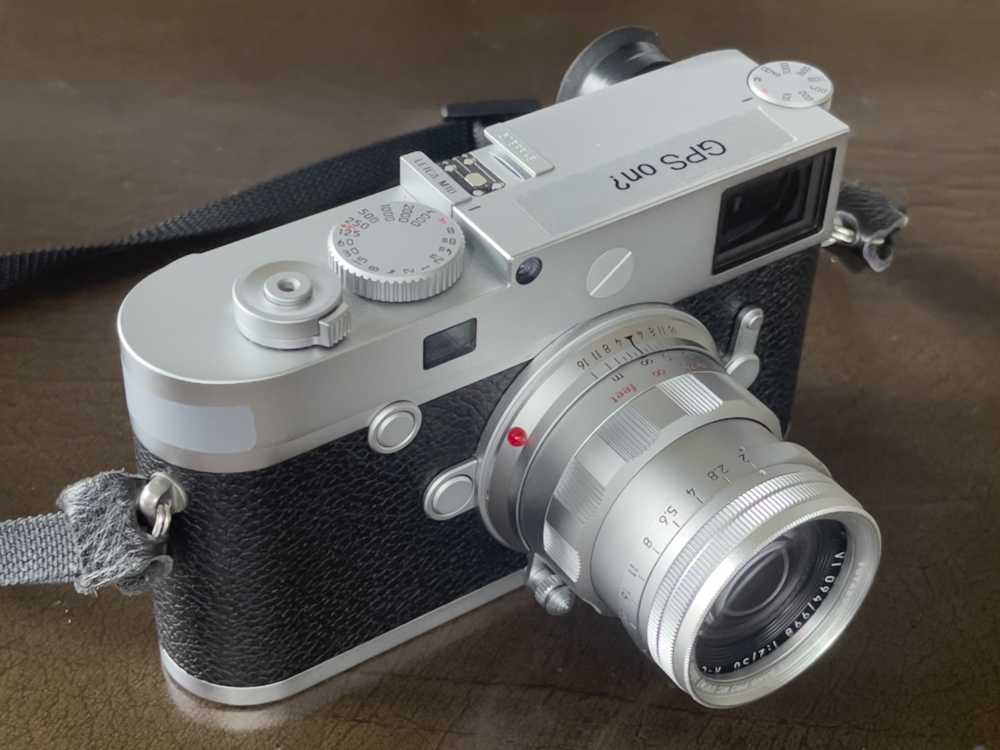
With 39mm UV filter in place.
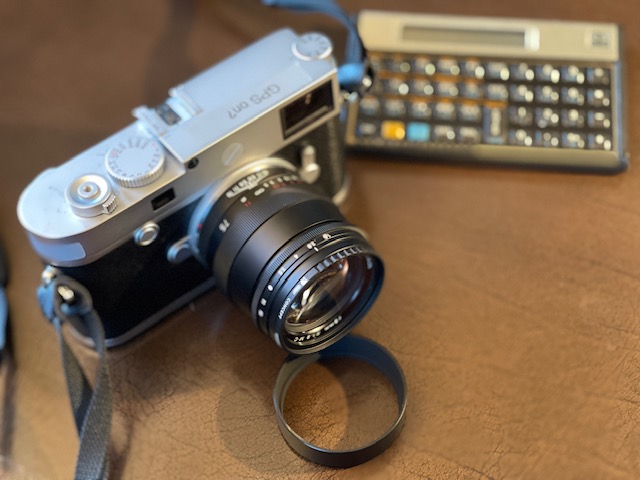
The label reminds me to turn on my iPhone for GPS recording.

My favorite street snapper

As much fun as it gets.

For an index of all Leica-related articles click here.


Leica M10, 35mm f/2 Canon LTM and 75mm f/1.9 Voigtländer Ultron.

When I bought my first Leica M3 in 1971 it was about as fast a street snapper as there was. Later autofocus, anti-shake and auto exposure were added to more modern cameras by the great Japanese camera makers and the Leica went from hero to zero when it came to operational speed. Only the stealth factor remained, something I always believed was enhanced by the amateur looking silver finish. For some reason that attracts less attention than the black favored by most camera makers today.

And speaking of stealth, no-one needs the stock red ‘Leica’ dot which screams ‘Steal me now’, so here it has been replaced with a faux silver ‘screw’ – you know, the one Leica charges $1000 more for on the M10-P. ‘P’ for ‘Professional’, you understand.

Yet the M body, now in digital form and, with the M10 and M11, finally identical in size to the film bodies of old, remains a favored street snapper. With the 35mm lens, stopped down a bit, zone focusing is as close as you get to fast autofocus, the shutter is quiet and the whole package is small and unobtrusive. With the 75mm lens, when detail is sought, a more contemplative approach to focusing is called for, especially with the unforgiving nature of the sensors in the M10 and M11. In turn these sensors will ensure you will never use film again. The M10’s sensor is as noise-free at ISO 6400 as Kodak Ektar film is at ISO 100, which is 6 stops faster. As for color rendering, the magicians at Leica have seen to it that colors are rendered every bit as well as that fine Kodak film delivers, but without dust, scratches and interminable processing delays. And film is not film any more. It’s all digitally scanned. Enough with the ‘film look’, already.

For street use I set the aperture priority exposure measurement to Auto and the film speed selector likewise, limiting the slowest shutter speed to 1/4f where ‘f’ is the focal length of the lens. That pretty much ensures an absence of movement blur, even when pixel peeping. Both lenses are 6-bit coded (by me!) which ensures that the correct focal length is communicated to the body, allowing proper determination of that 1/4f factor.

You can read more about the 35mm Canon LTM here with the 75mm Ultron profiled here.

Don’t for one moment think that there is any concept of value with a modern digital Leica M. Even a beater M10 will set you back over $4,000 and only the truly insane – or insanely wealthy – spend the $3,000 and up demanded for a used current Leica lens. The ancient Canon LTM and Leica lenses I use, over 50 years old, and the modern sensor in the Leica body makes these optics sing. Simply stated, those old lenses are better than ever. And Voigtländer fills in the gaps with its modern Leica clones at 21 and 75mm.


TOBEM* lens.

Sure, you can take street snaps with any number of modern, inexpensive digital cameras for a fraction of the cost of that digital M body. So why use the modern Leica? Well, nothing feels quite so perfect in the hand or so satisfies with its fit and finish. The optical finder – which shows details outside the frame – is a sheer delight, now made even better with LED illumination of the finder frames and with a higher eye point for the eyeglass wearer (me!) than the finders found in the film bodies. Further, my history with the Leica M goes back over 50 years and its use is second nature to me. So there are elements of familiarity and nostalgia in my choice. The only thing I had to unlearn when moving from the M3 to the M10 is film winding. There is no film winding lever and, strangely, I rather miss it.

The M10 remains my favorite street snapper and while the M11’s 60mp sensor is tempting, I don’t need that sort of pixel density. Plus I would rather stay solvent. The 24mp sensor in the M10 delivers perfect, noise free prints at 13″x19″ at pretty much any ISO setting, and if you want to print larger the viewer will be forced to step back to take it all in. So if it’s perfect at 13″x19″, it’s perfect at any size you want.

* There’s One Born Every Minute.

Here is a handful of recent street snaps, all taken with the M10 and the 35mm f/2 Canon LTM:


75mm Voigtländer f/1.9 Ultron for the Leica M

A compact and fast medium length lens for the Leica M.

For an index of all Leica-related articles click here.


The multicoated, matte finished version of the Ultron.

A brief history of Leica and Voigtländer 75mm lenses:

Leitz made a super fast 75mm f/0.85 lens in the 1930s. The true speed, in the absence of anti-reflection coatings, was likely a stop less but it was an impressive achievement. How you were meant to focus this accurately at full aperture using the iffy rangefinders of the day remains a mystery.

The Leitz 75mm f/0.85 Summar.
From Theo Scheerer’s ‘The Leica and the Leica System’,
Fountain Press, 1962

In 1980 Leitz introduced its first post war 75mm lens for the M body, the f/1.4 Summilux-M (Version 1 – 17.3oz, version 2 – 21.2oz, neither exactly a lightweight). The f/2 Apo-Summicron-M followed in 2004 (15.2oz), and remains available new, with an economy model f/2.5 Summarit-M introduced in 2007 (11.5oz), rubberized focusing collar and all (ugh!) and now discontinued as Leica prefers to offer only crazy expensive lenses. This was later revised to f/2.4 (12.3oz). Finally a super-fast f/1.25 Noctilux-M (a whopping 36oz) was introduced more recently and you can buy it for the price of a good used Japanese car. All came in a black finish except for the Summarits which came in black or chrome.

Imitating the look and feel of the Leica optics, the Japanese company Voigtländer/Cosina started with a 75mm f/2.5 Color Heliar (a scant 8oz) in 1999 which came in a Leica Thread Mount, easily adapted to the M bayonet body, and available in black or chrome finish. An f/1.8 Heliar version followed in 2010, bayonet mount and black only (15oz – heavy, so likely using a good deal of brass, black only), and a fast f/1.5 Nokton Aspherical (12.4oz) followed in 2019 in black or silver. Like the Noctilux-M this optic’s considerable bulk is anathema to the aesthetic of the Leica M body, and focus at full aperture using the rangefinder is a hit and miss proposition, and finder blocking by the bulky optic is significant. An eyepiece magnifier is probably a good idea.

The latest Voigtländer offering is the improved 75mm f/1.9 Ultron (10.2oz), uses an aluminum alloy body which comes in either multi-coated or single-coated versions, the latter allegedly providing more of a ‘film look’, and likely producing more flare shooting into light sources. The lens has no aspherical surfaces, a design which often gives that clinical, modern rendering. The lens was introduced in 2023. Sadly the scalloped focus ring of the earlier versions was replaced by a tapered, fluted design, reminiscent of the fine Zeiss Ikon lenses for the Contarex. Design consistency and naming conventions are clearly a low priority at Cosina.

Purchase:

It being Christmas and having a hankering for a focal length I have not used on the Leica M10 I found a nice lightly used example of the Ultron at B&H for a reasonable $465. New Voigtländer lenses are no longer the bargains they used to be. For that you probably have to look at the increasing number of Chinese offerings some of which can be had for a good deal less money. While B&H’s listing stated “shows light signs of wear” in practice the lens arrived in absolutely mint condition with front and rear caps, lens hood and lens hood cap, along with the original box. The controls are just so – a nicely click-stopped aperture ring (with half stop clicks – ugh!) and a smooth and light focus collar. The vestigial lens hood does not look like it will make much difference in use, and for protection I use a 49mm multi-coated UV filter for all of $10 – don’t waste money on costlier ones – just see the images below. The center of the front element of the Ultron protrudes significantly, close to the plane of the front ring, so a protective filter is a good idea. The included hood is probably redundant. The lens focuses down to 0.5m but the M10’s rangefinder only works down to 0.7m, so below that distance you would have to use Live View to focus on the rear LCD screen (double ugh!). Feel and operation of the lens are both easily up to Leica standards. I got a bargain.

Disassembly:

Yukosteel has a fine disassembly pictorial here which testifies to the high quality of the design. Well worth perusing, especially if your used example has dust collected inside.

Lens coding:

The M10 provides lens correction profiles for two 75mm Leica lenses – the 75mm f/1.4 Summilux-M and the 75mm f/2 Asph Apo Summicron-M. Snapping a clear blue sky I found that the profile for the Summilux provided the least vignetting though there is very little in it, so I coded the lens 100011 in accordance with this table. The arcana of lens coding are detailed here. The rear flange of the 75mm Ultron has a recess around the mounting surface which neatly accepts coding from a felt tip pen with no abrasion wear when the lens is mounted or removed. You can obtain the coding template shown below by reading this.


The 75mm Ultron is coded 100011 using the coding template and a UniBall fine felt tip pen.

Size:

Weighing a few grams more than the wonderful 90mm f/2.8 Tele Elmarit (one of the few affordable used Leica lenses) the size is virtually identical as regards length with the Ultron a tad chubbier. Weights are 10.2oz (Ultron) and 7.9oz (Tele Elmarit):


Size compared with the 90mm f/2.8 Tele Elmarit (last version).
Note the hard to see lens mounting index on the Voigtländer optic.

Mounting index:

As with the 21mm Voigtländer Color-Skopar, the lens indexing red indicator is small and hard to see, so I have drilled the rear ring for a larger red plastic index dome which confers both visual and tactile location information. See the end of this piece.

Import into Lightroom and correct naming:

On importing images to Lightroom follow the process here to automatically invoke the correct lens correction profile. Then rename the lens used to ’75mm Ultron’ using the instructions here. Lightroom does not currently include a profile for the 75mm f/1.9 Ultron so I use the profile for the Leica-M 75mm f/2.5 Summarit. It works well, correcting for a very small amount of pincushion distortion.


The Lightroom Library and Develop module appearances
after applying the changes referred to above.

Why bother with correct lens naming? Because I find I frequently search images by equipment used, so using Lightroom’s Metadata panel in the Library model makes searching for ‘Leica M10 – 75mm Ultron” easy.


The Lightroom Library Metadata panel.

Images:

Here are some images from a first outing – three have click-throughs to the 24mp original files. On a desktop or laptop computer, click again on the big image to get a real whopper. All were taken in poor, overcast light:


At f/2.8. Click the image for a larger version.


Painted window.


At f/1.9. Click the image for a larger version, and read Rangefinder adjustment below.


Farm equipment.


Barn door.


At f/2.8.Click the image for a larger version.

Rendering of out-of-focus areas is pleasant and the lens is sharp wide open – provided you nail focus. I did not use an auxiliary magnifier on the M10 and had little difficulty focusing accurately. By f/2.8 the lens renders images tack sharp all over, and prevails all the way down to f/16. F/1.9 is fully useable – see below. The focus collar throw is some 100 degrees and is just right for speedy focusing. Balance on the M10 (or M3, or M2, etc.) is well night perfect, but note that only later versions of the Leica M film bodies have a built-in 75mm finder frame, so an external finder may be called for when it comes to accurate composition. The lens will invoke the 50mm finder frame on those earlier film bodies. The M4-P was the first film body equipped with the 75mm finder frame. All digital M bodies have it.

Conclusion:

Recommended, if you like the 75mm focus length – an ideal partner to the 35mm for street snapping – and can find one in the market. I see little point in getting the single coated variant – you can always confer ‘glow’ in post processing if your original file is too sharp.


On the M10, dirt cheap MC UV filter and all.

Rangefinder adjustment:

Click on the third image above, the one with the string of light bulbs and red ribbons, and on critical viewing you will see that the focus point is ever so slightly nearer than the central ribbon. A matter of a mere couple of inches, but not correct nonetheless. It is that ribbon I focused on.

When writing about critical adjustment of the M10’s focusing mechanism I explained how to adjust the eccentrically mounted cam roller using the 135mm f/4 Elmar lens at full aperture, aided by an eyepiece magnifier for accurate rangefinder focus. A fairly critical test.

But not critical enough.

Consulting depth-of-field tables it transpires that the DoF for a 135mm f/4 lens at 5′ (its closest focus) is 0.31 feet. By contrast, the DoF for a 75mm lens at f/1.9 at 3′ (much the same magnification) is a scant 0.05 feet. That’s under one inch! So given the more critical focusing cam adjustment for the 75mm lens I set to adjusting the cam roller as illustrated here, making the most minuscule adjustment using the 2mm Allen wrench to move the focus point away from the camera. A ‘bookcase test’ – wherein I photographed a row of book spines at 45 degrees to the camera at the 0.7 meter (2.3 feet) minimum focus distance before and after this adjustment – confirmed that the focus point was, indeed, too near and the small adjustment nailed it. So if you are unhappy about the focus accuracy of your M body at full aperture, consider this simple process.


Make adjustments of no more than 2-3 degrees of arc at a
time and iterate the process until focus is perfect.

Adding the red dome mounting index:

Because the small engraved red line on the mounting ring is barely visible, a red plastic mounting hemisphere is added. This greatly enhances visual location when mounting the lens on the camera and adds tactile recognition for use in very poor light.

My red hemisphere has a diameter of 0.129″ so I used a #30 drill whose diameter is 0.138″, a small amount oversize to permit proper location and space for a minuscule amount of glue squeeze out. I used two part J-B Weld epoxy which takes 24 hours to cure. This is a lifetime fix so avoid quick setting glues which are weaker.

The lens is wrapped in a couple of layers of protective cloth before installation in the vise on the bed of the drill press and everything is aligned and snugged down just so.


Machining and installing the red index.

The area surrounding the drilled recess is masked before applying the epoxy to prevent glue getting in the wrong places and a pair of fine tweezers is used to locate the dome once the glue is in place in the machined recess. Do not try doing this at home unless you are confident in your machining skills. A messed up lens will haunt you forever.

Construction quality:

Yukosteel has a disassembly pictorial here which testifies to the high construction quality of this lens.

Leica M EV1

Curious.

For an index of all Leica-related articles click here.


Odd looking with no finder window.

Introduced in 1954 the Leica M3 brought the best optical viewfinder experience to 35mm photography. Comparing that finder with the one in my digital Leica M10 shows that a good thing can be made better. The greater eye relief of the M10’s finder along with the electrically illuminated finder frames which adjust to the level of ambient light made things even more useable.

But even with digital M bodies – and the sensors in the M10 and M11 are superior to anything film can deliver – the age old limitations of the body’s design remain. That means no autofocus, no in-body vibration reduction and a limited range of finder frames for different focal length lenses. The M10 and M11 display 28, 35, 50, 75, 90 and 135mm frame lines, in pairs. The 28mm is barely visible to eyeglass wearers and focus with fast 90 or long 135mm lenses is a decidedly iffy proposition at larger apertures, necessitating the addition of an eyepiece magnifier. So while the limitations of the M’s optical finder are many the advantages more than compensate for this snapper. That means seeing outside the finder frames for what is about to enter the picture and the wonderful absence of myriad data displays in the finder which detract from the pure picture taking experience. All you see is the shutter speed and a small indicator telling you if exposure compensation has been dialed in. And, of course, that wonderful central focusing rectangle. Perfection.

However, someone at Leica determined that the world needed an M body, with all its svelte appeal, married to an electronic viewfinder. That’s nice as you can use any focal length and get accurate framing, even if you lose the ‘see outside the frame’ function of the optical version. For a premium price, barely discounted from the regular M11, you retain the ability to change lenses but still get no AF or IBIS. Yes, you can dial in finder magnification with the lever located where the frame selector lever normally resides, but it’s unclear whether this springs back when released or clicks in and stays in position. If the former, then it’s poorly designed as you need your left hand under the lens to effect focus operation. None of the reviews I have read indicate how this works.

One possible advantage of the EVF over the optical rangefinder, the latter with its considerable complexity and fragility, is that the EVF should be more resistant to knocks and bumps. The Leica M’s optical finder/rangefinder does not take kindly to being jarred and while adjustment back to the proper setting is easy, this is pretty far from the robustness of, say, a Nikon body. (I show how to adjust the rangefinder here).

The sensor? It’s the same as in the M11, meaning 18/36/60 mp options, as good as it (Sony?) gets, with the addition of microlenses to correct for axial ray aberrations of very wide angle optics.

Options? You can add the electronic Visoflex finder to an M10 or M11 for almost $1000, adding a clunky top plate protrusion but retaining the features of the separate optical finder. Or you can opt for a Leica Q3/Q3 43 which adds IBIS and AF but loses the interchangeable lens feature, meaning you get either a 28mm or 43mm lens. And while the Q3 is not cheap at around $7,000, it’s chump change compared with the $9,000 M EV1 plus $4,000 and up for a lens.

In conclusion, I rather doubt the M EV1 will have much appeal to traditional Leica M snappers but if it carves out a new niche for Leica …. well, good luck to them

Keks M-meter for Leica M – in use

Finally here!

For an index of all Leica-related articles click here.

I ordered the Keks meter for Leica-M the day I profiled it here on March 8. It finally arrived today from Hong Kong, 18 weeks later.

Why buy this? To my knowledge this is the first meter since the Leicameter – discontinued in its various guises decades ago – which offers coupling with the shutter speed dial of the Leica M for speedy shutter priority readings. Users of older Leica M film bodies have been waiting for this every bit as long and, as what follows discloses, I doubt they will be disappointed.

Nicely packed, the first impression of build quality is better than that of the Leicameter M/MC/MR/MR-4 from Metrawatt, meaning up to the standard of the contemporary Leica M2 or M3. The coarse and incorrect satin chrome of the various Metrawatt meters is replaced with a beautiful smooth finish in the Keks meter, done as it should be, and very close to that of the Leica M. Just a tad grainier. And the color match with the camera’s satin chrome is well nigh perfect. That’s close to as good as it gets. Well done, Keks.

Weight: The meter weighs 1.6ozs.

Charge as received: As received the state of charge was 40%, and rose to 90% just 15 minutes after plugging it in using a USB-C to USB-A cable. 90% to 100% took an additional 15 minutes. Not at all bad. (Keks claims 60 minutes for a full charge from flat). As the image below shows, the meter ships with a short USB-C to USB-C cable. I prefer to use a USB-A wall mounted power socket with a USB-A to USB-C cable, which is nice and fast, but the meter should charge nicely from a modern laptop or desktop computer equipped with USB-C, if maybe not as quickly.


Boxed.


Unboxed.


Connected to USB power. Just 20 minutes
from 40% to 90% charged. The state of charge
is displayed when the rear button is depressed.

Setting variables: A host of variables can be tailored. You can see how to do this by downloading the manual here. Here is how the meter is shipped, with parentheses showing my preferred setting:

  • Exposure compensation: 0 stops (Same)
  • Apertures: 1/3 stops* (1/2 stop)
  • ISO stops: 1/3 stops* (1 stop)
  • Display brightness: 50% (Auto)
  • Display on time: 15 seconds (Same)
  • Max aperture: f/1.0 (f/1.4 for my 50mm Canon LTM lens)
  • Min aperture: f/128 – rather silly really (f/22)

    * Using 1/3 stop settings with a film camera is confusing precision with accuracy.

    The last setting allows the user to dial in the 1, 1/2, 1/5, 1/10, 1/25 etc. steps for early Leica M3 bodies. Wonderful that the manufacturer thought of this. (Check my Comment, below, how to do this). As I said in my initial review, Keks is going to sell a lot of these meters and I see they are already on backorder at B&H.

    The claimed replaceable battery: At this time I have yet to summon up the courage to remove the baseplate to discover what sort of (purportedly replaceable) battery is used. The specifications state only that it is a 220mAh cell. Suffice it to say that the base is retained with four Allen head bolts and these fit a 1.5mm (tiny!) Allen wrench. Update: See the conclusion of this piece, below.

    Coupling with the camera’s shutter speed dial: The shutter speed coupling dial turns to ‘B’ smoothly whereupon it is lifted and turned further CCW to a stop. The meter can now be slid into the camera’s top plate mounting shoe, with the camera’s shutter speed dial first set to B. The process is identical to that with the earlier Metrawatt meters. The knurled ring on the meter is then turned CW until the pin drops into the corresponding slot on the shutter speed dial of the Leica. The meter is now coupled to the shutter speed dial and offers far superior ergonomics for shutter speed setting owing to the larger diameter of the meter’s knurled knob. The Keks meter engaged perfectly on my 1959 single-stroke Leica M3.

    Use with long shutter speeds: The Keks meter can display shutter speeds as long as 30 seconds. To access these you set the shutter to ‘B’, lift the knurled knob and keep turning counter-clockwise. Coupling is lost but the shutter speed dial is set at ‘B’ where you want it, and you can count the indicated seconds long exposure when making the exposure using a cable release. This function is identical to that in the various Leicameters.

    Acceptance angle: Using a point light source and a protractor I measured the horizontal angle of acceptance of the meter at 36 degrees (Keks claims 30 degrees), which is close to the 27 degrees (=90mm lens) claimed by Metrawatt for the Leicameter MR/MR-4, meaning that with the 90mm frame line invoked on the camera semi-spot readings of the area indicated by that frame line are possible with the Keks meter. Now I’m getting the sense that some real Leica M enthusiasts were involved in the design of this meter.

    Design errors: Five boo-boos, and none is a big deal.

    First, the meter displays Exposure Values (EVs) below the ISO setting, as shown below. Who on earth uses these with a Leica M, which is not equipped to display them?

    Second, why show EVs (to two decimal places!) when no decimal places are used in practice with EV equipped cameras like certain Rolleis, Retinas and Hasselblads? It would be nice if the EV display could simply be hidden as it adds useless clutter. Perhaps a piece of black insulating tape is called for?

    Third, it would be nice if the aperture was indicated as f/4 etc. not 4.0F.

    Fourth, the display sometimes indicates 1/50th (the flash setting) when it should display 1/60th, especially when moving from a slower to a faster shutter speed. This error is accounted for by sample-to-sample variations in the Leica shutter speed dial’s detents and is not Keks’s fault. Keks is to be applauded on delivering a fix – see “Shutter speed calibration”, below.

    Fifth, on one or two occasions I got wildly inaccurate readings on a first press of the rear button (the readings come on instantaneously), cured by a second button press. The errors are so egregious that you are not about to be fooled. Just press the button again.


    The EV display is below the ISO. ISOs can be changed with the two top plate buttons.

    Continuous exposure readings: A double press of the rear button is required to enable continuous readings – a ‘C’ will appear on the display to the right of the battery charge indicator. A single press will lock the reading, exiting continuous reading mode. Beautifully implemented.

    Shutter speed calibration: The shutter speed dial click stops are equally spaced on the Leica except for those between 1/30th and 1/50th and between 1/50th and 1/60th. 1/50th is the electronic flash synchronization setting and the click stops between the adjacent speeds of 1/30th and 1/60th are half the spacing of all the others. As shipped my Keks meter could not distinguish between shutter speed dial settings of 1/50th and 1/60th, showing 1/50th for both settings as the shutter speed dial was rotated toward shorter shutter speeds. So a speed of 1/60th was incorrectly shown as 1/50th. Keks includes a useful calibration function to address the issue of the set speed and the indicated speed differing, as here.

    With the shutter set at 1/60th but the meter indicating 1/50th press the power (rear) button and the ISO ‘-‘ button to enter Settings. Then use the ISO ‘+’ button to cycle to ‘Reset’. Press the power button then press the ISO ‘+’ button until you see ‘Calibrate SS’. Press the power button. The display will read ‘Shutter: B-2’. Using the ISO ‘+’ button keep pressing the button until you see ‘1/60’, then press the power button once more. What was formerly displayed erroneously as 1/50th second is now correctly displayed as 1/60th second. This calibration function works for all shutter speeds, though in my case only one shutter speed was being displayed incorrectly. Given that there will be sample-to-sample variations in Leica M bodies Keks can only be applauded for adding this function. Clearly the designers are avid Leica M film camera users. Ingenious.

    Tech specs for the sensor:. Keks uses the Vishay VML7700 sensor and you can see the full technical specifications by clicking here.

    Setting shutter speeds with the meter off: You cannot set shutter speeds on the camera when the meter is off. It must be on for these to be visible. But it’s just a quick press of the rear button to illuminate the display so, again, not a big deal.

    Battery level: This is disclosed as shown at the lower left in the image above. 4 bars = 100%. The Leicameter MR/MR-4 uses a front panel battery level check, notorious for mechanical failure. The Keks approach is better, acting as a continuous reminder in use, with no buttons to press.

    Clearance for a rewind crank: Unless your camera is one of the M4 variants with the angled rewind crank, you may prefer to fit your earlier Leica M with a rapid rewind crank, as I do. In this case clearance with the side of the meter’s case is important as you really do not want to have to remove the meter to rewind the film. As the image below shows, clearance is more than adequate:


    Clearance with the rewind crank installed.

    Use in poor light:. Far superior to the older Leicameters as the Keks meter’s OLED display is internally illuminated. I just wish it was black on white rather than white on black.

    Beyond the limit? If the light is below the meter’s sensitivity range the aperture display simply changes from an f-number to three dashed lines. Fine with me.

    Sensitivity: Keks claims EV1 at the lower end, which is 1 second at f/1.4 with ISO100 film or 1/4 second at f/1.4 with ISO400 film. My tests suggest this is fairly stated. The upper limit is stated as EV20 which is jolly bright sunshine! I could get it as high as EV21 in the brightest setting.

    Accuracy: I compared readings from the Keks with those from my Leica M10 (built-in meter) and from my Gossen Luna-Pro F under a broad variety of lighting conditions. Used properly the Keks was in agreement with both.


    On my 1959 Leica M3.

    The Keks meter for Leica M is recommended without reservation, especially at the price asked.

    Battery replacement: I screwed up my courage and decided to take the top cover off to see about battery replacement.


    A 1.5mm Allen wrench is required. A German
    Stahlwille seems appropriate!


    The four screws around the periphery of the black
    plastic plate are removed. While no thread locker
    appears to be used they are a snug fit.


    The nicely machined top plate comes off
    along with three free-floating buttons –
    power, ISO up and ISO down.


    The innards exposed.


    Battery location?

    The battery is not immediately visible after this first stage dismantling. I suspect it’s under the right hand assembly – last image above – but fear that dismantling that will make reassembly difficult as it houses the shutter speed dial/rotator. So I called it quits at this point. (Check the Comment by Keks, below).

    So my suggestion to Keks – their comment below suggests they read this blog – is to publish the battery replacement procedure for those mechanically adept. The economics of sending the meter in for battery replacement likely do not solve. Now, sure, that battery should last many recharge cycles and several years, but as a legacy product – and a fine one at that – it would be nice to know that the meter can be kept functional in the long term.