Category Archives: Nikon bodies

About Nikon DSLRs

Design consistency

Thank you, Nikon.

One of the welcome features of the D2X (2005) is how little its design varies from the much more recent D700 (2008):

Top view – each camera has a GPS data receiver installed top left, the D2X’s safety tethered with dental floss ….

The top plate controls are almost identical except for the aperture/shutter Lock button on the D2X, lower left, for which I have yet to divine a serious use, and the superior metering selector on the D2X’s prism, which has an invaluable lock button to prevent accidental movement. The one on the D700 is just visible here on the rear plate and is prone to accidental change. The ISO button on the D2X moved to the lower rear. The D700 adds a handy pop up flash. The D2X has none.

The rear views are also similar:

The 3″ screen on the D700 dwarfs the 2.5″ LCD on the D2X.

Of note is that one button has been added for minus magnification on the D700 (top) replacing the two button action needed on the D2X, An improvement for those into LCD chimping, a practice I avoid as much as I do politics. Note the Nikon DK-17M magnifying eyepieces I have fitted to both bodies – a massive improvement over stock and a must-have for anyone using manual focus lenses. With these fitted both finders show a huge, clear, uncluttered image, wonderful for composition and shooting.

The D2X adds the lower information panel common to all the D-Pro bodies and most definitely not an improvement as the text is small, for the most part, and hard to read. All of this information falls nicely to the top display in the D700. Finally, in addition to the large battery grip which permits easy vertical shooting, the D2X adds a microphone and speaker activated by the button to the lower right corner of the LCD display for recording voice memos of up to 60 seconds for each snap. Very handy. The D2X hides its CF card behind the door to the right of the LCD and adopts a truly complex access mechanism which will have you resorting to four letter words when it comes time to replace the card. The D700 adopts a far superior sliding latched door on the right of the camera. Finally the center button in the four way rocker dial for changing focus points is far superior on the D700 to the one on the D2X. It protrudes a millimeter or two further, making engagement on a center press much easier. With the D2X you find yourself toggling instead of pressing, as often as not. I suspect that a small piece of rubber glues to the D2X’s button will fix what ails the design. The AE-L/AF-L and AE-ON buttons at top right are identical on the two bodies.

The front plates are identical. What the above snaps cannot disclose is the extent to which the software is much the same between the two bodies and that is the icing on the cake. It adds to an easy ergonomic learning curve the absence of torture-by-software which every new DSLR imposes on a new user. So for D700 owners thinking of upgrading to a pro body – D2X, D3, D4 – they will likely find as I did that they will be up and running in no time.

The D2X is faster in most respects. It can sustain an 8 fps framing rate in cropped mode using the stock battery; to accomplish that with the D700 requires the battery grip and new batteries, as the stock will not fit. Mercifully, regular AA cells are an option to the costly Nikon LiOn battery. Shutter response of the D2X is marginally better, but in practice the difference makes no matter. What is noticeable is how much quieter the D2X’s shutter is. Maybe that’s because it’s smaller given the smaller frame and maybe it’s also because the D2X’s flapping mirror is smaller for the APS-C format. Whatever the reason, the result is clearly distinguishable. Batteries in the D2X are inserted from the side, those in the D700 from below, meaning that if used on a tripod, the change in the D700 is more fiddly. However, both bodies have such high battery lives (probably over 800 shots on a charge) that the practical inconvenience with the D700 is not significant.

For MF lens users the focus confirmation light in the D2X is better than the one in the D700, shuddering less at the point of optimum focus. Nikon has long spec’d its pro and prosumer AF modules as requiring an aperture of f/5.6 or faster, but I have found no difficulty in using the AF confirmation light in the D700 with the f/8 Mirror Reflex Nikkor. On the D2X that light fails, making confirmation focus with the D2X impossible. A shame.

The Nikon D2X – Part III

Some snaps.

Part II appears here.

The only thing not to like about the Nikon D2X is the bulk and weight. Hold it your eye for more than a few seconds and fatigue-induced shakes set in. Neither the body nor the classic era lenses I prefer were built with plastic. We are talking a lot of brass and alloys here and that makes for weight.

I took the body and three Nikon lenses – the current 16-35mm VR f/4 G, the twenty year old 35-70mm f/2.8 AFD and the forty-year old 200mm f/4 Nikkor-Q MF with a CPU installed to Filoli to catch the last days before the house and grounds close for the season. With the body set to center point focus and aperture priority enabled, with center weighted auto exposure, I found it a delight to shoot in portrait mode, owing to the provision of the second shutter release and the auxiliary control dials – the latter needed for the G lens. For the AFD and manual lenses I have the body set to permit use of the lens’ aperture ring. The G has no aperture ring so a control dial on the body must be used.

Here are a few of those snaps from yesterday:


Orchard.


End of season. The fallow plots await new bulbs.


Last growth.


These decorative urns are everywhere.


The Bonsai garden.


The alley.


Planter.


The Conservatory.

Despite its massive complexity and versatility, once set to your preferred mode of shooting using the D2X is child’s play. If you can lift it, that is.

A few comments on the sensor. I have long found that the sweet spot for most of my pictures is an ISO 400 setting. Fast enough to mitigate camera shake but not so fast as to destroy image quality. That held in the days of TriX monochrome film with Leicas, with the superb sensor in the original Canon 5D, in the Nikon D700, and in both my Panasonics – the G1 and G3. The D2X is in the same class. At ISO 400 noise in dark areas is just becoming noticeable in a 24″ print if you get too close. Large areas of continuous tone, like skies, show very fine, even grain at those enlargement ratios. And while the D700 is the best as regards noise suppression, owing to the large photosites used in the sensor, the earlier sensor in the D2X does not disappoint.

I have read some comments which have it that the D2X’s sensor is not usable at ISO 400. I can only think writers of this tripe are either technically clueless or spend their days pixel peeping. That’s just arrant nonsense. 36″ x 48″ prints from this sensor at ISO 400 are easily accomplished. Here are my Import Preset settings in Lightroom 4:

Lightroom 4 import settings for RAW files from the D2X.

The clock tower at Filoli – section of a 36″ x 48″ print, ISO 400, 35-70mm f/2.8 AFD Nikkor at f/4.
Grain and sensor noise? Get real.

Pay no heed to the fact that the lens profile refers to the D700 in the above screenshot – that’s what I named it. In practice, lens profiles are lens – not sensor – specific, and any of my D700 full frame profiles works equally well with the D2X or any other APS-C Nikon body. Remember that for a lens to be automatically recognized it must have a CPU fitted. One comes stock on Nikon AFD and G lenses (and even on some modern Zeiss Nikon-mount optics), but requires manual labor to install on older lenses. The alternative of remembering to set the ‘Non CPU’ lens variable in the camera’s Shooting Menu is near useless, as you will forget to do so the minute you first change lenses. This is a huge plus of installing CPUs on older pre-Ai (once adapted), Ai and Ai-S lenses. If you prefer spending time in LR or PS manually correcting distortions and vignetting because the application does not know which lens was used and hence which correction profile should be applied, that’s your choice. The few minutes it takes to install a CPU is repaid the first time you use the lens and save time at the processing stage.

Trade offs? Well, the APS-C sized sensor make all your lenses 50% longer. That might be a feature at the long end, but it is a curse for wides. A 16mm ultrawide becomes a more modest 24mm, the sensor only using the central part of the image cast by the lens. On the other hand, that central part is very much the cream of the crop definition and distortion wise, so what you lose in coverage you gain in definition. Where the D2X (and probably its later descendants, the D3 and D4) excel is in handling. The ergonomics are superb, the machine clearly designed with input from working photographers. Everything falls to hand, buttons are there in lieu of frustrating LCD choices for commonly used settings and the machine is built like the proverbial tank. Unlike that tank it is very fast indeed and wonderfully quiet, almost as quiet as a G3 despite the far greater capabilities.

Highly recommended, especially at the price, for someone who wants the last word in robustness at the price of a prosumer entry DSLR made of the purest plastic. Unlike that wonder, the D2X can handily double as a weapon in times of need. A good clunk on the assailant’s head will render him unconscious and you can still get his mug shot with the weapon you just used.

There’s a strong case to be made that the D700 is perfect for the wide-angle user whereas the D2X, owing to its superior ergonomics, excels with longer lenses.

The Nikon D2X – Part II

Some settings.

Part I appears here.

First things first. Now that my pristine Nikon D2X has arrived, courtesy of a fastidious original lady owner, I immediately installed an Upstrap to make sure it felt comfortable when worn. Not surprisingly, the ghastly ‘Nikon’ emblazoned strap which came with the camera was unused – it’s rubberized on one side only and you become an unpaid advertiser when using it. Upstrap is the way to go – the SLR-LT/SLRN non-Kevlar model is what is called for.

Second, a quick check of the firmware confirmed that Version 1.01 was installed. A download of the two BIN files from the Nikon USA site to the root directory of the CF card, a couple of button presses and two minutes and Version 2.0 was up and running. Advantages?

Nikon D2X firmware version 2.0:

  • H 0.3 (equivalent to ISO 1000) and H 0.7 (equivalent to ISO 1250) if using EV steps of 1/3rd steps in the Custom setting b2 or H 0.5 (equivalent to ISO 1100) if using EV steps of ½ steps in the Custom setting b2, have been added between the ISO 800 and H 1 settings in the ISO menu.
  • Autofocus subject acquisition and tracking performance has been improved.
  • A Black-and-white (sRGB) option has been added to the Color mode option in the shooting menu.
  • A new Trim function has been added to the shooting menu.
  • Up to 3 custom tone curves can now be downloaded to the camera for use with the Custom Tone compensation option.
  • Nikon Capture 4 (Ver. 4.4.2) Camera Control or Camera Control Pro with Ver. 1.1.1 and later is required to download 3 custom tone curves to the camera.
  • An Image authentication option has been added to the setup menu.
  • The optional Image Authentication Software is required to authenticate images.
  • A Save/load settings item has been added to the setup menu.
  • The Mirror lock-up option in the setup menu has been modified to function with battery power as well as AC-adapter power.
  • The Lock-On option in the CSM menu now offers 4 options: Long, Normal (default), Short, and Off.
  • Max. sensitivity and Min. shutter speed options have been added to the ISO auto menu.
  • The Maximum shots option in the CSM menu has been updated to support a maximum setting of 60 shots.
  • The FUNC. button item in the CSM menu has been divided into 2 separate items labelled FUNC. button and FUNC. + command.
  • A Recent settings item has been added to the setup menu.
  • The shooting data of an image in the playback photo-information display now includes Focus mode (S/C/M) and Vibration reduction (on/off). Displayed only when the image was captured with a VR lens.
  • Latitude and longitude GPS data now displays up to 3 digits for each segment.
  • A compass bearing is displayed in the GPS data, if used with a GPS device is equipped with digital compass.

Non-trivial enhancements, as you can see. The only surprise here is that the original owner did not do this!

I popped an SDHC 8GB Lexar CF card in and recharged the battery, which the camera states is some half way through its useful life. The D2X was made before SDHC high-speed transfer technology was available, so write times are not reduced with an SDHC card in the camera, but read times in a USB3.0 card reader most certainly are when loading the images into Lightroom or Photoshop. And with the body’s large multiple-shot buffer, write times are not a major concern. In my D700 the 8GB card will store 302 RAW images; in the D2X that rises to 386. Nice.

As expected, the weight of the body, despite its increased bulk, is little different from that of the full frame D700.

As long time readers know I own many old MF Nikkor lenses from what I consider to be the golden age of manufacturing, and have modified all of these by adding a CPU. To confer aperture control on the aperture ring of lenses thus modified (and also for AFD lenses which come with a CPU) the related setting is found in Custom Setting Menu->f – Controls->f6 Command Dials->Aperture setting->Aperture ring->OK. Phew! You can now change the aperture on manual and AFD lenses using the aperture ring on the lens. That’s how cameras used to be and that’s how I like mine. If you elect to use my lens correction profiles, these will automatically adjust to either FF or APS-C images, so no changes need be made when importing images from one or the other sensor.

As usual, I turn Image Review off. If I need to chimp the image on the built-in LCD it’s to check the histogram, and that only in challenging lighting.

The GPS unit and sender set forth here for use on the D700 works better with the D2X, the D700’s 70% hit rate rising to over 90% with the D2x.. Latitude, longitude, altitude and UTC time are all faithfully recorded in the file.

A quick reset (two green buttons at the rear base held for 2 seconds) restarted frame numbering from zero, the body having some 22,500 actuations on it when received. In other words, as these things go, it’s a baby. You really must avoid pros’ beaters when searching out one of these.

Autofocus with AFD lenses is slightly (subjectively) faster than with the D700 – the D2X stops the focus first time whereas the D700 sometimes goes past the optimum focus point then retraces. But practically there’s little to choose. Both are breathtakingly fast, and the older AFD lenses which use the ‘screwdriver’ lenses focus mechanism are nicely suited to the powerful focus motor in the body of the D2X. I only own one Nikon G lens, the 16-35mm VR f/4 which uses the more modern linear in-lens focus motor, and this locks autofocus even faster than the AFD lenses I use. The G lens may be set in awful resin, but the technology delivers. On the AF-C D2X, the 16-35mm focal length range computes to an FFE of 24-52mm, a handy range for street snappers. Couple that with the 35-70mm AFD (FFE of 52-105mm) and you have a powerful ‘around-the-world’ outfit.

A quick tweak on the eyepiece adjuster saw things nice and sharp in the finder. Subjectively the finder in the D2X is one stop brighter than the one in the much newer D700. The D700 projects a larger, warmer image with the 1.2x magnifier I use. Removed, the two are near identical, though the D2X has a smaller sensor. Unmagnified, the D2X’s finder is just right – there’s no need for the eye to scan around for data. Both bodies present a wonderfully uncluttered image area through their respective finders. Best of all, the Nikon Eyepiece Magnifier fits perfectly and makes the viewfinder into a true state of the art focus and composition aid. Highly recommended, especially with fast and/or long lenses.

The focus confirmation light, used with manual focus lenses, is more decisive than in the D700 – there’s less stuttering around the optimum focus point, but I am splitting hairs here. If you use my lens correction profiles (click on Sitemap, above), these will require no changes for the smaller APS-C sensor.

The D2X has one useful feature missing from prosumer bodies like the D700. A button at the lower rear allows recording of a voice memo of up to 60 seconds with an image. Very handy for, say, recording the name and email address of someone in a street snap when you want to send them an image later. It’s a nice thing to do for posed snaps and a handy feature to have.

Despite its increased bulk, the D2X handles better than the D700, owing to the duplicated dual command dials on the handgrip which make vertical operation a breeze – as long as you remember to flip the switch to enable the vertical shutter release! The shutter is noticeably quieter than in the D700, but the latter has a 3″ LCD compared to the 2.5″ on the D2X. If you are a big LCD user, that is not good.

Otherwise things are remarkably similar between the two bodies, despite the disparity in their ages. The EN-EL4 battery has a 1900mAH capacity meaning a whopping 1,500 images per charge (the later EN-EL4a is 2500mAH or 32% more shooting capacity). These batteries are awfully expensive but as there are so many tales of melting aftermarket ones, I bought a lightly OEM Nikon used spare. The EN-EL4a will not fit the D700 but will fit the D700 when equipped with the vertical hand grip. One more recharger to remember. For comparison the D700’s battery is 1500mAH.

In summary, I do not think you will complain about value for money when buying a used D2X. You can decide, based on this and subsequent articles here, if a used one makes sense for you. While I’m not a serial shooter, cranking the body up to maximum continuous shooting is quite something to behold – 8fps in cropped frame mode.

Overall impressions are of a body of quite immense solidity, perhaps subjectively better than even the massive and well made D700. At $650-800 for a lightly used non-pro ‘beater’ the D2X is a bargain if you can live with APS-C. Pay a little more for one with low actuations – the risk-reward is positive. The D2X will accept just about any Nikkor lens ever made, and older ones can be easily retrofitted with CPUs to modernize their data recording abilities.

Pictures in Part III, but of course there has to be the obligatory snap of Bert the Border Terrier to round out this piece!

Bertie. D2X, 85mm f/1.8 AFD, f/5.6, ISO 400.

Detail of the above. The spot autofocus center rectangle was used, locked with a first pressure on the shutter release.

A quick look at the first images from the D2X does prompt the question: Wither sensors? A friend sent me some uncompressed originals from his new Nikon D800 the other day, and encouraged me to pixel peep, meaning I was looking at display images which equalled print originals 10 feet in size. 10 feet! The rendering of detail, the absence of noise/grain/whatever were startling. Even at ISO1600 the results were special. But I cannot help wonder, in the real world, one where prints are dying and large LCDs are the default display medium viewed at a rational distance, who needs these insanely great sensors? For those who do not, and who are looking for value for their money, oldies but goodies like the D2X have an awful lot to offer. And you are not going to beat the framing rate or the vast choice of inexpensive manual focus optics.

And thank you, Christine, for a camera delivered in such fine condition!

Part III appears here.

The Nikon D2X – Part I

And oldie but a goodie.

The law of diminishing returns affects all technological goods. The desktop PC has peaked, hampered by its slowest part, poor broadband speeds. All modern cars are good, with even Korean products certain to last 200,000 miles with a minimum of maintenance. The smartphone continues to add bells and whistles but the iPhone 1 pretty much defined the genre five years ago. And the latest offerings from camera makers continue to regale us with more pixels and faster operation, while largely missing the increasingly essential things found on any smartphone – GPS and wifi.

The smart buyer, be it of cars or cameras and maybe even computers, focuses on products a tech generation or two old. The cheapest car is a lightly used five year old one which you can buy at 60% off original list price and drive happily for another 15 years, the first owner having paid you for the depreciation. That car has all the functionality and sophistication of the latest model save maybe its fuel economy, and if you do the math there is no way on earth your hybrid will be cheaper over its life than my ‘dated’ gas guzzler.

With pro-DSLRs the financial math is even more extreme. Case in point. I just bought a near-mint 2005 vintage Nikon D2X body for $760. This body sold for a stunning $5,000 7 years ago. It has 22,000 shutter actuations against a life expectancy of some 250,000 or, as a friend remarked:

If you took 300 snaps per trip, you only have 760 trips left.

So it’s not like I am about to worry about wearing the shutter out in one of the most robust bodies ever made. As a back-up to my full frame D700, the 12mp APS-C sensor in the D2X offers like definition within the confines of a 1.5x cropped frame. That’s not useful for ultra wide lenses, where the 20mm suddenly sees like a 30mm optic, but it’s jolly nice for a 50mm f/1.4 which becomes a handy, small and very fast 75mm portrait lens. And I’m talking the old MF Nikkor from the days when men were men – and women were men.

Read the tech blogs and you will discover that the D2X does not remotely match the high ISO performance of the D700. Indeed, its sweetspot is in the ISO 100-400 range. That’s fine for my purposes. Read on and you will learn that seven year old Sony sensor – the first CMOS sensor used in a pro-grade Nikon – has a stellar reputation for color rendering in that ISO range. Now that gets my attention. And it just happens to have extraordinarly fast autofocus when that is needed.

A related dictate for my purchase was that I did not want to scale the steep learning curve which is part and parcel of the modern DSLR. The controls and operation of the the D2X are identical to those of the D700 in most respects, so setup will be a cloning process of the preferred settings I have learned to love on the D700.

So there’s lots to look forward to here, not least being the fact that many aver that this is the best constructed digital era body Nikon has yet made, and I have a penchant for things that are well made.

Part II is here.

100mm, f/1.4

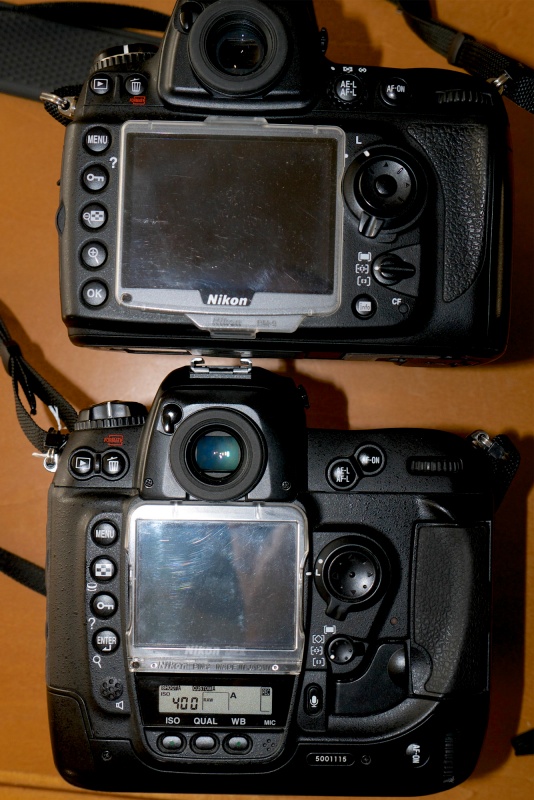
Nikkor MF lenses on the Panasonic MFT bodies.

This piece will finally join the heretofore parallel lines for the Nikon D700 and Panasonic G3 systems I use. Absent the one in the iPhone 4S and an old Panasonic Lumix LX-1, I have no other cameras.

Adapters and their limitations:

Adapters, most around $25, are available to use Nikon and Canon and a host of other manufacturers’ lenses on MFT bodies made by Panasonic and Olympus. But just because you can do that, does it make sense?

For the most part the answer is a resounding ‘No’.

You have no autofocus, auto-exposure is aperture-priority only, and Canon EF and Nikon ‘G’ lenses require specialized adapters to control the aperture. Otherwise you are restricted to full aperture only as those lenses lack a manual aperture ring. Except for Olympus MFT bodies which have anti-shake built into the body, a Panny user loses that feature also. Any VR/IS in a Canon or Nikon lens is lost. The sheer bulk of most full frame lenses destroys the compact concept of the MFT body’s design and the whole idea has a rather Rube Goldberg aspect to it. Cool to tinker, useless in practice.

Still, I plonked down $23 for one of these the other day and just received it. It adds some value in specialized applications and works with Nikon pre-Ai, Ai’d, Ai, Ai-S and AF-D (manual focus) lenses. If you want to adapt a G series AF-S lens as well as all older Nikkors, buy the costlier adpater with a mechanical aperture control ring. Read on.

Click the picture to go to Amazon US. I get no click-through payment.

Adapter quality:

I opted for the Rainbow Imaging version as user reviews suggested it has a better release catch for Nikon lenses than other cheap ones. Manufacturing quality is very high, the interior is semi-matte but that’s unlikely to have any effect on image quality as the reflectivity is low. Fit of both the Nikon end and the Panasonic end is excellent. Novoflex makes adapters for $300. Save your money. The cheap ones are fine. You can see the full range of Rainbow Imaging adapters by clicking here. There are 30 adapters for MFT alone, including such odd ducks as Alpa (a superb Swiss 35mm film SLR whose quality of engineering puts Leitz to shame), movie C-mount, Contax/Yashica, Retina Reflex (!), Exacta/Topcon, Zeiss Ikon Contax rangefinder (!!), and many others. Fotodiox makes an inexpensive adapter for Hasselblad lenses to MFT.

Checking the flange-to-flange dimensions with a micrometer I found a maximum-to-minimum variation of 0.0001″ (0.0025mm), right at the limit of accuracy of the measuring tool. That would be tough to beat at any price. The grinding of the front flange, which mates with the Nikon lens of choice, is to a very high standard. The body of the adapter is made of very thick alloy and not about to flex, regardless of the lens fitted. The serrations on the barrel provide a decent grip for installation and removal on the camera. A small set screw on the rear flange provides adjustment of tightness of fit on the camera. Springs permit adjustment of the tightness of the front mount. Both front and rear on mine were set just right on receipt, but it’s nice to know that adjustments can be made in the event of wear.

Best lenses:

So which lenses make sense? The MFT sensor is one quarter the size of a full frame one, meaning that you are using only the center of the image projected by a full frame lens. Thus a 50mm lens becomes a 100mm. However, the depth of field remains that of a 50mm lens. Depth of field is solely a function of focal length. A 50mm lens on a 4″ x 5″ plate camera will have the same DOF at any given aperture as a 50mm lens on medium format, full frame, APS-C, MFT, you name it.

That pretty much means wide angle lenses from full frame bodies are a waste of time. Even a super wide 17mm, with all its associated bulk, becomes a semi-wide 34mm on MFT. You are far better off using the kit zoom with all its automation, than using a gargantuan FF wide. It just gets worse the wider you go. A monster 14mm Nikon or Canon is a not so wide 28mm on MFT. Silly. If you want really wide, use something like Panny’s 7-14mm or Oly’s 9-18mm. I use the latter and it’s an outstanding optic.

Likewise, modest aperture standard or medium long lenses make little sense. The Panny kit zoom – 14-42 or 14-45 – meaning 28-90 equivalent on FF, has you covered. And if you want something really long, using a monster FF telephoto on MFT bodies makes little sense unless you need a very fast aperture. But then why bother with an MFT body when FF will deliver superior results with little aggregate change to weight and bulk? The superb Panny 45-200mm (=90-400mm) has decent apertures fully open and built-in anti-shake, making it perfectly useable at the long end hand-held. And it’s tiny compared to anything from a full frame body.

That leaves fast FF lenses and special purpose ones.

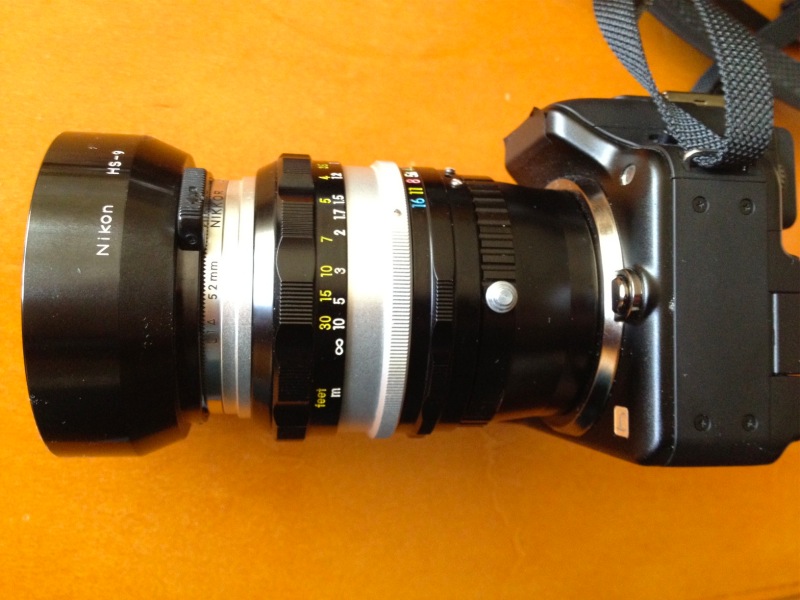
50mm f/1.4 Nikkor-S on my Panasonic G3 body.

The fast 50mm makes for a fine portrait lens and permits limited DOF effects, if you can handle manual focus.

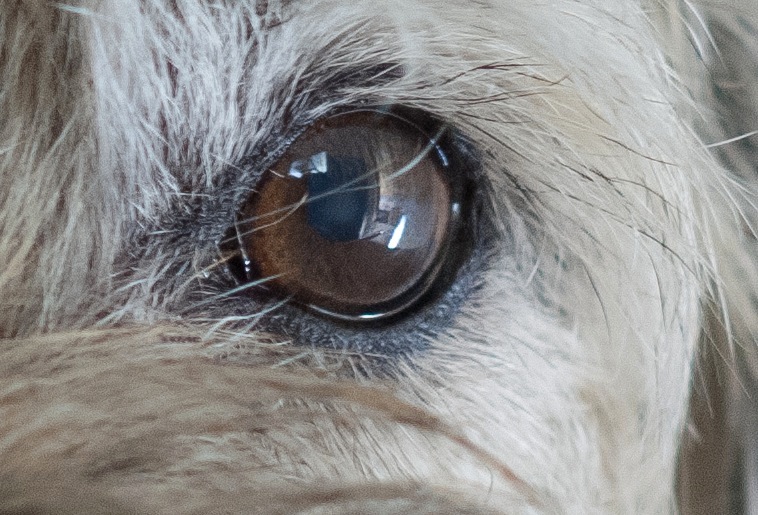
Winston. One 60 watt bulb for lighting. Nikkor-S 50mm f/1.4 at full aperture, Panasonic G3, ISO 1600.

As you can see from the snap, DOF is extremely limited fully open and close-up.

In use on the Panny G3:

You switch the body to Custom->Use Without Lens (go figure; I saved this to C2-2 – the G3’s custom settings allow one on C1 but three on C2, the latter selectable using the LCD rather than the top dial) to enable control of the adapted lens and here’s where one of the great advantages of the electronic viewfinder in selected MFT bodies kicks in. With the camera set to aperture priority automation, as you stop the lens down the finder brightness remains unchanged. It’s as if you were using a standard auto-aperture MFT lens! The EVF adapts as the FF lens’s aperture changes, only the perceived depth of field changes. If only the D700 came with an EVF ….

So aperture automation is not an issue, though the finder will report the aperture as 0.0 regardless of how set. You have to check the lens to see which aperture you are using. With aperture-priority automation, the shutter speed is correctly displayed in the EVF.

As for focus, Panny has another trick up its sleeve. By depressing the control wheel into the body, with the G3 you get a 10x magnified center rectangle (the magnification is variable at will), picture-in-picture, which makes manual focus trivially simple and dead accurate. (Panny’s MFT bodies do not have a focus confirmation LED). Far easier than using MF on the FF D700! Press again or touch the shutter release and the EVF returns to normal display. (In the earlier G1 the whole finder image is magnified, but the functionality is near identical). Thus, with a 50mm lens you are getting the focus accuracy of a 500mm, and even at smaller apertures the magnified image snaps in and out of focus sharply, leaving little room for doubt.

Picture-in-picture 10x focus tool in use on the G3.

For my purposes there are just a few lenses in my extensive Nikkor MF collection which make sense to use on the G3. They include the 50mm f/1.4 and 85mm f/1.8 for their fast apertures and shallow DOF when fully open (one of the banes of MFT is too much DOF with just about any lens), the 100mm f/4 Micro-Nikkor for its close focusing ability, and the 300mm and 500mm Nikkors for extreme reach. The 300mm is sort of silly as it’s large, heavy and hard to hold at the best of times, but the 500mm (1000mm equivalent) is a real surprise. This mirror lens, with its slow f/8 fixed aperture. is an absolute pig to focus on the D700. The focus LED indicator is at the very limit of its capability (it starts checking out much below f/5.6) and the finder image is dark. With the G3, the finder image is bright as can be and focusing is a joy. No need for the 10x focus feature. The unmagnified image is easy to focus in any light. And the 500mm Reflex Nikkor, once you get the hang of it, is really a special lens – positively a midget for that focal length and sharp as can be when properly handled. Balance on the small G3 body is excellent.

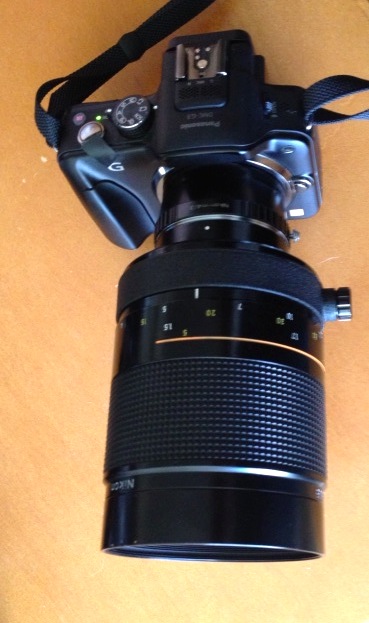
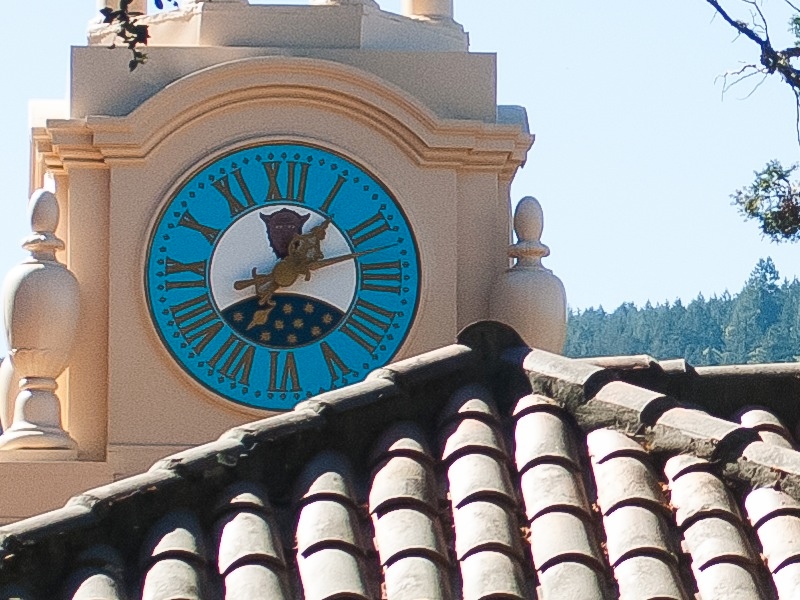
500mm Reflex Nikkor on the G3.

Neighbor’s backyard test target. 500mm Reflex Nikkor, 1600 ISO, G3, 1/1000.

The above was snapped hand held through a dirty window, the ‘target’ is some 100 yards away.

So the FF->MFT adapter has its uses, even if they are somewhat limited. However, a mirror reflex on the G3 is a joy and a pleasant surprise. It’s almost as if the Reflex had to wait all these years for a body capable of doing it justice.

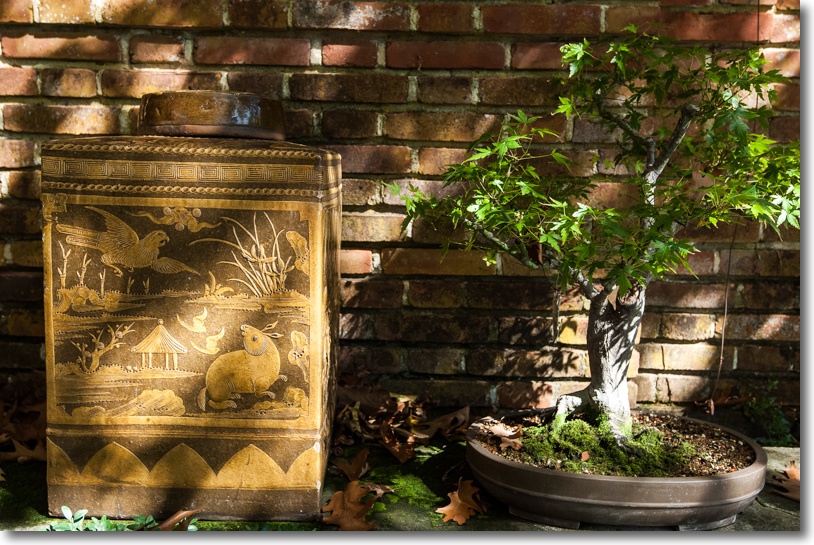
Using the adapter with the Nikon Micro-Nikkor 105mm f/4 makes for a powerful combination. At closest focus you get 1:1 reproduction, compared with 1:2 on an FF body. Despite the small maximum aperture, critical focsuing is very easy thanks to the EVF, and the outfit balances nicely in the hand.

An even better body for use with really long lenses would be the recently released Olympus OM-D MFT SLR, which has in-body image stabilization, though I do not know whether the IS in that camera works with adapted lenses. However, at $1,000, this overpriced body currently costs twice as much as the G3.

A note on CPUs, processing and EXIF data:

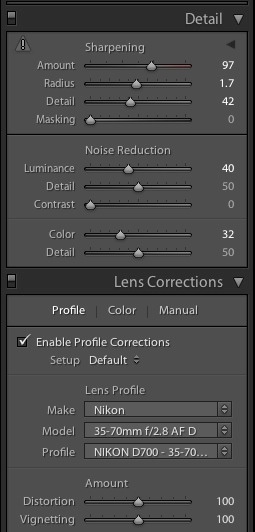
If you have installed CPUs in your Nikon MF lenses, as I have, these do not interfere with the adapter. EXIF data in LR or whatever you use for processing will be missing any lens information, as the camera has no way of knowing the focal length used. Thus if you want to apply a lens correction profile, it will have to be selected manually. As only the central part of the image is being used, the need for lens correction profiles is lower than with FF sensors.

The 16mp G3 sensor figures to the equivalent of 4mP on a four times large FF sensor for same-sized prints. That’s perfectly adequate for 18″ x 24″ prints, as the walls around me testify, provided your technique is up to it.