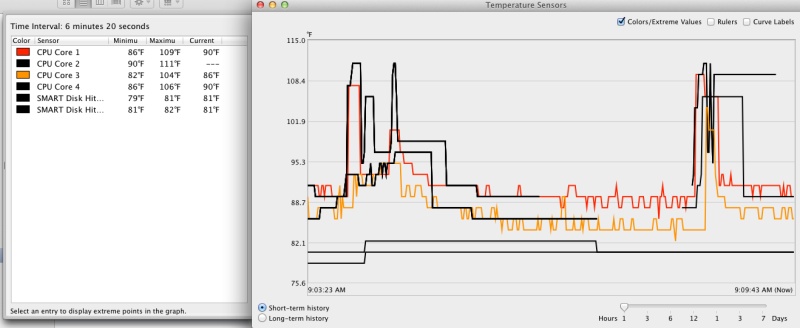
Category Archives: Hardware

Stuff

Saving Sammy’s best

A quick fix for a dead HDD.

A new Samsung HE103UJ 1tB disk drive runs some $240, a great deal more than the $120 I paid for mine, the immediately previous generation HD103UH with the same specs – 32mB cache, 7200 rpm, 3mb/s SATAII data transfer rate. At that replacement cost I reckoned there was no downside to taking it apart and seeing if something obvious was the cause. The drive would not be recognized by OS X’s Finder but would pop up in Disk Utility. However, Disk Utility could neither repair or erase the drive, those options remaining greyed out.

Yes, there are cheaper drives out there, but as a reader commented on yesterday’s column, recent drive failure rates seem to be skyrocketing. The Sammy is a known, high quality drive, mine being 3.5 years old. I own a dozen of these 1tB drives and this is the first to fail. Most have over 3 years’ use, often 7/24.

The controller board on the back of these is retained with five T8 Torx screws and I had it off in a couple of minutes. It makes contact with the drive’s innards in two areas – a multi-contact connector and a two point one – both circled below:

Even to the naked eye it was obvious that the multi-contact connector was heavily oxidized, though there were no signs of heat damage anywhere on the board and the drive neither overheated or made strange noises which would suggest mechanical issues. A couple of seconds cleaning the contacts with my son’s school eraser, the board was replaced and guess what?

Yup, Disk Utility erased and formatted the drive immediately and the Repair function found no errors. The drive also now appeared in Finder.

Sammy must have sold millions of these and they have a deservedly great reputation, so before applying a sledgehammer to your blown one, as long as the heads are not clicking like mad, the bearing is not screaming and it can still be seen in Disk Utility, try this quick fix. I checked a couple of other 3.5″ SATA drives from other makers and the mechanics seem much the same, with the controller board attached with a few screws.

Big Storage

Spinning discs rule – if only just.

First, a few words about large traditional spinning disk (HDD) external drive enclosures. These are still the cheapest way to store large amounts of data. The recent floods in Thailand, which accounts for one third of global drive manufacturing, have increased prices from as low as 9 cents/gB to maybe 11 cents/gB for the slower drives, but that still puts SSDs to shame, with prices around $3/gB, or 25x as much. And SSD capacities are atill low. A 1tB Western Digital Caviar Green HDD runs some $130 today.

My rule is that if you buy a single traditional HDD for storage you are playing with fire. Drives simply must be duplicated as one or the other will eventually fail. A device whose multiple platters spin at a minimum of 5,400rpm – that’s 2.84 billion revolutions a year if left on – and whose data heads fly back and forth at insane speeds, is a modern miracle which works awfully hard. So matched pairs it is. Further, I don’t buy ‘passive cooling’ arguments, where fins are claimed to conduct heat away. Nope, if it doesn’t have a fan I’m not interested. And finally, I don’t trust RAID. A simple copy works for me, not yet more technology waiting to go wrong. I use Carbon Copy Cloner for automated overnight backups so that there’s nothing to forget.

When one of my OWC/MacSales enclosures recently failed, just out of warranty (naturally), a failure that was the driver for yesterday’s column, I ordered a like replacement from OWC. These are not cheap at $120 each but they are well made, beautifully finished in unpainted aluminum and as only one of the five I have owned for years had failed I didn’t particularly want to explore alternatives. But OWC has changed the design and the latest variant which ships without drives has deleted the internal dip switches which permitted setting the box to recognize the two drives inside as individual devices. The current version permits RAID only. Back it went. OWC told me they only sell these with pre-installed HDDs of their make of choice for individual drive setups, as some makers’ drives are too temperamental to be thus recognized. I had two good drives, so an empty enclosure was what I required.

So I shopped around for a dual drive, fan cooled enclosure, which permitted the two drives to be recognized as separate devices, and settled a tad reluctantly on the Vantec NexStar MX. The low price was troubling – just $45 from Amazon USA. Further, the Amazon reviews complained about the fan noise but I reckoned at that price there was little to lose. Well, it turns out this is a fine enclosure. While it comes in black only, the drive mounting scheme is far superior to the fiddly cables used by OWC. The drives simply slide in, there are no cables, and each is retained with the screws provided. Four more small Philips screws hold the enclosure together and you are in business. The enclosure is beautifully made, requiring no excuses. This is USB2 only, so high data transfer rates will not happen here, but for mass storage of photographs or movies, these are just the ticket. The drive enclosure is 12 feet away from where I work so fan noise is not an issue. If it is you could probably hack away the grille to reduce it or reduce the fan speed as one Amazon reviewer did. He soldered a 120 ohm resistor in series with the power supply cable to the fan. The trade off is that the enclosure will run hotter.

There’s a green power light and a blue LED for each HDD to denote activity.

Rear view. The stand need not be used in practice and is removable.

The drives simply slide in. No cables required.

The manual specifically states that the capacity is 2 x 1tB HDDs. Amazon reviewers suggest that 2 x 1.5tB is possible although new drivers may have to be installed. I don’t know if this enclosure will support larger drives. I doubt it. So if you are happy with two 1tB HDDs, this is fine. Anything larger, do your research first. 2tB drives currnetly offer the lowest data storage cost per byte. I rather suspect that if you partition these into two 1tB partitions they will work fine, as I am guessing that the enclosure’s drive controller chip is choking at anything larger than a 1tB partition, but I do not know. Finally, this enclosure will not support the higher data transfer rates offered by the latest SATAIII HDDs. It supports SATAI and II only. If you can live with those limitations it’s a fine and inexpensive solution for large volume data storage needs.

The HackMini

Keeping it cool.

When I bought the Mac Mini as a home theater PC, I knew it was but a temporary solution until time to make my own became available. I named it the Mac Fry and so it has proved, with CPU temperature soaring to 168F when ripping/compressing a movie with Handbrake. The service limit is 176F for the C2D CPU and all that thermal cycling so close to the limit is not consonant with a long life.

So when the opportunity arose, I procured the parts to make my own, and the Mini will move to a less demanding home for near zero net outlay. But first I will have to replace the slot loading DVD drive because, like every other Mac slot loading drive I have owned, it has just failed.

As before, ace builder TU Steve writes what follows:

To keep things simple, I used the same parts as in the HP10, my utility machine which runs super cool and has performance comparable to all but the fastest iMacs at a fraction of the cost. The only thing which would change is that an elegant case would be used, as the HackMini is very much on show below the TV screen.

Well, I thought I was using the same parts, but the restless people at Gigabyte conspired to change the audio chip used on their mini H67M-D2-B3 motherboard from the Realtec ALC888b in HP10 (v1.0) to the ALC889 in the HackMini (v1.1), meaning the build started with no sound until I applied the fix here. Then OS Lion refused to allow login to the AppStore – essential for software updates – and a few seconds here quashed that little bug.

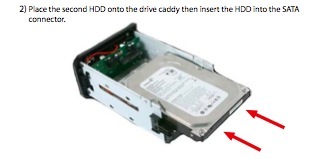
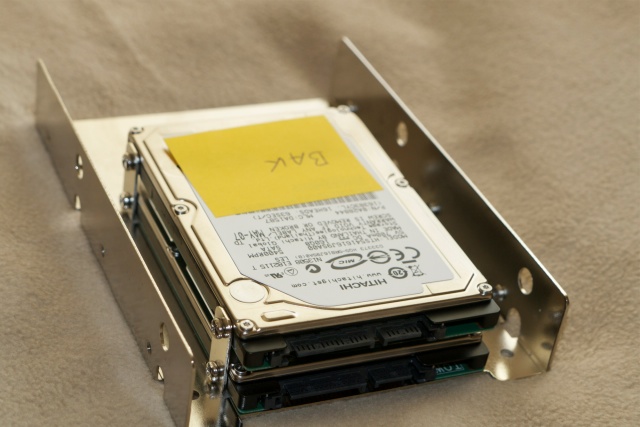
As I had a couple of small notebook drives in a drawer, remaindered from fried Apple laptops, I used those doubled up on a Silverstone adapter plate, allowing installation in a 3.5″ slot.

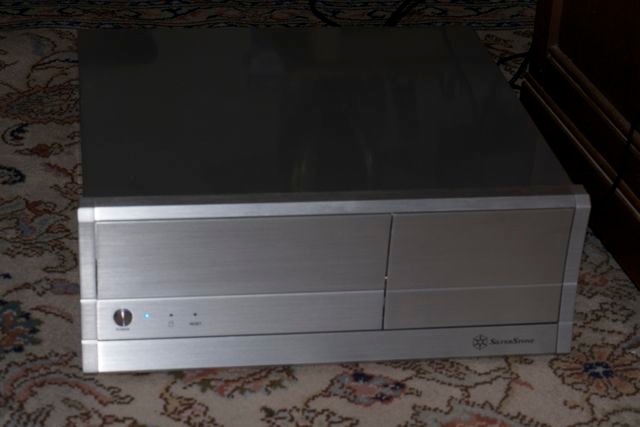
I spent a long time choosing a case, wanting something less than full sized but not so small that cooling would be an issue. This machine is going to be worked hard, and must have front USB slots for sneakernet movement of movie VOB files. I finally decided on the Silverstone LC03S in unpainted alumin(i)um, as I really dislike black, with neat front flaps covering the USB sockets and the full size tray loading Sony DVD reader/burner. I have never had one of the latter fail and they are dirt cheap.

The build was dead easy, taking just two hours from box opening to start up, and I had prepped the drives using HP10 while waiting for the parts. The case is premium priced but you get rolled steel edges inside, meaning no injuries when building.

There are two small, silent case fans, so I had to procure a two-into-one connector as the mobo sports but two fan connectors, the other used by the CPU cooler. Another $2 was blown on a small beeper speaker which announces itself with a single beep at power-on, indicating all is well. Just like in a crappy Windows machine. As you can see, there’s tons of room in there, with space for another 3.5″ device – I will likely add an SDHC card reader – and several more drives. Many build their HTPC Hacks with micro ITX mobos but that makes for small boxes and hosts of issues. This case will actually accommodate a full size ATX mobo, but that would be overkill for the intended use. As it is, the Gigabyte mobo used sports no fewer than eight rear and two front USB sockets, including USB3 if desired, so it’s not like connectivity is an issue.

Finally, the motherboard includes two SATA3 sockets which will support the latest 6gb/s fast HDDs and SSDs. The two notebook drives are ancient SATA2 devices, and as disc access is infrequent in this application, that’s just fine.

As you can see, space is abundant inside:

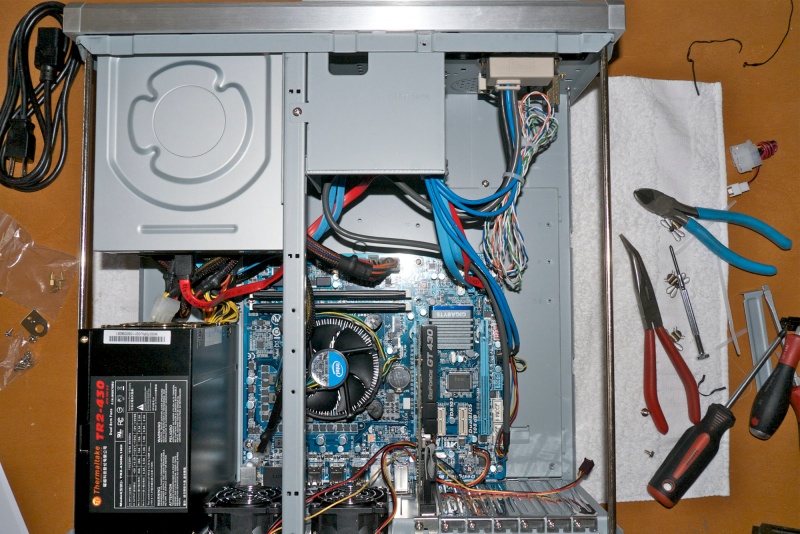
The over-spec’d Thermaltake PSU, at 430 watts, will not break a sweat and I like the brand for it’s neat cloth covered cable sheaths.

And that’s about it. Here it is in place, happily replacing the awful Mac Mini which may just be the worst designed computer I have ever owned.


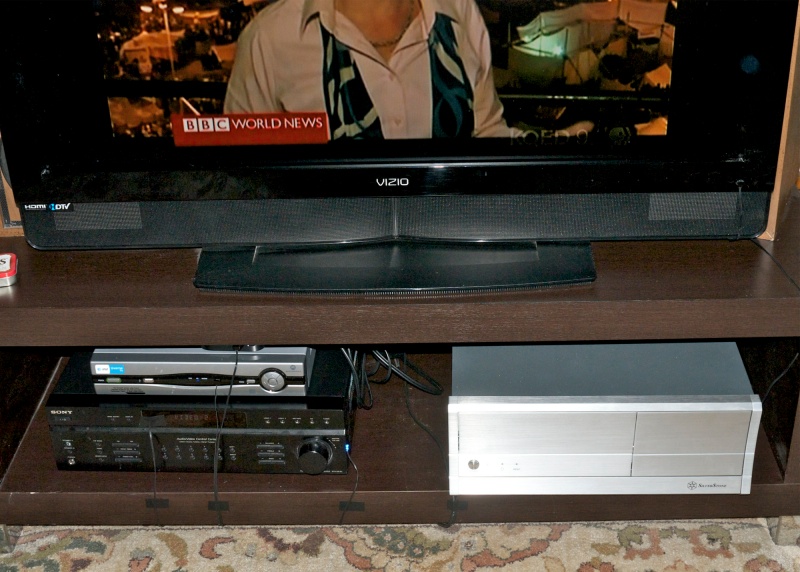
The ugly small black ‘wires’ are optical fiber cables for an IR blaster.

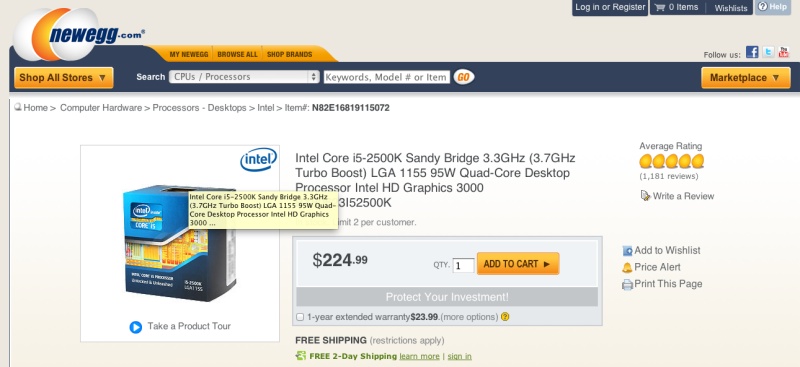
Here’s the parts cost – I used the awesome Intel Core i3 Sandybridge CPU:

Case $86
Wifi card 38
GT430 GPU 75 (EVGA with HDMI/VGA/DVI)
Motherboard 96
Drive plates 16
RAM/DVD/CPU/PSU 237 (8gB Corsair 1333mHz)
Beeper 2
Y fan cable 3
EVGA rebate (15)

Total $538

To be fair, the cost of an HDD has to be added to strike a comparison with the MacMini which is certainly price competitive. Until it fries, that is. And the current Mini no longer includes a DVD burner.

Performance is everything you would expect of the Core i3 and the outstanding GPU:

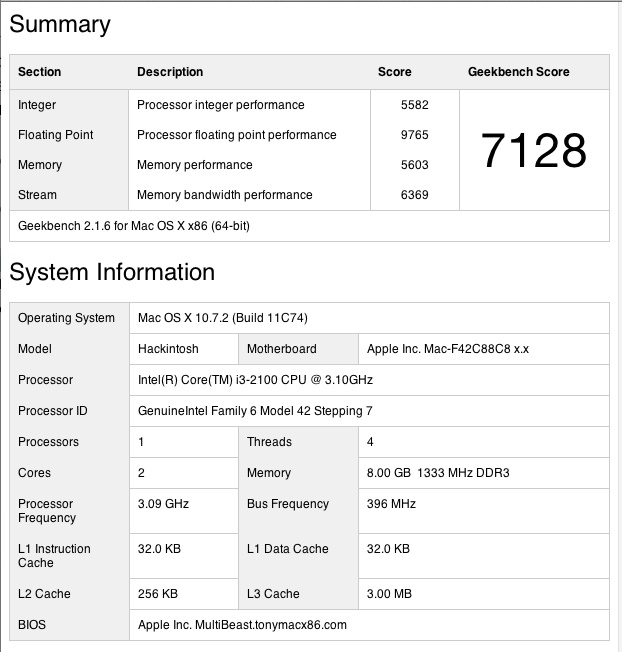
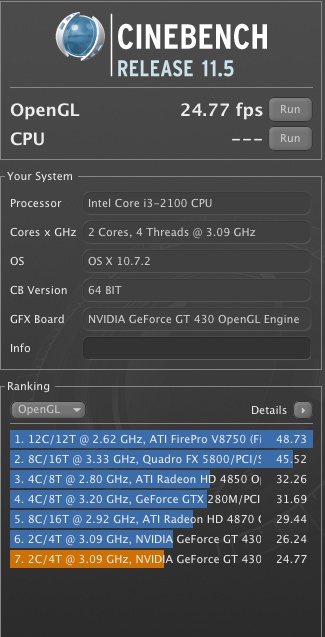
Start-up and Geekbench run, using the stock Intel CPU cooler.

While the machine is used as an HTPC, it would also make an excellent desktop. I will likely replace the poor stock Intel CPU cooler with something better once I figure out sizing ($30) and will also add an internal multi-format card reader ($15). For a machine which is never switched off, an SSD makes little sense.

The HackMini is controlled with an RF Microsoft Mobile Mouse 6000, RF being far superior to Bluetooth in range and stability, not to mention battery life, and with Mobile Mouse on the iPad when typing names of movies into the DVDpedia database. This has interactive, clickable links to movie files residing on 10 tBs worth of external disc storage.

Audio is 2.1, with sound output from the motherboard routed to an ancient Sony receiver and thence to even older B&W DM4 speakers. With a little more hacking 5.1 surround sound using the multiple sockets on the motherboard would be easily added.

Want to add BluRay playback? Swap the regular Sony DVD burner for a BluRay SATA one ($60) and add this $50 software, and enjoy something Apple does not provide on any of its hardware.

Factory warranties are three years on the CPU, motherboard and graphics card and lifetime on the RAM, with only the Mobo being a pain to remove. No money wasted on AppleCare here. It should be added that of the many Hackintoshes in which I have had a hand, several used hard in professional settings, the sole failure over the past five years has been to one 1tB Samsung HDD, which was still within its three year warranty.

As befits an HTPC, the Hack Mini computer is silent as the grave.

* * * *

Thank you, TU Steve!

There are many reasons to avoid the poorly designed MacMini, even more so in its latest guise where the DVD burner has been deleted (though, arguably, that’s an improvement over the awful slot loader in mine); for the full scoop just click here. Hint: It’s nowhere near as cheap as you think.

Bluetooth update: To learn how to really get this fragile, wireless technology working well with the HackMini in its rôle as a keyboard-less home theatre computer, please click here.

Using reviews

Where not to go.

One of the striking aspects of the many remembrances of Steve Jobs is how assiduously he cultivated big name journalists. He wasted no time marketing to Mac fan sites. Once you have used a Mac the number of switchers returning to the horrors of Windows probably compares with the number of Americans applying for resident status in North Korea. No, preaching to the converted is time wasted. Indeed, the ace fan site and magazine, Macworld, numbering many decent journalists in its ranks, admitted that not one of them had ever had a face-to-face discussion with Jobs, absent the occasional “Hi! Nice to see you” sort of thing at a product roll out. There’s a reason for that.

Jobs’s primary focus was on the NYT, WSJ and Time. Who do you think got pre-release versions of all the new hardware? And why? Big readerships, with lots of Windows and Android users ready for conversion. But while these publications have decent writers, they are converts also, so objectivity is not the reason you go there.

Let me put this in focus by explaining how I go about choosing parts for a Hackintosh. The two in my home do not have a single piece of Apple hardware, for good reason. I want proper ventilation, which rules out everything except the MacPro, I want a decent price which rules out the MacPro, and I want a mouse which has solid ergonomics, unlike the Magic Mouse which is an ergonomic disaster. I want a keyboard with mechanical scissor keys providing proper tactile and aural feeedback. The Apple keyboards, whether in a laptop or sold separately are a catastrophe in those regards. I want a matte screen which I can profile properrly with a colorimeter. No such device exists in the Apple hardware line. I write this having used just about every example of the Apple hardware I am criticizing. Their non-iOS hardware is simply so deficient in so many ways there’s nothing – absent maybe the MacBook Air – which works for me.

So my ‘go to’ places to assess hardware for OS X are different. They include AnandTech, Tom’s Hardware and buyers’ comments at Newegg.com.

Anandtech is written by engineers for engineers. The writing is of a high technical standard by experienced men. Take a look at their outstanding review of the iPhone 4S, largely written by an optical engineer. Note especially the stellar writing about the camera and video.

Click for the review

Did you know, for example, that AnandTech tested the latest iteration of Apple’s Airport Extreme router and found it massively changed and far superior to earlier ones? Apple didn’t even tell anyone about the changes, and you can read Brian King’s outstanding analysis here.

Tom’s Hardware has fine technical writing about motherboards and graphics cards, and the reviews and comparisons pull no punches. A high quality source for the computer builder.

And finally, Newegg is the place gamers buy their hardware. I’m not into games but game playing is usually the most demanding use of a computer’s processor and graphics, and the sheer number of reviews here makes the result statistically meaningful. Absent the usual number of cheaters writing for a manufacturer, the writers tell it as it is. If something sucks, you’ll read that here.

When 1,200 customers/buyers say something emphatically does not suck, you know you are onto something.

So if you want real analysis, go to these places and avoid the fan sites and national press at all costs.

It’s fairly easy with computers – most of the variables can be measured and few are subjective, such as keyboard/mouse feel and display rendering. Everything else can be pretty much reduced to data – speeds, capacities, temperatures and so on.

With cameras it’s far harder. You can find lots of technical sites on the web which tell you about the knobs and dials and lens resolution

They have some value but none can answer whether the feel and operational realities work for you. I have extolled the virtues of the MFT format in the Panny G1 and G3 here, and have told you that both render files good for large prints. But until you try it for yourself, that opinion is non-transferable. So, unlike with computers, the best way with camera gear is to try it and see. And if you pay $5,000 for a Leica lens, you can convince yourself and all who care to listen to your mental meanderings that you can really feel that Leica glow. It’s actually the red ink on your bank statement.

iPhone auxiliary lenses

Clutter or value added?

A friend sent along a link to Olloclip (eh?), a maker of auxiliary lenses for the iPhone 4/4S. Click the picture to go to their site.

Click the picture

This particular variant adds wide angle, fish eye and macro capabilities when clipped over the iPhone’s rear facing lens.

Auxiliary lenses are nothing new. Zeiss Ikon in their Contaflex and Kodak in their Retina IIc/IIIc folders and Retina Reflex cameras used this approach in the 1960s. The standard lens would have a small removable element which could be replaced with wide and long focus front elements, invariably gargantuan and, in the case of the Contaflex, there was even a macro and a monocular adapter. The bulk and clutter these added to the camera bag were in no way repaid by image quality. The wides were not very wide, typically 32-35mm, and you could get better long focal length quality by simply enlarging the 35mm negative more, in preference to using the attachment. Most of the ‘teles’ were 75-80mm with the Retina Reflex boasting a 200mm.

Accordingly, I confess I have mostly negative opinions of this sort of thing. First, auxiliary lenses seldom are much to talk about when it comes to definition. Look at the fish eye examples on that site and the definition is pretty awful. Second, you are fiddling about with attachments rather than taking pictures.

So the Olloclip device, and its cousins, none of which I have used by the way, fail the test of ‘small and simple’. Futzing about with add on gadgets when snapping with the quite decent camera in the iPhone 4S seems, to me, to destroy the small and fast concept, and the displayed images suggest that anything larger than a wallet sized print will embarrass both photographer and viewer. On the other hand, I just made some 13″ x 19″ prints from my naked 4S and the quality needs no excuses. I see no pressing reason to mess with that.