Category Archives: Hardware

Stuff

Paranoia ….

…. when it comes to backing up.

A while back a fellow photographer mentioned to me that he used Apple’s Time Machine utility and found it a blessing when trying to recover previous layered images in Photoshop, after accidentally flattening the current version and losing all layers of the photograph on his working hard drive. Unlike regular backups which overwrite a file with the latest version, Time Machine maintains an intact catalog of all the versions of a file as it changes. So if you need to recover from destructive edits, it’s just the ticket.

I confess I pooh-poohed the idea as I don’t believe in any back-up that you cannot boot from, and while Time Machine back-ups can restore to drives which are bootable, you cannot boot from the Time Machine back-up itself.

But as this bit of wisdom came from a person whose views I respect, I slept on it and concluded there was a place for Time Machine in my back-up strategy which, troublingly, does not include an off site back-up. My MacPro has a 1tB boot drive and a like internal clone, to which an incremental bootable back-up is made every night using a scheduled task in Carbon Copy Cloner. But both boot and back-up drives reside in the same location inside the same Mac Pro. Catastrophe at that location would wipe me out. And cloud computing storage for large photo files is still a thing of the future, as broadband speeds in the US are simply too slow to upload and download large files.

So I messed about a bit with Time Machine and while I care little for all the glitz and fireworks of the interface, the application is easy to use and after the first backup (very slow – 4 hours to backup 400gB – with some performance drag on the Mac) incremental back-ups are fast. Because the volume of data being backed up incrementally is small, there’s no noticeable performance penalty. Time Machine saves hourly backups for the past 24 hours, daily backups for the past month, and weekly backups for everything older than a month until the HDD is full. After that, it’s first-in-first-erased.

But I did not want to relocate a drive enclosure daily. I required something small and easily carried – the easier the better and the more likely I would actually behave and take it home! Backup strategies dictate paranoia and discipline. Discipline is sloth’s foe and we are all, by inclination, slothful.

The cheapest solution I could find was this:

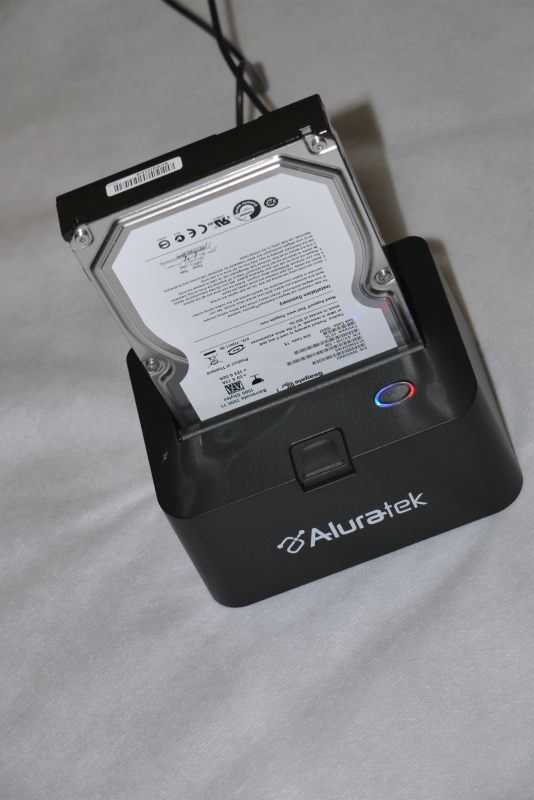
The Aluratek plug-in backup cradle. Blue means on, red means working.

For the grand sum of $24.95 from B&H, one of these Aluratek cradles was delivered, postage paid, and plugged into a USB port. Your naked drive of choice – it can be any 2.5″ or 3.5″ SATA drive – plugs into the top and is released by pressing the button, like on a toaster. While there’s no fan, the device sits in the open, so is reasonably ventilated and, given its light duty cycle after the first core backup, heat is not an issue. “Warm to the touch” describes it.

Opinions of the required size of Time Machine HDDs are all over the lot. Obviously, as a minimum the Time Machine HDD should be as large as the volume of data on your source HDD plus some space for historical back-ups of changed files. The more generations of data you want to store the larger the required TM HDD. On the other hand, I can’t see wanting to go back too far in time. This assumes I realize I have messed up before too much time passes, so that the last good version of whatever I messed up is still available. Further, as my internal HDD is relatively mature, meaning the rate of change of bytes in percentage terms is low, I tend to think too much excess capacity is a waste.

However, as my boot disk is 1.0tB I plugged in a 1.5tB 3.5″ SATA HDD into the Aluratek and let Time Machine do its thing. With only 400gB on the internal drive, 0.5tB – 0.75tB would have done fine, but the incremental cost of the larger drive, at some $30-50 more, is so low as to make no material difference in exchange for the peace of mind. The sledgehammer solution and almost certainly overkill.

Now I simply unplug the naked drive after ejecting it from the Desktop (right click on the mouse) and pop it in my shoulder bag before going home for the day. On reconnection, Time Machine recognizes it within 30 seconds and confers the appropriate green icon on the drive which appears on the Desktop.

I really suppose I should use a grounding strap when removing the HDD from the Aluratek cradle and an antistatic bag to transport it, but I am bothering with neither and all is well after a month of use. We’ll just see how it goes. With the internal redundant backup HDD in the MacPro I simply have iCal send me a monthly reminder to check that I can boot from the backup drive. But Time Machine backups are not bootable. So how do you check them? Well, there’s a clever Time Machine Buddy widget which tells you if everything ran smoothly – worth checking now and again. Typically, I’m finding incremental Time Machine runs are reported as no more than a minute or two in length by Time Machine Buddy, which provides a useful log of what was done by the application.

If the minimum 1 hour backup frequency of Time Machine is too frequent, you can use a free application named Time Machine Editor to extend it.

Another interesting point of discovery is determining how many remove/replace cycles the HDD and the Aluratek can handle. The HDD depends on contact strips and the Aluratek on wipers, both of which wear with use. If they survive a couple of years I will feel fine about my investment.

More paranoia:

I’m beginning to sound like Andy Grove of Intel fame (“Only the Paranoid Survive”) but my pictures are precious to me. So what if a large surge or electromagnetic wave takes out my two internal drives and the Time Machine drive simultaneously while the Time Machine drive is connected? I’m sunk. So I suppose I really should rotate two Time Machine HDDs with one always in the remote location.

Of course, the minute I adopt that strategy, some nut (or divine providence) will drop a Big One on Silicon Valley and then all my redundant drives are toast. But so am I. So in that case I do not care. On the other hand, if an earthquake takes out the Bay Area and I survive, maybe one of the two HDD locations gets lucky. Oh! boy, guess I need another 1.5tB HDD!

One note of caution. Time Machine software is also available packaged with an HDD in a white plastic box from Apple, named Time Capsule. This adds a hard disk to the software and, as is common with Apple products, places looks above longevity. Not only is the plastic case a very poor conductor of heat (in fact it acts as an insulator, trapping heat inside) the box has no fan, meaning it overheats. Further, it uses wireless for the data stream. You are going to trust your precious backup to flaky wireless? No wonder, then, that the web is replete with complaints of Time Capsules having high failure rates. Save your money. Buy your own properly ventilated, hard wired, external drive enclosure and have something that lasts longer than the warranty period, while saving money in the process.

The online backup alternative:

Why not just use an online backup service. In a word, because it’s useless for large files. Here’s why.

My upload speed on DSL is 0.64 megabits/second. At best. 1 megabyte=8 megabits, so that translates to 0.08 megabytes/second.

My Lightroom catalog is 87.66 gB, so it would take 87.66 x 1000/0.08/60/60/24 = 12.7 days to upload it for storage.

Now, apart from the fact that this would completely clog up my DSL, what do you think the chances are of an uninterrupted 12+ day period for this upload?

Then add another 53.2 gB for my iTunes library, and 28.4 gB for my iPhoto library and all the other things and …. well, you get the picture.

On line storage is simply not a practical answer with our slow broadband speeds. The cost is also high – $50-$100 a year and good luck getting more than a gigabyte or two in space. By contrast, the 1.5 terabyte hard drive I am using cost $140 and has a 5 year warranty, so the maximum cost is $28/year – and that’s for 1,500 gigabytes. Not to mention nearly instantaneous retrieval in the event of catastrophe. And by the way, what makes you so sure that the online service, operating in a competitive environment with razor thin margins, will be around tomorrow? Or that their backups are safe? Or what if some crook at their end steals your personal data? Sorry, this approach fails risk analysis on so many issues it is simply a non-starter for me.

* * * * *

On a related note, there’s something awe inspiring about having one or two terabytes in a jacket pocket. Doubtless, 2.5″ drives will have these capacities soon. They max out at 750gB currently, have very small 8mB buffers, are slow at 5400 rpm and expensive. Soon I expect that SDHC cards will take over. A terabyte in a stamp sized card. I still never cease to be amazed at what engineers and materials scientists have done with storage capacities. Imagine, your life’s achievements in exquisite detail on a postage stamp. Truly, modern storage technology is the hoarder’s dream come true.

Eye-One Display 2 colorimeter update

A fresh calibration.

It’s been a month since I first calibrated my two Dell 2209WA displays using the X-Rite Eye-One Display Two colorimeter and the Eye One software just reminded me to redo the calibration. I had set it to remind me in one month.

As usual I do this by near-noon daylight in my brightly lit office with no incandescent or fluorescent light sources. Time taken was 15 minutes per monitor.

Interestingly, both monitors were new when first profiled and have shown considerable drift. As before I am profiling for a screen brightness of 140 cd/m2 , a bit brighter than the recommended 120 cd/m2. That works for me in a bright ambient light setting.

Here are the original and revised settings – brightness had shifted little:

Monitor settings a month earlier and now.

The Blue drift in the right hand monitor is especially noticeable.

I’ll check back in a month to see if things have settled down. The only change from the initial calibration is that I have migrated to version 10.6.2 of Snow Leopard from 10.6.1.

Working with two displays

Some thought required.

As I am new to the world of working with two displays, having used but one at a time for the past thirty years, I thought it might be helpful to share some thoughts on how things stand now that I use two Dell 2209WA displays with my MacPro.

Here are some useful metrics regarding the area of various displays in square inches of usable screen:

iMac 24″: 239 sq. in.
Dell 2209WA: 219 sq. in, or 438 sq. in. for two
Apple 30″ Cinema Display: 394 sq. in.

So using two 2209WA 22″ diagonal Dell displays, I have 83% more display area than in the 24″ iMac I used earlier and 11% more than the user of one 30″ Apple Cinema Display.

However you look at it, that’s a lot of surface area and while the first reaction is Wow!, in use there are some issues which need addressing.

First, given the 16:10 near-widescreen format of the Dells it makes sense to locate the Dock at the left rather than below the screen. Unless you are watching movies, most 3:2 ratio photographs use less than the full width of the screen so placing the Dock on the left makes sense, and that’s the first problem. If you frequently place files temporarily on your Desktop, as I do, then it’s a long drag-and-drop from the file’s location on the right of the right hand display to the trash can at the lower left of the left hand display. So I’m getting used to right-clicking the file and clicking on Move to Trash instead. If several files are to be trashed, I simply highlight them by dragging a clicked mouse over them and then right click and Move to Trash in one click.

Often, when working on the right display, I need to access an application. Once again, it’s a long way to the Dock on the left display as the following picture indicates (Yes, that’s the HAL 9000 on the Desktop(s) and yes, I am a huge Stanley Kubrick fan!):

Two display desktops side by side.

So rather than move the mouse pointer all the way to the left display to click on the desired application, I use HimmelBar which resides in the menu bar. I place the Menu Bar on the right display as that works well with this approach (System Preferences->Displays->Arrangement):

HimmelBar in use

HimmelBar has been around for ages and is a free download. In its current version (I’m using 3.0 (64) ) it allows the user to edit the drop down lists of Applications and Utilities, so as to avoid a core dump. I simply choose those I use often (much the same ones as in the Dock) and try to limit the list to no more than the height of the screen to avoid having to scroll. If you create an Applications folder in your user home folder (normally the Applications folder resides in the home folder of the hard drive you boot from) then you can have a further selection of personal applications to choose from. However, I avoid this approach as I simply like to have all my applications in one place for ease of maintenance and update.

While HimmelBar always resides in the MenuBar, there’s an alternative approach using a product named Xmenu which will pop up at your mouse pointer’s location when a Cmnd-key combination is struck (you can choose the second key, the first has to be Command). I find I am more comfortable with HimmelBar but others may prefer Xmenu.

So between the Dock and HimmelBar, the Application menu is never far away.

How about the physical arrangement of the displays? Here’s how mine looks:

Elevation view.

Plan view.

As you can see, the monitors are abutted along the vertical axis and sloped slightly inward to present a perpendicular view with a small turn of the head. My eyes are approximately 30″ away from the center point and level with the top of the display(s).

That leaves the issue of what to display on which screen. For work (my job is data intensive) I keep detailed lists on the left screen and items clicked in these for extensive reading on the right. That allows me to quickly scan news story headlines in a feed reader (I use the excellent NetNewsWire) and then read a clicked story of interest on the right screen.

For Lightroom I find I am most comfortable with the detailed LR screen on the right – the one with all the processing controls – with the full sized, uncluttered loupe view on the left.

Is this better than simply using a giant 30″ diagonal screen? I don’t know. I do know that when using the 24″ iMac I rarely broke disparate application displays into adjacent windows as the single 24″ screen was never large enough, whereas with two displays I find I’m getting used to the idea of using one as an index and the other for detail.

Based on my short period of use, is the second monitor a necessity? Far from it. More of a luxury. Maybe it will grow on me, but as of now I’m rather lukewarm on the concept.

X-Rite Eye-One Display 2 colorimeter

It just works!

Feb 27, 2011 – cautionary update: Read the last part of this entry.

Unless xrite updates its EyeOne software to run on Intel Macs natively, your colorimeter will become useless junk, as the forthcoming version of OS X Lion will no longer support Rosetta, which is required to run the very dated current PPC version of xrite’s software. So if you use a Mac, until you hear that xrite has committed to updating its application for Intel Macs DO NOT BUY this device. Whether you like it or not, you will migrate to Lion sooner or later.

* * * * *

A while back I sold my Monaco Optix screen profiling colorimeter in dismay at its inability to properly profile my iMac’s screen for good color matching with prints from the HP DesignJet 90 large format printer. Further, I have abandoned my 24″ iMac which was on the verge of failure, replacing it with a MacPro and two Dell 2209WA monitors with far better adjustment controls.

Since then I have profiled by eye but it’s been a bit of a hit and miss affair, and gets pretty tedious after a while. Monitors drift over time so they need to be re-profiled occasionally.

After some online research, the decision to get a new colorimeter came down to the Pantone Huey Pro ($80 at Amazon) or the much costlier X-Rite Eye One Display 2 ($201). My ill fated Monaco Optix and both these two devices are made by the same company – X-Rite – which makes a host of other color measurement and profiling tools.

Three things pointed me to the X-Rite device – one was the excellent review at TFT Central; the second was the fact that Martin Evening, whose book on Lightroom I strongly recommend, uses one. And, finally, the Huey Pro has so many simply awful reviews on Amazon that I decided that life wasn’t worth the aggravation of saving $120 for a compromised device.

Once you migrate to two displays as I have, you will quickly find that any difference in color rendering between the two will drive you up the wall. A professional quality colorimeter is the answer. Before starting profiling, turn off any screen saver to avoid having it kick in part way through the process.

The software, which comes on a CD, installed quickly on my MacPro and for the first pass I used the quick method which does not permit user adjustments of display contrast, brightness and the red, green and blue channels. While the printed instructions are cursory in the extreme, the on screen guide provided by the software was all I needed – I’m running this with Snow Leopard 10.6.1. I use two Dell 2209WA displays which have a broad range of user adjustments but I thought it would be interesting to try the ‘quick and dirty’ approach first, my manual efforts having failed to provide a half decent match between the colors rendered by the two monitors.

The software installs quickly and instructs you to place the puck, with its suction cups, on the display. As the thought of suctioning anything to the delicate surface of an LCD display fills me with terror, I simply angled the display back a few degrees and let gravity take its course, like so:

Eye One Colorimeter puck in place

Suction cups you definitely do not want to use on your LCD panel.

To force the software to read the left or right display you have two choices. The first, which is dead wrong, is to switch the cables plugged into your graphics card. It’s wrong because you are assuming that the profiles of the two outlets are identical, which is impossible given normal manufacturing tolerances. The right way to do this is to go to System Preferences->Displays->Arrangement and drag the menu bar to the display you wish the software to profile. It will appear on the display to which you have dragged the menu bar.

System Preferences->Displays->Arrangement. In this example, with the white menu bar dragged to the right, the right hand monitor will run the X-Rite software for profiling. To profile the left monitor, drag the white bar to the left.

From starting the process through generation of the display profile took all of 5 minutes on my first monitor using the basic method, though I did take the precaution of turning the displays on some 30 minutes ahead of time to allow them to stabilize. The Dell 2209WA seems particularly poor in this regard and needs quite a while to stabilize. I profiled the second screen in under 4 minutes.

The software can send you a periodic profiling reminder – the choices are none, 1, 2, 3, or 4 weeks. This makes sense as all monitors drift with age. I set mine for four weeks – whether that is often enough time will tell. Click here for the first four week update.

Here’s a photo of the two displays side by side after calibration – close, but you can see the difference. Having made a note of the names assigned by Eye One to the two profiles, I went to System Preferences->Displays and selected the appropriate one for each display. OS X does a really nice job of supporting dual displays and presents the user with a profile chooser for each.

Two profiles selected – one for each display

This first quick pass was very encouraging and presented a closer match between the two displays than I had managed with any amount of manual effort with those frustrating front panel switches. The quickest way to gauge the accuracy of the match is to drag a photograph with flesh tones of someone you know so that it splits across both displays. All I had to do was reduce the brightness on one display a tad and the match was fairly close, and certainly better than I had managed trying to do this by eye.

So now, getting ambitious, I decided to try the Advanced mode, as used by Martin Evening and explained in his book on pages 230-233. This requires the user to adjust Contrast, Brightness and Red/Green/Blue during the calibration process – options largely unavailable to buyers of Apple’s displays, whose LCD panels are made by the same company making Dell’s – LG Electronics in Taiwan. Apple Cinema displays (and all their other computers with built in displays) only allow the adjustment of Brightness.

The Eye One comes with an Ambient Light Attachment which clips on the base of the Eye One and measures the light falling on the screen – mine measured at 6500K and 970 Lux on the right display – I work in a bright room by noon light. The clips on mine were far too tight but a few moments with a fine file applied to the attachment’s three retaining tabs fixed that. My left monitor, which is slightly more shaded, came in at 6400K and 815 Lux. The Ambient Light Attachment, if left in place, has the additional advantage of protecting the device’s sensors when the colorimeter is stored in your desk drawer. Reusing the maker’s packaging is anything but easy and, in the event, unnecessary.

Eye-One with Ambient Light Attachment in place.

The Advanced mode takes full advantage of the Contrast, Brightness and RGB controls on the Dell. The process takes 20 minutes per display and here are my results:

Dell 2209WA settings after Advanced calibration

The Xrite result after profiling using the Advanced method

A couple of points. As you can see there are significant differences between my two Dell 2209WA displays, both bought at about the same time. The Right one had to have Brightness reduced to 0 and I still could only get Actual Luminance down to 140.3 – Martin Evening states that that is the maximum you would ordinarily use for an LCD display. My Right display is visibly brighter for a given Brightness setting than the left – witness that the Left display is set to 18 versus 0 for the Right. Gamma is set at 2.2, which is the PC standard. If you use the Apple standard of 1.8 your pictures will look too dark on 95% of the world’s computers, all of which run Windows and use 2.2. Finally the lowest luminance of 0.2 speaks to the outstanding rendering of blacks by the Dell monitor.

In practice, because I like a really bright display (my eyesight is not the greatest) I simply increased the Brightness on both monitors by 30 to 48 and 30, respectively, from 18 and 0. That works for me and the color match is unaffected. If my ambient lighting were dimmer I would simply turn brightness down on both displays.

The Contrast setting of 100 for both places the calibrator dead center to where the software dictates.

Color variations are low (look at the R, G and B settings) but noticeable if not adjusted, and can be fine tuned with exquisite accuracy using the X-Rite software and Dell controls, which make a just a wonderful combination in this regard. My Eye One software version is 3.6.1 – Martin Evening used 3.6.2. The current version is 3.6.3 and claims Snow Leopard compatibility, though I have had no issues using 3.6.1 with Snow Leopard version 10.6.1. I have also downloaded 3.6.3 from X-Rite (who may well have the world’s slowest file server – it takes ages to download) and it works every bit as well, but seems no different.

So how do the two displays compare after calibration using the Advanced method?

Absolutely dead on identical to my eyes. Well worth the additional effort involved using the Advanced method. This is money very well spent.

Users who are in the habit of processing and printing their pictures under various light conditions (say by noon daylight and by incandescent light in the evenings) may like to generate display profiles for each set of lighting conditions. This will be important for the best print/screen matching. In this case, the Brightness, Contrast and RGB settings for each lighting condition should be noted and input when profiles are switched in System Preferences->Displays->Color.

I have lost count of the number of times that I have read ‘experts’ pontificate how you should always look at your prints in 6500K light and how your work room should emulate that color temperature with special light bulbs. This, of course, is pure nonsense. If color fidelity is your goal, you must adjust for the light conditions in which the print will be viewed. So if your client proposes to view your artwork by incandescent room lighting, that’s what you should print for. Period.

In Part II I will take a look at how the display profiles match up with printed output from my HP DesignJet 90 large format dye ink printer.

Meanwhile, based on this first experience, the X-Rite Eye One Display 2 (which could use a simpler name) is highly recommended and for those wanting the broadest range of adjustments I strongly advise against buying Apple’s overpriced Cinema Displays, only one of which, the ridiculously costly 30″ model, comes with a matte screen. Any photographer interested in proper color profiling using a glossy screen for processing is simply wasting his time.

As for the 22″ Dell 2209WA, this has to be one of the greatest bargains on the planet – an IPS matte screen for under $300, including a three year Dell warranty which provides for delivery of a replacement before the user has to ship his faulty monitor back. No need to blow more money on the insurance scam known as AppleCare. You can buy two of these Dells and still have $300 left over for a professional colorimeter and a top class meal, had you purchased one of Apple’s 24″ versions with the mirror-like surface which will reflect your ego, if not your work.

Apple’s screens are intended to do but one thing – scream “Buy Me” at you in the store where, like that cranked up stereo system with the big bass in the music showroom, they seem so much better than anything else. (“Gee, Mabel, that iMac screen sure was impressive in the Apple Store. It just jumped out at you, didn’t it?”). Of course, once you actually start using the equipment and the headaches begin, things are a bit different ….

In his book, Martin Evening states (p. 229) “…. it is possible to buy a good colorimeter for under $250 …. and when you consider how much you might be prepared to spend on camera lenses, it really is not worth spending any less than $1,000 on the combination of good-quality display plus calibration package.” Prices have dropped since Evening wrote that and the Dell 2209WA, as the cheapest IPS panel on the market, now makes it possible to spend just $800, for which you get not one but two displays and a crackerjack colorimeter (the same he uses) into the bargain.

Follow up: Someone at EyeOne, ever grateful for free publicity, has seen fit to reference my review on their US home page for the device. Setting aside the fact that they got the URL wrong, the reader should be assured that there is no gain of any sort for me in this sort of thing.

Feel free to refer to my Code of Ethics to see what I am talking about. It will be a desperate day indeed which sees me trying to make chump change from my hobby of photography.

The HackPro and obsolescence

A follow up.

HackPro builder FU Steve set forth how to build a high performance desktop computer running Snow Leopard for less than one third of the cost of a comparable MacPro here. His intent was to craft a cool running machine for reliable photo processing. That’s cool as in temperature not cool as in Apple Hype. The two are diametrically opposed concepts. In the event, his HackPro turned out to be exceptionally speedy – see his benchmarks at the end of this piece. I asked him for his thoughts on obsolescence with specific attention to the HackPro. Here they are.

* * * * *

It may seem premature to address the HackPro’s obsolescence, but I always like to think ahead.

In terms of life expectancy, the video card is one of the best there is – it’s now rebranded as the GT150 but that’s the same as the nVidia 9800GTX+. You can get versions with 1024mB but I don’t know how that would make any difference for Lightroom and Photoshop users. GPU development has hit a wall and the one I used should last quite a while.

The RAM is DDR2 800mHz. The mobo will support up to DDR2 1333mHz, so lots of room for upgrades if it makes sense and when the price falls. Meanwhile, 800mHz/DDR2 offers the optimal price/performance mix.

The CPU is the 2.83gHz Intel Core2 Quad Q9550 at $220. You can upgrade to the 3.0gHz for $340 – lots more for little more. Alternatively, you can crank up what you have to 3.4gHz (or more) and simply add a bigger cooler for $30 – there’s lots of room in the box for one and there’s a large community of users doing this reliably. I have not bothered with any overclocking tests as what I have is fast enough. Current CPU designs are peaking as the 45nM component separation is getting close to the wavelength of the electromagnetic spectrum, which limits further size reduction. Heat management will improve with the newer Nehalem CPU but it’s not an issue in the HackPro, only in laptops.

The motherboard uses the Intel 775 socket, meaning you cannot fit the latest Nehalem Intel CPU (i7 socket). The Nehalem’s advantage is better multi-threading but while Lightroom can run in 64-bit mode it does a poor job of using all four cores; until that’s fixed by Adobe the Core2 Quad will be far better than the software I’m asking it to run. If I get the craving for an i7 for some reason, the motherboard will have to be changed. $140 + CPU cost. Easy to do but makes no sense today for the applications I use. Even Apple’s Final Cut Pro for professional video editing and Photoshop CS4 are still only 32-bit applications, so software has a lot of catching up to do before today’s quad core CPU designs are over the hill.

The display is independent and you can use/spend what you want. The Dell 2209 I use may hold value well as it has no competition at its price and attracts users with specific needs – meaning photographers who cannot tolerate color shifts as the viewing angle changes. Its IPS panel is the best display technology there is and there are no signs of new revolutionary designs on the horizon.

The Snow Leopard OS seems very robust and as it’s an enhancement to Leopard and not a new design, you would expect that. That very fact tells you that the rate of improvement in Apple’s operating systems has slowed dramatically. There’s not a whole lot that needs improving. Subsequent releases seem to be minor bug fixes and when 10.6.2 comes out (imminent) you will be able to run the new Apple Magic Mouse with its touch sensitive surface if that’s your thing. There is no Magic Mouse driver in 10.6.1 though the newly introduced iMacs have it installed.

Blu-Ray will fail, in my opinion and my HackPro has none. Too costly, needs new, expensive gear to exploit fully (big screens, etc.) and introduced right into the teeth of a shot economy. Sales remain flat despite the failure of its only competitor HD DVD. Plus Blu-Ray’s huge file sizes with the US’s slow broadband invalidate the format for transmission. Still, I expect Apple to add it shortly (Yuppie and Joe Sixpack demand) and once the drivers become available you can simply install a Blu-Ray drive in the HackPro in one of the 5 1/2″ front bays (3 remain available). The cost is closing in on $100.

The HDDs are traditional 3.5″ SATA 7200 rpm with a 32mB cache, a technology that shows signs of peaking. There are 10,000 and 15,000 rpm designs available but they are smaller in capacity and run hot. I question their life expectancy. On the other hand, flash drives will come to the fore over the next few years and I expect we will all be using 1tB flash HDDs in a decade, costing under $100 and the size of a postage stamp. They will run cooler, though HDD heat is not of concern in the capacious Antec case. Meanwhile, their prime use is as a boot drive in 32mB or 64mB sizes at under $200, where they are affordable, but it’s hard to see the need for a fast boot if you never switch your machine off. I leave mine on all the time, arguing that thermal cycling from switching on and off is far more destructive to life expectancy than a permanently ‘on’ state. Think light bulbs.

Wireless 802/11n can be added for $50-125 but I see no pressing need for it in a desk top computer unless you cannot easily run a broadband cable to the case. I have no wiring issues so I did not bother with wireless. Not really an obsolescence issue.

Windows 7 has, as even members of obscure Amazonian pygmy tribes know, just been announced and is opening to favorable reviews from every magazine which derives advertising revenue from Microsoft. Time will tell if it is fast and robust (there’s zero basis for trusting MSFT on anything given the company’s record) but in the spirit of keeping an open mind, let’s assume it offers things you cannot live without. Well, it’s a moment’s work to partition the HDDs into two partitions, one with Snow Leopard, the other with Windows 7. You can then choose whether to boot from one or the other. Alternatively, you can use Apple’s Boot Camp to accomplish the same (one advantage of using Boot Camp may be the ability to see data across the partitions – Windows files from the Mac side and vice versa, but I have no idea if this works) or, smarter, use Parallels or VMWare ($50 or so + Windows 7 + applications) in your existing partition to load Windows in its own window without the need to reboot, if the performance drag is acceptable. I used Parallels on my dying iMac with Windows XP for a while and it works fine if not very quickly. Maybe, in the interest of keeping Windows as remote as possible from your safe OS X environment, it’s best to load it on a separate drive and boot from that.

Finally, resale value. The picture is very bright here. My cost, excluding peripherals, is $815, which gets me the case ($100), CPU ($220), GPU ($120), RAM ($100), motherboard ($130), DVD burner ($30), Card Reader ($15) and HDD ($100). A like configuration from Apple, Dell or HP runs $3-5,000 using the exact same parts. I can sell the machine as either an OS X or Windows box, or both, focusing on its top-of-the-line components. I should get a good price even three years hence, and have no need to sell my monitor and peripherals. Or if I upgrade piecemeal, I can simply sell the components for even better prices.

What about the greatest threat of all? Say Apple decides to make future Snow Leopard revisions run only on Macs? Well, they have a lamentable history of failure in this regard. Take the iPhone. Try as they might, the hacker community breaks each attempt within days of introduction. It’s a red rag to a set of very smart and dedicated bulls. And let’s say they succeed. Heck, I would be happy running the HackPro on Tiger, let alone Leopard or Snow Leopard. These upgrades really do very little for a working still photographer. Arguably the only value added by Leopard compared with its Tiger predecessor was the Time Machine backup utility which makes for seamless file backup. Other than that it’s a lot of fluff. Lightroom can run in 64-bit mode fine in Leopard and does not need Snow Leopard to do so.

But I don’t think Apple will do something so foolish. First, desktops are a falling part of their profit picture as Apple is rapidly becoming a cell phone company. It’s where the money is and in the iPhone they have a superb product with no real competition. Second, the Hackintosh adds value to Apple rather than taking it away. Most Hackintosh builders either could never afford a Mac or are simply making something not available from Apple – a reliable desktop with low entry and repair costs. Many Hackintosh builders are future Apple customers, so it’s foolish to write them off, and most – like me – still buy the OS where otherwise there would be no sale. And, in the grand scheme of things, sales lost to the Hackintosh are a rounding error to Apple. How many people can be bothered to a make the modest effort involved in building the best desktop for photographers on the planet, especially when uninformed comments on chat boards policed by Apple zealots consistently proclaim that the Hackintosh is junk? Still, I do love those fools as they just help my Apple stock position along!

Before I show you the comparative performance data from Geekbench, it’s worth adding a few words about the extraordinary degree of failsafe redundancy built into my HackPro. The following functions are duplicated so if one fails, I simply switch to the other and all have been tested:

  • Dual BIOS on the motherboard
  • BIOS level and application level CPU high temperature warning buzzers
  • Dual video card outlet sockets
  • Dual video card motherboard sockets
  • Matched memory pairs allow the system to run with 4gB almost as well as with 8gB should some memory fail
  • Dual case fans – if one fails the system temperature rises just 10F
  • Dual boot drives – my 1tB internal drive has a matched one in the case which is fully bootable and is backed up daily. Further I run Time Machine on an external drive which is kept in a remote location.
  • Finally – dual monitors – I bought two of the Dells!

I don’t recall seeing the word ‘redundancy’ in any Mac specs. Maybe you have.

Here are the data comparisons:


MacPro with 2.66gHz Core2 Quad Nehalem
and 4 gB RAM rated by Geekbench in 32-bit mode


FU Steve’s HackPro with 2.83gHz Core2 Quad Yorkfield
and 4gB RAM rated by Geekbench in 32-bit mode

By the way, the just introduced 27″ iMac (C2D) scores 4650 on Geekbench, making the HackPro 25% faster than Apple’s latest offering.

Finally, a few words on opportunity cost. Many comments on chat boards addressing the economics of constructing a Hackintosh wrongly attribute high opportunity cost to the process, arguing that time spent in research, procurement, construction and testing makes the whole thing uneconomical. This is not a correct understanding of opportunity cost. Time spent only has economic opportunity cost if it displaces time which could have been spent on activities providing a positive income stream. In the event, the Hackintosh builder is using time which would likely have been spent in such unproductive activities as watching sports or playing computer games or whatever. In that sense, the time invested in the Hackintosh is free and the true economic cost is purely that of the components used.

* * * * *

Thank you, FU Steve.

Only a fool would make long life claims for a computer but I think FU has constructed something with a decent life expectancy at very modest cost and with exceptionally low repair costs. Using the MacPro (an excellent machine) as a reference, the rate of change in its components has been positively glacial in the past couple of years, suggesting most of the technologies used are very much at the point of diminishing returns. The retail technology business is focusing much more on smartphones, handheld devices and small laptops. FU’s HackPro should last a while. The HackPro is the Elitist’s choice. The Macpro is for the snob.