Category Archives: Hardware

Stuff

Olympus 17mm f/1.8 MFT Zuiko – Part I

A fix for what ails the 20mm Panasonic lens?

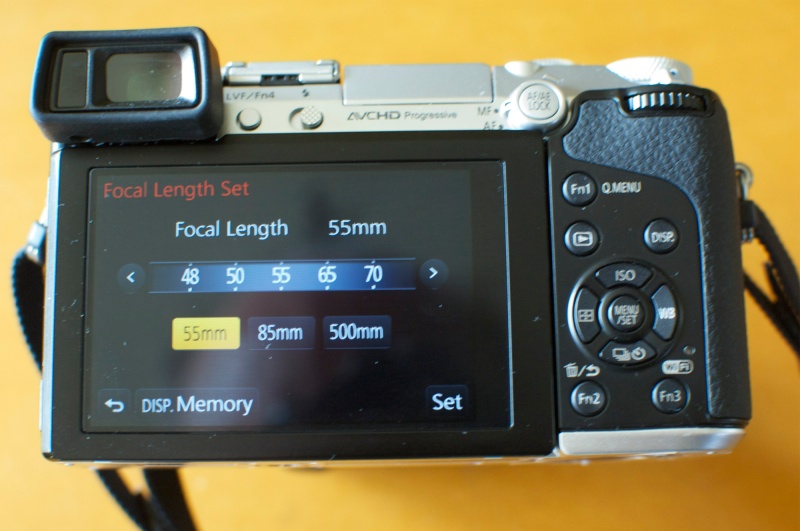
You can read my review of the Panasonic GX7 here.

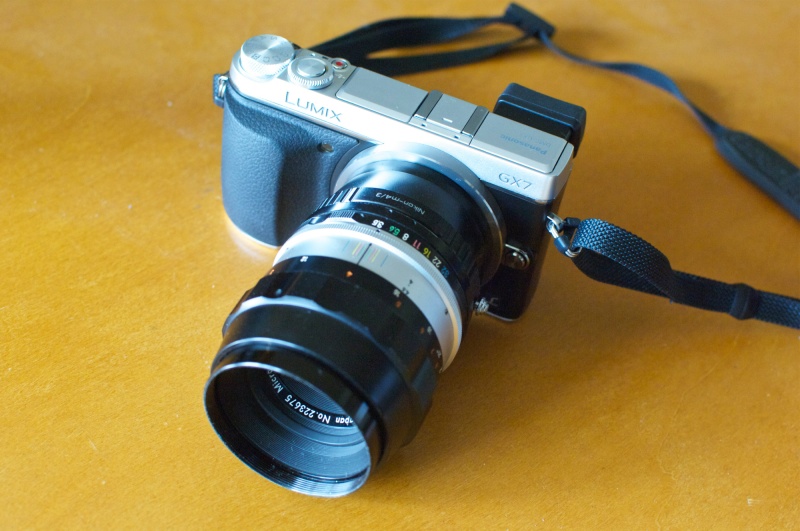
I just ordered a 17mmm f/1.8 Olympus Zuiko AF lens for my Panasonic GX7 body. As the GX7 adds in-body image stabilization and as the Olympus lens is reputed to have very fast and silent autofocus, the combination of the small body and the 35mm (FF equivalent) fast prime lens proved irresistible. I paid $400.
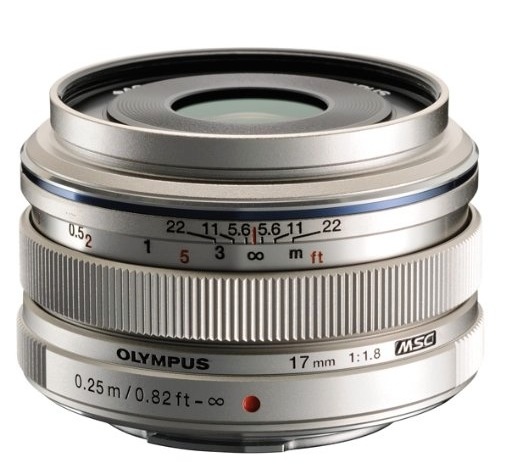

Olympus.

The standard for comparison here is, of course, the 35mm Leica rangefinder optic which graced my Leica M2 and M3 bodies for over three decades. Whether as a modest f/3.5 Summaron, a better f/2.8 Summaron, and even better f/2 8-element Summicron and, finally, the ne plus ultra f/2 Aspherical Summicron, ‘Leica M body’ and ’35mm lens’ simply go together. Until modern AF and digital sensors came along, a Leica rangefinder body and a 35mm MF lens were the street snapper’s ideal. Then prices went stratospheric and now only investment banksters can afford them, for display in their china cabinets along with their trophy wives.


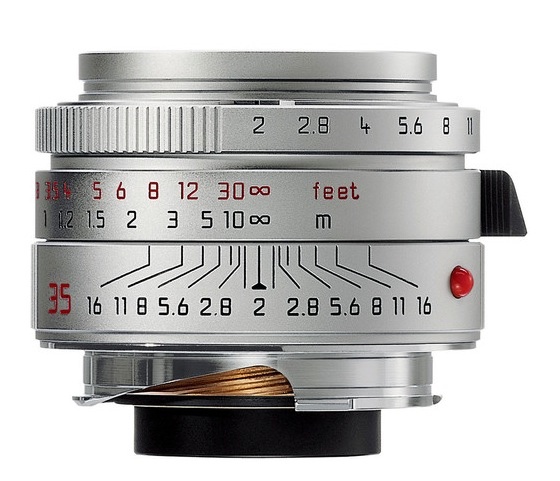
Leica. Note the corrosion
on the brass helix.

The specifications are similar, but the Leica optic uses heavy chromed brass in its construction whereas the Olympus makes do with plastics for the most part, set in a light alloy metal barrel. Both lenses come with engraved DOF scales, both quite useless given that such calibration is meaningful for a specific print or display size only. ‘Retro chic’ is the best (?) you can say of it, disregard it and get down to snapping.

The Leica optic is 1.4″ long as is the Olympus, with diameters coming in at 2.0″ and 2.3″, respectively. But the German lens weighs 12.8 ozs compared with but 4.2 ozs for the Japanese one. The Summicron focuses to 28″ while the Olympus goes down to 10″.

And there are two other factors to consider. The dated, overpriced Leica M body has no AF, and a tired optical finder whereas the GX7 boasts a stabilized body with an excellent EVF and full AF and manual focus modes. Any Panny owner, however inept, with but a few snaps under his belt will beat the Leica investment banker to accurate focus every single time and his success rate will be 100%. Guaranteed. And with the electronic shutter option in the GX7 he can do so in total silence. The Panny operator will also be able to use 2-3 shutter speeds slower owing to the (excellent) Panny IBIS, negating the advantage the Leica’s bankster owner’s claims for his bigger …. errr …. sensor.

Silly me. How could I forget. There’s a third and overriding factor. When it comes to total weight and cost, there’s no comparison. How do $10,200/36.8 ozs versus $1,400/18.4 ozs sound for the camera and body ensemble? No prizes for guessing which is the MFT version.

In Part II I’ll take a look at some ergonomic issues and fixes for this combination. Long time readers will recall the massive disappointment I had with the Panasonic 20mm f/1.7 lens which was incapable of fast focus and made a lot of noise not getting there on time, only to deliver one of the most flare prone images I recall in any lens since my 1959 Kodak Brownie 620. That Panny lens was returned 400 images and one day later to B&H, in disgust. It’s since been updated in Version II with a metal focus collar but, by all accounts, remains every bit as flawed. The only consolation here is that the Olympus optic cannot possibly be worse. (Reminds me why I bought MSFT stock when Ballmer was finally booted out. His successor could not possibly be worse).

Flare – a sneak peek:

The reflected sunlight from the Transamerica building was so intense that it was impossible to look at, but if you can see any flare in the result your eyes are better than mine. OK, there is one pinhead sized flare spot visible in the top left of the building at the right if you look hard, but absolutely no overall veiling of the image. Remarkable.


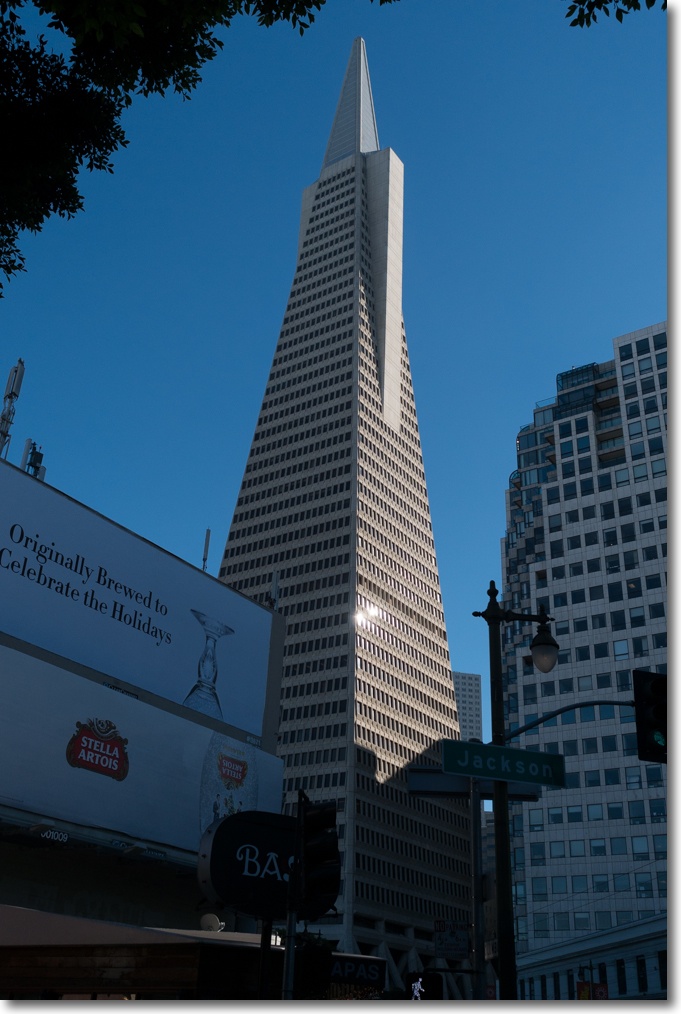
Panasonic GX7, 17mm f/1.8 Olympus MFT at f/2.8. No filter used.

More on flare – or rather on its absence – later. No, I did not use the silly-priced $60 Olympus lens hood (maybe Leica makes it?) as I do not own it. Cheaper aftermarket versions exist but I will pass in the name of compactness.

Part II is here.

Mac Pro buying opportunities

Looking better and better.


The best desktop computer from Apple. Ever.

The new Mac Pro:

With the new Mac Pro (the small, cylindrical one) due out very soon, the 2009-2012 models will become even better bargains. There are very few performance metrics yet available for the nMP and while it’s reasonable to guess that CPU and GPU performance will be fine, there remains a big question over cooling efficiency. Apple has gone from 7 (or 8, if your GPU has two) large fans to one small one to cool the nMP and having had three iBooks and two iMacs literally melt their GPU chips in my household, owing to Apple’s compromised heat engineering, you can understand my sensitivity about proper thermal design.

Further, quite why Apple has relegated storage to external devices with the nMP and focused on making a professional machine as small as possible quite defeats me. The small size is a solution in search of a problem (do you hear production pros complaining that their computers are too big?) but early adopters of the nMP will only do photographers a favor by flooding the market with the older machines and driving prices down in the process. Right now supply of the old 2009 Mac Pros appears tight as the word gets out just how special these Mac Pros are, but I expect that situation to change markedly in favor of abundant supplies in the near future.

The new machine will start at $3,000 (4 core) to $4,000 (6 core) and I would be prepared to wager that a loaded 6 core machine will easily hit 5 figures.

The old MacPro:

A mint 2009 can currently be had for $700 (one CPU) or $1,100 (two CPUs) and as I have illustrated at length on my blog these machines can be easily and cheaply enhanced with better CPUs, SATA III drives, SSDs, USB3, RAM, Blu-Ray DVD drives, etc. It would be hard to spend a total of much more than $2,000 on a loaded dual CPU machine which comes with more internal storage and expandability than you can shake a stick at. There is no point in getting anything other than an absolutely mint machine. The thought of waking up to a beater for the next 2,000 or so days of ownership and heavy use makes no sense for the insignificant amount saved. $100 off for scratches and bruises? Are you kidding me?

Earlier models of the Mac Pro are not a good investment at any price. The 2008 is marginal as additional RAM is costly, being of a special design, though it will at least run 64-bit applications using its slow CPUs. 2007 and prior are obsolete owing to their 32 bit designs which deny the best performance in the latest applications. The 2009 Mac Pro, single or dual CPU, is very much in the sweet spot for price/performance/upgradability. The 2010 and 2012 later models added faster CPUs and better graphics cards at significant increases in cost. Otherwise they are identical to the 2009, with the sole exception of the unique CPU socket design in the 2009 dual CPU model.

CPU upgrades:

The most cost effective CPU upgrades are currently the (non-Xeon) Core i7-980 6-core for the single CPU Mac Pro ($330 used – a far better bargain than the $600+ used Xeon W3680 with the same functionality and speed) and the Xeon W5590 3.33GHz 8-core for the dual CPU Mac Pro ($400 for a used pair). Either option increases CPU speed by 50%.

We can expect to see prices on 12-core paired X5680 (3.33GHz) and X5690 (3.46GHz) CPUs to come down quickly as these CPUs are discontinued and server room upgrades see a flood coming to the market. Google alone probably has a million awaiting sale …. Currently, for dual CPU machines the 12-core CPU pairs run $1,200 and up, making the modest performance boost over the W5590 a poor return on investment. I see no significant risk to buying used, with the better bulk recyclers offering money back guarantees. I lose count of how many used CPUs I have purchased and have yet to get a bad one.

While CPU upgrades in the 2009 dual CPU machines are tricky owing to the unique design of the CPU sockets, you can pay experts (like me – click here for details of my upgrade service) to do it right on a turnkey basis and take out risk from the equation.

Alternatively, for the DIY set, buy faster CPUs from my colleague Paul Opsahl who modifies CPUs for the 2009 dual CPU Mac Pros for very modest outlay using costly lab tools, making for a drop-in replacement.

Either approach is cost-effective for a machine which easily has a 5 year life expectancy with no excuses necessary for performance.

USB3 built in?

Adding powered USB3 through a PCIe card is simple, as I illustrate, but Paul is also working on a custom modification to the front panel USB2 sockets to make them USB3 and I hope to showcase his work here down the road.

Equalling Thunderbolt speed in the old Mac Pro:

About the only modification you cannot currently make to the ‘old’ Mac Pro is the addition of Thunderbolt connectivity for external devices. The technology seems to be centered on the motherboard and no cards are available for use in PCIe slots.

However, once you break through all the hype surrounding Thunderbolt (cost is high – reckon on $1,100 for a TB disk enclosure and cables compared with $200 for USB3), you realize that you can easily approach or exceed TB speeds through the simple expedient of pairing two SATAIII drives using an Apricorn card and striping them in RAID0 using Apple’s Disk Utility. Bingo! TB speeds at USB3 prices. So the non-availability of TB is hardly a deal breaker here.


Two old RAID0 120GB SATAII SSDs running in my Mac Pro.

The above shows speed test results for two RAID0 SATAII ancient SSDs inside my 2009 Mac Pro. Were these SATAIII drives attached to an internal Apricorn card ($50) then Read and Write speeds would double, with the results comparable to or superior to Thunderbolt.

Airport wi-fi upgrades:


A Broadcomm (Airport) card installed on the motherboard in a Mac Pro.
PCs use the same 802.11n card.

As regards wi-fi, the newest 802.11ac protocol found in the latest laptops, iMacs and the new Mac Pro should become readily available using plug-in USB ‘dongles’ before long. There are one or two out there already but early reports suggest some problems remain to be resolved. But I believe it’s just a matter of time before aftermarket solutions become available. Whether we will ever see a plug-in card for use in the motherboard of the old Mac Pro (and PCs for that matter, the socket being a standard PCMCIA one shared with PCs) remains to be seen. Now that would be nice as the user would get an integrated Airport-style solution, rather than having to use an auxiliary utility application.

Performance and life expectancy:

For even the most demanding users, I expect that the performance of a suitably modified 2009 Mac Pro will remain satisfactory for photographers of all kinds over the next five years. Maybe longer.

PCs have very much hit the wall of technological progress with innovation increasingly focused on mobile devices and applications. With PC sales and demand falling and with performance improvements stalling, the ‘old’ Mac Pro may have a very long life indeed ahead of it.

Parts supplies are not an issue. So many of these machines were made (I would guess production numbers in the low hundreds of thousands) that both used and new parts are easily found with the most common wear items – those with moving parts like fans, DVD drives, power supplies and disk drives – abundantly available.

Except for the 2009 dual CPU motherboard with its unique CPU sockets, parts for the 2009/2010/2012 Mac Pros are identical, though the single CPU versions use unique heat sinks and motherboards (‘backplane’ boards in Applespeak).


The 2009/2010/2012 Mac Pro – a machine of (very) few parts.

The best way to describe the fit and finish of these machines is to compare them with the 1959 Nikon F film SLR. Both are made to survive combat and neither should be dropped on your toe.

Panasonic Lumix GX7 – Part V

Wi-fi.

Part IV is here.

There are excellent descriptions of how to enable Wi-fi in the GX7 at CameraLabs.

I’ll add some personal experiences below.

Wi-fi:

Wi-fi on the GX7 means that you can send images to your portable device of choice – cell phone or tablet, iOS or Android – after first having downloaded the Panasonic Image App from the AppStore (iOS) or GameStore (Android). The app is free. Further, once the GX7 is connected to the device, you can control just about anything on the camera – focus (using the touch screen on the cell phone or tablet), framing rate, movie mode, you name it. However, you cannot send or receive emails while the camera and device are connected as they share a wi-fi circuit unique to the two devices. So if you download images from the camera to your device, you must then switch to your regular wi-fi or cellular connection before these can be sent out.

Here’s the order of events to get wi-fi working:

  • Turn on the GX7
  • Hold the wi-fi button on the rear until the blue diode lights up
  • Go to Settings->wi-fi on your device, find and activate the GX7 wi-fi connection – it’s named ‘GX7-204E2A’. The first time you do this you will have to input the password shown on the LCD display of the GX7. Thereafter you can simply save this password to your device.
  • Open the Panasonic Image App on your device – your device will take 10-20 seconds to connect to the GX7. Sometimes this fails so turn the GX7 off and on and the app on the device off and on. Re-pair the wi-fi and try again after doing this. It usually works by the second attempt, worst case.
  • The Panasonic Image App will now display on your tablet or cell phone exactly what the lens on the GX7 is seeing. Magic! You can now control the GX7 fron your device.
  • Take a picture by touching the camera icon on your device. Enlarge any image to full screen by touching it.
  • You can now download the picture to your device by touching Playback on the device app, whereupon all the images on the GX7 will be displayed on the device in thumbnail format. Touch any thumbnail for a full screen view.
  • The Panasonic Image App does NOT recognize Panasonic RAW images. You will see a preview with a symbol but you cannot email the image. Thus you must set the GX7 either to JPG or RAW + JPG. In both cases, the JPG file will be both visible on the device and can be emailed out once you revert to your normal wi-fi or cellular connection.


The GX7’s wi-fi connection seen on the iPhone.


The GX7 under remote control by the iPhone, seen on the iPhone.
You can move the focus rectangle using touch-and-drag.
Touch the camera icon (circled) to take the picture.


Image downloaded to the iPhone. The logo indicates
this is a RAW image which cannot be emailed.

I have successfully tried the above with two iOS devices (iPhone5 and iPad Air) and one Android one (Nexus7 tablet).

While steup is a bit clunky, operation is simple and effective. It’s a nice feature to have if you want to email images on the run or control the GX7 remotely.

Panasonic Lumix GX7 – Part IV

Manual focus lenses.

Part III is here.

The range of dedicated prime and zoom lenses from Panasonic, Olympus, Sigma and Leica for the MFT format is now very large indeed. Over 40 lenses and counting. But that does not mean that older manual focus lenses from other makers are useless.

The Panasonic GX7 is exceptionally well attuned to the use of these older MF lenses. Mine are Nikkors but adapters are inexpensively available for just about any lens on the planet, owing to the low bayonet flange-to-sensor dimension of the slim body. That means that infinity focus will be attainable on just about every lens ever made. This means owners of old – and superb – Canon FL lenses (which, unlike the EF line which came after, have proper aperture rings), and owners of old Minolta, Leica and Leicaflex lenses can also revel in modern body technology. Don’t buy any of that ‘made for digital’ bunk used to sell modern plastic-fantastic optics. The old Canon, Nikkor, Rokkor and Leitz lenses are some of the best optics every made and most can be had for a song.

On a technical note, the distance from the optical center (nodal point) of the adapted MF FF lens to the camera’s sensor will be large, thus mitigating the incidence of light rays striking the sensor at acute angles. The MFT format cherry picks the best definition in the center of the full frame image circle of these FF optics. This helps greatly by sidestepping edge aberrations, thus requiring no lens correction profile for the lenses I highlight below.

The EVF in the Panny MFT bodies has always excelled with MF optics as it automatically adjusts to the aperture, maintaining constant brightness. So you can enjoy the strange experience of taking your f/2 MF optic, stopping it down all the way to f/22 and the only thing you will see change in the finder is the depth of field! The image maintains constant brightness as the EVF’s circuitry instantly adapts.

Secondly, the outstanding central area focus technology from the G1 and G3 continues in the GX7. Switch the rear lever to MF, double press the rear control dial, and the central part of the image is magnified up to 10x for critical central focus, the magnification adjusted with the rear control wheel.

Third, used in Aperture Preferred exposure automation mode, exposure is automatic – and correct.

But the GX7 adds two new technologies missing from its predecessors. First, you can turn on focus peaking which will outline in-focus areas in green, yellow or blue – your choice. Sometimes this really helps, especially in poor light. At worst it does no harm.

Much more importantly, the GX7, for the first time in any Panny body, adds an in-body anti-shake stabilizer (IBIS) and Panny does not stop there. The body permits you to set the stabilizer to the focal length in use and three settings can be re-programmed and saved. You can also elect two axis or single axis stabilization, the latter for tripod use.

To simplify access to this stabilizer menu, I recommend programming one of the function buttons to ‘Stabilizer’. I assigned it to the LVF (Fn4) button which is poorly placed by the eyepiece for its default purpose of switching between EVF and LCD. I then assigned the EVF/LCD function to the QMenu (Fn1) button which I would never otherwise use. Thus the Stabilizer menu can be called up with one button push, rather than having to page through many menus. The extended operating manual explains how to pre-program focal lengths of choice into the stabilizer menu. Thereafter, a simple touch on your lens of choice on the LCD display, then a touch on ‘Set’, and you are off.


Three favorite MF Nikkors programmed into the in-body stabilizer.

Adapter: I use this $14 adapter for my Nikkors. It measures to better than 1/10,000th inch parallelism between the front and rear flanges, at which point my micrometer gives out, so it will be good enough for the most fastidious. There is absolutely no play on the GX7 on either the body or lens flange. Recommended. The adapter comes in a host of lens mount fittings. At the price asked, you can spring for one for each of your favorite MF lenses.


Nikkor to MFT adapter.

As I explained in my G3 review, few MF lenses actually make sense on the MFT body. You lose the automation and small size of MFT optics and have to add manual steps to make things work. But four of my Nikkors make eminent sense for use on the GX7:

55mm f/3.5 Micro Nikkor:

This outstanding (and very inexpensive) macro lens goes to half life-size on an FF body. It can be easily found for well under $100. On an MFT body it becomes an effective 100mm, doubling your subject distance for easier lighting, and now going down to life-life size without the need for any further adapters. MF is fine for contemplative macro use, making this a perfect companion to the GX7 body. Used on a tripod, the swiveling eyepiece and the LCD display make for ease of focus and composition. A perfect macro rig.

Here is the Micro Nikkor at closest focus – this is my D2x – at full aperture:

85mm f/1.8 Nikkor:


Same DOF as a 170mm lens at f/6.3.

This one needs little explanation. Imagine using a 170mm f/1.8 at full aperture with the bulk of an 85mm lens ….


With the 85mm Nikkor at f/1.8.

180mm f/2.8 ED IF AF D Nikkor:

This is actually an AF D autofocus Nikkor which is easily switched to MF. D lenses have aperture rings, discontinued in the later, and current, G range. There’s one reason to use this optic and that’s to enjoy f/2.8 at an effective focal length of 360mm, where it is simply stellar. With the current 400mm AF f/2.8 Nikkor retailing at $9,000, you can do the math. The IF focus is light and precise and focus peaking really works well with this lens, for some reason. Other than that the 45-200mm MFT Panasonic zoom, which is f/5.6 at the long end, is easier to use.


Hand held at f/2.8.

500mm f/8 Mirror Reflex Nikkor:

This lens is a natural for the GX7. The finder is bright, despite the slow, fixed f/8 aperture and IBIS adds what the G1/G3 sorely lacked. The outfit is very compact but you should seek out a support at all times, where possible. While there is no slapping nirror to hurt definition, the effective focal length is 1,000mm which is non-trivial to hand hold steadily, with depth of field being paper-thin. This dictates the use of the magnified central focus aid in the GX7 whenever possible. The exceptionally smooth operation of the focus collar in the Mirror Nikkor simplifies things considerably. The 1,000mm (effective) focal length is a nice step up from the 400mm (effective) limit on the Panny 45-200mm MFT optic.


This 3″ lemon was 10 feet from the camera.
500mm Reflex Nikkor. 1/100th second, ISO 400, tripod, electronic shutter with IBIS.

Effectiveness of the in-body stabilizer:

Testing with and without the stabilizer switched on I estimate that the in-body stabilizer in the GX7 is worth 2-3 shutter speeds’ improvement over a non-stabilized lens. It works as well with AF MFT lenses from Olympus (which have no in lens stabilization – I own the 9-18mm Oly) as it does with MF Nikkors.

Conclusion:

Manual focus lens use on the GX7 will never be as easy as with an Olympus or Panasonic dedicated autofocus MFT lens, but it makes sense for a few select optics. The required adapters for old Manual Focus lenses are very inexpensive and of excellent quality.

In Part V I’ll take a look at a new technology in the GX7, absent from the G1/G3 – Wifi.