Category Archives: Photography

An earnest walk along Mission Street

Do you want to fight?

Any street snapper visiting San Francisco should avoid the tourist traps. He should forget Union Square and Fishermen’s Wharf and take the BART subway to 16th or 24th Street. He will immediately notice the stench that is Mission Street and he will be inspired by it, for it is life lived large.

The street snapper will not find Gucci or Louis Vuitton there. He will encounter a neighborhood where the predominant language is Spanish and the most common price is 99 cents. He will absorb the atmosphere and he will know it is good.

Mission Street between the 16th and 24th Streets BART stops.

All he needs is a camera with a wide lens. The sidewalks are not especially broad. Stepping into busy Mission Street is a bad idea. The wide lens will allow him to get in close. The snaps will then be devoid of clutter. The lens is small and it is also right for the many alleyways. These are rich in murals. They are steeped in history, in popular culture and in political protest.

This is not Beverly Hills. Cops patrol actively on light Noddy bikes. That does not mean he should take his safety for granted. The weak should stay away. If he cannot afford to lose his camera the snapper cannot afford to come here. He must dress down and leave the Rolex at home. This is a place for men, brave men, and they will not be found wanting.

These were snapped on 40 year old Nikon lenses. Lenses made by engineers for men and for men who know what they are about and who know how to use them. The street snapper must risk losing his gear or be prepared to fight for it. He must think like a bullfighter. The smell of fear is broadcast louder than a whore’s scent. No bullfighter ever entered a ring expecting to meet a friend. Nor did he enter it scared. He will prevail or he will die, be he bullfighter or snapper.

Mural. 24mm.

Cop Noddy bikes. 24mm.

Sun and mural. 105mm.

Cocktails. 50mm.

Usurious lenders aplenty. 50mm.

Many derelict theaters remain. The street has seen better days. 50mm.

Primary colors everywhere. 24mm.

Buddhist low rider on 17th Street. 24mm.

Clarion Alley mural. Along with Balmy Ally, off 24th Street, this is a ‘must see’ location. 24mm.

La Taqueria with pups. The finest Mexican food anywhere, at 25th Street. Click the picture. 24mm.

With apologies to Ernest Hemingway.

HDD storage

An update.

After spiking mightily, with prices doubling owing to the floods in Thailand which took out a sizable chunk of the world’s production facilities, Hard Disk Drive prices are coming down again. While my main Hackintosh uses Solid State Drives for the OS and applications, SSDs still remain prohibitively expensive for high volume data storage. Meanwhile, HDD technology refuses to die and just gets cheaper.

Scanning Amazon US I see 3.5″ indicative prices as follows:

  • 500mB – $70-90
  • 1tB – $100-120
  • 2tB – $120-140
  • 3tB – $140-160

Current Amazon US 1tB HDD listings.

Now there are drives and there are drives. In the various specs you will find 5400rpm, 7200rpm and 10000rpm, 3gb/s SATA II and 6gb/s SATA III, 32mb and 64mb buffers. You will also find hybrid drives with small SSD front ends and traditional high volume spinning discs doing the heavy lifting. The latter only make sense if you access the same apps (though it’s much more effective to simply buy more RAM and keep the apps loaded all the time) or recurring data frequently; otherwise, the price premium does not solve. And, unless you must have the portability afforded by 2.5″ notebook drives, these also make no sense for high volume storage at home where portability is not an issue, but price is. Further, 2.5″ notebook drives do not come in the higher capacities available in the larger 3.5″ clunkers.

Here’s my experience using a Hackintosh with a current motherboard, a machine superior in most regards to the current, and rather dated, MacPro:

  • 6gb/s transfer rates make for the biggest performance increase. I have found that the promise of twice as fast read/write times is largely met in my Hackintosh compared to an older 3gb/s HDD.
  • Bigger buffers – 64mb rather than 32mb – make a difference in streaming video applications where the larger buffer mostly obviates occasional pauses for refilling of the buffer with drives in external enclosures.
  • Rotational speed makes the least difference. The 7200rpm premium is hard to justify in photo processing applications. Save on your power bill and use 5400rpm if possible.
  • 10,000 rpm drives make no sense – costly, noisy, power hungry and with high failure rates.

If your PC or Hack’s motherboard supports 6gb/s connections – as the latest motherboards mostly do – then a 6gb/s drive for internal mounting is the best price/performance option. You get a fast, hardwired motherbard connection and no need for an external enclosure. I still use 1tB drives as the areal storage density is low so the technology is fairly remote from the ‘bleeding edge’. However, 2tB drives have been around a while now and while failure rates are slightly higher, they are more cost effective. At this time I am avoiding anything over 2tB. Most external USB enclosures support up to 2 x 2tB HDDs, but not 3tB.

For external storage eSATA is the way to go or use a USB3 external enclosure – not easy to find – which supports 6gb/s drives.

So its’s good to see that HDDs are becoming affordable once more. They remain an attractive option until SSDs start falling in price, something that is happening at a glacial pace.

Finally, for aficionados of Nikon’s latest, the D800, where file sizes can rise to 75mB, that gets you 13,000 files or so per 1tB. So the upgrade to a couple of 2tB drives should likely be part and parcel of your upgrade to a sensor few realistically need, and even fewer can fully exploit.

A few from the 80~200 f/4.5 Nikkor

Not half bad.

I went on about the Zoom-Nikkor 80-~200mm f/4.5 lens the other day and finally had a chance to take it for a spin.

Light and easy to use, you have to be a bit careful with focus at full aperture as f/4.5 is not all that bright, though the viewfinder focus confirmation LED in the D700 works a treat in marginal cases. Fixing any zoom slop with vinyl tape, as I illustrated, is essential. There’s nothing worse than having the zoom ring flop about in use. In the snaps that follow I mostly used f/4.5 and f/5.6. The lens needs no stopping down to sharpen up and renders out of focus areas in a pleasant, smooth manner at larger apertures.

MIB3.

Friends.

Shine.

Go Forth.

On break.

Bay Bridge.

Sky ride.

For about a Benjamin, the lens is a keeper. Many will prefer the 75-150 Series E which, at f/3.5, is a stop faster and much lighter and smaller, but if you need the extra reach, this lens does nicely. And the 80-200mm is a better lens, clearly out-resolving the 75-150mm through f/8, where the smaller lens catches up.

Nikkor 80~200mm f/4.5 Ai lens

Sharp as a tack.

With original box, no less.

Nikon made a lot of these one-touch lenses. They use one ring for focus and trombone-style zoom. Some 180,000 in all, if serial numbers are any guide, starting in 1969 through December, 1981. The smart money – and not much money at that – opts for the last series in which the earlier 15 elements in 10 groups construction was reduced to 12/9, starting in 1977, with an attendant weight reduction of 2.8 ounces to 26.5 ounces. Many claim the optics improved also, but I have no way of confirming that. Mine is a very late 1981 model from the last production run, all of which was in an Ai mount, meaning the lens will fit all modern Nikon DSLRs. It cost me $130, pretty much at the top end of the range for this lens. Excellent examples can be found for less and most have loose zoom rings. Read on for the fix.

The lens has the usual zoom creep, and a couple of strips of black vinyl insulating tape fixed that in a jiffy, also firming up the focus resistance. Neither its length nor the front or rear glasses move longitudinally when the delightfully light collar is operated to either focus or zoom, but the lens does rotate when focused, so it’s less than ideal for fans of polarizing filters.

Strips of tape in place, arrowed, end zoom creep.

CPU installation:

As I install CPUs in all my MF lenses to enhance function, I set about the 80-200mm. The rear baffle is 1.632″ in diameter, so it exceeds the 1.429″ maximum which allows the CPU to be simply glued on. It’s retained by two countersunk and one longer, proud Philips screws. Be sure to mark the location of the long one, then remove all three. The baffle can then be removed, having first marked the location of the ends of the CPU.

An arc is cut out to accommodate the CPU, to the depth of the plane surface in which the rectangular opening appears. Any excess abrasions can be touched up with matte paint. Here you see the CPU installed in the usual way. This is a very easy machining job and if you are nervous about machining your lenses, it’s an excellent lens to start with. In fact, as the baffle metal which must be removed is so thin, the whole job could be done with a hand file, no Dremel cut-off tool needed. The three other lenses I have had to machine in my collection and the related degrees of difficulty are:

  • 28mm f/3.5 pre-Ai. Difficult, as the baffle is sloped and there’s not much for the CPU to adhere to.
  • 50mm f/1.4 pre-Ai. Risky, as the flange and baffle must be removed and absolutely no adhesive must come in contact with the focusing optics.
  • 105mm f/4 Micro-Nikkor. Easy, but the baffle is so thick that a Dremel tool really makes sense, unless you want to spend ages hand filing.
  • 300mm f/4.5 Ai-S ED IF. Easy, but the baffle is so thick that a Dremel tool really makes sense, unless you want to spend ages hand filing.

A comprehensive list of lenses stating whether machining is required appears here. This will aid the purchase decision for those contemplating CPU installation but preferring not to do anything more than simply glueing the CPU in place.

The CPU glued into the baffle.

Here’s the installed CPU – there is no issue with a broad, sound base for the CPU to adhere to. After checking final alignment, I glued the CPU in place with the baffle removed from the lens, to preclude any possibility of getting glue on the lens. As usual I used two-part epoxy, letting the glue cure 24 hours before using the lens. I touched up the abrasion marks on the baffle with some matte black paint from the local hobby shop.

The CPU in place on the lens. Is that a perfect job or what?

Performance:

This is a professional specification lens in every regard. What minor vignetting there is disappears by f/6.3 and even though the lens stops down to a small f/32, there is negligible diffraction when fully stopped down. The seven-sided diaphragm makes for pleasing, soft rendition of out-of-focus areas and the lens balances well on the heavy D700 body. There are absolutely no qualms about using it fully open at any focal length. While multicoated, the exposed front element suggests both a 52mm protective filter and the HN-7 lens hood make sense. The rear element is fairly exposed, so I use a rear cap when the lens is in my bag. There is no tripod collar and none is needed with this relative lightweight.

How does this zoom at 200mm and f/4.5 compare with the 200mm f/4 Nikkor-Q first made in …. 1961? At full aperture these two lenses deliver identical results. At all other apertures there’s nothing to choose, which is a roundabout way of saying that, given the complexity of making a good zoom, this one is just fabulous. After all, the Nikkor-Q is 200mm, and only 200mm. The zoom gives you a choice of 80-200mm at a similar maximum aperture for a 6 ounce (160 gram) increase in weight and identical bulk.

If you can handle manual focus, have no issues with trombone zooms and like the focal length range, this lens is an outstanding bargain. The faster MF 80-200 f/2.8 Ai-S ED is a real monster by comparison, weighing in at 67 ounces (1.9 kilos). Good luck carrying that around. Trust me, I owned one and was happy to see it move on. The smaller and much lighter zoom profiled here poses no such issues, at the expense of a 1.5 stop loss in maximum aperture.

I’ll publish some pictures snapped with this optic on the D700 soon. On APS-C bodies (D300, D7000, etc.) the effective focal length becomes 120-300mm.

Pre-Ai-S Nikkor exposure issues

The non-linearity problem.

This is of interest to those who are contemplating the addition of a CPU to a pre-Ai-S Nikkor lens, meaning an Ai or a pre-Ai lens which has been modified to Ai specifications.

Because I have found that pre-Ai lenses are the ones I enjoy using most – the quality, fit and finish are in a different league from what followed – I have accumulated no fewer than nine. A related advantage is that these lenses are often seen as orphans in a digital world and sold as “use on film cameras only” owing to the absence of the Ai conversion. That keeps their prices low and makes them outstanding bargains in the process. The least I paid was $39 for the 200/4, the most was $252 for the 28/2. Most were around $125 and are all close to mint condition.

Of my collection, two came already converted to Ai specifications, five were converted by the estimable John White, and two I converted myself. As you can see from the picture, I have installed CPUs in each at $30 per lens, with the 28/3.5 and 50/1.4 being a challenge, all the others being a simple glue-on job.

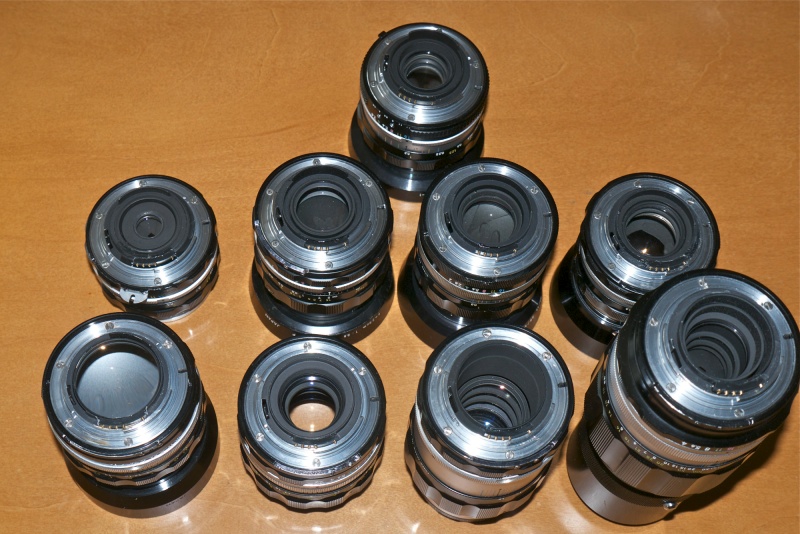
Top: 24/2.8. Middle: 28/3.5, 28/2, 35/2, 50/2. Bottom: 50/1.4, 105/2.5, 135/3.5, 200/4.
A CPU has been installed on each. All are pre-Ai, with scalloped, metal focus collars.

When using auto exposure, I always use ‘A’ mode, meaning aperture priority. I set the aperture and the camera chooses the shutter speed. Because these pre-Ai-S lenses have non-linear aperture stop down geometry, I pass control from the camera to the lens for aperture setting by appropriately programming the CPU and setting the camera controls. Not only is this my preferred way of setting aperture, as I find the large ring on the lens far easier to use than the fiddly control wheel on the camera, it also avoids exposure issues. Plus it’s very much the way I have been using cameras for 40+ years and that’s how I like it.

When Nikon introduced the Ai-S lens design, the optics generally remained unchanged. What did change is that the mechanics were redesigned so that the aperture lever in the lens moved a constant amount from stop to stop. This allowed the use of Ai-S lenses with modern digital bodies which did not have the ability to pass control to the lens – like the D40 for example. The aperture could be accurately controlled with the body figuring out the extent to which the stop down lever had to be moved rather than by the user definitively dialing it in on the lens. Clever.

On the costlier DSLRs (D200, D300, D300s, D700, D7000, D800, D800E, D1-D4) Nikon made it possible to pass control to the aperture ring on the lens together with a ‘non-CPU lens’ option in the body for better EXIF data recording. That’s not as good as using a CPU, and I spell out the advantages of a CPU here, but it does result in proper exposure in ‘A’ and ‘M’ (but not in ‘P’ or ‘S’) modes when the aperture ring on the lens is used to set aperture. A fine way of extending the life of lenses many of which are approaching 50 years in age.

The upshot of all this is that if you let the camera set the aperture on pre-Ai-S lenses then you will likely run into exposure errors. To determine the extent of these errors, I set the camera to take control of aperture, setting each lens to its minimum aperture (just as you would with an AF or AF D lens) and setting the aperture using the control dial on the body. Then I used the simple expedient of running through the aperture range, using auto exposure in ‘A’ mode, determining which (if any) was correctly exposed, then adjusted the others in LR4 to match.

The result is not pretty, and the variations are all over the map. A ‘0.00’ reading means exposure was correct. Negative numbers show the number of stops of underexposure, positive ones the number of stops of overexposure.

Exposure errors with pre-Ai-S lenses when aperture control is passed to the camera.

Some of these variations have no discernible pattern whatsoever. Take a look at the 28/2 or 35/2 columns above, as an example.

With recent sensors, 1 or even 2 stops of underexposure is not a deal killer. With the outstanding processing controls in Lightroom 4, a significant improvement over Lightroom 3, you would be hard pressed to tell the difference between a RAW file which has been correctly exposed compared with one fixed after two stops under exposure. You might see a little more noise in the shadows, but that too can be fixed. But overexposure is a different kettle of fish. One stop over is close to being a deal killer, even with RAW, when it comes to bright highlight details. Two stops is a no-no on any but the lowest contrast, low key subjects. So that absolutely rules out the 200/4 which overexposes through most of its aperture range. The 28/2 is pushing the underexposure limit at f/16 and the 105/2.5 likewise at f/22. The 135mm is not a happy camper at full or minimum aperture and the 50/1.4 is not good at its two smallest apertures. You can decide whether these are debilitating issues for your method of use. The other lenses you can pretty much get away with, but you will constantly be tweaking exposure adjustments in post processing.

So why not just make Adobe lens correction profiles to compensate for these exposure errors? I suspect that is possible from my extensive work with Adobe’s excellent application, and you can download any number of profiles I have created here, each of which can be automatically recognized by LR or PS on import of files taken with a CPU-equipped lens. But profiles are applied upon import of a file into LR or PS, by which time the bird has flown, meaning that highlights which were burned out at the taking stage will remain burned out no matter how accurately the profile corrects the exposure error.

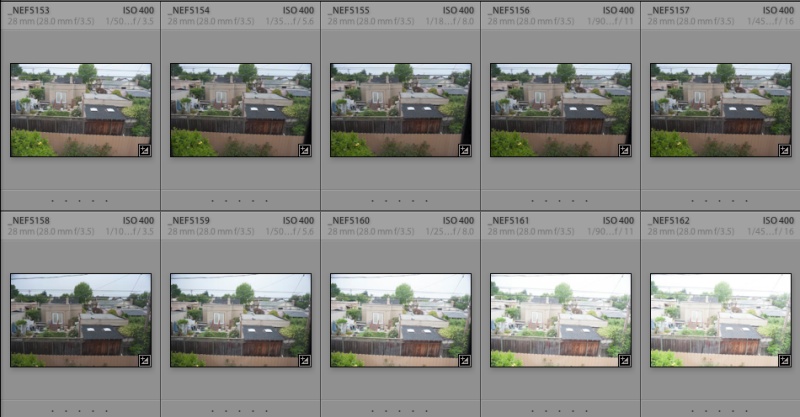
A range of exposures with the 28mm, f/3.5 Ai’d. Lens aperture control in top row,
camera control in bottom row. Camera in ‘A’ auto exposure mode.

The Bottom Line:

First, you must be comfortable using Manual Focus lenses, because every Ai’d, Ai or Ai-S lens is MF.

Then if, like me, you appreciate great engineering and execution, and further conclude that it makes you a better photographer (it works for me), and if you like a bargain and are not averse to a bit of tinkering, the Ai and Ai’d lenses are the optics of choice. Most will accept a CPU with the application of epoxy only and they are pure joy to use – touch, feel, optics are one, and as good as it ever was. I have demonstrated optical quality here time and again, and my standard for judgment is not an 800 pixel LCD display or test chart, but is rather a 24″ x 18″ glossy print. These lenses have fabulous optics.

Destroying classics:

As for ‘destroying’ classics, well that’s easy. Unless it’s something really costly and rare, these are so cheap that you can always find another. Millions were made and remain in circulation. If the installation of a CPU makes you a better snapper, forget the ‘classic’ issue and have at it. No one except you will ever see the CPU! Type “Nikon Nikkor lens Ai” into US eBay and you will routinely get over 1,000 listings, two-thirds pre-Ai-S, the remainder Ai-S. KEH lists hundreds more, generally costing a little more, but with no risk about returning a dud. Assuming that eBay items transact no more than once a year, there are some 50,000 new listings coming to the eBay market alone annually.

If, however, you like to snap in ‘S’ or ‘P’ modes and/or your camera body does not permit transfer of aperture control to the aperture ring on the lens, then you should avoid Ai and Ai’d lenses and search out Ai-S versions instead, if you propose to add a CPU. They typically run a little more, far fewer were made, and the lovely scalloped metal focus rings of the pre-Ai versions are replaced by plastic surfaces, but they will deliver correct exposure when the camera controls aperture selection and they remain far better made than any AF, AF-D or AF-S plastic monstrosity.

And for those interested, the optics you will most often find on my D700 are the 50/1.4, because it is so awfully good, and the 24/2.8, because that focal length largely accords with how I see. But then I must confess the 28/2 and 35/2 are real corkers, I love the 105 and 135 for what they can do and the 200 is a sheer delight. Well, you get the point.