Category Archives: Photography

Stamp out sensor dust

Apple’s Aperture has a unique tool for the job

It’s no secret that image sensors in digital cameras with removeable lenses are prone to atrract dust. The Canon EOS 5D I use seems to be especially bad in this regard from what I have read on the various chat boards. While I give my sensor a swipe with the anti-static brush now and then, the reality is that sensor dust does crop up and can be a real problem if many snaps are exposed with the dust mote in place on the sensor.

The one positive about all of this is that Apple’s Aperture has a tool to remove such dust spots, as the designers recognized that any particular speck of sensor dust will have the exact same position on the resulting photographs from image to image. The dust mote does not move even if the camera does.

Apple’s Aperture provides a tool, unique as far as I can tell, which permits rapid removal of sensor dust from mutiple images. So if you have just taken two hundred pictures only to find an offending dust spot in each, at the same location, the Aperture Lift and Stamp tool is for you.

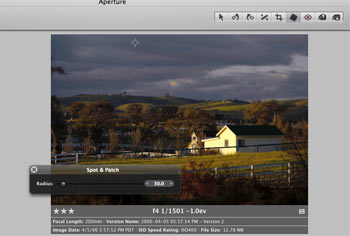
Here’s how it works. In this picture you can see the Spot and Patch tools cross-haired locator at the top of the image, where the offending dust spot makes its home:

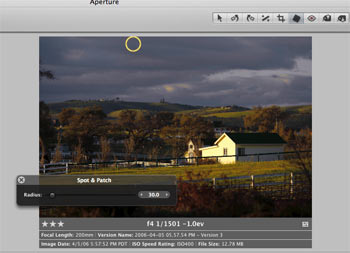
Hit enter and the circle becomes yellow, effecting removal of the spot on the selected image:

Unlike with Photoshop, there is no need to select a source for the patch – Aperture does it automatically based on the area sorrounding the defect.

Now click on the Lift part of the Lift and Stamp tool icons visible at the top of the screen – it’s the one with the arrow pointing up.

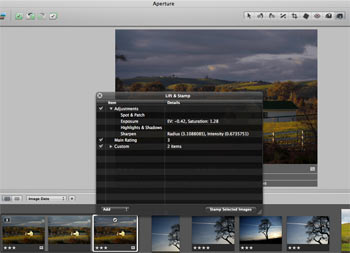
The type is small here, but the original discloses that I have made four adjustments – Spot & Patch, Exposure, Highlights & Shadows and Sharpening.

Now highlight all the images with a like dust defect (Shift-Click for contiguous ones or Control-Click for non-adjacent ones), click the Stamp icon of the Lift and Stamp tool (the one with the arrow pointing down) and click on any one of the selected images.

The dust mote is removed in all of them. In my case, as I have also made Exposure, Highlight & Shadow and Sharpening adjustments, these would also be conferred on all these images. So if the images are different, do the Spot & Patch and Lift & Stamp work first, then selectively change other parameters in images as you please. The images selected for dust removal can be versions of one image, disparate images, or both.

Don’t forget to clean the camera’s sensor after doing this!

See what I mean about good design? Care to find this feature in Photoshop? I think not.

A simple precaution

Protection for that exposed LCD screen on the Canon EOS 5D

For a few dollars from the good people at B&H I picked up a packet of three sheets of matte surfaced stick-on plastic screen protectors for the exposed rear LCD screen of the Canon EOS 5D – click on the topical index to learn more about this camera.

I couldn’t get quite the right size so I purchased the 3″ one and shaved 9/64″ off the long side and it fits fine. The packet comes with a nice cloth to make sure you have removed all grease from the screen before applying the plastic sheet and also includes a small hard plastic blade to smooth the film once in place. This spreads even pressure better than your finger can.

A side benefit, apart from the protection against scratches, is that the matte surface does a far better job of supressing reflections than the smooth surface of the original.

New EOS 5D firmware

It pays to stay current

Canon has released Firmware update 1.0.5 for the EOS 5D.

Here’s mine loading and the result:


This fixes a problem with color pictures taken with the Standard Picture Style with +4 Color Density setting (the pictures would lose saturation on the sRGB setting and appear monochrome) and with the 85mm f/1.2L lens when used with the Canon 580EX flash where the shutter button would not work.

It’s nice to stay current.

And now for some pictures

Which is what it’s all about.

All that cataloging in Aperture did have a bright side, specifically an opportunity to reacquaint myself with many pictures from days past. So after all this talk of cameras and printers and software in recent columns, I thought it might be nice to share some pictures with you.

As is the case, I suspect, with many photographers, I have perfect recall of the equipment and film used to take these, even though the stored files are silent, as it’s not something I routinely record. The digital age, of course, does this for you today.

So here goes – 15 snaps chosen at random and in no particular order.


South Uist, Outer Hebrides, 1977.
A rugged, lonely place.
Nikon F, 28mm Vivitar, TriX.


Tuileries Gardens, Paris, 1977.
A life begins, another draws to a close.
Leica M3, 35mm Summaron, TriX.


World Trade Centers, 1982.
Pentax ME Super, 40mm Pentax SMC, Kodachrome 64.


London, 2000.
Cabs old and new.
Leica M6, 35mm Asph Summicron, Kodachrome 64.


Tucson, Arizona.
A warm day!
Leica M6, 90mm Elmarit, Kodachrome 64.


Pebble Beach, California, 1987.
‘The Pirate’.
Leicaflex SL, 50mm Summicron-R. Kodachrome 64.


Tuileries Gardens, Paris, 1975.
What’s not to like about Paris?
Leica M3, 90mm Elmar, Kodachrome X.


Rodeo Drive, California, 1989.
Someone parked this huge ’60s wagon on this costliest of shopping destinations.
Leica M3, 50mm Summicron, Kodachrome 64.


Bermuda, 1999.
Land of sublime architecture.
Leica M6, 90mm Elmarit, Kodachrome 64.


Somewhere in Arizona, 1988.
Leicaflex SL, 50mm Summicron-R, Kodachrome 64.


Hong Kong, 1995.
Statues ready for illicit export.
Rollei 35, 40mm Tessar, Kodachrome 64.


Pismo Beach, California, 2004.
A lazy, sunny afternoon by the Pacific.
Leica M2, 35mm Asph Summicron, Kodak Gold 100.


Union Square, San Francisco, 1999.
A child’s wonder.
Leica M2, 35mm Asph Summicron, Kodak Gold 100.


Pasadena, California, 1988.
Gangster car.
Leica M3, 35mm Summicron, Kodachrome 64.


Santa Fe, New Mexico, 1995.
Rocking horses at an antique dealer’s.
Leica M2, 50mm Summicron, Kodachrome 64.