Category Archives: Software

DxO Optics Pro Elite

Anti-aberration software.

I have been going on for quite a while now about how correction of camera aberrations (rotten lenses, flaky sensors, poor manufacturing quality control) will increasingly migrate to software fixes, away from the far costlier hardware redesign route.

DxO has been making aftermarket software – meaning you run it on your computer not in your camera – to address many of the more common problems for ages. However, if you sniff around their web site (it’s invariably bog slow, so be patient. It’s so bad I almost didn’t bother, in fact) you will find that DxO also offers its creations for in-camera use. If they can get it to work fast in that iteration, let’s hope that Canon, Sony et al will take them upon it, swallow their ‘not invented here’ pride and start offering automated fixes for all that ails modern digital cameras within the camera’s firmware.

The product is named DxO Optics Pro Elite (a dumb name – something like Magic Lens Repair would have captured my attention much sooner), the costlier $299 Elite variant being DxO’s way of extracting some more coin from those of us who use full frame Canon DSLRs, as these are not supported in the base $169 version.

First you have to download the thing which takes for ever:

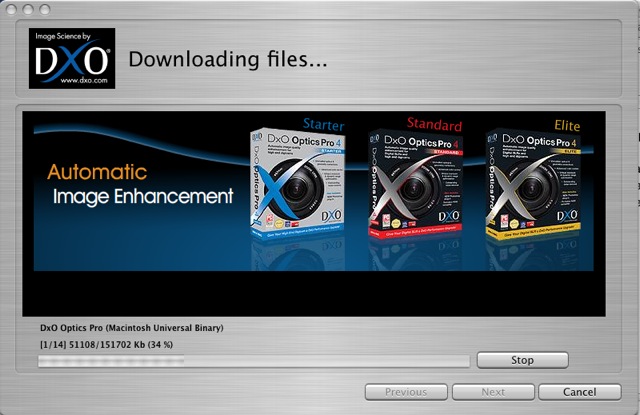
The 151mB download (version 4.5) is for my 5D with the lens modules for the 14mm, 15mm, 20mm, 24-105mm, 50mm f/1.4, 85mm f/1.8 and 400mm f/5.6 lenses chosen. Another mistake, DxO. Why not simply include all cameras and lenses to make one download for all users? I also have a 200mm f/2.8 L but DxO lists no module for that – probably because the lens is already close to perfect. By the way, I do not own the very costly 14mm L optic, but do have some snaps taken with a loaner. And that lens, special as it is, needs a lot of error correction. My download includes the Lightroom plug-in, meaning I can use the application as a standalone or from within Lightroom. Nice. I had to install the application three times before it worked properly – with the first two tries the lens modules were not recognized. Not so nice.

Anyone even thinking of using this application should first check if his body and lenses are supported – otherwise it’s largely useless.

What DxO is trying to do is provide a software suite to fix all that ails digital camera lenses and sensors, including vignetting, chromatic aberration, distortion, dynamic range limitations, noise removal (not really needed for the 5D), sharpness masking, de-fishing, etc.

$299 is an awful lot of money for someone who already has Photoshop, which offers many of the functions in DxO so the question here is whether it’s worth spending the money? I downloaded a 14 day (How silly is that? How about one month, DxO? Something this complex needs time to evaluate) free trial version for my MacBook which is using OS X Tiger 10.4.11. It also comes in a PC flavor for masochists.

What makes this interesting is the claimed lens-specific modules and the de-fishing function, especially now that ImageAlign appears defunct. If you use PS CS3 (at $700 it’s way overpriced for me) then you have the de-fishing ability built in. PS CS2 and earlier need the ImageAlign plugin or you use something like DxO.

In trying out this software my primary interests are in fixing the various lens distortions in the 14mm, 15mm, 20mm and 24-105mm lenses (the latter at its wide end, where it needs most help) in an effort to make a subjective evaluation of whether it’s money well spent compared with the existing tools in Lightroom and CS2.

Installation: DxO needs to learn from successful software makers that offering a product for under $100 will quintuple their sales and negate the need for all the anti-piracy software they insist on installing when you first fire up their product. Let’s face it, they aren’t going to sell too many of these at $299, any more than Apple sold Aperture at $499 (now at $199 and counting). $49-99 sounds about right to me.

The install screen says 21 days, their site says 14 days for the trial. Go figure.

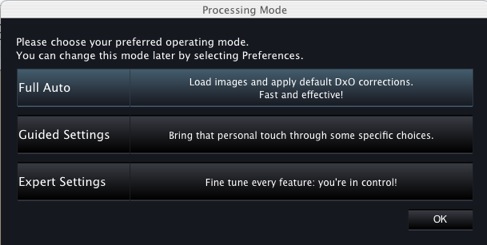
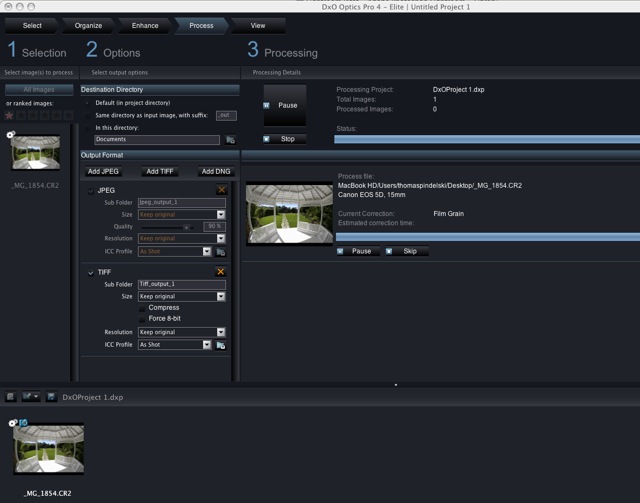
I went with ‘Expert Settings’:

Here’s the first file – a fish eye snap – being processed. That took 2 minutes – slow. Chromatic aberration correction was the prime aspect of this first pass.

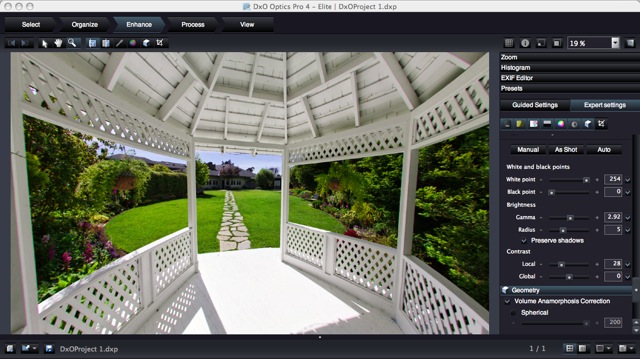
Next into the ‘Enhance’ section where you see something like this after clicking on ‘Geometry’:

One click and the image preview is de-fished.

Click ‘Process:’ and it’s another long wait – 3-4 minutes – before your file is output.

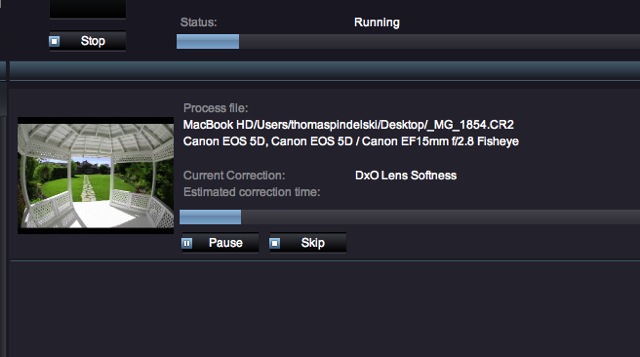
Sure, the result is fine, but it only takes a few seconds to do the same thing in ImageAlign.

Integration with Lightroom: DxO supplies a plugin which you can point Lightroom to as a second external editor. My first is, of course, PS CS2.

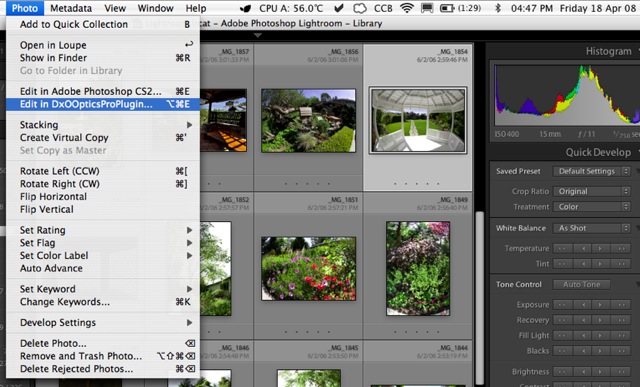
This works well – just remember not to have DxO already open or the plugin will not run. The image saved from the plugin will appear next to the original in the Lightroom catalog.

Another welcome feature is the abiity the application has to automatically correct vignetting (provided yours is one of the lenses supported) and also to optionally correct for Volume Anamorphosis – the tendency of objects near the edges of a picture taken with a very wide lens to be distorted. This is physics, not optical aberration, and the application does a good job of ‘naturalizing’ the result.

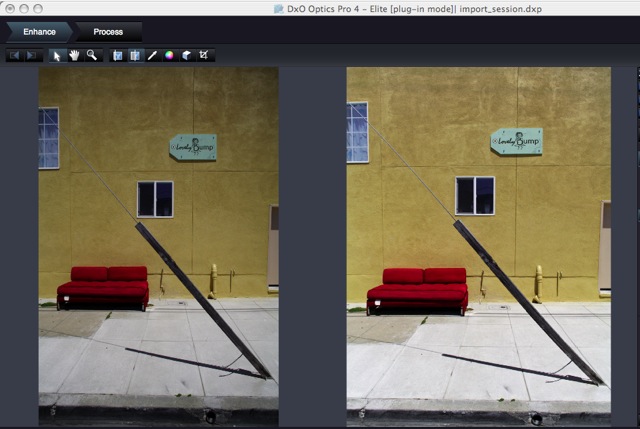
Here are before and after snaps of a file exported using the Lighroom plugin and taken on the 20mm Canon which has lots of vignetting and, obviously, renders objects with Voulme Anamorphosis uncorrected (like any 20mm on a 35mm format full frame camera). I have also allowed DxO to do its own thing with contrast and lighting. I think you will agree the result is good:

Did I try DxO’s noise reduction? Well, it’s not needed on the 5D’s images and where it’s really needed – for the Panasonic LX-1’s noisy snaps – it’s no use as that camera is not supported.

Cautions: A reading of the DxO forum suggests that upcoming version 5 for the Mac may be buggy if its recently released Windows predecessor is anything to go by. Worse, DxO apparently drops support for obsolete cameras in the later version, which disables a lot of DSLR users given the pace of change in hardware. So I suppose that when DxO upgades the application the user may have to upgrade his camera. Beyond dumb.

Conclusion: DxO Optics Pro Elite does what it says, and does it well as regards output quality. However, I have major issues which prevent me from recommending it:

  • It’s way overpriced. Sell it for $49.95 and customers will beat a line to your door. But $299 is ridiculous.
  • It’s simply too slow to be useable. My experience was on a speedy 2gB 1.83gHz MacBook with an Intel C2D CPU. It took DxO 4 minutes, typically, to process one 70mB TIFF file in 16 bit mode. The application comes with a batch processing function so if you can live with having like corrections applied to all your batch members, run it overnight.
  • The way the software, when updated, apparently obsoletes support of discontinued cameras or lenses. That one about does it for me, as my 5D will doubtless be ‘obsolete’ by the end of the year.
  • The application is buggy. After one day’s use (and three installs on a plain vanilla MacBook) the lens profiles were lost the next day and another install was required. That says Beta not Release version to me, and you still want $299? I don’t think so.
  • The list of supported cameras and lenses is very short.

The one feature this application has – the ability to correct Volume Anamorphosis – which I have not seen elsewhere – is nice to have, especially for architectural and object pictures made with very wide lenses and including significant depth. Otherwise, everything here can be done with Lightroom (vignetting, chromatic aberration, highlight and shadow recovery) and ImageAlign/PS CS2 (de-fishing and distortion correction). If, like me, you already own these, save your money or buy them used for less than DxO wants for Optics Pro Elite.

Lightroom 2.0

Beta testing is the way to go.

Adobe has just released Lightroom 2.0 Beta allowing all and sundry to bang away at it in a sort of group grope-wiki software development approach which I can only applaud.

Localized corrections in the Develop module and multiple monitor use seem to be the most useful enhancements – this is enough to call it 2.0 or are earnings hurting? Still, Adobe is adopting the right development approach.

There’s no soft proofing support yet, but read this for a workaround.

Interestingly, the ‘10,000 pixels a side’ import file size limit (meaning files cannot be over 10k pixels on either dimension or more than 100mB in total) has been increased to 30,000. I actually ran into the 10,000 pixel limit when migrating from Aperture to Lightroom on some big scans of 4″x5″ originals, so this is not as odd as it at first sounds.

Anyone can use the 2.0 Beta but to extend the trial past 30 days you either have to be a registered 1.x user or ask Adobe nicely. There’s a neat tutorial here. In a related tutorial an easy way of exporting, say, multiple images to Photoshop, such as in HDR photography is explained. The enhancements allowing multiple image printing on one page are nothing short of superb – some 5 minutes into this tutorial.

Is Adobe trying too hard? With 2.0 Beta newly out and 1.4.1 still in need of repair, is Adobe unnecessarily rushing things?

While I have no access to current data, assuming that PC users outnumber Mac zealots by 4:1, it’s not like Aperture is a competitor. Add the fact that Aperture 2.0 seems to require the costliest Mac to run half decently (if then), whereas Lightroom potters along nicely on an ancient G4 Mac, I somehow doubt there are going to be too many users switching from Lightroom to Aperture. In fact, I would guess they are about as common as people looking for permanent resident status in North Korea. Trust me, Abobe, I only want to go through this hell once, so there’s no way you are about to lose me as a user unless something better comes along and it uses LR’s catalogs without need for conversion.

However, given how few people use Macs, I wonder whether Adobe would be better off canning half the Lightroom development team and spending the savings on properly marketing 1.4. Lightroom 2.0 is nice but, let’s face it, it can wait and you are not going to dump Aperture just because of this Lightroom Beta upgrade which isn’t even ready for prime time.

And, please, no comments about how photographers are disproportionately users of Macs. The sole reason you visit this blog is to read about photography and 80% of you, according to my statistics, use Internet Explorer. Last I checked, that piece of garbage doesn’t even run on a Mac …. and anyone using IE with Parallels on a Mac truly needs a lobotomy. And I’ll bet that of the 20% using Safari, some are running it on Windows and many don’t use Aperture in any case. So the 4:1 LR:Aperture user ratio is probably understated.

Sure, all the toadies, sycophants, commercial flacks and those otherwise in the pay of Adobe will extol the virtues of 2.0 and praise Adobe for its community spirit. Utter nonsense. Adobe is a stockholder-owned public company. It’s primary duty, as with any public company, it to maximize the wealth of its shareholders, not tell us about its great good heart and wonderful social policies.

So, Abode, fire a dozen developers (starting with the fellow who approved 1.4.1 for release) – $1-2mm saved – and roll something like this out.

“Aperture users! Make Lightroom run twice as fast. On your ten year old Mac. Invest the hardware savings in a new Nikon D3 instead”.

And let’s face it, Adobe, your stock is nothing to write home about.

Or, better still Adobe, write a proper converter for Aperture to Lightroom catalogs and sell Lightroom at 50% of retail to anyone downloading it and sending in the box top from their Aperture software. Now that’s something that might make me show some interest in your stock and it would pay for itself with the first few conversions. It might even preclude an imminent hostile takeover though I’m conflicted here as I would far rather own the stock is someone wants to acquire you for a premium to the quoted price.

Importing into Lightroom

Automating sharpening on import.

One of the first things I have to do when processing images imported from my Canon 5D (or the Lumix LX1 for that matter) is to sharpen the RAW image. This is standard operating procedure for digital cameras and has nothing to do with poor native image quality. The process simply negates the effect of the anti-aliasing filter, used in nearly every digital camera. Apple’s Aperture is really smart about this and does it automatically, detecting the camera used and applying Apple’s pre-set adjustments. Lightroom is less smart but can be taught to make the adjustment automatically on import.

Here’s the process – I have enlarged the screen shots for legibility, hence the poor definition – if you want to see aliasing take a look at the ‘jaggies’ in the pointers!

Here are the Lightroom defaults for sharpening in the Develop module.

Leave them like this and you will have to sharpen every picture once imported. A waste of time.

Here are the settings that work best for me – and I have large prints made on an HP Designjet 90 printer as my goal. For the small images used for the web it really does not matter what you do. A large print, on the other hand, is the most demanding output there is.

Having made those adjustments in the Develop panel I then create a new User Preset by clicking on the ‘+’ sign in the Preset area in the left panel and naming the current settings Canon 5D. No other defaults have been changed in the Develop module at this time nor do you want to make any changes:

Then when prompted which settings to save with this new User Preset, I choose ‘Check None’ then check only the Sharpening box. This will limited changes made whenever this User Preset is chosen to Sharpening only. Were I importing from a small sensor camera with inherent image noise (not an issue with the 5D) I would consider including Noise Reduction when creating the User Preset and would check the related box, below.

Next I insert a CF card containing images to be imported into the card reader and the import Dialog pops up. Under information to Apply: Develop Settings I click the drop down box and point to the Canon 5D preset just created:

Now my preferred sharpening settings will be applied as the pictures are imported and 1:1 Previews are generated. As is always the case with RAW files, the original file is never changed – it’s just the Previews that are managed.

You can make User Presets which are specific to a camera serial number, if you want, but as Your Truly owns just one 5D (a status unlikely to change) and one Lumix LX1, that’s a luxury I do not need.

One size does not fit all:

Now the above approach is camera specific, not lens specific.

It doesn’t mean that you just merrily import every image without the need for any additional sharpening adjustments.

Even in my small set of Canon lenses there are noticeable variations. The 85mm, 200mm’L’ and 400mm ‘L’ optics are pretty constant when it comes to sharpness at all apertures. Indeed, the 200mm generally needs a small reduction, it’s that good. On the other hand, the 24-105mm ‘L’ and the 50mm f/1.4 at full aperture both need a little more and the 20mm needs more all the time. It’s a mediocre piece of glass at best.

And it’s not just sharpening you have to worry about. There are other lens aberrations.

It would be pretty neat to be able to automatically adjust for Chromatic Aberration (color fringing), Distortion based on the lens used and Vignetting, but that feature is not available, yet. CA and Vignetting would be especially tricky as they vary with aperture. Distortion is no walk in the park either as the distortion levels in zooms vary with focal length. That’s not to say that Adobe couldn’t do it (we are talking simple look-up tables here, although a lot of them, and a presumption of low sample variation) and I, for one, would love to be able to have the fairly pronounced barrel distortion in the 24-105mm ‘L’ zoom automatically removed when this otherwise fine optic is used at its wide end.

DxO Optics adopts this exact approach in a plug-in for Lightroom. They should be applauded for their efforts. The list of cameras and lenses they automatically adjust for is set forth here. I have not tried the product and, at $300, I’m not about too, but it may make sense to some. It looks like the latest Mac version is not yet available so I could not try it even if I wanted to blow the coin. Their video suggests the product is bog slow (a couple of minutes to adjust just five images), and you can bet they are using the fastest possible hardware to put a gloss on things, so a pinch of salt is recommended before you lay out your hard earned cash.

Does any of this really matter with small images – like those reproduced on the web or in snapshot prints? No. But once your prints sizes get large, it can make a significant difference to the appearance of the picture. And a little bit of automation to reduce the drudge of processing is always a good thing.

More on Lightroom printing

Some convenient enhancements.

Since publishing my first piece on how to profile monitors and printers for use with Lightroom, I have made a couple of interesting discoveries.

First, I listened to Adobe Podcast#1 (with Mark Hamburg, Kevin Tieskoetter and Jeff Schewe) from Apple’s iTunes store (search podcasts on “Lightroom”) which speaks to profiling (they are speaking about Lightroom Beta Release #4 for the Mac) and was intrigued to note that that we shared the same approach. The development team (a lot of very smart, well informed, outspoken engineers – highly recommended listening) does exactly what I published with regard to the use of Colorsync, letting the printer manage colors, not Lightroom. This philospohy is printer agnostic. Epson, HP, Canon, you name it.

My approach requires making Lightroom use Apple’s Colorsync utility to manage colors. You need a properly profiled screen and I describe in that earlier piece a very accurate way of doing that which does not even require a colorimeter, provided you follow certain disciplines regarding ambient lighting.

I suggest you give this method a try. Your maximum cost is a few minutes, a couple of pieces of paper and some ink. And the money saved on a Colorimeter (wish I had been that smart when I bought mine) will pay for a lot of paper and ink. It does not matter who makes your printer for this screen profiling approach to work.

The other thing I discovered is that it is possible to save the Colorsync setting in the Printer Profile – something I stated frustration at not being able to do.

I had forgotten that there is a ‘Save’ setting in the print dialog box. So elect Colorsync in Print Settings->PaperType/Quality then Save the setting with a meaningful name. I have named my saved file “HP Photo Satin – Colorsync” which states the paper type I chose before saving and obviously uses the Colorsync utility. Note that this named setting is independent of Lightroom’s Print templates – you choose it at print time after selecting a Print template. The printer dialog box dictates color management, the Lightroom Print template controls the paper size, margins and picture layout on the page.

Then, when it’s time to Print, I simple choose this drop down menu option in the Print dialog box (I have not yet figured out how to make it the default, something I would like to do as that’s what I use nearly all the time – what I need to do is work out how to delete the ‘Standard’ setting, I’m guessing, at the OS file level). A quick check – see the following screen picture – confirms that the Colorsync setting has, indeed, been saved and will be used when printing.

Now I am assured that both the right paper profile and the correct Colorsync setting is made without having to check yet another layer of menus in the print dialog box. So printing really is a breeze. I have created three templates – for three different paper sizes. That’s all I need, as I always use the same HP paper.

* * * * *

I learned an interesting thing from this podcast – what do you think Adobe did for the Lightroom development team for Christmas of 2005? They gave each member a digital camera and encouraged them to take lots of pictures. Maybe the resulting stress testing has something to do with the application’s speed? I wonder whether Apple ever considered doing that for its Aperture developers? Or do they simply get a $7,000 Mac Pro and 30″ screen which will run anything well ….

Tracking warranties

iCal to the fore!

I explained – and quantified – why the arithmetic of extended warranties on consumer gee-gaws made it a slam dunk for the writers of the insurance and a losing proposition for the buyers here. So photographers should know when the warranty expires on their latest camera or lens.

Machines fail when very new or very old/very used. No secret there. Look at light bulbs. Cars. Cameras.

Which brings me to tracking warranties.

As I have recently written, my trust in Apple quality control has been severely shaken over the past year when my new MacBook, Extreme router and wireless keyboard all broke down during the (measly) one year warranty period. In each case I had to scratch around to determine whether the first year of ownership had passed. Apple is a key photographic tool vendor for this user.

Then it struck me. Might as well use Apple’s own tools to track their failures and warranties, so now any time I buy a new toy, the warranty expiration date goes right into iCal with an email reminder to me. And if I do want to check, I simply search iCal for the name of the gadget.

So, Toshiba, I’m not about to forget about the three year warranty on that new hard drive. No way.

To make matters easy, all the receipts go in a three ring binder in chronological order. Easy.

And if I do want to check if something fails, or find the date of the invoice for a warranty claim, I simply search iCal for the name of the gadget – Apple-F in iCal.

So watch out, Apple, Toshiba, Canon, Panasonic, big screen TV maker, et al. You are being watched. Though, in fairness to all but Apple in that list, these manufacturers’ products have been failure free.

There is one far more important reason however, and it is a life saver.

This technique has saved half my net worth on more occasions than I can name. Now that I no longer have a secretary charged with reminding me of these things. To be safe, I put in vital dates twice, with two week and one day reminders. Who said computers don’t save you money?