Some convenient enhancements.
Since publishing my first piece on how to profile monitors and printers for use with Lightroom, I have made a couple of interesting discoveries.
First, I listened to Adobe Podcast#1 (with Mark Hamburg, Kevin Tieskoetter and Jeff Schewe) from Apple’s iTunes store (search podcasts on “Lightroom”) which speaks to profiling (they are speaking about Lightroom Beta Release #4 for the Mac) and was intrigued to note that that we shared the same approach. The development team (a lot of very smart, well informed, outspoken engineers – highly recommended listening) does exactly what I published with regard to the use of Colorsync, letting the printer manage colors, not Lightroom. This philospohy is printer agnostic. Epson, HP, Canon, you name it.
My approach requires making Lightroom use Apple’s Colorsync utility to manage colors. You need a properly profiled screen and I describe in that earlier piece a very accurate way of doing that which does not even require a colorimeter, provided you follow certain disciplines regarding ambient lighting.
I suggest you give this method a try. Your maximum cost is a few minutes, a couple of pieces of paper and some ink. And the money saved on a Colorimeter (wish I had been that smart when I bought mine) will pay for a lot of paper and ink. It does not matter who makes your printer for this screen profiling approach to work.
The other thing I discovered is that it is possible to save the Colorsync setting in the Printer Profile – something I stated frustration at not being able to do.
I had forgotten that there is a ‘Save’ setting in the print dialog box. So elect Colorsync in Print Settings->PaperType/Quality then Save the setting with a meaningful name. I have named my saved file “HP Photo Satin – Colorsync” which states the paper type I chose before saving and obviously uses the Colorsync utility. Note that this named setting is independent of Lightroom’s Print templates – you choose it at print time after selecting a Print template. The printer dialog box dictates color management, the Lightroom Print template controls the paper size, margins and picture layout on the page.
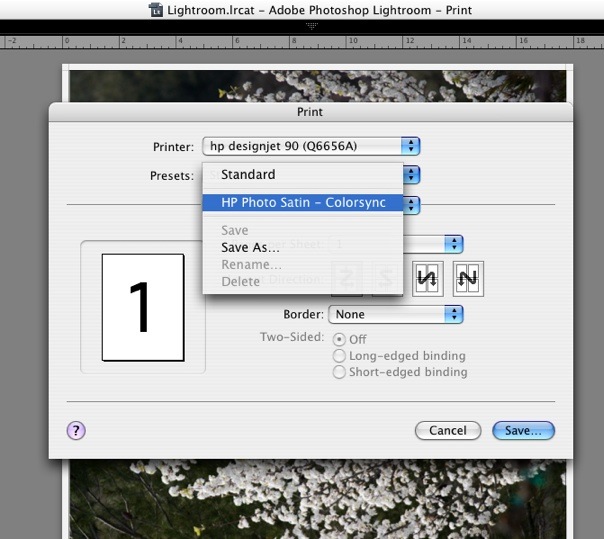
Then, when it’s time to Print, I simple choose this drop down menu option in the Print dialog box (I have not yet figured out how to make it the default, something I would like to do as that’s what I use nearly all the time – what I need to do is work out how to delete the ‘Standard’ setting, I’m guessing, at the OS file level). A quick check – see the following screen picture – confirms that the Colorsync setting has, indeed, been saved and will be used when printing.

Now I am assured that both the right paper profile and the correct Colorsync setting is made without having to check yet another layer of menus in the print dialog box. So printing really is a breeze. I have created three templates – for three different paper sizes. That’s all I need, as I always use the same HP paper.
I learned an interesting thing from this podcast – what do you think Adobe did for the Lightroom development team for Christmas of 2005? They gave each member a digital camera and encouraged them to take lots of pictures. Maybe the resulting stress testing has something to do with the application’s speed? I wonder whether Apple ever considered doing that for its Aperture developers? Or do they simply get a $7,000 Mac Pro and 30″ screen which will run anything well ….