A little goes a long way.
My HP DesignJet 90, the 18″ carriage model, was commissioned March 14, 2006, so it’s approaching seven years in age. One recent print with a dark black silhouette showed less than perfect blacks and deep, lustrous blacks are one of the many strengths of this excellent printer. Amazingly, B&H still lists the 24″ DJ130 for under $1300 new, and all ink cartridges and printheads remain available on their site, though you may have to hunt about a bit for the special swellable paper which absorbs the ink dyes used by the machine. Regular modern pigment ink papers do not work.
The HP DJ30/90/130 series is blessed with truly outstanding diagnostics and a quick checkout was all it took to find the cause.
First, I dialed up the HP Maintenance Utility which uses online software at HP. For Mac users you have to use OS Snow Leopard or earlier or an even older PPC machine, as HP never updated the software to run on Intel machines. Snow Leopard comes with Rosetta, the PPC emulator software and will run the HP Maintenance Utility fine. Apple recently re-released Snow Leopard on DVD and if you want to run the HP Maintenance Utility on a modern Mac it’s your best choice, though whether it’s even installable on the latest Macs I rather doubt.
I use a decade old iMac which runs Tiger and uses a PPC CPU. Unlike its modern day descendants it does not overheat and refuses to die.

You can run all these print jobs using plain paper in your printer – 8.5″ x 11″. Here’s the Image Quality Diagnostic – this one can unfortunately be run only by using the online software and is the best for determining if a printhead is failing:
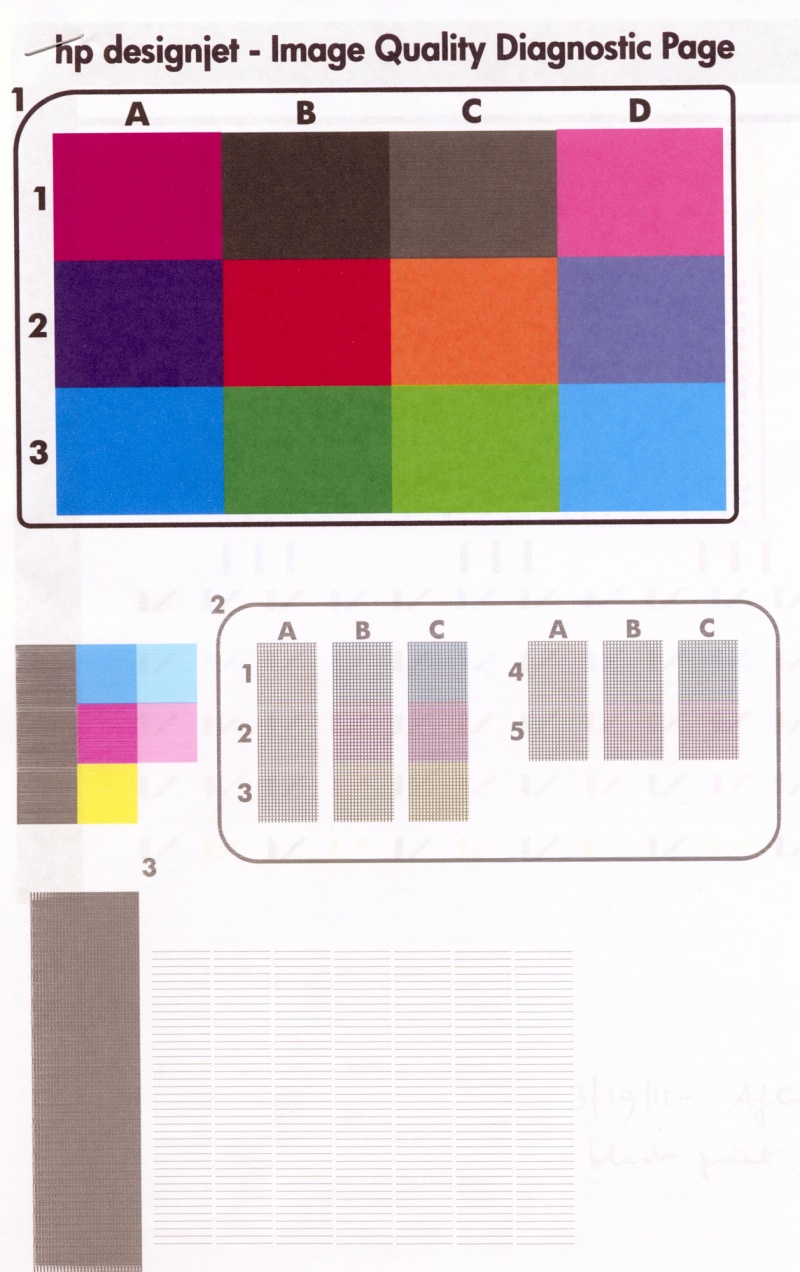
No real issues are disclosed here but printhead alignment is called for, judging my some of the colored squares in the center section. The full interpretive section for the above appears here.
Then I ran a printhead alignment which can either be done using the online utility or using the button presses illustrated here:
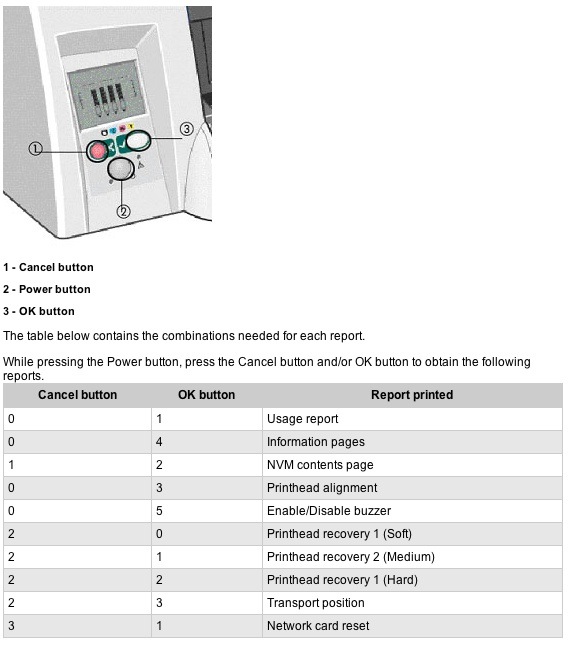
This did disclose a problem with the black printhead:
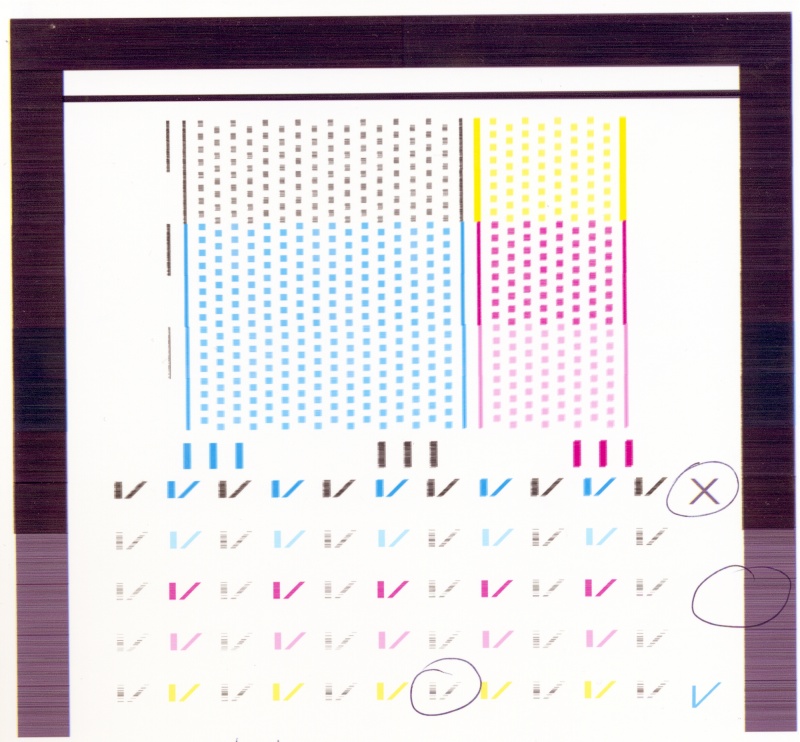
The large ‘X’ mark above testifies to a worn or blocked head.
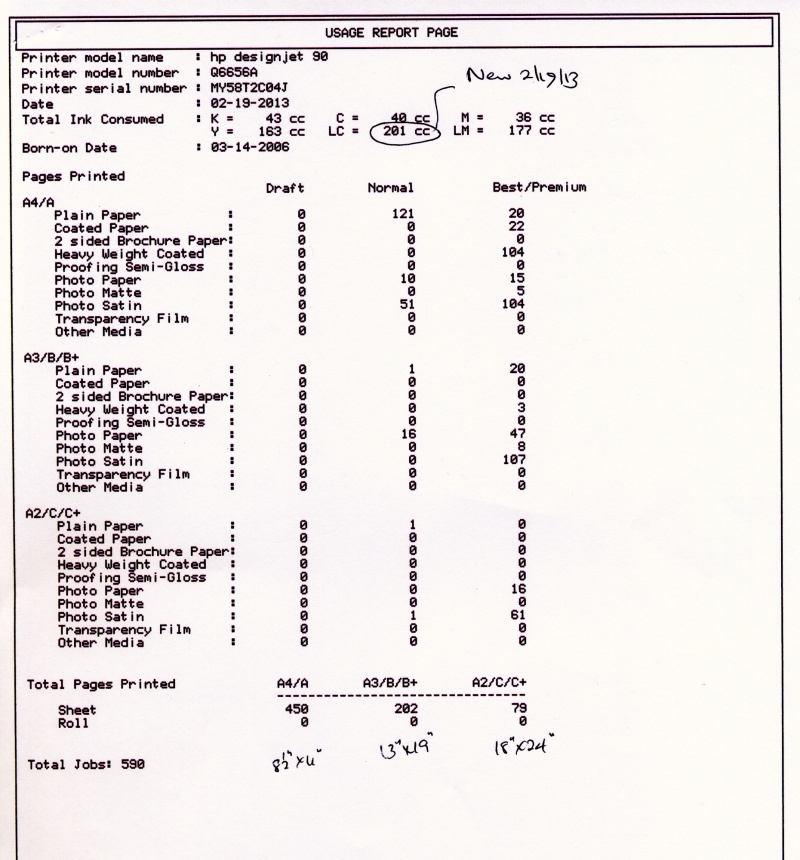
Before deciding on cleaning or replacement of the head I ran the ‘Information Pages’ printout (see above) and got this:
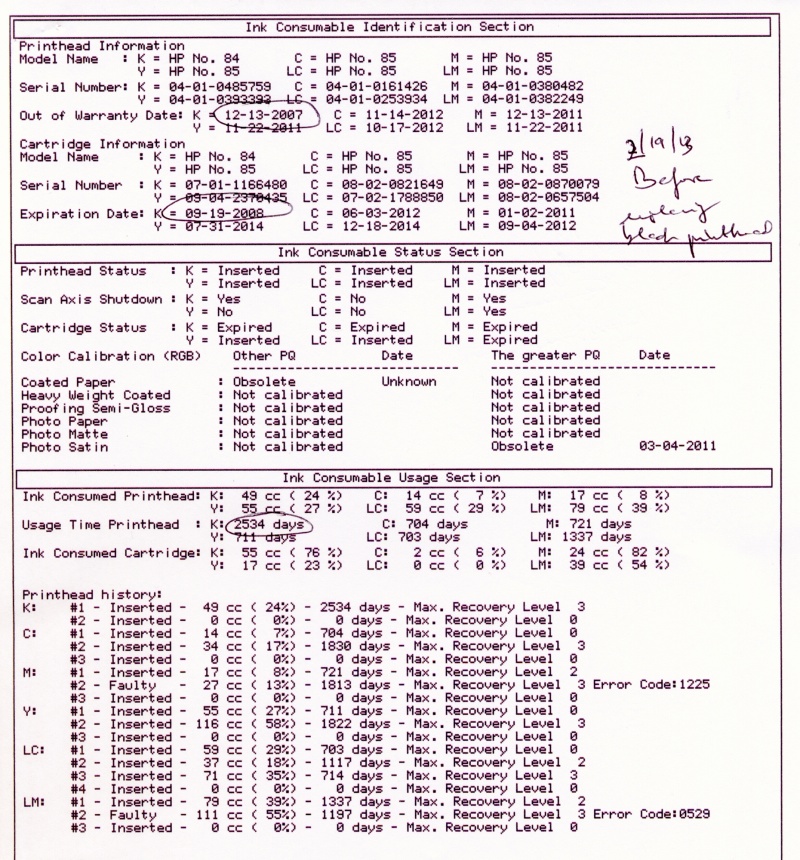
Gaack! The black printhead is 2,534 days old, meaning 6.9 years. It’s the one which came with the printer when I bought it new in 2006! So rather than trying to clean it, I simply replaced it. Pigs get slaughtered.
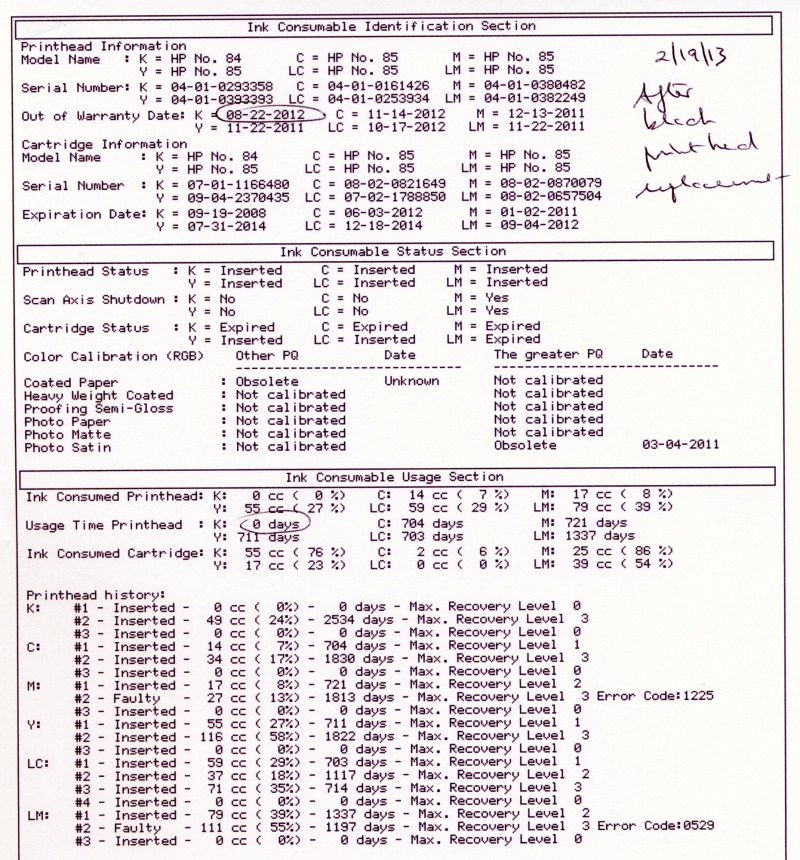
After replacement of the black printhead – the new one has been on my shelf for ages and is already out of warranty! Some users claim that heads over 30 months old will not work but obviously my experience does not bear this out.
When a printhead is replaced in these machines, they automatically run a printhead alignment which takes some 10 minutes and requires one sheet of plain paper.
Here’s what I got:
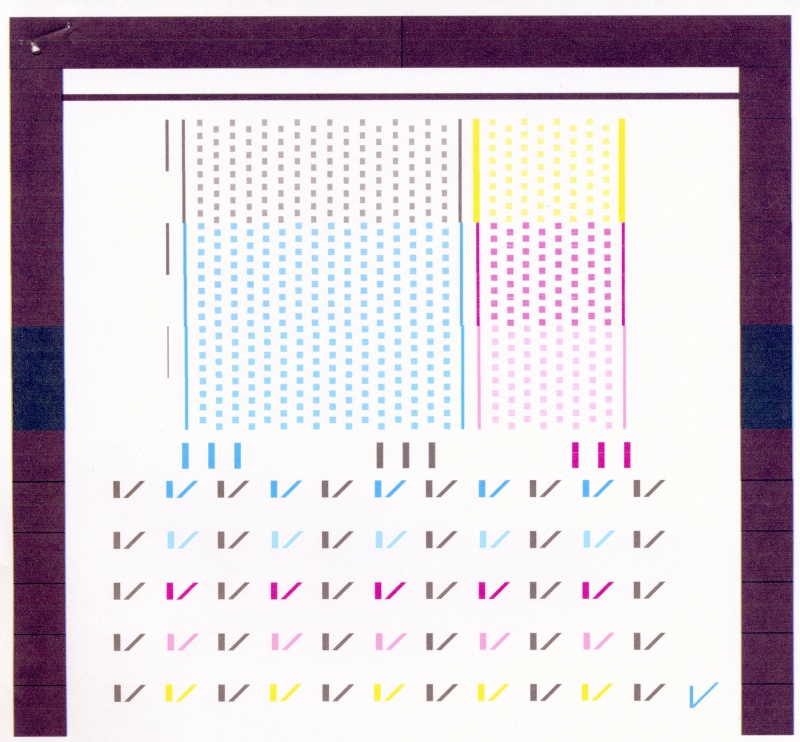
All is well.
Finally, out of curiosity, I ran the ‘Paper Usage’ report:
Some advice on older DesignJet printers:
Would I buy one of these used? Only if I could see the Usage Reports and Diagnostics shown above. Many were used by printshops which have beaten the heck out of them. New heads – there are six – run $35 each and cartridges cost a similar amount, so all new heads and supplies total $420. Add $35 for feed tubes. No bargain. Further, if the printer has been unplugged for any period of time, reckon on changing the clogged feed tubes as I had to do when mine went into storage for a few months when I moved a few years back. I explain how to do that here.
Bottom line? I would not pay more than $200-400 for a lightly used HP DJ90/130 (18″/24″) printer, anticipating that some parts will have to be replaced.
Spare parts:
I get mine from Spare Parts Warehouse. The ink feed tube assembly runs $35 and is easy to replace.
Would I buy a new HP printer? Hell NO. I would not buy anything from America’s worst run business whose customer service is a joke. Buy an Epson. The 24″ model runs $3,000 but they will fix it for you when it breaks.
Result:
Success. Perfect blacks were restored.
Here’s the print which was giving me problems:

In the extract, below, you can see a tear sheet of the old print, before the repair, superimposed on the new – night and day:

Printhead failure and analysis:
I have illustrated this before but it bears repeating. Right after the annual checkup, above, the DJ started printing everything with a green cast. This indicates printhead failure as ink levels were fine.
Here is the analysis chart:

I ran the diagnostic report using the online HP utility and this is what I got:
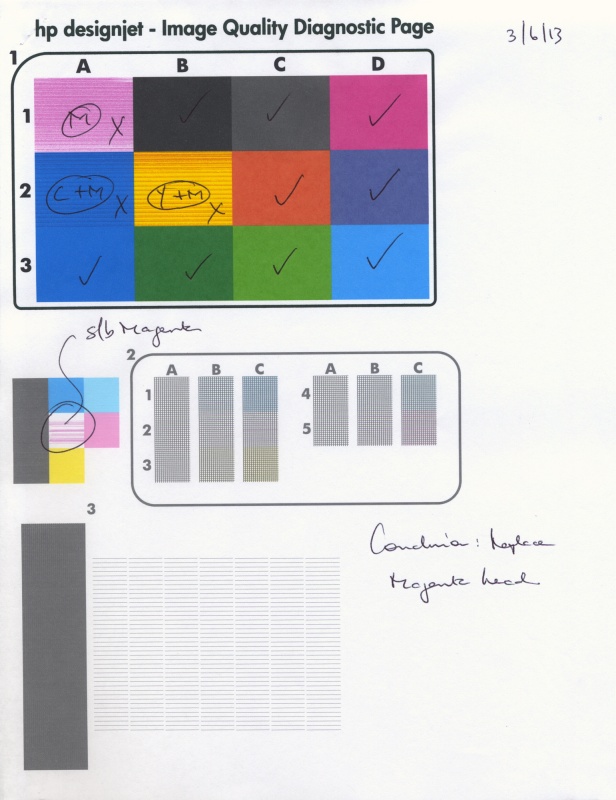
Diagnostic report showing printhead failure.
Comparing with the above chart, you can see that the color patches at A1 (should be magenta), A2 (should be purple) and B2 (should be red) are faulty.
The chart states that A1=M, A2-C+M and B2=Y+M. Note also that the central patch in the left middle section is wrong – it should be magenta. M (magenta) is the common factor to all four error conditions, so I concluded that the Magenta printhead was faulty. $35 to B&H later and it was replaced (a 30 second task) – do insert plain paper when doing this as a printhead alignment chart will be automatically printed when a head is replaced, and the printhead alignment will be performed automatically. It takes some 10 minutes, so be patient. Sure enough, re-running the diagnostic report showed all is well and the DesignJet is back to perfect operating condition.