Nikkor AF 35-70mm f/2.8D zoom lens

A fine optic.

My latest excuse for adding inexpensive, older Nikkors to my collection is “Roy made me do it”, the Roy in question being none other than English photographer Roy Hammans whose work I greatly enjoy. Now if some guy with a burgeoning check book and conflicted interests – you know, one of those ‘reviewers’ who gets gear free from the manufacturer – tells me something is good, I disregard the ‘advice’ and turn the page. But when a great photographer tell me this is one superb lens at a bargain price, and one which he has happily used for two decades, I think nothing of simply plonking down my cash and waiting for the mail man.

My latest addition is Nikon’s mid-range pro zoom of the 1990s. It’s autofocus and fixed maximum aperture, beautifully made in an all metal barrel, and goes for a song. While closest focus is 2 feet, it will go down to 1:4 life-size at 35mm when a small button is pressed and the focus ring turned. That’s pretty close to the front element at the minimum focus distance and you have to focus manually, but it’s handy in a pinch.

On the camera at 70mm and off at 35mm in Macro mode.

The front element is exposed so a filter and/or hood probably make(s) good sense for protection. The front of the lens rotates with focus so this is not the ideal lens for use with a polarizing filter. The lens uses push-pull zooming like the 75-150 profiled earlier and shows very minor zoom creep when extended at 35mm with the lens pointed to the sky. No effect in real world use, as the zoom pretty much stays put where you last left it. Everything else you need to know is in Roy’s review and test data. This lens is AF but has no VR. There’s a lock for the minimum aperture on the related ring which is used for Aperture Priority automated exposure metering. Contrast is high even directly into the sun, definition is excellent across the frame at all apertures and autofocus is fast.

Roy prepared a very data rich analysis when educating me about the lens, which you can read by clicking the picture below. His mouseover illustrations are especially informative, permitting instant comparisons between results at different apertures. The minimal loss in definition from diffraction at f22 is especially noteworthy:

Click the picture for Roy Hammans’s Nikkor 35-70 f/2.8 tests and comments.

Since this lens was discontinued, Nikon has made its mid-range zooms wider and bulkier – and they cost a lot! Meaning four to five times as much. If your other lenses mesh nicely with the 35-70mm range, look no further, unless you really must have Vibration Reduction. This lens has none.

Some snaps:

Blow Horn. At 70mm, f/16.

The Oakland Bay bridge. At 52mm, f/16.

Triumph. At 40mm, f/5.6, My vignette. I have never seen a motorcycle I did not like.

Fishermen’s Wharf, SF. At 52mm, f/6.7. My vignette.

Self portrait with bike. My vignette. At 35mm, f/13.

Fog City Diner. Sun in frame. I used f/22 to get the star effect. Note only minor ‘ghosting’.

Pier 9. At 48mm, f/11.

Wharf. Lots of these, many in poor shape, in San Francisco. At 58mm, f/6.7.

I have created a lens profile for use with Lightroom 3 and 4 and Photoshop CS4 or later. You can find it here. This profile will make correction of distortion and vignetting a one click process, once installed.

The Nikon D700 and geotagging – Part I

Where was I?

The addition of enhanced geotagging in Lightroom 4 prompted me into looking at options for recording GPS coordinates using the Nikon D700. The camera provides EXIF data fields to store latitude, longitude, altitude (!) and time. Many smart phones, like the iPhone, already record such data and the capability is increasingly making its way into point-and-shoot cameras as they desperately try to postpone the day when they will be history, trampled into the technological dust by cell phones. However, full frame Nikons, which may be around a while yet, lack this technology, so a separate device has to be used.

I looked at Nikon’s GPS receiver and immediately crossed it off the list. It’s wrong in every way. It fits in the accessory shoe where it’s waiting to be wrenched off, and the camera will no longer fit in my camera bag with the unit mounted. It uses an ungainly cable to plug in to the ten pin socket on the front and it sucks on the camera’s battery for power. Switch the camera off and the unit is switched off, meaning 30+ seconds to reacquire a GPS lock when next switched on. (First data acquisition is typically 30-40 seconds with GPS devices, with changes recorded at 1 second intervals thereafter, as long as the unit remains powered up). Try and use the built-in pop up flash with the unit in the camera’s accessory shoe and you cannot. Finally, it’s silly priced at $195. Canon users can rejoice in the knowledge that if the Nikon’s unit is silly priced, the Canon’s means you are Rockefeller, as its GP-E2 costs $270. In that case, of course, you can afford it. It works on the 5D/II, 5D/III and some of the ‘pro’ bodies whose nomenclature I forget. Doubtless aftermarket solutions exist at sane prices.

The right way to do this is to use a very small Bluetooth receiver which plugs directly into the D700’s (or D800/D3/D4) body, deriving GPS data from a separate GPS data logger. The data logger has its own battery to do the heavy lifting of acquiring coordinates from satellites, transmitting these to the receiver on the camera, the latter using modest amounts of power from the camera’s battery for the Bluetooth circuitry only. The logger can be left on all day, as it has a ten hour life, so the reacquisition problem goes away even if the D700 is turned off, as the GPS logger remains on at all times.

The only snags I can see is that you have to remember to recharge the battery in the GPS logger and that there is no ten-pin pass through port, so if you want to use any other device which needs the port, like a cable release, you are out of luck. However, the receiver does have a mini-coaxial socket for remotes so if I can find the right cable I should be able to use my wireless remote uninterrupted. Well, there is one other snag, but it’s unlikely to bother me. the software which comes with the logger will run on Windows only, displaying your journey details. It’s not a snag as it will be a cold day in hell before I ever use Windows again and and I really do not need to retrace my travels. All that matters to me is knowing where the pictures were taken.

The GPS Bluetooth receiver.

The receiver ran $60 on eBay and as the grammar-free English confirms, it’s shipped from China. The vendor is named “photohobby” and lists the device as “Bluetooth GPS adapter AK-4NII for Nikon D4 D200 D300 D300s D700 D2Xs D3 D3s D3x”.

The GPS device itself looks like this – “photohobby” lists a large range of devices which will work:

i-Blue MobileMate 886 Mini Bluetooth GPS Receiver.

I chose this one because it was the smallest and lightest out there, yet still promises a 10 hour battery life. You keep it in your pocket or in the camera bag, switched on while snapping. It cost $47 shipped from CA to CA, Amazon and many others carry it, and comes with USB and car charger cables. Weight is negligible.

Thus my total geotagging investment is $106, or almost half the price of the Nikon OEM solution with its poorly thought out design.

Now, I would love to tell you I have upgraded to Lightroom 4 and gush on about how wonderful it is but there are two reasons I cannot do so. First, I’m not some whore who adulates Adobe in print because I make a living from teaching the illiterate how to use their products. Second, Adobe’s servers are down and I cannot download the upgrade. What else is new?

However, the geotagging functions in LR4 seem easy to use and I’m of the mind that soon geotagging data will be expected, rather than just a novelty. Here’s a snap of how photo locations appear in LR4:

Geotagging in Lightroom 4.

More in Part II when the mail from the People’s Republic arrives. Hopefully, Adobe’s servers will have been fixed by then.

Alternative approaches:

As I seem to be getting a lot of emails on alternative GPS recording methods, all of which I researched before writing the above. Here’s is why I avoided them:

  • Use software to extract GPS data from your smartphone or GPS device, then sync it with your photographs, hoping that you remembered to sync the camera’s clock with the one in the GPS source as that’s the lookup field used for matching. Uh huh.
  • Hack your iPhone to unlock it using something like Cydia, which permits you to access your iPhone’s GPS data stream and Bluetooth output with like functionality to the i-Blue gadget I bought, above. And you are OK with draining your iPhone’s battery really fast? And you are OK with re-hacking it every time Apple does a software update and disables past hacks? And you don’t care if you can’t make calls when you brick your iPhone and have to restore it?

I guess it all comes down to what your time is worth and whether you prefer futzing about to making pictures.

Nikkor-Q 200mm f/4 lens

Another insane bargain.

This 200mm telephoto lens dates from 1971 and is the one to own if you love the early all metal designs, a broad scalloped focus collar and a similarly designed aperture ring. More importantly, how does gorgeous rendition of out-of-focus areas sound? I love the feel of this lens, so reminiscent of 1960s vintage Leitz Summicrons, but I would suggest you buy one regardless of whether you even plan to use it.

You see, this lens is the ultimate exemplar of optical and mechanical engineering. Further, as with the 500mm f/8 Reflex Nikkor, digital processing technology really brings it into the sweet spot for photographers. Forget the reviews, most dating from the film era. Processed in LR3 with my usual 86 Sharpness import setting, this lens is as good as it gets. Better still, the balance on the D700 is perfect. Sharpness across the frame is the same regardless of aperture, and there’s maybe one stop of corner vignetting at f/4, falling to nothing by f/8, and easily corrected in Lightroom. For ‘bokeh’ nuts, the out of focus bits are beautifully rendered. Contrast is a tad lower than that in more recent Nikkors, easily juiced in LR when needed. There is very modest color fringing at f/4 and f/5.6, easily and perfectly correctable in Lightroom 3, and only required if you are making large prints. Another example where modern processing technology has given new life to a very old lens.

At 6 1/4″ with the hood collapsed this is no modern resin/polycarbonate midget. I owned the Leitz Telyt 200/4 of the period for many years and it was similar optically, but inferior mechanically. I can say with comfort that this is, mechanically, the best long lens I have ever handled. I have also owned the Leitz 180mm f/3.4 Apo Telyt-R which was superior optically, if not by much, but inferior mechanically. Another 200mm I have owned is the Canon f/2.8L AF which is optically the best 200mm I have used, and mechanically OK. On a construction quality level, I would rate the Leitz 200 an 8, the Leitz 180 a 7, the Canon 200 an 8 and the Nikkor a 10. Optically the scores would be 7/9/10/8, respectively.

Shown here with built-in hood extended.

The feel of the focus collar could not be improved. Unlike the light action of lenses like the 50mm Nikkor-H f/2, this has a substantial resistance to motion which meshes perfectly with the balance, size and ergonomics of the optic.

And if you want to see how lenses were engraved before the days of chintzy screen printing, feast your eyes on this:

Engraving quality to die for.

The finish is stove baked enamel and black sheen for the most part (you can feel and hear the lathe’s tool with a fingernail drawn longitudinally across the sheen parts) and the chromed components are Leica-quality 1960s chrome. That means they are as good as it gets.

Mine has been converted to AI specifications, as the small rear aperture marker strip testifies, even though it is redundant on the D700/D800/D3/D4 FF bodies. Collectors will recoil in horror at the prospect of machining this lens, but I’m a photographer, not a museum curator.

Nothing is rushed here. The focus damping is deliberate and the focus throw long – some 180 degrees down to seven feet. Earlier models did not focus as close. Later ones started growing crappy rubber and vinyl parts. You can buy one of these for $39 (yes, thirty-nine mighty US dollars), almost mint, which is what I paid KEH.com for mine, plus another $33 to the estimable John White for AI conversion.

Goodness knows, I’m no gear collector, but in the case of this magnificent tool, I can see just putting it on display, not least for the price asked, should I become gaga and routinely start wetting myself. Further, spend an additional $30 for a CPU, glue it in place and you have a modern optic which will automatically report proper EXIF data and support matrix metering on a current Nikon DSLR body. And you still have under $100 into it.

Some snaps. The lens is distinguished by wonderfully plastic rendering of out-of-focus areas and beautiful balance on the D700 body, being easily handheld. Most of these were taken at the ghastly tourist trap known as Fishermen’s Wharf in San Francisco, and the long focal length does a fine job of separating the wheat from the chaff:

Mad men. At f/8.

Alcatraz. I added the vignette. At f/4.

Porthole architecture. At f/5.6.

Gorgeous 3D rendering of the bird. I added the vignette. At f/5.6

The Letter. A 200mm lens excels at this sort of thing. At f/4.

Umbrellas. At f/4. Thank you, Mr. Leiter.

Number Nine. I added the vignette. At f/4.

As you can see, there is every reason to use this lens at full aperture. The D700’s focus confirmation indicator helps out when needed. The only thing which leaves me mystified is that someone actually sold the almost unused one I so happily call mine. Their loss.

You can download my custom lens correction profile, for use with PS or LR here. It removes minor vignetting at full aperture and corrects for very minor pincushion distortion at all apertures.

D700 dream trio

What the well dressed FX snapper is wearing.

Flash back to my youth and the snapper’s dream outfit was a Leica M2 with 35mm and 50mm f/2 Summicrons and the 90mm f/2.8 Tele Elmarit. The 90mm Summicron at that time was simply too big to carry around, with the compact and outstanding ApoSummicron only coming along much later. I owned and used all of those and they were simply the best the film world had to offer. SLRs changed all of that and DSLRs changed it further, with modern makers boasting zoom lenses of extraordinary quality, range and …. price, bulk and weight.

In planning my little D700 outfit it was not lost on me that the Dream Team for most Nikon pros consisted of:

  • 14-24 f/2.8 AF ED zoom, $1,997, 2.1 lbs.
  • 24-70 f/2.8 AF ED VR zoom, $1,887, 2.0 lbs.
  • 70-200 f/2.8 AF ED VR zoom, $2,397, 3.4 lbs.

I have used none of these but the large number of test reports suggests that each is superior to prime lenses at its respective focal lengths. But there are drawbacks. While quite possibly the most extraordinary design triumph in modern optics, the pregnant, distended front element of the 14-24mm zoom precludes the use of filters and invites damage. And the bulk and weight of all three is non-trivial, with the trio weighing in at no less than 7.5 lbs and costing $6,300 in total. Add in one body and a carrying case and you are close to 12 lbs of dead weight.

I took a more modest approach. I very much tend to a wide angle view of the world so was prepared to splash out on the best wide zoom I could afford, as a broad range here obviates the need to carry many lenses. AF would be nice to have, but not essential as most everything is sharp most of the time, VR no big deal for a wide lens but no option to delete it. Shame, as it adds a lot of bulk and adds little for wide angle photography. Fixed maximum apertures are nice to have and generally denote a lens made to a standard, not to a price. So I ended up with this combination:


My economy Dream team.

  • 16-35 f/4 AF ED VR zoom – new $1,140. 1.5 lbs.
  • 35-70 f/2.8 AF D AI-S zoom – used, mint $400. 1.5 lbs.
  • 75-150mm f/3.5 Nikon Series E zoom – used, mint $85. 1.1 lbs.

The 16-35 is a current model, is one stop slower than the 14-24 but has a flat front element which allows the use of filters. You lose 2mm at the wide end but gain 11mm at the long end and VR is thrown in, if not really necessary. I spent big on this as it replaces the 16mm, 18mm, 21mm, 24mm, 28mm and 35mm lenses, which also makes sense of the bulk and weight. The 35-70 was the pro zoom of the 1990s – push-pull zoom, outstanding optics and a very useful true macro range, with definition to match down to 25% of life size, at 35mm. AF is nice on a lens which sees a lot of use, build quality puts the current 16-35 lens to shame. The lens was strongly recommended to me by a photographer whose work I love – what better way to choose? More on this optic later. And the 75-150, while MF and ‘only’ Series E (Nikon’s attempt at a budget line a couple of decades back) is light, has a fixed maximum aperture and is so compact that it’s not something you hesitate to take along. I’ll add a CPU chip to it for proper EXIF recording for another $30, a simple DIY job. Total weight is 4.1 lbs, almost half the weight of the first outfit and cost was $1,624 in aggregate for one stop less, 2mm lost at the wide end and 50mm sacrificed at the long end, for a saving of over $4,600. To make the comparison fair, used lenses should be substituted in the first example but these premium Nikkors sell for very modest discounts used, so maybe the true amount saved is more like $4,000. Non-trivial however you look at it.

Best of all, despite the frugal approach, there are no compromises when it comes to optical quality. All three are outstanding with maybe the best being that little sleeper the 75-150, an optic with a deserved reputation amongst Nikon fans in the know. And at $85 a replacement will be cheaper than repair in the event of damage.

Adding a CPU to MF Nikkor lenses – Part I

Feature enhancement.

Background:

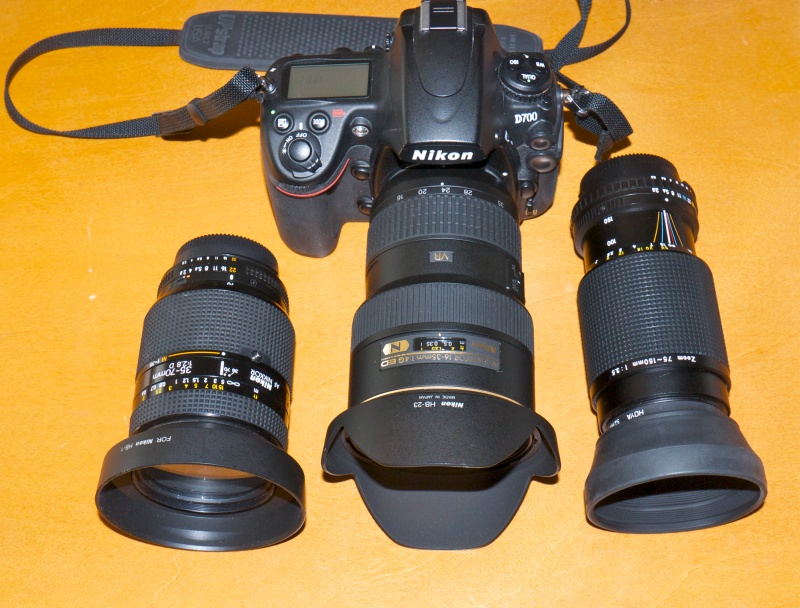
Manual Nikkor lenses lack a CPU, distinguished by 5 (AF D lenses with aperture ring) or 8 (AF-S G lenses with no aperture ring) electrical contacts on the back of later lenses. The CPU (really just a simple EPROM, hardly a CPU) confers a lot of modern functionality on the hardware when the CPU’s contacts meet like connectors in the body of the camera.

Advantages of a CPU:

  • Correct automatic recording of lens focal length in EXIF file data, except for zoom lenses.
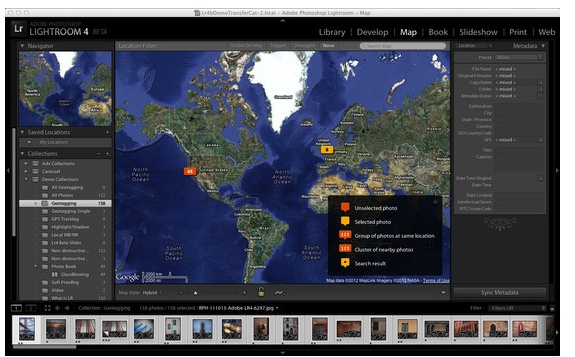
  • EXIF data for focal length is posted in a searchable field in Lightroom, unlike the case where a non-CPU lens is keyed in manually.
  • The limitation on nine non-CPU lenses keyed manually into the camera’s body disappears.
  • The user cannot forget to dial in the right lens, as is the case when using non-CPU lenses. Correct EXIF data are assured.
  • Lenses which focus incorrectly, as indicated by the focus confirmation light in the viewfinder, can be fine tuned for optimal focus.
  • Ai and Ai’d lenses can be set so that aperture control reverts to the aperture ring on the lens, not the control dial on the camera, permitting correct exposure in ‘A’ and ‘M’ modes. ‘P’ and ‘S’ modes require the lens be set to its minimum aperture and control reverts to the body, but correct exposure in these modes is not guaranteed, owing to the non-linear design of the aperture cam.
  • Ai-S lenses can be set so that aperture control is either with the aperture ring on the lens or the control dial on the camera, permitting correct exposure in ‘A’, ‘P’, ‘S’ and ‘M’ modes. ‘P’ and ‘S’ modes require the lens be set to its minimum aperture and control reverts to the body; correct exposure in these modes is retained, owing to the linear design of the aperture cam.
  • Exposure automation is no longer limited to Aperture priority.
  • Full matrix metering becomes available and I confess I am becoming a devotee given how good it is. Non-CPU lenses use matrix metering only if the ‘non-CPU’ lens data is entered using the LCD on the rear of the camera.
  • Program and Shutter Priority exposure automation are added; non-CPU lenses support Manual and Aperture Priority only. Shutter Priority would seem especially useful for sports photographers.
  • Focus lock is an option – the picture cannot be taken unless the lens is correctly focused when focus lock is programmed ‘On’.
  • Enhanced fill-in flash capabilities are added.
  • On ‘pro’ bodies like the D700 the Command Dial wheels can be used to set aperture (in aperture priority mode) in preference to the aperture ring on the lens, the latter being left at minimum aperture at all times, like with an AF D lens. I confess I prefer to use the aperture ring as I support the lens with my left hand from below, but it’s an option.
  • A lens with CPU fitted permits the appropriate lens profile to be automatically applied on import in Lightroom 3/4/5 when using custom lens profiles.
  • Certain earlier Nikon DSLRs, which do not provide auto exposure when no CPU is fitted, will now do so, allowing the use of MF lenses on these bodies with full exposure automation.
  • One reader has reported that chipped lenses (programmed on a D700, for example) can be used with bodies – such as the D40 – that don’t allow input of non-CPU lens data.
  • Bodies with electronic aperture readouts in the viewfinder which do not otherwise report the aperture to which the lens is set will now report it if aperture control is passed from the body to the aperture ring on the lens.

I am a huge fan of early Nikkors – Ai and pre-Ai with Ai conversion as, in my opinion, the construction and operating ‘feel’ of these lenses have never been surpassed, and the optics are outstanding on my D700. They are generally incredibly inexpensive, too, with near-mint copies easily found. As I never use ‘S’ or ‘P’ exposure modes, the limitations on auto exposure for these pre-Ai-S lenses, above, do not trouble me.

What I am aiming to accomplish with these articles:

Having had a couple of really old Nikkors converted for AI operation on my D700, I began to realize some of the shortcomings of not having a CPU in those lenses, so I did some investigating. My due diligence disclosed that there is a substantial body of knowledge relating to updating old manual focus Nikkor lenses by adding a CPU, that this knowledge is not to be found in one place, and that a programmable CPU could be purchased for $30 from a Singapore eBay vendor. What I have done in this piece, and in the article which follows, is put simple instructions in one easily accessible place and added a substantial amount of detail based on my practical experience of installing CPUs in both Ai, Ai’d and Ai-S manual focus Nikkor lenses. I address aperture non-linearity issues in Ai and Ai’d lenses and how to avoid these. I illustrate the differences between aperture control approaches. All of this was done using my D700, but much of it likely applies to other Nikon DSLR bodies.

Finally, I integrate the CPU installation and programming process with the use of custom tailored lens correction profiles for use in Lightroom and Photoshop, as the icing on the cake when a lens with a CPU installed is used.

Who can do this?

Anyone with two hands, one eye, an MF Nikkor, $30, maybe a screwdriver and jeweler’s file/Dremel/milling machine, some patience and some glue can install a CPU in most MF Nikkors. An engineering degree is not required. Some exotic lenses like the 55mm/1.2 and Noct cannot be easily adapted as there is simply insufficient room to install the CPU. But most Nikkors can be easily converted.

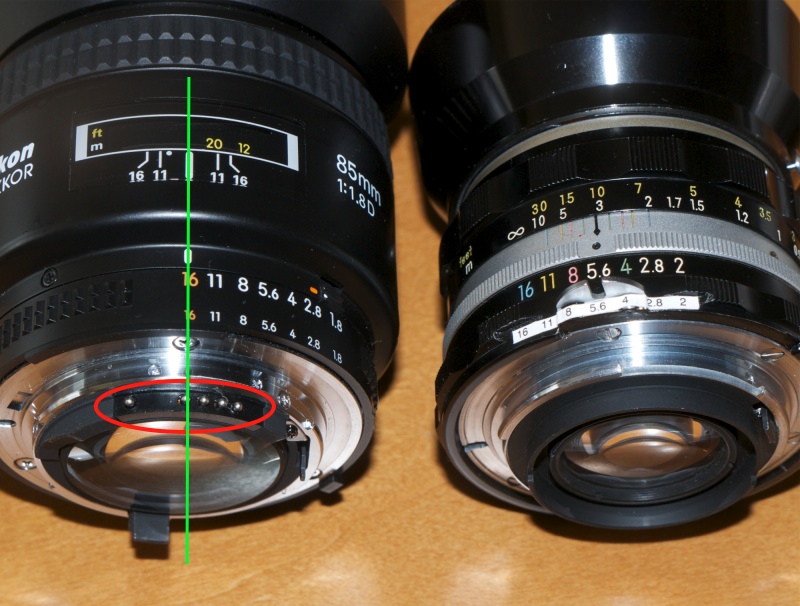
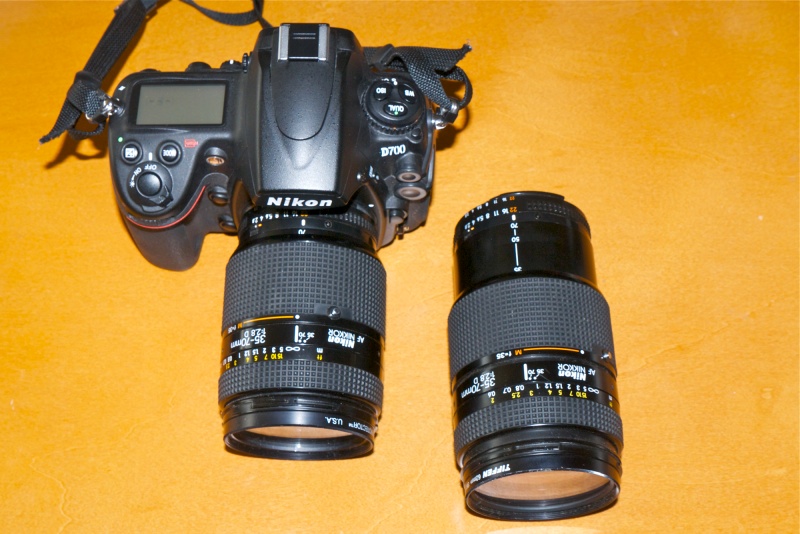
Red oval denotes the 5 CPU contacts on this AF D Nikkor.
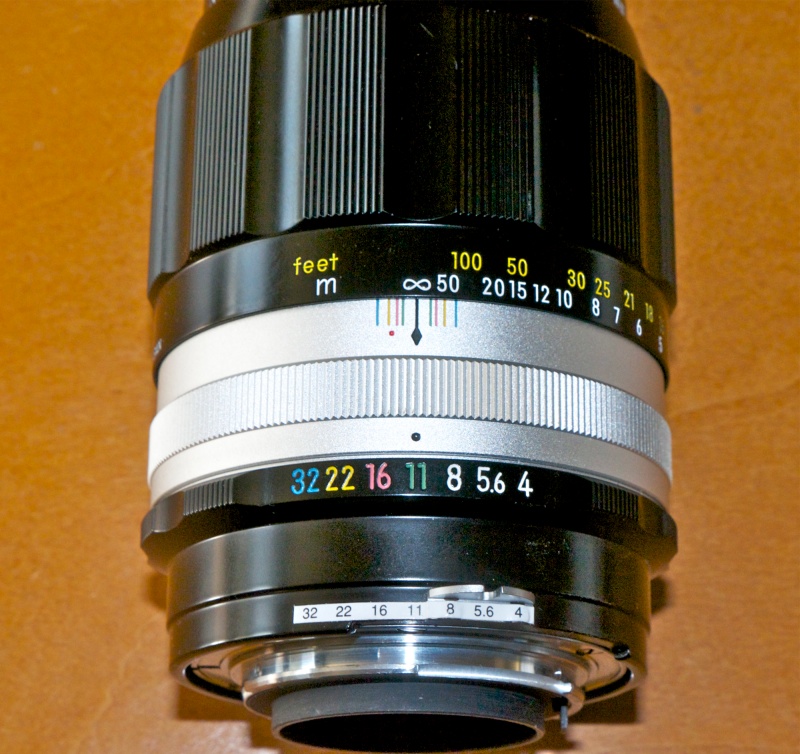
Green line denotes alignment of the fourth contact on the CPU with the focus mark.
Non CPU Nikkor on the right; this is my 50/2 converted to AI operation.

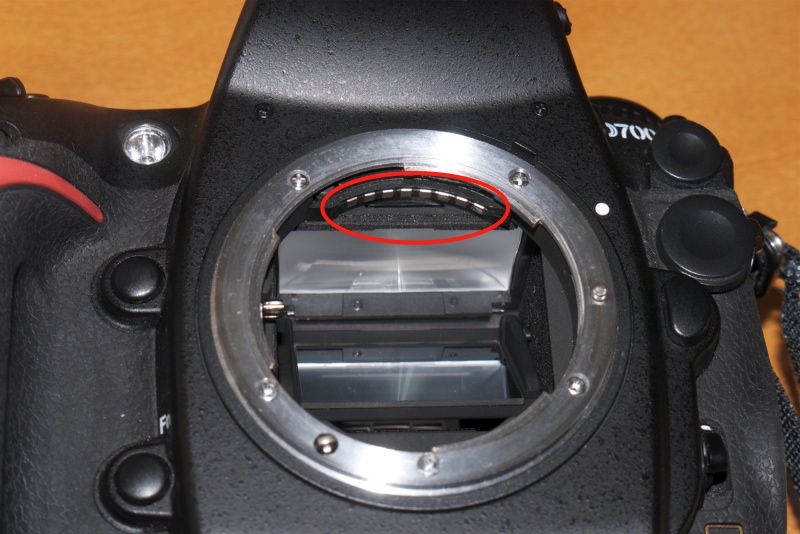
Corresponding contacts in the camera body. AF-S lenses use all eight; AF D use only five.

Source for the CPU:

Here is the information on the eBay seller – the price includes shipping. The reference to Leica in the listing is irrelevant:

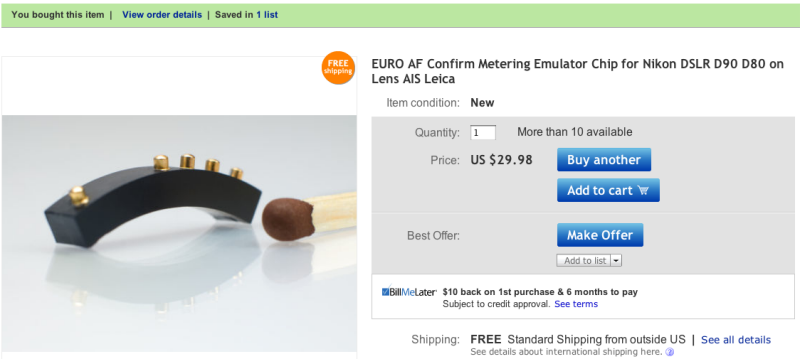
The vendor says that the CPU comes with an alignment template but if you follow this article all should be well even if you do not use it.

One reader advised this vendor is out of stock so try this one – look for ‘Dandelion Chip’. I do not know whether this Leitax CPU includes the ’60’ option to switch aperture control to the lens. If that’s important to you – meaning you are using pre-Ai-S lenses or prefer to use the aperture ring on the lens to the control dial on the camera – you should check before spending your money. See Part II of this article to understand what the ’60’ option does.

CPU alignment:

This CPU is simply glued into place on the rear of the lens’s internal barrel with the fourth pin aligned as shown by the green line in the picture above. However, the five contacts must not protrude beyond the periphery of the adjacent chrome bayonet mounting ring if proper fit in the camera’s body is to be assured. Likewise, they must not be too far recessed or no contact will be made.

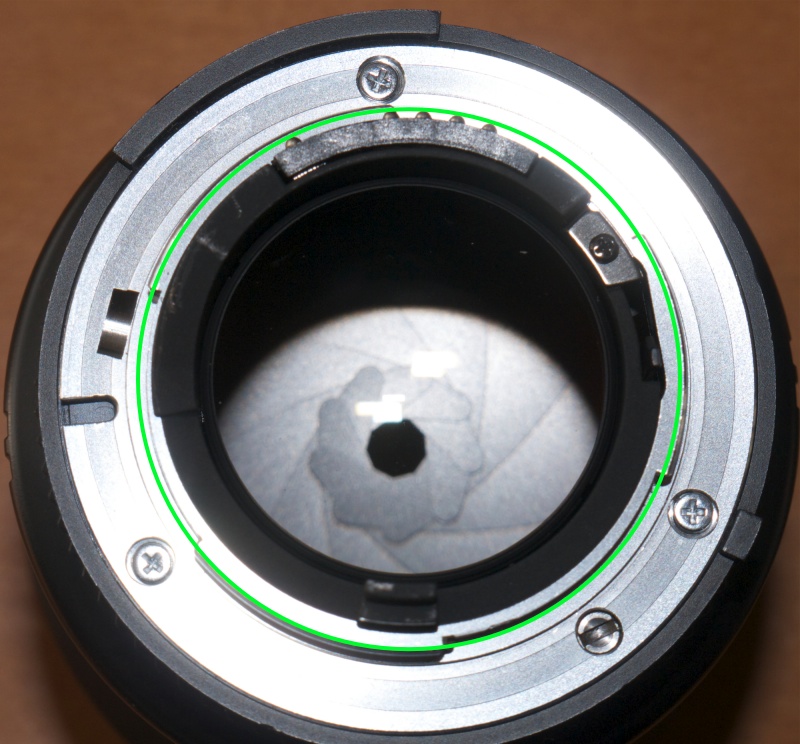
Green circle denotes correct protrusion of the five contacts.
This is on an 85mm f/1.8 AF Nikkor D.

So there are four scenarios:

  • The contacts protrude just so when the CPU is positioned on the barrel. Just glue the CPU in place, aligned as shown.
  • The contacts do not protrude enough. Glue a shim in place first to confer the appropriate stand-off, then the CPU, thus ensuring electrical contact.
  • The contacts protrude too far, risking damage to the camera and/or CPU. Remove metal from the barrel to ‘countersink’ the CPU appropriately.
  • There is insufficient room for installation of the CPU. (e.g. 55mm f/1.2, 58mm f/1.2 Noct). Delegate the job to an expert.

In the first two cases, no lens dismantling is needed. Glue only. In the third case, the internal baffle must be removed (generally requiring removal of three radial, countersunk Philips screws in the chromed bayonet flange), removing excess metal from the baffle with a Dremel cut-off tool, until the CPU is sufficiently recessed. It seems a modicum of material can also be removed from the base of the CPU but care is needed not to trash the CPU when doing this, so I do not recommend that approach. In the fourth case DIY is not recommended – seek out an expert. The idea of butchering a $3,000 Noct-Nikkor and getting it wrong is not one I want to contemplate!

Here are the key dimensions – the protrusion of the contacts and their distance from the outside edge of the bayonet flange:

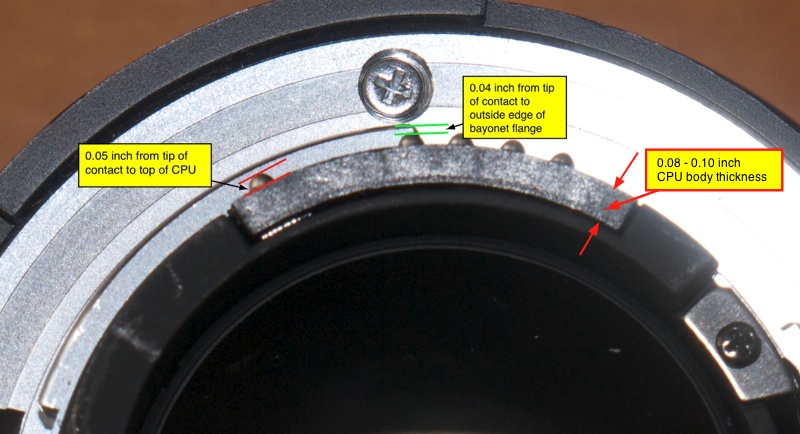
Dimensions, as measured on a factory AF D lens.

Here is the key longitudinal measurement – the contacts are centered between the green lines but, once again, it’s not that critical – look how broad the contacts in the camera body are, above:

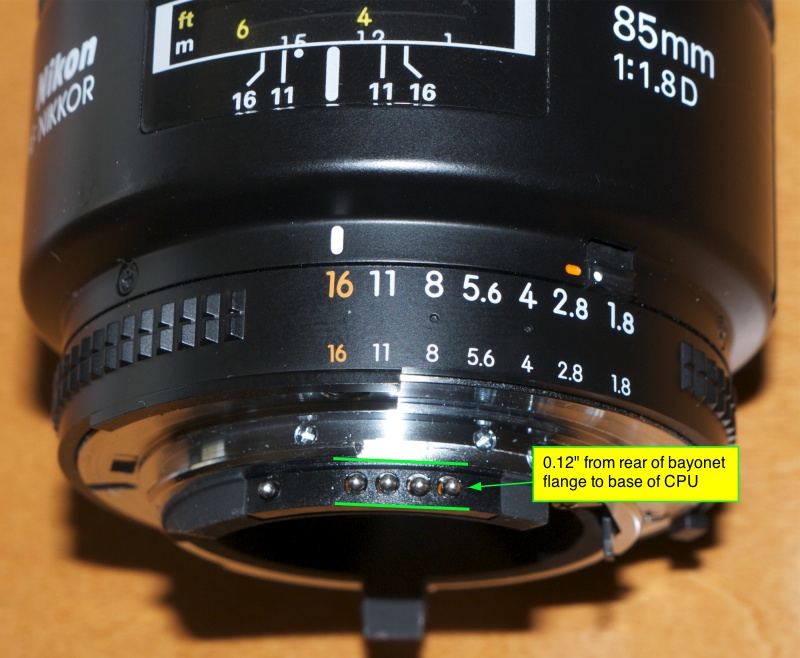
Longitudinal protrusion. Just look how shoddily made the CPU on this 85mm f/1.8D prosumer lens is!

Precision vs. accuracy:

I do not want to overemphasize the need for precision here. Reasonable accuracy is all that is called for. The contacts on the CPU are sprung for 0.05″ of travel, allowing for radial error, and as you can see from the above picture of the mating contacts in the camera body, you would have to be way off on axial placement to get it wrong. Looking at the above, if your Nikkor has 0.18″, give or take 0.01″ say, of clearance between the barrel and the outside edge of the bayonet flange, you should be able to simply glue it in place. Any less and you need a shim; any more and you will have to use a file on the barrel. As an example, my 50mm Nikkor-H of 1971 vintage measures a total of 0.16″, so 0.02″ of barrel would have to be removed before gluing the CPU in place.

General dimensional rule:

Based on my experience in adding CPUs to several lenses, any lens whose rear baffle external diameter is in the range 1.355″ through 1.426″ (34.62mm through 36.22mm) permits a simple glue-on CPU installation, with no need for machining. The ‘rear baffle’ referred to is the black ring protruding from the rear of the lens, inside the chrome bayonet mounting flange. Lenses with baffle diameters larger than this will need metal removed from the baffle to avoid damaging the CPU and/or camera’s contacts. Tow examples in my collection which needed such surgery – a few minutes with a Dremel cut off wheel and a file after removing the baffle – are the 100/4 Micro Nikkor Ai-S (1.621″ diameter – 41.17mm) and the 300/4.5 ED IF Ai-S (1.613″/40.97mm). Two others, the 28mm f/3.5 Ai’d and the 50mm f/1.4 Nikkor-S Ai’d are much trickier.

Choice of adhesive:

Which adhesive? I am no fan of Super Glue (cyanoacrylate). It is extremely dangerous should you get it on your fingers (two fingers become one), runs far too readily (though ‘gel’ consistencies are available) and has far too short an ‘open time’. I propose to use a two-part epoxy which has none of these drawbacks and also is far more reliable than the fussy Super Glue variants, working with a broad range of surfaces. The glue used must work with plastics and metal. The very last thing you want is for the CPU to become detached and get whacked by the camera’s mirror or trapped in the focal plane shutter, either scenario guaranteed to spoil your day. And what with the occasional whack from a rear lens cap when the lens is removed for storage, you really want this to last for the long-term, without having to baby it. Waiting 24 hours for the glue to cure seems like little to ask for peace of mind.

Programming:

The beauty of this CPU is that it is programmable using the camera! Once the CPU is in place, the lens is mounted on the body and the programming instructions are followed. The programming step serves to tell the generic CPU the maximum and minimum apertures of the lens and the focal length. Additionally, you can switch on focus lock (though I don’t see doing this with an MF lens) which will operate in ‘S’ shutter mode only, just as with any modern AF Nikkor. ‘C’ mode disables it.

This ‘CPU’ is a simple EPROM (Erasable, Programmable, Read Only Memory) meaning that if you make a mistake you can simply redo your work and your latest settings will be saved. The CPU has no variable or moving connections to the lens. It simply sits there, like a lump on a log, waiting to tell the camera body which lens it’s attached to, and the camera’s battery provides the power to do this.

Further, if your MF lens front focuses or back focuses (meaning the focus confirmation light does not come on at the optimal focus sharpness), you can correct for this when programming the CPU. For regular AF Nikkors you do this using the LCD panel and the Menu system. For CPU-modified lenses it’s done as part of the CPU programming step.

Non-OEM lenses and zooms:

The programming instructions are relatively well written and easy to follow. However, I hope to improve on them in Part II of this article, based on my practical experience. It is clear that Zeiss (and other non-OEM) lenses in Nikon mounts can be programmed to work correctly so long as there’s room to glue the CPU in place, but it’s unclear how one programs zoom lenses’ focal lengths. As the CPU is a passive device, it cannot report the correct focal length with zoom lenses, and there appears to be no way to state a focal length range in the programming instructions, so I expect I would enter the 75-150mm lens as ’75mm’ for identification purposes in EXIF data. Note also that my zoom is a fixed maximum aperture lens. I would expect that variable maximum aperture zooms would run into exposure problems as the CPU can only program one maximum aperture.

Coming in Part II:

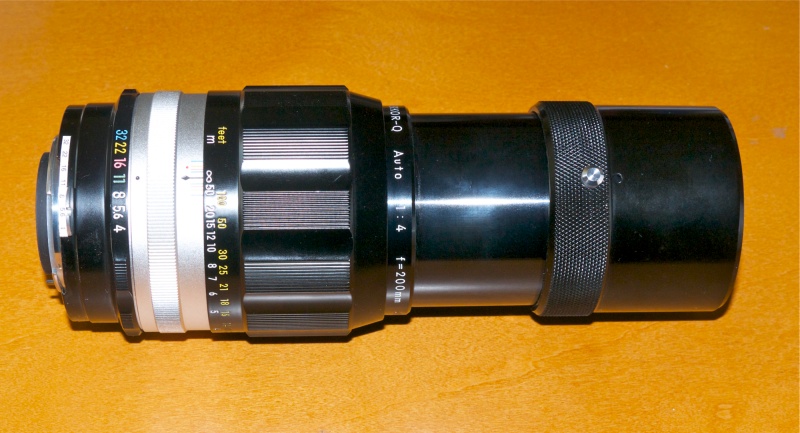
To cut a long story short, I have ordered several of these CPUs and when they arrive I’ll write about my experience in installing and programming. As a first pass I’ll try it on the newly AI-converted 50/2 H, 105/2.5 P and 200mm f/4 Q as the barrels are easily accessible even without removal of the rear chrome ring on the lens, and I should be able to do a dry run to confirm positioning and programmability using just two-sided 3M Scotch adhesive tape (very carefully!) for a temporary fit. If all is well, epoxy will be the next step.

The CPU will not, of course, add AF or VR, but it does add a lot of value to some great classic Nikkors for little time, effort and cost.

More in Part II.