Performance.
My primary use for the Mac Mini M4 is for processing and printing still photographs from either my Nikon D800 (36mb lossless compressed RAW files) or from my iPhone 12 Pro Max (32mb Apple Pro RAW) using Lightroom Classic. If video processing is your focus I suggest your research what your applications of choice require in terms of machine hardware.
Apart from the dramatic size and weight comparisons –
- Mac Pro – 54lbs, self contained.
- Mini – 1.5lbs, drive enclosure 10 lbs, DVD reader/burner – 2lbs, the last two external
– the CPU and GPU comparisons are also striking:
- The 2010 Mac Pro sports two 6-core 3.46gHz Intel CPUs, an Nvidia GTX980 4gb GPU and 80gbs of 1333MHz RAM.
- The Mini uses a 10 core 4.4gHz CPU, a 10 core GPU, all Apple Silicon and 16gb of 7500MHz LPDDR5X RAM.
Both machines boot from SSDs and data storage is on traditional spinning disk HDDs.
CPU performance: The Geekbench comparisons are instructive:
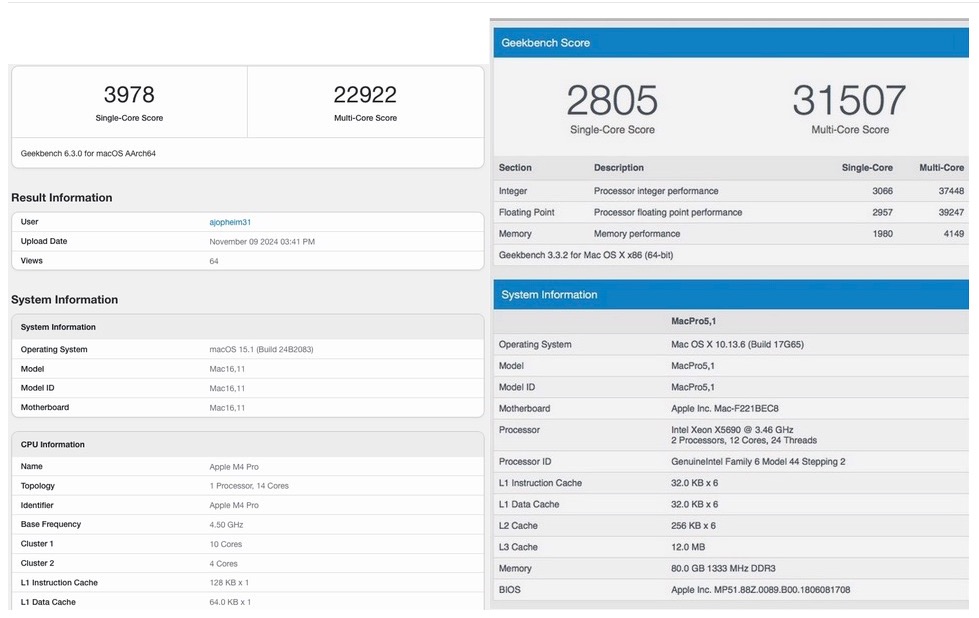
Mac Pro on the right.
Simply stated the Mini is 42% faster on single core tasks but 27% slower on multi-core tasks. Now Adobe claims that Lightroom Classic is optimized for Apple Silicon and uses multiple cores when processing. Who knows? I find it hard to believe anything from this poor integrity business. The same one that sold me a ‘perpetual’ license for LR6 only to make sure it did not run on Apple Silicon.
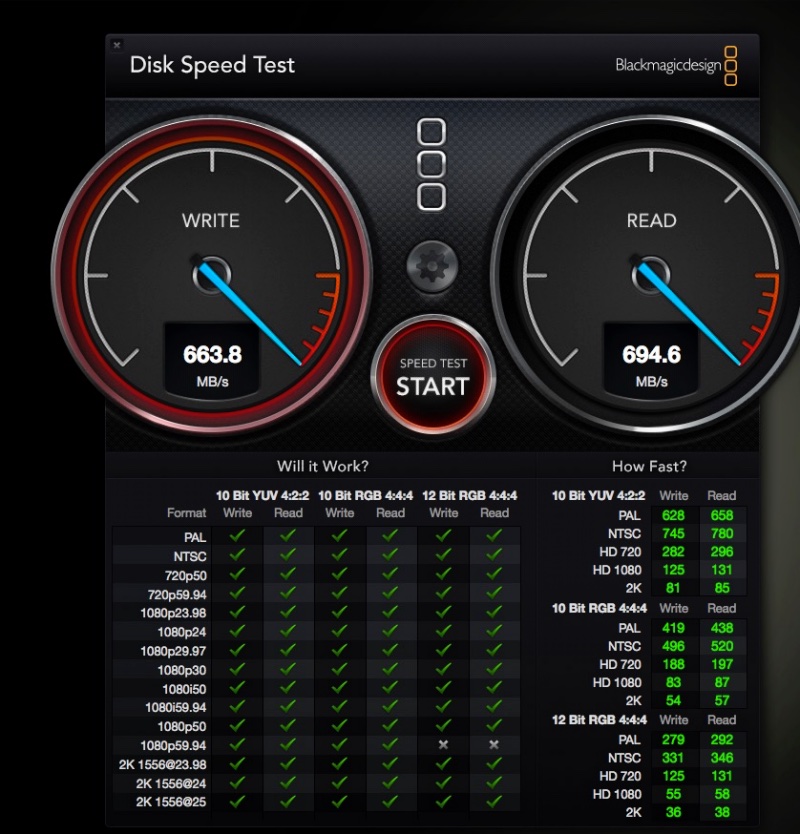
Disk speed: The Mac Mini’s internal SSD is far faster than the SSD in the Mac Pro:
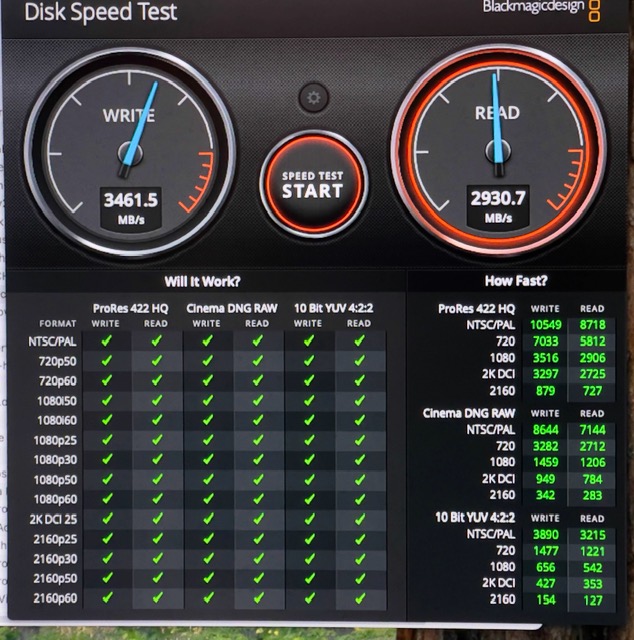
Mac Pro below.
This five fold speed increase contributes to the Mini’s fast start and application loading performance. LR takes 4 seconds to boot on the Mini (my picture catalog contains some 29,000 images) compared with a lengthy 20 seconds on the Mac Pro.
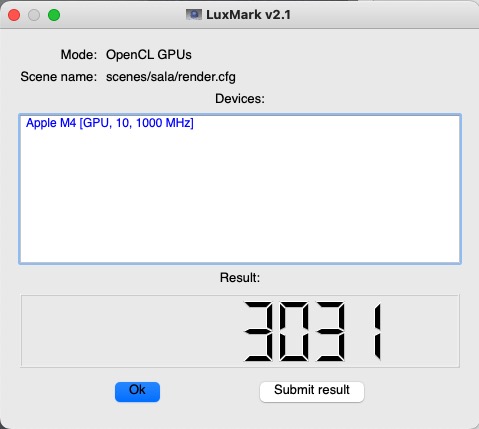
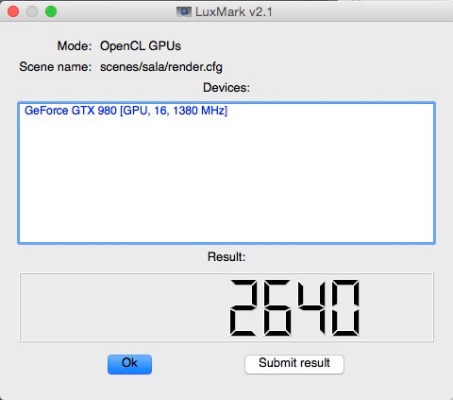
GPU performance: The Mac Pro used a very capable 4gb Nvidia GTX980 card which cost more back in the day than the Mac Mini M4! LuxMark comparisons show that the GPU in the Mini is 15% faster when rendering a complex scene:
Mac Pro below.
Performace with Lightroom: I’m no fan of subjective evaluations when it comes to processing speed but am finding that the Mini is pretty much identical in performance to the Mac Pro when processing images from the relatively large Nikon and iPhone files. With 1:1 previews you can fly through images by holding down an arrow key and when you cease the sharp preview pops up instantly. So the use experience is much the same, you have a minuscule box doing what a monster one did the past 15 years and power consumption is negligible by comparison (one small fan compared with 7 large ones (two of those in the GPU) and a power efficient CPU/GPU). The power supply section of the Mac Pro is alone maybe twice as large as the Mini, which also sports an integrated power supply unit which is tiny.
Security: Perhaps the greatest gain, as mentioned in the opening of Part I, is the availability of up to date security to fend off the bad guys. Yes, Ivan and Boris, I’m looking at you. Cost wise, while Apple continues its habit of ripping you off on disk storage ($200 extra for 256gb more – really!) the sub-$1000 package price (I had to add external disk drive and DVD enclosures to the $745 base price of the 512gb Mini) is a fraction of what the Mac Pro cost for much the same performance. Based on just a few days’ experience the Mac Mini M4 is recommended. The new computer takes up negligible space, costs a fraction of the 15 year old Mac Pro and is equally speedy on most operations. On disk read/write operations the Mac Mini M4 is far faster.
Internal SSD upgrades: Early teardowns of the Mac Mini M4 disclose that the NAND storage resides on a removable card. However, components on that card make it impossible to simply plug in a larger storage one as the Apple design ties the card to your particular machine. However, hackers with micro-soldering skills have unsoldered the two existing NAND modules from the card, replacing them with much larger ones for very low cost, and things work well. So you can bet that an aftermarket business will shortly arise offering this service. When you realize that Apple charges $200 for the jump from 256gb to 512gb, and $600 more to go from 256gb to 1tb, there’s money to be made from competing with Apple’s greed. So if you want a 1TB drive or greater it might make sense to buy the base 256gb $600 Mac Mini and wait for the market to offer upgrades.
If you cannot wait but still want to avoid Apple’s gouging, buy an external Thunderbolt SSD of large capacity and make that the boot drive. This 1tb Thunderbolt 4 example sells for $150. For best performance, be sure to plug it into one of the three rear sockets as the front ones are not Thunderbolt capable.
Location: My M4 Mini hides in the rear of the keyboard tray. The DVD drive is at the monitor’s lower left, along with the camera CF/SD card reader. The disk drive enclosure is in the footwell of the desk:
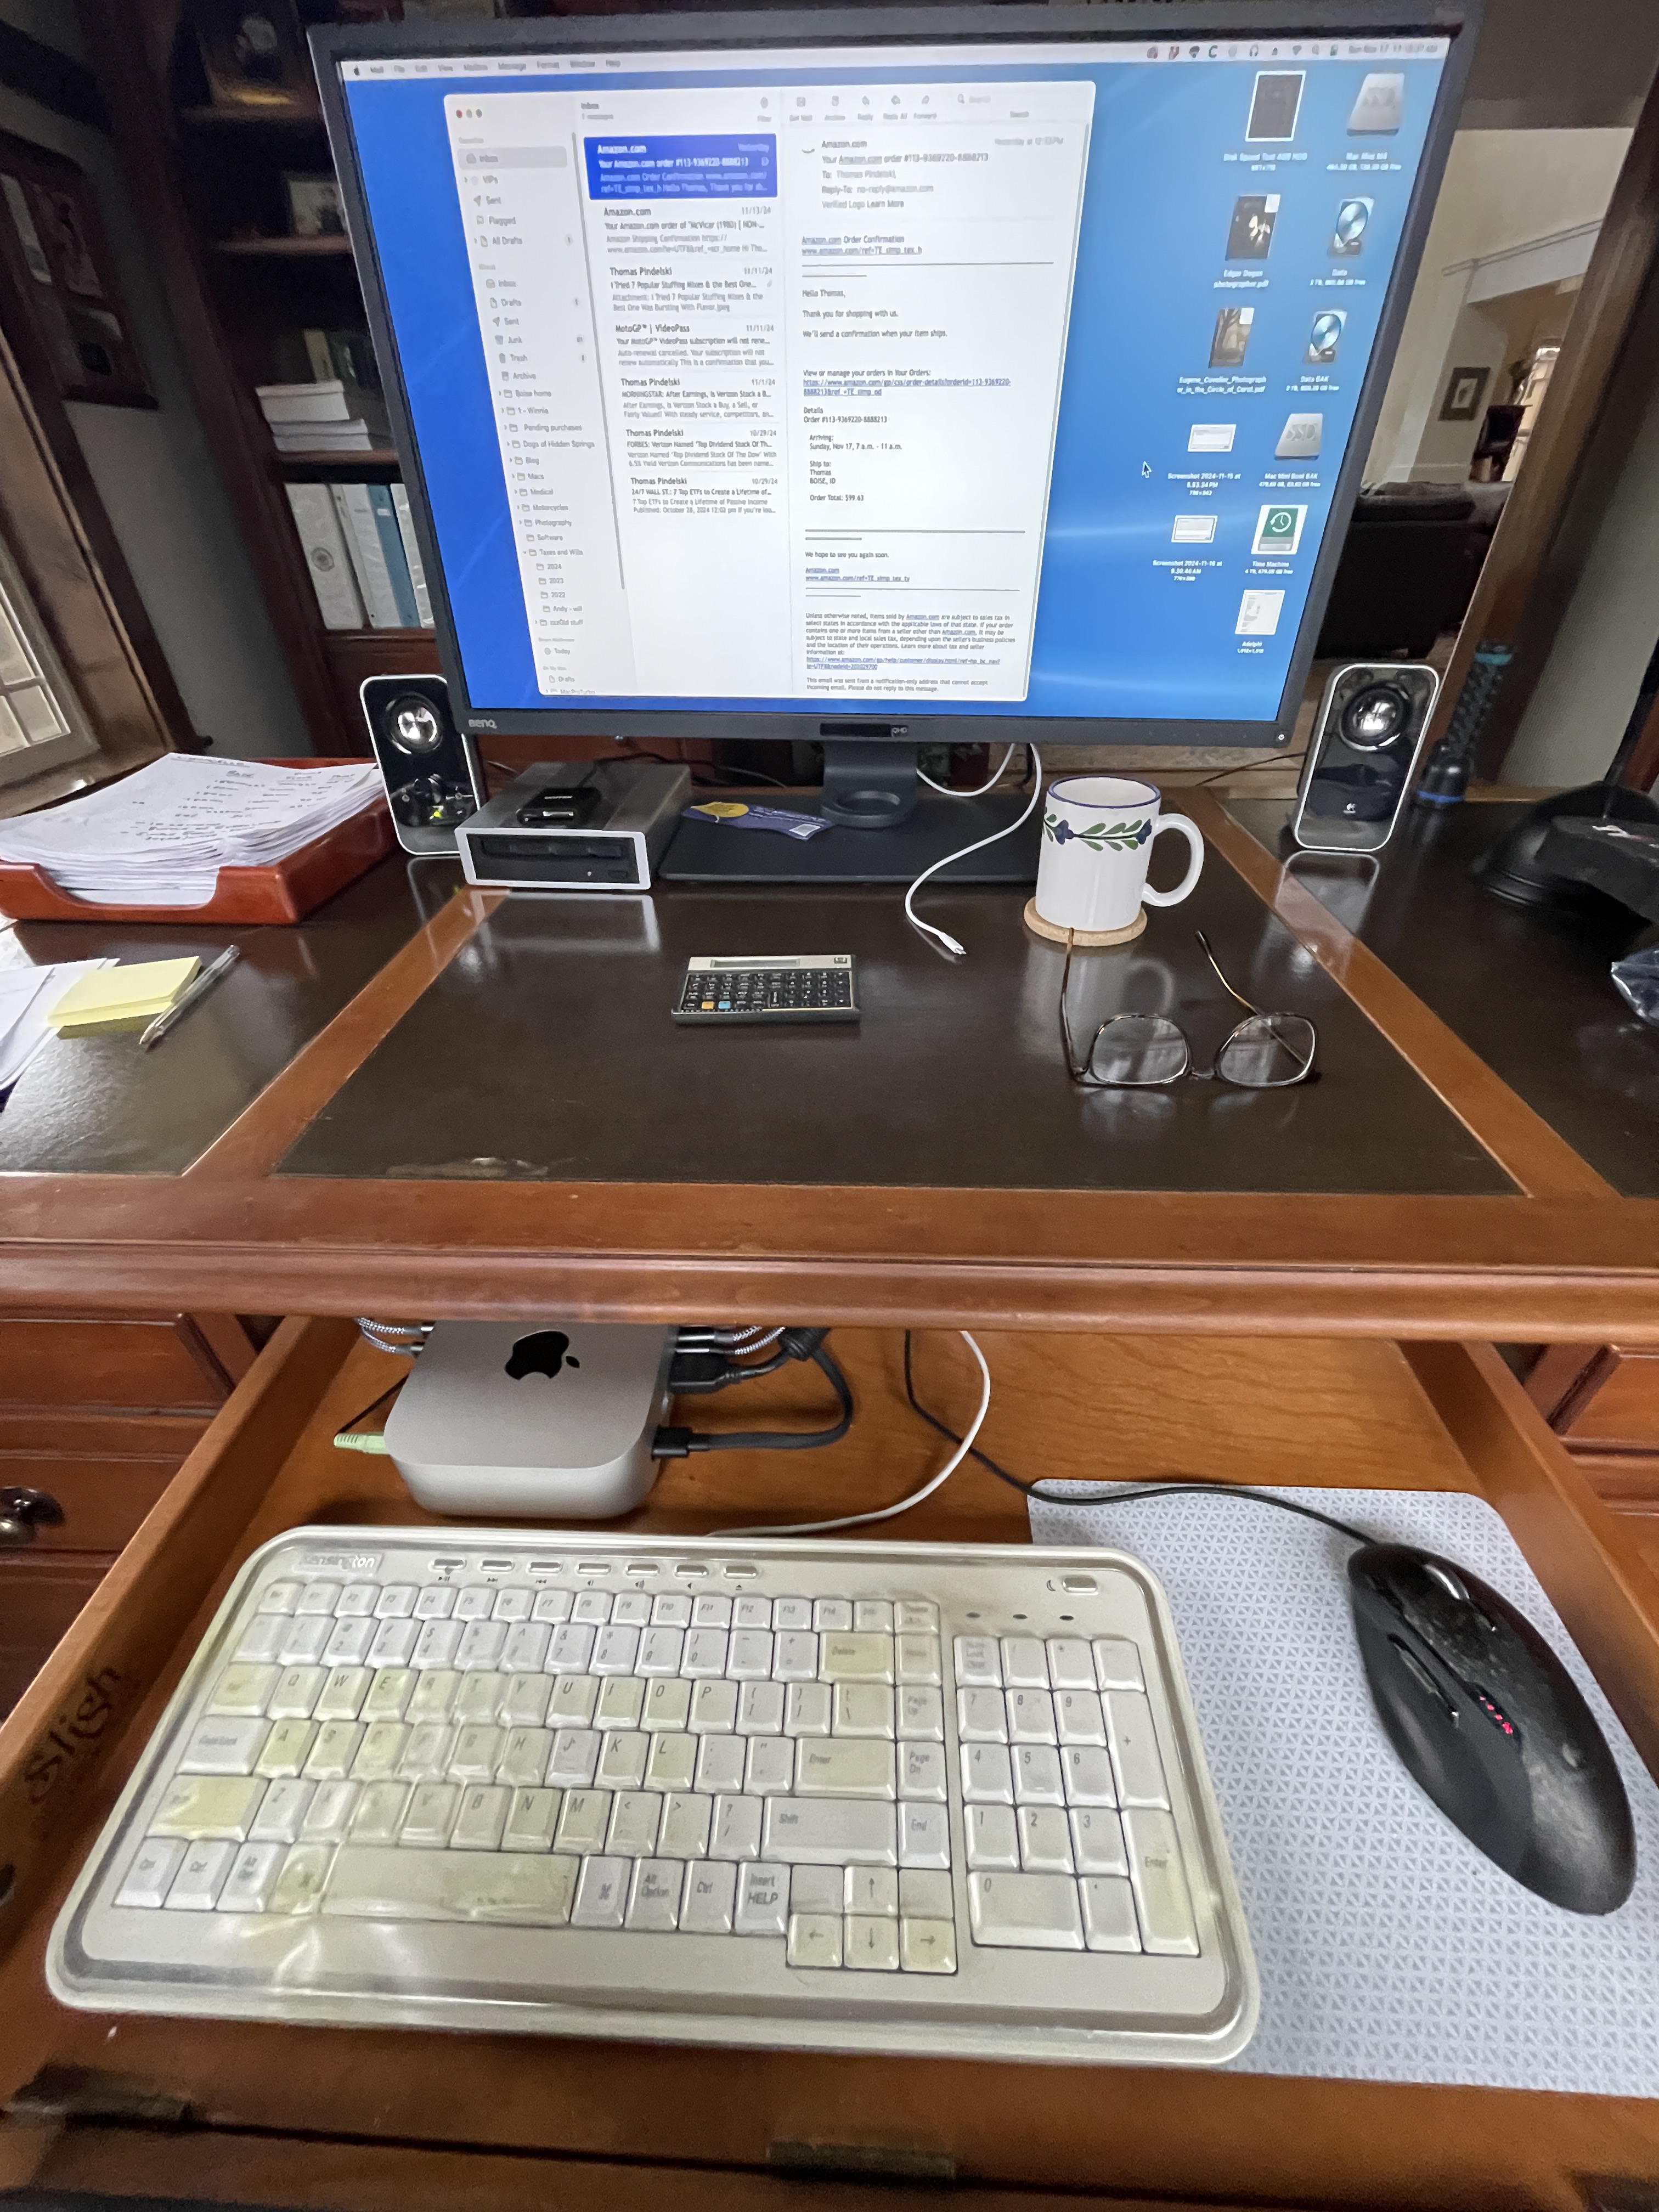
It looks pretty ugly with cables sprouting out in all directions,
so hiding the M4 Mini at the back of the keyboard tray makes
sense. Ventilation is adequate.
The front connections include a mouse, keyboard and loudspeakers. The three rear Thunderbolt 4/USB-C sockets connect a laser printer, the disc drives, the DVD drive and the camera card reader, the latter two through a two into one splitter. Then there is the HDMI cable for the monitor and the power supply cord.
Time to upgrade: If you’re thinking of upgrading your Intel Mac to the M4 chip set now would be a good time to do that before Pig’s cretinous tariffs kick in on January 20, 2025.