This could be the start of a beautiful friendship.
For an index of all Leica-related articles click here.
The previous owner has wisely covered the garish red ‘Leica’ logo.
Nothing screams ‘Steal me now’ louder.
The primary purpose of this article is to examine the use of Leica M lenses on the Leica SL2-S mirrorless body. Usage methods and anomalies are addressed. There are also a few words regarding the general features and usability of the SL2-S body.
A brief history:
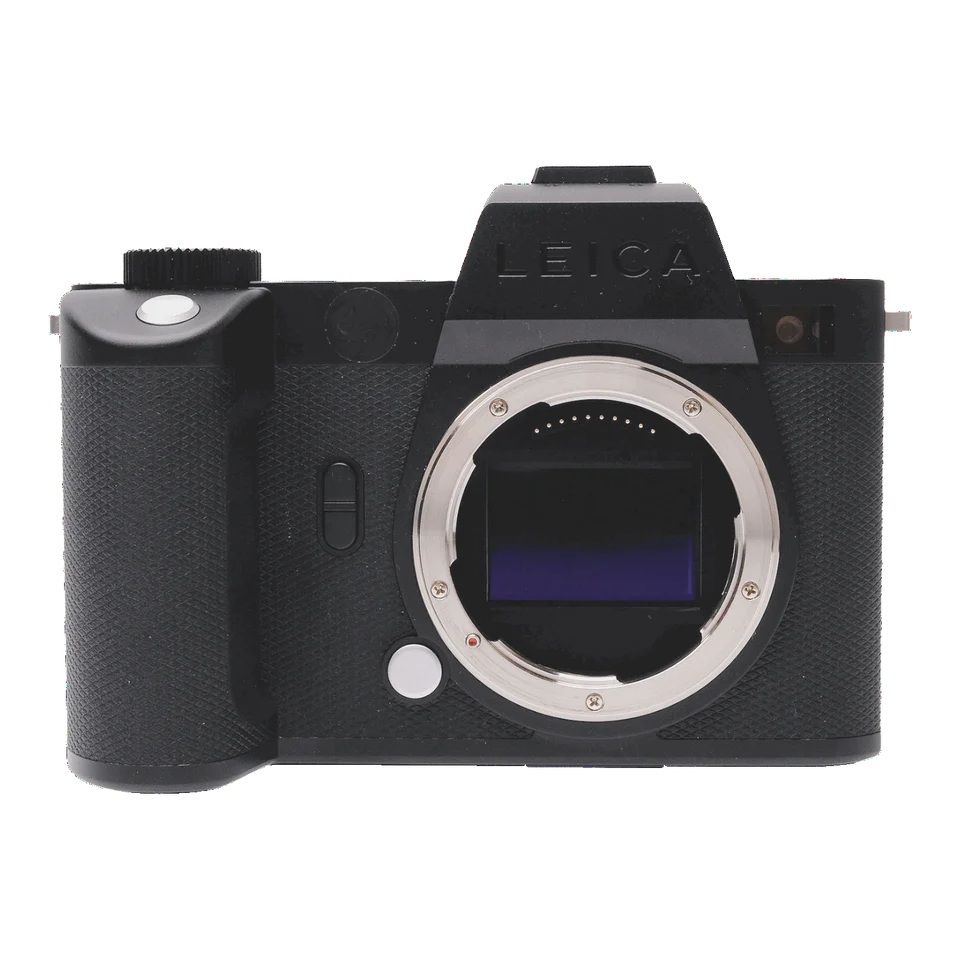
Leica released the SL2-S mirrorless body in December 2020, supplementing the SL2, released in November, 2019. The garish large and white paint-filled LEICA engraving of the SL2 was mercifully left black in the SL2-S. Where the SL2 came with a 47mp sensor, the SL2-S sensor was just 24mp, making for faster frame-to-frame rates and allegedly superior low light performance owing to the larger pixels on the sensor. It was also some $1,000 cheaper. The SL2 and SL2-S improved on the original SL by adding In Body Image Stabilization (IBIS), claimed to be good for 5.5 stops, with both bodies boasting an industry leading 5.76mp EVF. The SL2-S was replaced by the SL3-S in January 2025, updating the contrast detect AF to phase detect AF, making for superior AF with moving subjects and adding a handy flip-out rear LCD screen. (Sadly the battery life dropped by 40% despite using the same cells).
This technological obsolescence immediately made the SL2-S an attractive cost proposition as the price on the used market crashed. It probably also increased the availability of lightly used bodies as the upgrade crowd rushed to the latest and greatest. Only the M bodies seem immune to this price behavior, retaining excellent resale values. I paid under 50 cents on the dollar of the original price for my SL2-S body, mint and boxed. Only the original Instruction Manual was missing. That manual, an imposing 299 pages in length, is well written and bears careful study when tailoring the camera to the user’s preferences, for the SL2-S is nothing if not immensely capable of being tailored.
The M bayonet to L adapter with 6-bit coding:
My primary goal is to use the SL2-S with my collection of 6-bit coded M lenses and for this purpose a special adapter, available only from Leica, is required. This is the Adapter T, #18771.
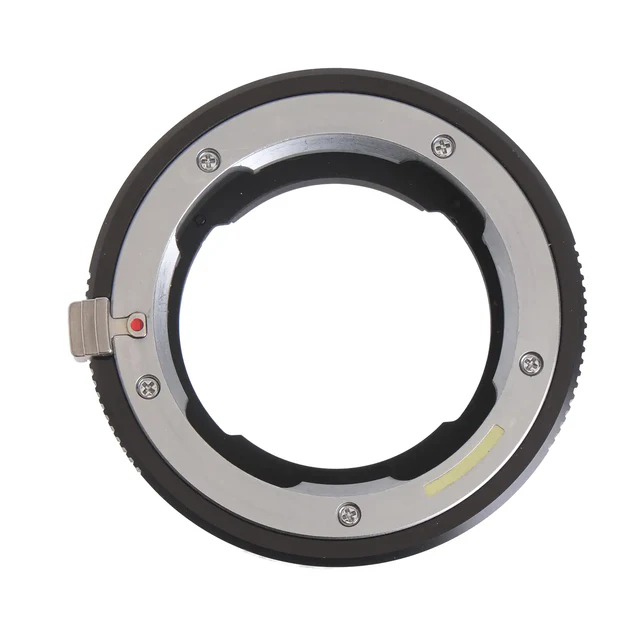
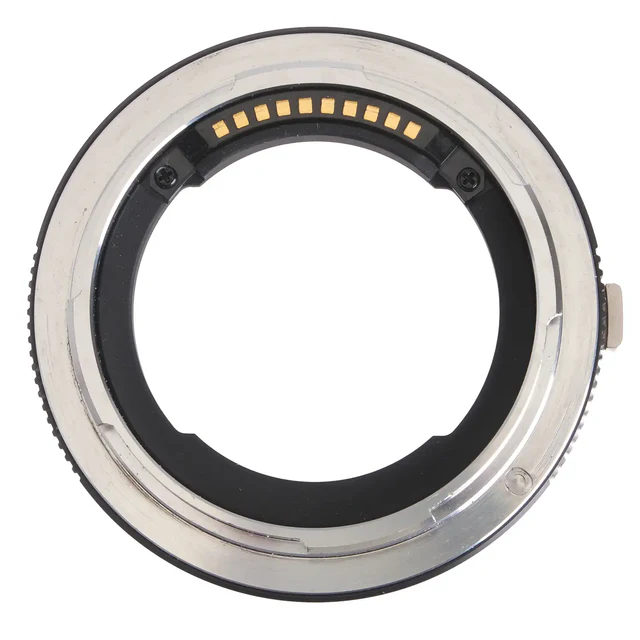
The 6-bit code reader communicates information electrically to the body.
The latest version (now named the Adapter L – I see no difference from my Adapter T) costs a stunning $480. Again I bought mine lightly used for under half that price. It’s the only adapter available which converts optical 6-bit coding to electrical information for saving in the EXIF fields of the image file and the key piece of information required is the focal length as this clues in the IBIS system how to behave to negate camera shake. A long lens will have more shake than a shorter one when handled identically. Use a cheap aftermarket adapter and IBIS will not work properly unless you dial in the focal length manually (ugh!) and one of the key benefits of the SL-2 and later bodies is this anti-shake technology with automatic focal length detection. So if you want to use Leica M lenses on the SL2 or later bodies with IBIS this adapter is de rigeur. A related benefit of IBIS is the provision of multi-exposure technology which, with the camera mounted on a tripod, shifts the sensor one pixel at a time between images for a combined 4 image file size of 96 mp and crazy definition. Handy for detailed architectural snaps but of no use with moving subjects.
Pluses and minuses:
Why use this body with M-lenses when the M10/M11 offer fine performance? Simple. Lenses longer than 50mm pose a steep challenge to the rangefinder in the M body for accurate focus at large apertures, especially with all the pixel peeping technology which is now commonplace. Things were far less critical in the days of film. Relatedly, IBIS takes out camera shake with these lenses. I own 75, 90 and 135mm focal lengths north of 50mm and take a lot of architectural pictures, so this is a handy way of ensuring the best definition without having to resort to an eyepiece magnifier for accurate focus and higher (definition destroying) ISOs to negate camera shake. Neither my eyes nor my steadiness are improving with age ….
The looks of all the SL bodies are similar. In architectural terms I would characterize these as ‘Brutalism meets Bauhaus’. I find the result to be quite ugly compared with the svelte grace of the M10. A case of grin and bear it.
When Leica introduced the original SL (Type 601 was their strange nomenclature) in October 2015 they created an alliance with Panasonic and Sigma to make compatible lenses with both also making their own bodies. If you want AF these are probably the way to go as they typically sell for one third the price of Leica SL lenses, and are of known (high) quality. Certainly the 35mm Sigma f/1.4 Art lens I used on a Nikon D3X was the highest resolving power lens I have yet encountered. But in exchange for AF you add a lot of bulk and weight, which is what makes Leica M lenses so attractive a proposition on the Leica SL2-S. If you are OK with manual focusing these make for a fine combination.
But do not expect light weight. The SL2-S body weighs a hefty 2.1 lbs, just a tad less than the Nikon D800 DSLR with its flapping mirror. So ‘light and mirrorless’ does not apply to the SL2-S, but you do get a very rugged package. A broad shoulder strap is indicated and the factory stock one works fine though it’s only rubberized on one side, the word LEICA emblazoned in huge letters on the other. As soon as I can find a good used Upstrap on eBay I’ll be installing it. Note the strap attachment method in that link. Leica’s instruction manual illustrates a sub-optimal method which leaves the strap’s free ends exposed, meaning they will fray in time. The Upstrap method is superior, avoiding this issue, and works fine with the Leica strap.
Firmware:.
Leica made many revisions to the firmware for the SL2-S with the last version, 6.2.0, released in May 2025. Some of these releases made efforts to improve AF while adding minor features, while others addressed various bugs, so it makes sense to update to the latest version. The ‘Camera Information’ submenu discloses the version installed as well as being the location from which a new firmware file is uploaded from the SDHC card.
Buttons:
The SL2-S body may not be pretty but the design thinking is commendable. Where high end DSLRs and mirrorless Japanese bodies sport a plethora of marked buttons the SL2-S makes do with one unmarked one on the rear along with a joystick, two on the top plate, a thumbwheel and a rotary knob, and two buttons on the front. That’s it. The design philosophy is that the five buttons and joystick are assignable. Hold a button for a couple of seconds and the assignment menu pops up on the rear LCD. This is an elegant solution. I find that even after much use I still confuse the D800’s metering mode button with the focus mode one. With the SL2-S I assign these functions as I want and it’s an easy thing to remember.
Here are pictures comparing the two bodies:

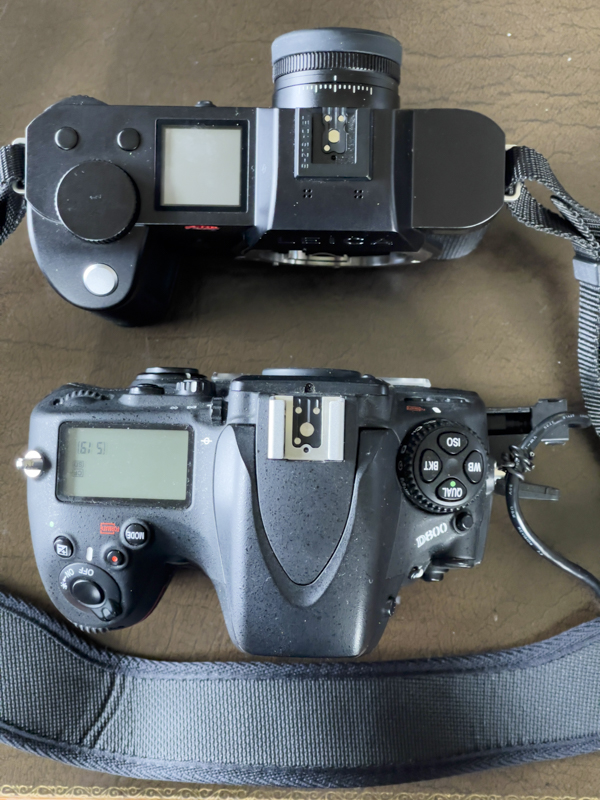
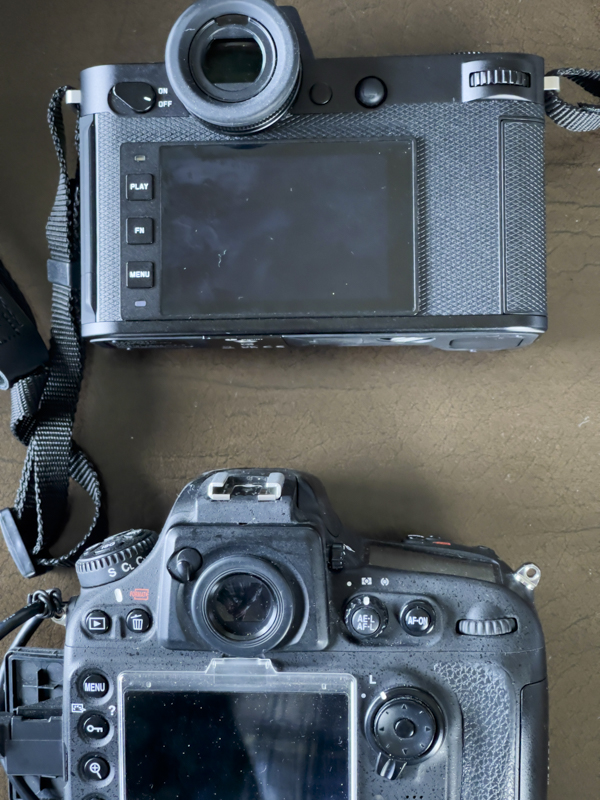
Starkly different design philosophies.
Battery life and aftermarket options:
The EVF can be set to turn off after a delay of 2s/5s/10s/2m/5m/10m to save battery use. I find 5s is fine. A touch on the shutter release brings the EVF back to life. The rear LCD can be permanently turned off to save battery power. I turn it off as I never chimp.
Leica claims a battery life of 510 shots assuming you do not constantly chimp on the rear LCD. After the initial setup I only use the LCD when formatting the SDXC card. The latest cells, the BP-SCL6 cost an outrageous $240 from Leica, but many aftermarket clones are listed on Amazon, some as low as low as $39. Some have a stated capacity of 2600 mAh which is 18% higher than the factory 2200 mAh cells, which computes to 602 shots. Not bad, and almost twice as many as with the mirrorless Nikon Z8. (The DSLR Nikon D800 easily gets to 900 or more shots a charge). I bought this one as a backup and it seems fine so far.
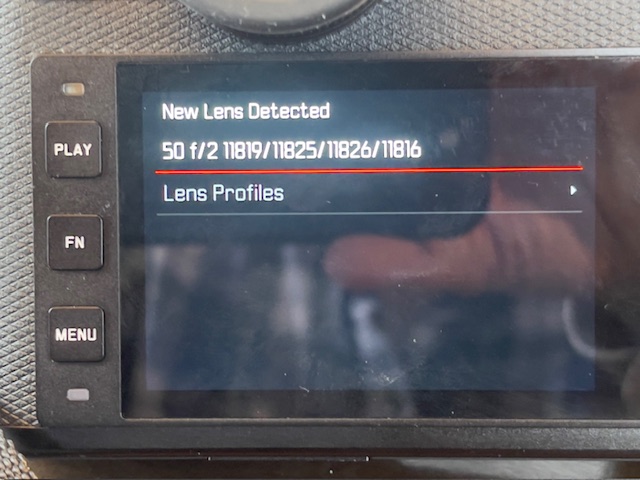
6-bit coded lens recognition:
The key requirement of the Leica M to L adapter is the correct reporting of focal length, so that the IBIS system knows how to behave. I own six 6-bit coded lenses – the 21mm and 75mm Voigtländers, the 35mm and 50mm Light Lens Labs Summicron clones and ancient 90mm and 135mm Leitz optics. 5 of the 6 lenses’ focal lengths are correctly recorded in EXIF data; the 135mm is reported incorrectly on the SL2-S, but is correctly reported on the Leica M10, suggesting this is a firmware glitch. Here are the records from Lightroom Classic:
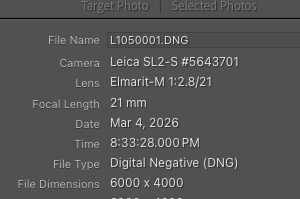
With the Voigtländer 21mm Aspherical Color Skopar.
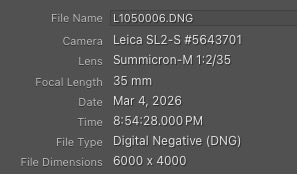
With the 35mm LLL Summicron clone.
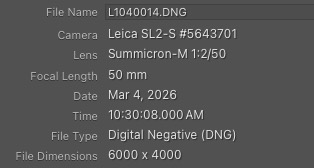
With the 50mm LLL Summicron clone.

With the Voigtländer 75mm Ultron.
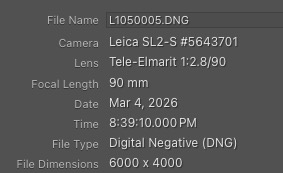
With the Leitz 90mm Tele-Elmarit.
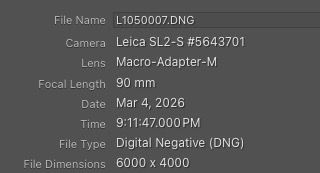
The Leitz 135mm Elmar, coded to look like the 135mm Apo Telyt,
is incorrectly reported as the 90mm Macro Adapter M.
Fortunately, there’s a simple workaround to this error. Some experimentation with a six bit LTM-to-M adapter in the SL2-S disclosed that the code in this table for the 135mm Elmarit-M 135mm f/2.8 (Versions I and II), which is ‘001001’, sees the SL2-S reporting the lens as an ‘Apo-Telyt-M 1:3.4’, meaning the correct focal length is being communicated to the IBIS system. At the time that table was prepared the ‘001001’ code did not work with M bodies but the latest Leica firmware update for the M10 now sees the M10 reporting the ‘001001’ code as a 135mm Apo-Telyt-M. Good enough. This means that the 135mm focal length is correctly reported with this coding on both the SL2-S and the M10.

Corrected focal length result with ‘001001’ code on the 135 mm Leitz Elmar.
After import I use this LR plugin to correctly name the lenses used. It takes seconds to do.
Use of the magnifier to aid critical focus:
Focus magnification can be assigned to the rear joystick – Main Menu->Page 4->Customize Control->Joystick->MF Mode->Magnification. With the magnifier invoked by a press on the joystick the setting for the rear thumbwheel, which cannot be changed, has the EVF enter more magnified mode with one click on the wheel. A second click further magnifies the image, with a touch on the shutter release button reverting the EVF to the normal view. This is a quick and easy process. My tests have disclosed that even with ‘one-click magnification’ critical focus is easily attained every time with the 75mm f/1.9 Ultron and the 135mm f/4 Elmar, both at full aperture. The ease of use is considerably greater than using the M10 with a 1.4x eyepiece magnifier where particular care has to be taken and, as a precaution, focus bracketing is a sound idea.
EVF brightness and eyeglasses:
The 5.76mp EVF is outstandingly bright and sharp. The 0.76x magnification compares with 0.73x for the M10. Color and brightness are user adjustable, and I have no difficulty seeing the complete frame when wearing glasses. As with the M10 the finder is possibly the outstanding feature of both bodies. The one in the SL2-S has built in diopter correction.
Although manual lenses physically stop down the iris at smaller apertures there is no darkening of the screen which adjusts to normal brightness. At the smallest apertures there can be some noise visible in the EVF display but it’s not intrusive. Obviously the noise does not appear in the final image.
Seamless operation with 6-bit coded M lenses:
Used with the Leica M to L adapter operation with 6-bit coded lenses is seamless, after fixing the anomaly with 135mm lenses referred to above. The adapter fits the body perfectly – as well it should for the price asked – and the various lenses fit equally well in the adapter. With manual M lenses the adapter is simply left permanently on the camera and the lens is inserted in, or removed from, the adapter in the same way as on every M body since the M3 of 1954. The seamless notification of the focal length (and lens name, for that matter) to the EXIF data in the image file is a masterpiece of engineering, allowing lenses back to the Leica Thread Mount, with an LTM-to-M adapter, to be used on a recent digital body with all its bells and whistles. If you could tell Max Berek that his 50mm Elmar of 1925 is equally at home on a digital body with IBIS as it is on a Barnack Leica he would likely fall off his chair. Leica deserves serious respect for the way they have managed to adapt even ancient lenses to the SL.
Operation with uncoded lenses:
Insert an uncoded lens into the SL2-S and you will get a ‘lens not recognized’ message with a link to the Lens Profiles section of the software. There you can either choose a Leica lens of similar focal length (tests for which suits every lens best are recommended) or opt to simply enter the correct focal length in a different menu. Again, the goal is to tell IBIS how much to adjust for camera shake based on the focal length of the lens mounted. While I have not tested this I would guess that any old cheap non-Leica adapter with manual focal length input on the SL2-S body will do the trick. No need to splurge on the Leica version whose sole benefit is automated use with 6-bit coded lenses. One other possible benefit of the Leica adapter is the likely assurance that everything will fit perfectly.
IBIS:
It works well. I can get tack sharp images at 1/30 second with a 135mm lens. On the M10 I have to resort to a shutter speed no longer than 1/4f, where ‘f’ is the focal length, meaning approximately 1/500th second. That computes to a 4 shutter speed gain with IBIS invoked on the SL2-S.
Leica FOTOS App:
Whereas the M10 is often reluctant to pair with an iPhone running the Leica FOTOS App, the SL2-S connects speedily using Bluetooth and adds two functional aspects in addition to the download of images to the iPhone. (I average a connection time between camera and iPhone of 30 seconds). These include GPS data being written to the photo file (the camera has no GPS chip so it uses the one in the iPhone) and synchronization of the camera’s time and date with the dead accurate data from the phone. Like the M10 the SL2-S’s timekeeping without this link drifts from what is accurate. When the FOTOS link is active the small rectangular LED at the lower left of the rear LCD blinks blue. I have yet to determine whether use of FOTOS chews up battery life excessively. You also gain a self timer and remote release using the iPhone. I have assigned FOTOS to the rear top panel button – the one which is hard to reach with the right thumb. One press and you get to the screen where Bluetooth is turned on for FOTOS. GPS data are sent seamlessly to the related EXIF field in the image file. This is a fine implementation.
The top plate display:
I’m not sure how useful this is, but the absence of dials and knobs makes it easier for Leica to include the feature. When the camera is turned on it displays the model name, the word ‘Ready’, the date, the time and the battery charge level. Though I have the date format (in ‘Camera Settings’ on Page 6 of the Menu) set to American style (mm/dd/yyyy) the top display insists on showing it English style (dd/mm/yyy), a simple programming error. The battery indicator is crude at best, not showing a percentage, like early iPhones, displaying only a four position bar (full, 3/4, 1/2, 1/4, after which you are out of luck). Pull the SDXC card and the ‘Ready’ indication becomes ‘No Card’. There are two of these shown if you have the crazy-priced auxiliary battery grip attached.
After 6 seconds the display changes to show metering method (A or M with manual focus lenses), the aperture as a couple of dashes as there is no aperture readout available with MF lenses, the shutter speed, ISO (A-ISO for AutoISO in my case), the ISO selected by AutoISO, the presence of card 1 and card 2 (if installed), the number of shots left on the card (almost certainly understated by 50% and that semi-useful battery level bar again. If exposure compensation is being used the ‘A’ for Auto exposure displays a + to – sign. There is no time display when a manual focus Leica lens is fitted. That’s a shame.
When wi-fi is invoked you get a wi-fi indicator and if FOCOS’s GPS is active (useless as it is – see below) a tear drop icon which, when full, purportedly shows that the GPS data are current. Yeah, right.
When the camera goes to sleep the top display is turned off.
Useful? So-so.
Aperture reporting:
With MF lenses only the Aperture Priority and Manual exposure modes are available. In both instances the camera has to figure out the aperture used as there is no electrical or mechanical connection between the aperture ring and the body. The M10 does a very poor job of this, regularly reporting an aperture up to 2 stops higher than the one used. In fact, it very rarely gets it right. The SL2-S is every bit as bad. Disappointing.
Tethering:
Using a Mac Mini M4 running OS Tahoe 26.3.1, firmware 6.2.0 in the SL2-S and Lightroom Classic v 15.1 the camera was promptly recognized by LRC and images correctly and promptly transferred to the computer.
The not so good news is that pre-Classic versions of LR do not work (I tried), and LRC needs Mac OS Sequoia (v 15) or later. My Mac Book Air from 2014 which is used in the home studio will not run Sequoia so if I want tethered output I either have to stick with the Nikon D800, which works fine, or upgrade the Mac.
Sensor cleaning:
The only mention of sensor cleaning in the Instruction Manual is that the body should be sent to Leica. This means interminable delay – Leica’s repair speed has to be the worst on earth and probably loses them many professional sales – and high cost. You can easily DIY with an air blower and a sensor cleaner swab lightly moistened with lens cleaner. You are cleaning the protective glass, not the sensor itself. Just remember to make sure that the camera is turned on and the battery is charged. You can clearly see the sensor lock into position when turning the camera on with no lens mounted. When turned off the sensor (owing to the IBIS mechanism) floats freely. Turned on it is locked when no lens is fitted and will thus resist moving under your ministrations.
The Shutter:
The SL2-S has two shutters, one a vertically traveling mechanical design (up to 1/4000th), the other an electronic one (up to 1/16000th). The default factory setting is Hybrid with the former being used for all but 1/8000th and 1/16000th, where the electronic shutter takes over. The sound of the mechanical shutter is a touch quieter than the already quiet one in the M10. The electronic shutter, which can be elected for all shutter speeds, with the attendant risk of rolling shutter distortion, is silent.
Who should get this body and adapter?
- Users of M or LTM lenses who desire a superior focusing system to that found in the Leica M or Barnack Leica bodies. All of that in a digital body which improves on anything possible with film, while retaining Leica’s excellent color rendering, assuming that the weight and bulk of the body can be tolerated.
- Anyone who needs IBIS.
- Photographers desiring speedy critical focus with longer/faster lenses. If you use something exceptionally fast like an f/0.95 Noctilux your chances of nailing focus on an M body are not great. With the SL2-S they are high.
- Those seeking to use long focal length manual focus lenses. There are adapters available for just about every mainstream lens fitting. Some even come with a helicoid for macro focusing.
- Those with failing eyesight and/or lower steadiness than in years past who will benefit from the enhanced functionality of the SL2-S over the digital M bodies, albeit at a substantial weight and bulk penalty.
- Those seeking entry into a high end mirrorless Leica body at one third of the cost of an M10 or M11.
- Anyone sick and tired of the mindless clutter of myriad buttons, levers and gewgaws which characterizes most high end cameras from Japan.
Can you get a comparable feature set for much less from Canon, Nikon, Sony or Panasonic? Absolutely. But you cannot get proper handling of MF 6-bit coded Leica M lenses without having to manually input lens data at each lens change.
Use in the rain:
Leica claims the body is rain proof but I cannot recommend its use in the rain as Leica M lenses are anything but weather sealed.
Video:
No comment as I do not use it.
In Part II I will provide feedback about setting the camera up for the street.

The Leica SL2-S with the 1960 135mm Elmar.
A marriage made in heaven.
The Elmar is tack sharp at all apertures and inexpensive.