The non-linearity problem.
This is of interest to those who are contemplating the addition of a CPU to a pre-Ai-S Nikkor lens, meaning an Ai or a pre-Ai lens which has been modified to Ai specifications.
Because I have found that pre-Ai lenses are the ones I enjoy using most – the quality, fit and finish are in a different league from what followed – I have accumulated no fewer than nine. A related advantage is that these lenses are often seen as orphans in a digital world and sold as “use on film cameras only” owing to the absence of the Ai conversion. That keeps their prices low and makes them outstanding bargains in the process. The least I paid was $39 for the 200/4, the most was $252 for the 28/2. Most were around $125 and are all close to mint condition.
Of my collection, two came already converted to Ai specifications, five were converted by the estimable John White, and two I converted myself. As you can see from the picture, I have installed CPUs in each at $30 per lens, with the 28/3.5 and 50/1.4 being a challenge, all the others being a simple glue-on job.
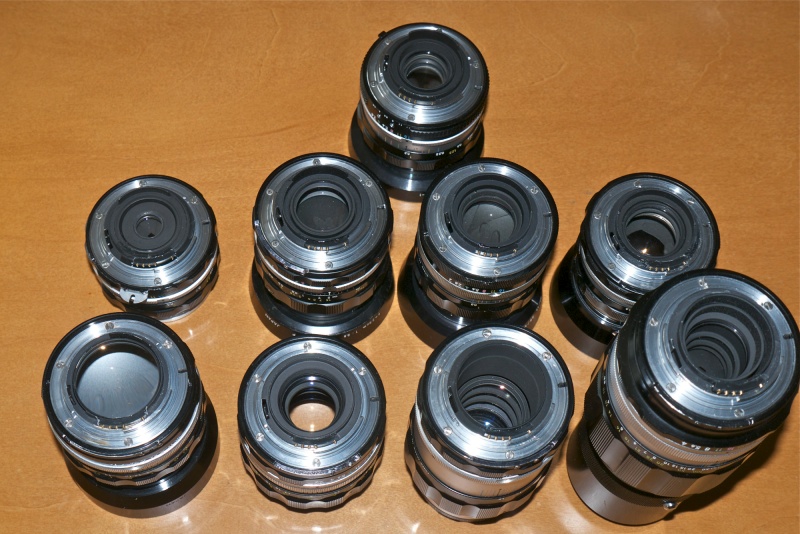
Top: 24/2.8. Middle: 28/3.5, 28/2, 35/2, 50/2. Bottom: 50/1.4, 105/2.5, 135/3.5, 200/4.
A CPU has been installed on each. All are pre-Ai, with scalloped, metal focus collars.
When using auto exposure, I always use ‘A’ mode, meaning aperture priority. I set the aperture and the camera chooses the shutter speed. Because these pre-Ai-S lenses have non-linear aperture stop down geometry, I pass control from the camera to the lens for aperture setting by appropriately programming the CPU and setting the camera controls. Not only is this my preferred way of setting aperture, as I find the large ring on the lens far easier to use than the fiddly control wheel on the camera, it also avoids exposure issues. Plus it’s very much the way I have been using cameras for 40+ years and that’s how I like it.
When Nikon introduced the Ai-S lens design, the optics generally remained unchanged. What did change is that the mechanics were redesigned so that the aperture lever in the lens moved a constant amount from stop to stop. This allowed the use of Ai-S lenses with modern digital bodies which did not have the ability to pass control to the lens – like the D40 for example. The aperture could be accurately controlled with the body figuring out the extent to which the stop down lever had to be moved rather than by the user definitively dialing it in on the lens. Clever.
On the costlier DSLRs (D200, D300, D300s, D700, D7000, D800, D800E, D1-D4) Nikon made it possible to pass control to the aperture ring on the lens together with a ‘non-CPU lens’ option in the body for better EXIF data recording. That’s not as good as using a CPU, and I spell out the advantages of a CPU here, but it does result in proper exposure in ‘A’ and ‘M’ (but not in ‘P’ or ‘S’) modes when the aperture ring on the lens is used to set aperture. A fine way of extending the life of lenses many of which are approaching 50 years in age.
The upshot of all this is that if you let the camera set the aperture on pre-Ai-S lenses then you will likely run into exposure errors. To determine the extent of these errors, I set the camera to take control of aperture, setting each lens to its minimum aperture (just as you would with an AF or AF D lens) and setting the aperture using the control dial on the body. Then I used the simple expedient of running through the aperture range, using auto exposure in ‘A’ mode, determining which (if any) was correctly exposed, then adjusted the others in LR4 to match.
The result is not pretty, and the variations are all over the map. A ‘0.00’ reading means exposure was correct. Negative numbers show the number of stops of underexposure, positive ones the number of stops of overexposure.
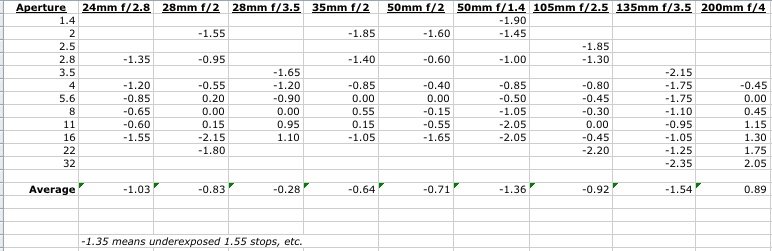
Exposure errors with pre-Ai-S lenses when aperture control is passed to the camera.
Some of these variations have no discernible pattern whatsoever. Take a look at the 28/2 or 35/2 columns above, as an example.
With recent sensors, 1 or even 2 stops of underexposure is not a deal killer. With the outstanding processing controls in Lightroom 4, a significant improvement over Lightroom 3, you would be hard pressed to tell the difference between a RAW file which has been correctly exposed compared with one fixed after two stops under exposure. You might see a little more noise in the shadows, but that too can be fixed. But overexposure is a different kettle of fish. One stop over is close to being a deal killer, even with RAW, when it comes to bright highlight details. Two stops is a no-no on any but the lowest contrast, low key subjects. So that absolutely rules out the 200/4 which overexposes through most of its aperture range. The 28/2 is pushing the underexposure limit at f/16 and the 105/2.5 likewise at f/22. The 135mm is not a happy camper at full or minimum aperture and the 50/1.4 is not good at its two smallest apertures. You can decide whether these are debilitating issues for your method of use. The other lenses you can pretty much get away with, but you will constantly be tweaking exposure adjustments in post processing.
So why not just make Adobe lens correction profiles to compensate for these exposure errors? I suspect that is possible from my extensive work with Adobe’s excellent application, and you can download any number of profiles I have created here, each of which can be automatically recognized by LR or PS on import of files taken with a CPU-equipped lens. But profiles are applied upon import of a file into LR or PS, by which time the bird has flown, meaning that highlights which were burned out at the taking stage will remain burned out no matter how accurately the profile corrects the exposure error.
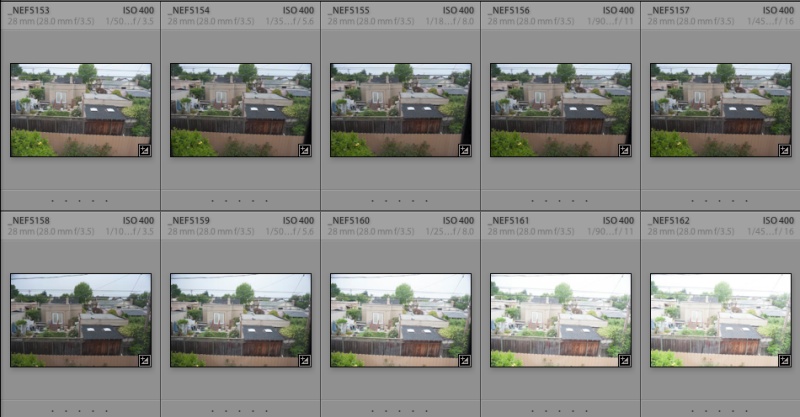
A range of exposures with the 28mm, f/3.5 Ai’d. Lens aperture control in top row,
camera control in bottom row. Camera in ‘A’ auto exposure mode.
The Bottom Line:
First, you must be comfortable using Manual Focus lenses, because every Ai’d, Ai or Ai-S lens is MF.
Then if, like me, you appreciate great engineering and execution, and further conclude that it makes you a better photographer (it works for me), and if you like a bargain and are not averse to a bit of tinkering, the Ai and Ai’d lenses are the optics of choice. Most will accept a CPU with the application of epoxy only and they are pure joy to use – touch, feel, optics are one, and as good as it ever was. I have demonstrated optical quality here time and again, and my standard for judgment is not an 800 pixel LCD display or test chart, but is rather a 24″ x 18″ glossy print. These lenses have fabulous optics.
Destroying classics:
As for ‘destroying’ classics, well that’s easy. Unless it’s something really costly and rare, these are so cheap that you can always find another. Millions were made and remain in circulation. If the installation of a CPU makes you a better snapper, forget the ‘classic’ issue and have at it. No one except you will ever see the CPU! Type “Nikon Nikkor lens Ai” into US eBay and you will routinely get over 1,000 listings, two-thirds pre-Ai-S, the remainder Ai-S. KEH lists hundreds more, generally costing a little more, but with no risk about returning a dud. Assuming that eBay items transact no more than once a year, there are some 50,000 new listings coming to the eBay market alone annually.
If, however, you like to snap in ‘S’ or ‘P’ modes and/or your camera body does not permit transfer of aperture control to the aperture ring on the lens, then you should avoid Ai and Ai’d lenses and search out Ai-S versions instead, if you propose to add a CPU. They typically run a little more, far fewer were made, and the lovely scalloped metal focus rings of the pre-Ai versions are replaced by plastic surfaces, but they will deliver correct exposure when the camera controls aperture selection and they remain far better made than any AF, AF-D or AF-S plastic monstrosity.
And for those interested, the optics you will most often find on my D700 are the 50/1.4, because it is so awfully good, and the 24/2.8, because that focal length largely accords with how I see. But then I must confess the 28/2 and 35/2 are real corkers, I love the 105 and 135 for what they can do and the 200 is a sheer delight. Well, you get the point.