Category Archives: Hardware

Stuff

Apple Battery Charger hype

The latest in spin from Cupertino.

Traditional rechargeable batteries have a short shelf life. They self-discharge quickly and cannot handle many charge cycles before dying.

Apple has introduced a charger with six AA rechargeables using enhanced technology rechargeable batteries. At $29.95 it’s not a bad value as things Apple go, though you are limited to recharging only two batteries at a time and have to avoid the gag reflex when reading the usual hype on their web site. Still, given the low self-discharge rate, that’s not a big deal. Charge two, charge two more, etc. They claim that the recharger has very low static current draw but it would seem to me that any sane person would not leave the charger plugged in unless it was actually charging, so hardly a feature.

The Apple device actually uses Sanyo Eneloop batteries which have been around a while. You can read about the technology here.

And, needless to say, you can do much better on the price by buying the Sanyo four battery charger which comes with eight AA and 2 AAA batteries for $29.45 from Amazon. It also comes with C and D size adapters which take your AA batteries but that’s dumb as small AA batteries will not run long in a high drain device like a flashlight (English: ‘Torch’, which is far more accurate) which typically uses C and D cells. So you get more batteries and a four cell charger for less than the Apple device. No surprise there. Plus the recharger will also charge AAA cells; at least one of my remotes uses those.

Additional AA/AAA Eneloop batteries are very inexpensive at Amazon if you need more than the eight/two supplied. Eight AAs sell for $20 with 4 AAAs at $9, meaning you are getting the charger for all of $5 in the kit.

The model of Sanyo recharger is 110 volt only, but there are multi-voltage versions out there is you look. I cannot tell from the hype on Apple’s web site which voltages their charger works with.

What’s the downside? These batteries can deliver no more than 2000 mAh of current, compared with 2700 for fresh, throw away alkalines. So if you have very high current draw devices, they will seem weak. On the other hand typical uses – Bluetooth wireless keyboards, computer mice, TV remotes, clocks, etc. – will pose no problem.

The upside? Less toxic waste and you always have a battery handy when needed. These will work fine with the Apple wireless keyboard (four in the white original, three in the first aluminum one, two in the current aluminum one) and, best of all, with Pentax DSLRs as Pentax seems to be the only manufacturer out there with the common sense to use regular AA batteries in its fine SLR cameras.

Once my supply of disposable AAs is exhausted I’m buying this little kit. And you can bet I’m not falling for the Apple recharger hype, a device marketed by a company which increasingly regards its customers as stupid.

The Russar 20mm lens

Major league strange.

For an index of all Leica-related articles click here.

The Unfinished Church, Bermuda, 1999. Leica M6, 20mm Russar, Kodachrome 64.

Mention of the quirky Leitz Stemar stereo lens yesterday got me to thinking of some of the stranger lenses I have owned. Without a doubt on of the oddest was the 20mm Russar-M f/5.6.

Mine came in black – the Russar 20mm f/5.6 ultra-wide angle lens.


This was a super wide angle Leica thread mount lens without rangefinder coupling. Not that any was needed as at 20mm pretty much everything was sharp all the time. I got mine shipped from the UK for under $200 and it came with the best wide angle viewfinder I have yet seen. Not only was the image clear and relatively undistorted in the finder, the field of view was accurately defined and the whole thing was superbly made using light alloys. None of these atrributes apply to the awful Leica 21mm finder, now in plastic and costing a ridiculous $750 today. Further, the Russian finder had a swivelling foot which allowed you to tilt it down for parallax correction at close distances. A masterpiece.

But the lens was even better. When the Russians took possession of eastern Germany in 1945 one of the priceless properties there was the old Zeiss, Jena factory. I cannot confirm this but am fairly certain that the 20mm Russar was optically identical to the 21mm Zeiss Biogon and like designs, meaning a deeply protruding rear element which rested very close to the camera’s shutter and required a deep rear lens cap for storage. The oddest ‘feature’ of this lens was the aperture ring which was deeply recessed within the front of the lens so you had to stick your finger almost into the lens to change f-stops.

This placement, of course, precluded the use of a filter as with one in place you could not adjust the aperture.

Viewfinder and Russar 20mm on the Kiev copy of the Contax II. The lens also came in a Contax bayonet mount.

The definition was excellent at all apertures and best at f/8. In practice you would simply take a wild guess at the correct focus distance (in meters, not fun for one brought up to estimate in feet!) sight through that wonderful finder and bang away. I kept it permanently mounted, using a screw to bayonet adapter, on my Leica M6 which had such a poor viewfinder (can you say flare? – I shoot into the sun a lot) that it made a natural mule for the Russar. What’s more, it amused me no end to have a Russian lens mounted on what was then Germany’s finest.

The lens was an inexpensive alternative to the Leitz Super Angulon f/3.4 (the earlier f/4 was a real dog) and later Leitz Elmarit and Aspherical Elmarit f/2.8 designs which cost and arm and a couple of legs. The Aspherical variant remains in the catalog at $4,400, so you get the picture. When my Russar-M finally moved on, replaced by that same unbeatable Aspherical Elmarit (it was one of my ‘more money than sense’ moments, I confess) I found myself missing the Russar’s compactness and built-in ‘hood’. The Elmarit was gargantuan by comparison, and the even larger hood an object of ridicule. I never used it. When the Aspherical Elmarit was finally sold I did at least have the pleasure of doubling my money on it, Leica gear prices having gone through the roof.

The equipment pictures above are from the excellent USSRPhoto site which has masses of information on all sorts of Russian camera gear.

Bermuda Sky, 1999. Leica M6, 20mm Russar, Kodachrome 64.

A 20″ x 16″ print of the above over the mantlepiece at home testifies to the quality of the Russar.

Panasonic 3D lens

The Stemar is back!

For an index of all Leica-related articles click here.

Sold in very limited numbers in the mid-1950s, Leica’s Stemar lens was an elegant way of making stereo pictures with your rangefinder Leica.

The 33mm f/3.5 dual lens Stemar

The Stemar lens (the name derives from STEreo elMAR – meaning a simple four element design like the 50mm Elmar) would take two images, each 18x24mm on a standard 24x36mm film frame and came in a kit with a tailored lens hood, a 33mm clip-on viewfinder, a close up lens/prism, and a binocular viewer to permit 3D examination of the transparency image. There was also an even rarer attachment for your slide projector to project the twin images on a large screen. All are visible in the picture below.

Stemar outfit.

Given that it came in a Leica screw mount, easily adapted to the latest Leica M cameras, there’s no reason why it wouldn’t work every bit as well with the latest M7 Leica film camera or even the M9 full frame digital, though I’m not sure how you would create viewable transparencies with the latter; doubtless possible with some ingenuity.

As the picture shows, the lens was something of an ugly duckling, screws showing prominently on the front plate, the ugly protruding finger focus tab, the many gadgets needed to make it work, and definition cannot have been that great. The four element Elmar design works reasonably at 50mm and 65mm (the latter on the Visoflex SLR ‘mirror box’) and well at 90mm but is probably poor at 35mm. Leitz made a 35mm full frame Elmar pre-war and it was soon replaced with the excellent six element Summaron. Compare with the Panasonic lens, below and see what stylish modern design is all about.

As with all low production Leica hardware, the Stemar has now acquired that awful epithet of ‘collectible’, meaning it’s doomed to a china cabinet and commands a $6,000 price tag at auction. I find this every bit as damnable as the $1mm Ferrari treated in like manner rather than thrashed on the backroads, which was the design intent.

Now a Stemar was not something I ever owned. Even a few years ago when it was actually affordable it would have been no use to me, as a childhood eye defect forever rendered me incapable of seeing in three dimensions. My brain – such as it is – cannot fuse the disparate images, with the happy result that I read with my right and drive with my left eye. It makes for interesting moments when trying to pour red wine in a white tablecloth restaurant, as I have no depth perception, and is the reason you will invariably find me delegating the task! I have experienced too many reddening tablecloths to want to repeat the experience, testimony to my having missed the glass completely ….

But I console myself that my infirmity has been all to the good. Like the blind man with an overly developed sense of hearing, this One Eyed Jack simply tries harder with what he has. While motorcycling near the cliff edge can be an unusually unnerving experience, I grit my teeth and try harder, consoling myself as the journey ends that I am a better and stronger person for the experience! Further, I get to save money and weight on binoculars, as a monocular is fine, the second optic being wasted on me.

But 3D is the coming thing. In one of those mail catalogs I simply cannot seem to unsubscribe from, the assorted big screen TVs for sale were dominated by one thing – labels screaming ‘3D’. Motion pictures are a hit in the format (or so my 8 year old assures me – I cannot go with him as I cannot actually see anything but a head-splitting mess on the screen) as Hollywood discovers the latest in moneymaking technology. More power to them. I get to save on the entry price to the 2D theater.

Many of those 3D TVs in the catalog come, of course, from Panasonic, which is a pioneer of the technology. So it’s hardly a surprise that they will shortly release a 3D lens – just like the Stemar but auto-everything – for the G-series of micro Four-Thirds camera bodies.

Panasonic’s modern Stemar.

I don’t know the focal length but would assume 16mm or so, as the Full Frame Equivalent of 33mm used in the Stemar is ideal for 3D images – anything much longer and the subject tends to lose the 3D effect. Or so I am assured by those with binocular vision. I think it’s a tremendously exciting development as the images taken with this optic will simply be ported to your Panny 3D TV set for viewing with those funky glasses, a far superior experience to the Stemar’s hand-held binocular viewer, I would guess. In that case, your ‘collectible priced’ Leica M9 may finally fulfill the potential, with its equally collectible Stemar, which the latter so under-delivered on over fifty years ago. The G-body + Panny 3D lens will run you some $12,000 less, by the way.

Just goes to show, doesn’t it? There really is not that much new under the sun.

Here’s Panasonic’s press release on the subject; check the double asterisked note – you can bet Panny’s designers have a Stemar or two in their labs. The English may be stilted but the awareness of the predecessor design is clear:

And here’s the 1954 audience enjoying the predecessor anaglyph system – one lens red, one green:

Topaz DeNoise

Snake oil?

I confess that I have always regarded noise reduction applications for digital images as so much snake oil – a solution which makes the problem worse. Sure, they reduce noise but they also destroy definition in the process. Better noisy and sharp than blurred and smooth, in my book. Further, with most of my digital snaps being on the essentially noise-free sensor in the Canon 5D my incentive for ‘denoising’ images has been non-existent. Until, that is, the Panasonic G1 with a sensor one quarter the area of the one in the Canon became my daily user. Go over 13″ x 19″ when printing (and that is really the only time you will see noise in practical use) and noise makes itself heard, if you get my drift.

So the other day when I was giving my new Olympus 9-18mm MFT lens a good workout on the G1, I indulged in a spot of pixel peeping to see how good the definition was and, in the process, ran into noise when examining the equivalent of a 30″ x 45″ print on the Dell 2209WA monitor. Now one of the claims for Lightroom 3 is that it comes with significantly improved noise reduction capabilities, so I promptly gave these a shot .

Here’s the original RAW image:

At 18mm, f/8. Sunflowers.

And here’s a 30x selection before applying any noise reduction; this is an excellent test image as it has fine detail and shadows:

No noise reduction at 30x. ISO320, RAW.

Here’s that same section after applying the best looking noise reduction in LR3:

After applying LR3 noise reduction.

The LR3 noise reduction setting were as follows – the sharpness settings are my import defaults for the G1 RAW files, and were determined after much experimentation (5D images need less sharpening, by comparison):

LR3 noise reduction settings

Topaz DeNoise costs $80, seems to be popular on the chat boards, and requires Photoshop CS3 or later, where it installs as a plugin. As I’m still on CS2, and unlikely to upgrade, I wanted to run Topaz DeNoise from within LR3. This dictates the download of two applications – the plugin itself (41.2mB download, 113.7mB installed) and a separate app named Fusion Express (free) which is a 509.1 mB monster of a download but installs at 57.9mB if you restrict the installation to Topaz DeNoise; the Fusion Express application supports many Topaz apps, hence the size of the download. Now the installed size of Topaz Denoise must represent some of the sloppiest programming on record. At 113.7mB for a single purpose tool it exceeds the 89.5mB of Lightroom3 by some 27% – and last I checked LR3 does a heck of a lot more than just remove noise. Draw your own conclusions.

For RAW originals Topaz provides no fewer than seven presets for noise reduction and after some experimentation I determined that the lightest of these gave the best result. That said, the result was significantly inferior to what LR3 delivered with its built in tool. No matter how I tried, I could not reduce the artifacts in the circled area to as low a level as LR3 provided and shadow detail in the hairs on the stem of the sunflower was marginally worse at all settings, even after adjusting the ‘Adjust Shadow’ slider.

Topaz DeNoise version at RAW – lightest setting.

The Topaz noise reduction setting were:

Topaz DeNoise settings

What this little experiment goes to prove is that Adobe has done a truly stellar job in coding the noise reduction features built into LR3 and kept it nice and simply with just five sliders (you mostly use the first three shown above) compared to the overkill of seven offered by Topaz. No matter how much I messed with these I could not approach the LR3 result with regard to the elimination of contour artifacts in out-of-focus areas, and these artifacts are both more noticeable and annoying in the Topaz processed image.

Speed? LR3 is instantaneous. Topaz? First you need to invoke the plugin from within Lightroom which causes the RAW image to be converted to a TIFF copy then exported to Topaz DeNoise, some 7 seconds. Topaz Denoise take a further 7 seconds to process the preview image, and seven seconds every time you move a slider which makes experimentation a royal pain, then a whopping 58 seconds to process and save the file in TIFF format (I’m doing this on my four core Mac with 8gB RAM running a 2.83gHz CPU speed with an Nvidia 512 mB 9800GTX+ video card – it doesn’t get better than that!). So that’s a minimum of 72 seconds per image on a very fast computer. Good luck if you have many images to process …. that’s no more than 50 images an hour.

For the geeks amongst you, here is the Geekbench 64-bit score for my hardware:

So while Topaz DeNoise does a half decent job for the $80 asked, and if you shop around you can find discount coupons bringing the price down to $50, if you are a Lightroom2 user you can upgrade to Lightroom3 for $100. For the additional $20/$50 you get superior noise reduction, the processing is instantaneous compared with bog slow for Topaz, LR3’s improved Adobe Camera RAW processing software compared to that in LR2 is included, and LR3 offers an integrated solution which does not require that you exit the Lightroom application to enter a separate de-noising one. I did not do any tests with JPGs as I only use RAW, and you should too.

You can draw your own conclusions where the value lies. Here’s a side-by-side comparison to make things easier:

LR3 on the left. Topaz on the right.

Olympus 9-18mm MFT lens – Part III

Finally, some pictures.

In Part I, I looked at some of the design aspects of the Olympus 9-18mm MFT lens for the Panasonic G1 and in Part II set forth some thoughts on how it handles.

This article addresses results. How good is this lens in practice?

So what qualifies me to pontificate on wide lenses?

I have always been a ‘wide’ rather than a ‘telephoto’ guy, liking to get close to the action. That’s my street snapper thing. In that context the widest lens I have used, and still own, is the Canon full frame f/2.8 8 mm fisheye for my 5D which, with de-fishing software, yields an effective Full Frame Equivalent (FFE) of 12mm. That’s insanely wide. That Canon lens is no slouch but the micro contrast is simply not there in big prints and definition is not that great at the corners until you stop it down to f/8.

The next widest lens I have used is the very costly 14mm f/2.8 Canon L for the 5D, a loaner. At thrice the cost of the fisheye it underperforms in every way with heavy chromatic aberration at most apertures and poor edge detail. A real dog. Apparently improved in the Mk II version but at $2,100 you can forget it. And it’s an absolute monster in your bag or on your camera.

The next widest was a sweet and minuscule 20mm f/2.8 Takumar which I used for years on my Pentax ME Super 35mm film camera. Small, fast, no bulbous front element and sharp all over. Everything was right about this optic which explains why it is much sought after on the used market.

My worst experience with ultra-wides was with the Canon 20mm f/2.8. No fewer than two of these soiled the rug and I was glad to see the last of them. Poor corner definition at most apertures, horrible vignetting, there’s really little good to be said about this excuse passing for a lens. Canon should be ashamed.

Then came two really heavy hitters. The unsurpassed 21mm f/2.8 Leica Aspherical Elmarit for my Leica M bodies (really a bit too large to equate well with the compact Leica M’s ethos) and the huge 21mm f/4 Super Angulon for my Leicaflex SL (a nice pairing) and Leica R4 (which it overpowered from a balance perspective). The former cost me $1,000 lightly used, I sold it for $2,000 and it now costs $4,200. The latter, actually a Joseph Schneider design licensed to Leitz, moved on with my Leica SLR gear when digital came along. It was almost as good as the Aspherical but sported a huge front element and was immensely heavy. Over-engineered in the way only Leitz knew how back then.

In use:

To check things out I set out for Half Moon Bay, a rather down-at-heels coastal town a few miles south of San Francisco. That is a good feature. Have you ever taken a good snap in the pristine, manicured sterility of Beverly Hills?

Half Moon Bay has some funky beach streets and an interesting boat marina and commercial fishery on the wharf.

Using the lens, absent the reverse rotation of the zoom ring compared with the two Panny lenses in my G1 kit, is unexceptional. The size, once extended, is similar to that of the 14-45mm kit lens and operation is much the same except, of course, that the 9-18mm Olympus is really wide at 9mm.

Loading the pictures into Lightroom 3, three considerations arise:

1 – Orientation sensor: In common with other Olympus MFT lenses, this optic has no orientation sensor to automatically rotate pictures in Lightroom 3. (Olympus does this in their MFT bodies). All pictures load in landscape orientation so it’s necessary to Command-click all the portrait images and turn them through a right angle using LR3’s controls. A minor irritant.

2 – Barrel distortion: Panny lenses on the G1 have in body distortion correction. Load the images into LR3 and distortions are notable for their absence. Because there is no in camera distortion correction with the Olympus lens on the G1, barrel distortion is noticeable – straight lines at the edges bow outwards in the center. This is easily fixed, where it matters, using the Lens Corrections->Manual->Transform->Distortion slider in the Develop module of LR3. (LR2 does not have this feature). This has to be done in the Manual section, as Automated (“Profile”) corrections in LR3 are currently limited to Canon, Nikon, Sigma, Sony and Tamron lenses. I do not know if Adobe will add Olympus lenses mounted on a Panasonic body. To get things dead straight, the slider has to be at +10 with the Olympus lens at 9mm and +3 at 18mm. The distortion is not severe and need only be corrected in architectural or landscape shots with prominent straight lines. You can also automate distortion correction by clicking here.

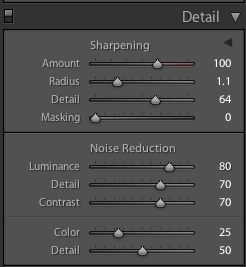
3 – Chromatic aberration (color fringing): As with barrel distortion, this has to be corrected manually. It’s mostly noticeable as a red fringe when pixel peeping at 9-10mm focal length and a setting of -15 to -20 on the Lens Corrections->Manual->Transform->Chromatic Aberration->Red/Cyan slider in LR3 does the trick.

It makes no sense to incorporate these settings into an import profile as that assumes that all pictures imported are taken on this lens at a specific, wide, focal length. Simply add the settings on the ‘keepers’ – it takes seconds to do.

None of these are disabling issues as the pictures from the lens are in every way as detailed and sharp as from its Panny stablemates, which means superb. There is a total absence of vignetting at any focal length or aperture and if you see any in the pictures here it’s because I added it in LR3 to heighten the impact of an image. Rather funny that designers go to all that effort to eradicate vignetting and photographers then proceed to add it when processing their pictures.

Examples:

Barrel distortion:

Barrel distortion at 9mm – look at the horizon.

Barrel distortion at 18mm – less pronounced, but still there.

Chromatic aberration:

Not illustrated as it’s only visible to pixel peepers.

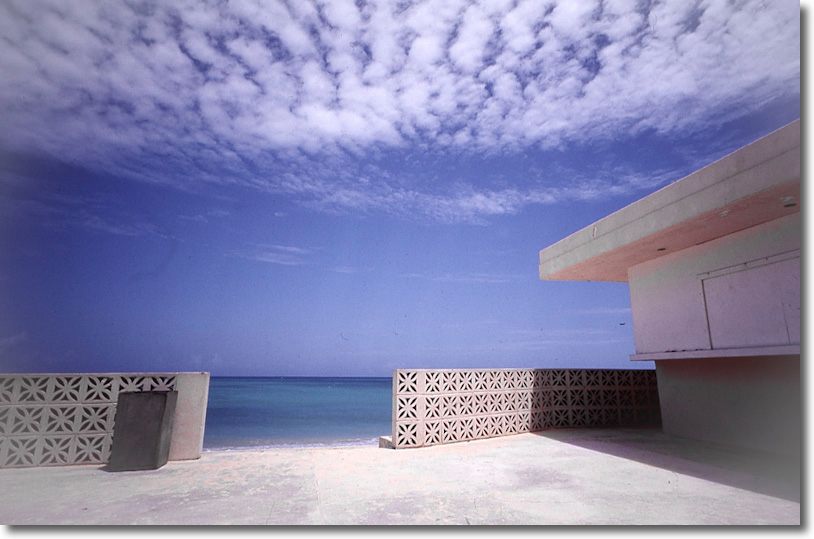
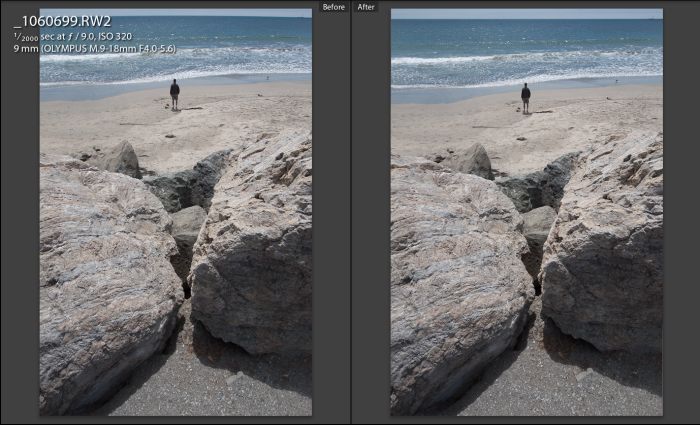
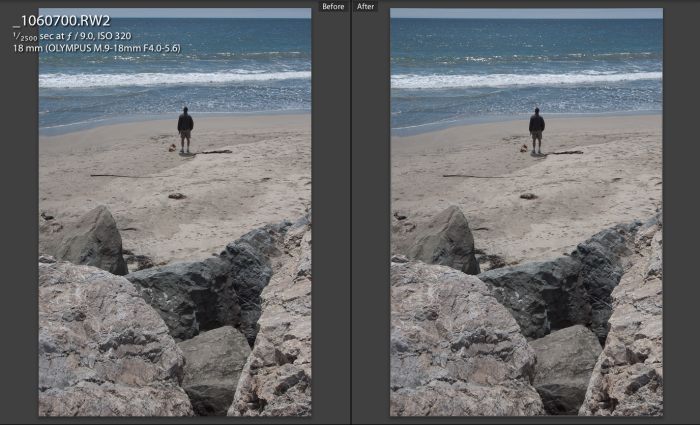
How wide is 9mm (=18mm FFE)?

18mm FFE is incredibly wide and if you are new to something this wide be prepared for disappointment with your first few snaps. Take a look at the two pairs of pictures above – one is at 18mm FFE, the other at 36mm. The increased amount of foreground is immense – I have kept the horizon at the top of the frame for comparison purposes. If you think you need this lens to ‘get more in’ forget it. Unless your back is against a wall or unless you have strong foreground interest, your pictures will be awful, your subject a tiny blob in the distance. And if you are afraid of getting in close, stick with your longer lenses and save your money; an ultra-wide is not for you.

Here’s another case in point – I was but a couple of steps away from this surfer dude throwing the ball to his retriever:

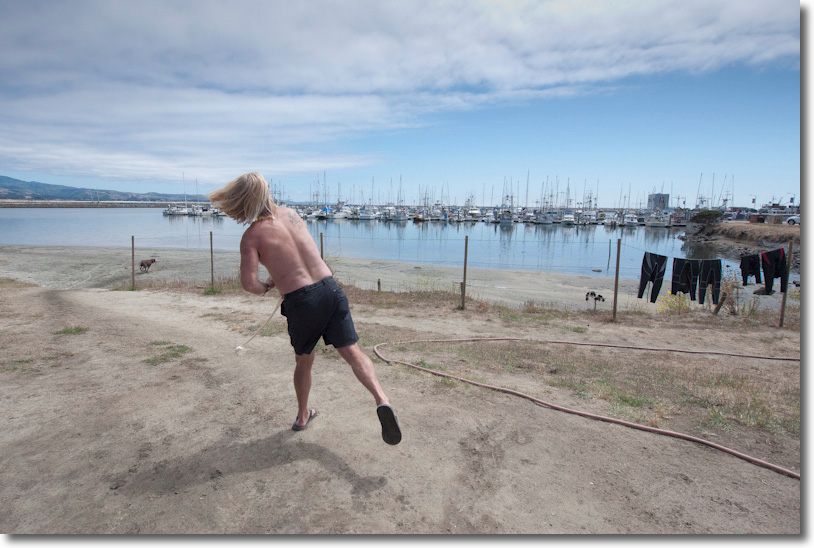
At 9mm, f/4.5 – the chocolate lab gets ready to retrieve.

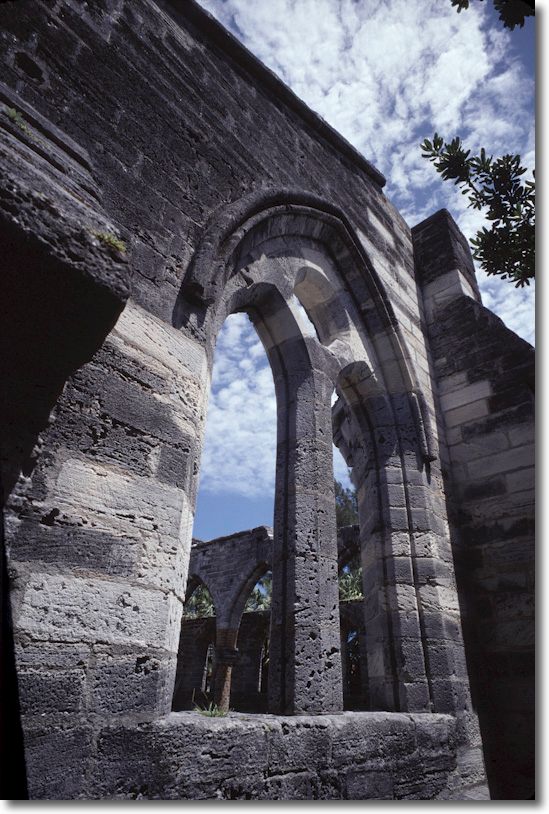
An 18mm FFE lens is a surrealist’s delight. Sure you can take the proverbial interiors of cathedrals with it, and that’s fine, but I prefer to buy picture postcards of those as they are far better done than anything I want to spend time on.

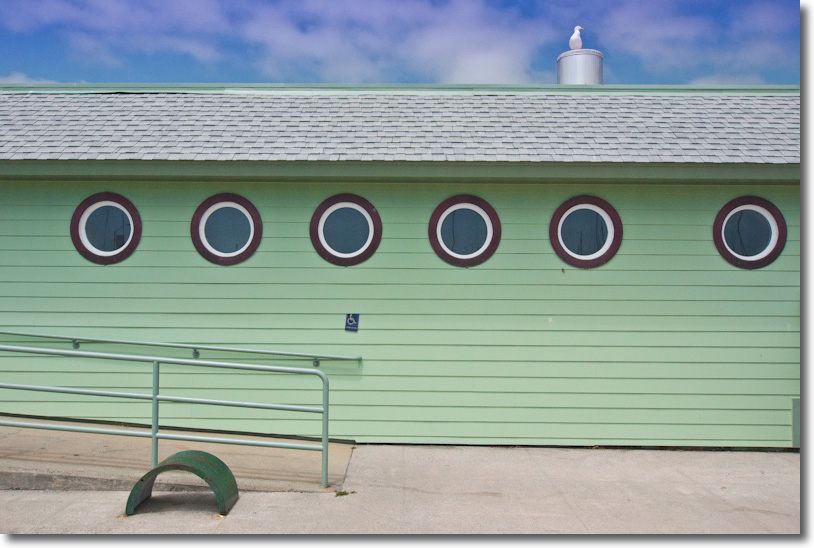
At 9mm. Portholes and gull. Lovely architecture for a building in a fishing village.

How about flare?

The wider a lens gets the higher the likelihood that strong light sources will be in the frame. This is an extreme example – the dynamic range between the interior of the bar and the strong sun outside is some 10 stops.

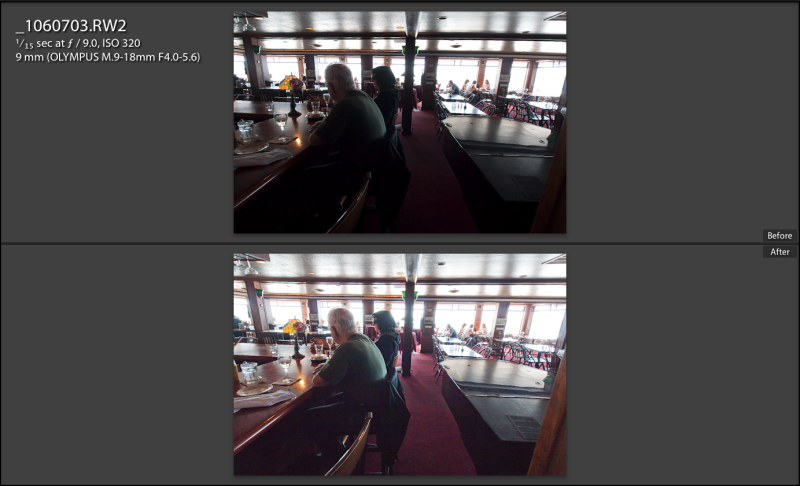
At 9mm, f/4.6. Lower picture shows the effect of using the Fill Light slider in LR3.

Flare is very well controlled, even in this extreme case. There are only minimal light source haloes to be seen in either interior or exterior pictures at 9mm. I do not, and will not, use a lens hood. Here’s a larger image:

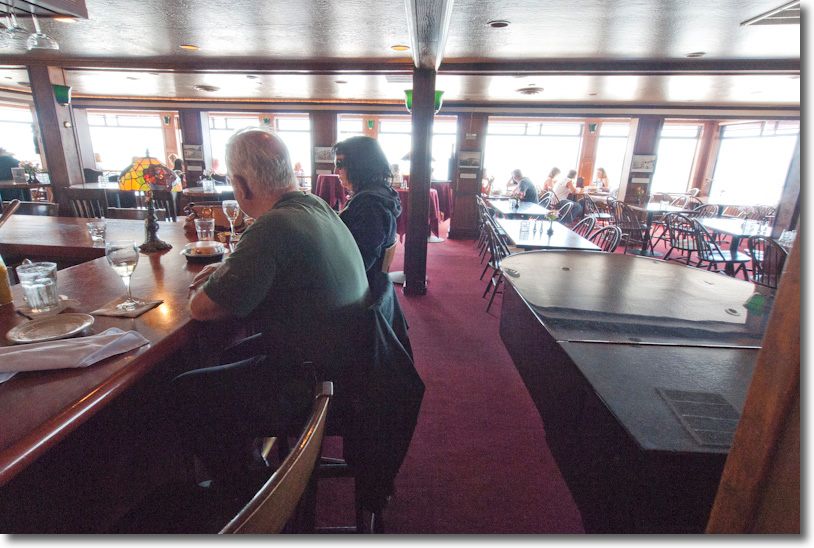
At 9mm, f/4.6. Flare is well controlled.

What’s the depth of field like?

It’s extreme at 9mm no matter what aperture you use. 9mm is 9mm. No matter whether it’s on an MFT body or something larger – depth of field is a function solely of focal length and aperture and has nothing to do with the size of the film or sensor used. While in the picture below I stopped down to f/22 to be safe (the rusted beams were inches from the lens) this also shows that, DP Review’s charts notwithstanding, where they show definition falling as the lens is stopped down, f/22 is as sharp in practice as is f/4.

At 9mm, f/22. A few inches to infinity ….

Finally, when your back really is against the wall, this sort of thing becomes easy:

At 10mm, f/9. Colors on a wall. Taken in a narrow alleyway.

For more snaps over the next few days check my photoblog, Snap! While I have emphasized pictures taken at the wide end of the lens (a primary reason to buy it) performance at longer focal lengths is every bit as good.

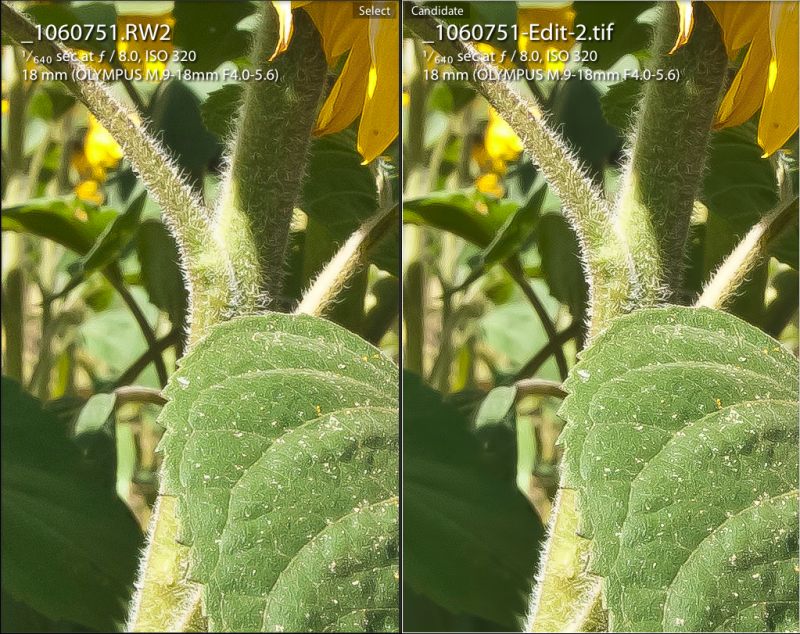
Be honest – Micro Four-Thirds is lousy for big prints!

OK – here’s a full frame image:

At 18mm, f/8. Sunflowers.

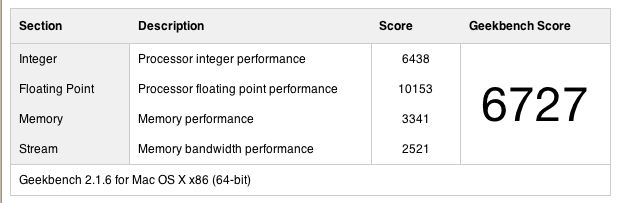
Now here’s a magnified section which, if the whole thing was printed, would make a 30″ x 45″ print:

Magnified section of above – screenshot.

And your point is?

Conclusion: Despite a few quirks – a contra-rotating zoom ring, a non-existent image orientation sensor on import to LR3 and the need to manually correct chromatic aberration and barrel distortion if needed when used on a Panasonic rather than an Olympus body, the performance of the Olympus 9-18mm MFT ultra-wide zoom is as good as anything I have used at this focal length range. Color rendition is identical to that of the 14-45mm and 45-200mm Panasonic MFT lenses for the G1 camera range. At $600 it is an outstanding bargain.

42 lbs. The fish and the amount of fat this fisherman needs to lose. At 9mm, f/4.5

As the above shows, one huge advantage of an ultra-wide is that your subjects have no reason to believe they are in the frame!

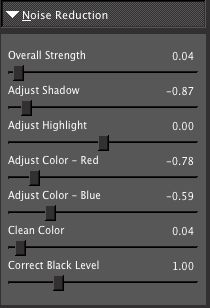
Automating aberration corrections: If you want to learn how to create profiles for this lens which will correct aberrations automatically in Lightroom 3 – or if you simply wish to download the ones I have already created – please click here.