Category Archives: Hardware

Stuff

Adobe Photoshop Express

A useful iPad app.

I’m not sure what they are putting in the water coolers at Adobe Labs HQ in San Francisco, but they should definitely stick with the program.

First we got a really value added, fairly priced upgrade to Lightroom 3, many of whose enhancements I have written about here – film grain, superior RAW conversions, outstanding flexibility to remove lens aberrations and distortions – and now, at no cost, an iPad app named Adobe Photoshop Express.

The price is right!

It’s an inspired piece of programming which really ‘gets’ the touchscreen interface and one of the best efforts yet to make the iPad into a photo processing platform. Sure the controls are limited – basic exposure, sharpness, effects, frames, monochrome conversions and so on – but all the ‘sliders’ for the controls dictate that the user merely slides his finger across the screen to change things. Surely this is the future of photo processing? Further, sign up at Adobe and if you can get comfortable with access rights (theirs not yours) to your pictures, then you can sync your snaps to your desktop or laptop via their servers.

Here’s a simple snap of our son with a neat frame added – this is a screen shot as I do not have an Adobe online storage account:

Winston at Point Lobos. My ‘equipment man’.

Very worth while looking into and it seems some of the earlier bugs have been stomped on as I have had no issues with my version. And what have you got to lose?

The Leitz close-up gizmo outfit

A new high in strangeness.

For an index of all Leica-related articles click here.

If the 20mm Russar and 400mm Telyt were odd ducks in my lens tool kit over the years, this one takes the biscuit.

It’s the Leica close-up kit marketed in the 1950s which I owned for many years. I say “owned” rather than “used” because it was much more fun to assemble this collection of hardware and play with it than it was to use.

The Leitz close-up kit.

What you see in the neat fitted box is my Leica M2 attached to a Visoflex I mirror housing. The housing is attached to the Leitz Focusing Bellows I fitted with a 135mm f/4.5 Hektor lens head and a compendium lens shade – the latter extendable at will for very effective shielding of the lens. There’s a fine 45 degree right-way-round prism finder lower left. An excellent Leitz ball and socket head is lower center. These are beautifully made and I continue to use a variant on my monopod with the Panasonic G1. Highly recommended if you can track one down on the used market – exceptionally engineered, very secure when tightened owing to the design of the ball and indestructible. Attach a QR plate and you are done.

It’s hard to put into words how beautifully engineered everything in this kit really was. Every component speaks to the very height of the machinist’s art and confirms that Leitz’s quality and finish had only one way to go once the fifties ended. Downhill.

The lens fitted to the assembled Visoflex I and Bellows I

The idea of a continuous focusing range from infinity to life size was not new at that time – large technical cameras with long extension bellows had been doing that trick for ages – but seldom had it been executed as elegantly as here, especially in the 35mm film format.

The fitted case also accommodated a dual cable release with adjustable pin lengths. The idea was that the longer pin would raise the flapping mirror in the Visoflex I and further pressure on the plunger would then trip the camera’s shutter. It worked well.

Double cable release attached to the Visoflex I.

Everything was designed just so, right down to the bracing blocks in the lid of the case which made absolutely sure that your precious gear would not flail about in transit.

Truly a fitted case.

A second finder in the kit provided a reverse waist level view and, as you can see, the mirror in the Visoflex I was well oversized, for better function with long lenses.

With the waist level viewfinder in place.

In practice the 45 degree finder was far superior, offering an unreversed image at chest height, and included eyesight adjustment. Perfect.

Focusing, however, was far from perfect. The plain ground glass screen in the Visoflex I had no focusing aids and lacked a fresnel lens, so light drop off to the edges was severe. You simply opened the lens up to its modest f/4.5 maximum aperture (nope,no click stops here) and then racked it back and forth either side of what you though was sharp until it looked as good as you could get it. Then, fingers crossed, you pressed the button or rather you depressed the plunger on the twin release, trying not to forget to stop the lens down first. Of course, as the lens was completely manual things went dark really fast, so that handheld photography was pretty much out of the question. Definition at f/4.5 was iffy and depth of field so shallow that only the very lucky tried to use this apparatus hand held.

The compendium lens hood just went to prove that the engineers and designers at Leitz, Wetzlar had spared no expense. Like everything else in the kit it was beautifully made, slipped into the front of the bellows focusing rack on two chromed rods and clipped neatly to the front of the Hektor lens head in the groove provided.

The compendium lens hood for the Visoflex I.

The Hektor lens head was ordinarily sold with a coupled rangefinder focusing mount but for use with this kit the head was detached from the rangefinder mount and inserted into an adapter tube for fitting to the Bellow. Leitz wallowed in an orgy of adapters for seemingly everything in those days and various other lens heads had to use specific types. However only the rare 125mm f/2.5 Hektor and the 135mm Hektor and, later, Elmar and Tele Elmar kens heads would focus to infinity. You could also fit the 200mm and 400mm Telyt heads if you could find a second tripod to support the whole thing. The 135mm Hektor was a decent pre-war four element design and gained anti-reflection coating during the war years, being replaced by the more capable Elmar and, later the even better Tele Elmar which was the last 135mm rangefinder lens Leitz made with a detachable head. The even later 135mm Apo-Telyt-M was strictly for use on a Leica M body, with a fixed head. It was quite superb for its intended purpose, as my copy testified, provided your Leica M’s rangefinder was properly calibrated. Many were not and only the M3 with its nearly life-sized finder could really do the lens justice at full aperture and close focus distances when it came to dead on focusing.

The Hektor lens head fitted to its intermediate collar.

It’s some reflection on how times have changed when this sixty year old gear is compared to a modern full frame DSLR. My Canon 5D fitted with the Canon 100mm f/2.8 EF Macro and a ring flash offers focusing from infinity to life-size in a standard focus mount – no bellows needed! – is auto focus and auto aperture, delivers quality which will knock your socks off, and is easy to use handheld. There’s even a costlier ‘L’ version available with anti-shake technology. As these things go it’s also relatively compact, if not lightweight. None of that could be said of the Leitz outfit but the craven functionality of the Canon gear lacks everything the Leitz hardware possesses in spades. Sheer physical engineering beauty.

I have taken more great pictures with the Canon gear than I can recall but cannot recall having taken one half decent picture with the Leitz outfit – which is why you see none her.

But it sure was nice to look at. I bought and sold mine, after many years of ownership, for a song.

A bargain basement G1

Snap one up while you can.

The Panasonic G1 is discontinued but remaindered new samples are still out there at a bargain price.

G1 pricing at Amazon.

The replacement G2 is $770, so the equation is simple. If the following new features of the G2 are worth $270 to you, get the G2:

  • A touch screen to focus the camera
  • A movie mode

And, of course, the 14-42mm kit lens on the G2 is now widely reported as being inferior to the 14-45mm version on the G1, and I can most certainly testify to the quality of the latter.

The G10 (lower quality movie mode) at $540 is not really an alternative to the G1. It has an awful EVF (one key reason you buy a G1/2 is for the excellent eye level viewfinder), drops the swiveling rear LCD display (not like I care about that and nor should you – LCDs are not a useful framing tool) and has the same lower quality 14-42mm kit lens.

The G1 at $500 strikes me as a real bargain for real photographers tired of lugging around their heavy APS-C or full frame DSLRs. I have had no reliability issues after nearly 7,000 frames over the past year. If you just want a G1 back-up body, it is not sold in that configuration in the US but I would bet you can unload the spare kit lens for $200 to someone displeased with the latest version. So call it $300 for a spare body. Not bad at all.

And if you want to join the cadre of elite users, like me, you can get the blue bodied version for a modest $40 more!

Further, if you want to get lucky, it seems that an iPhone and a G1 are THE winning combination:

As usual, Windows users are SOL.

Latest iMac 27″ bench tests

Compared to the HackPro.

When FU Steve built the HackPro to replace my fried 24″ iMac the goal was simple – make something reliable and fast for photo processing with superior heat management and using inexpensive off-the-shelf parts.

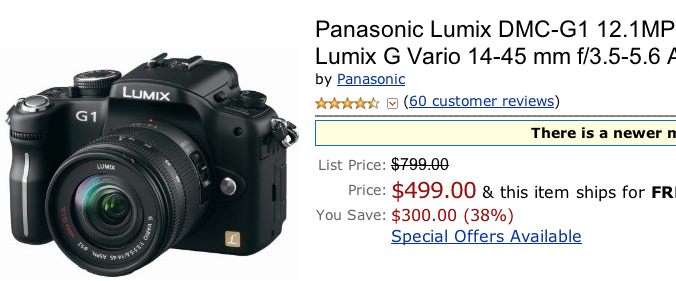
Technology marches on and Apple has now released its latest iMac which in its best configuration includes the latest Intel i7 CPU and a 27″ display. Is it better than the HackPro?

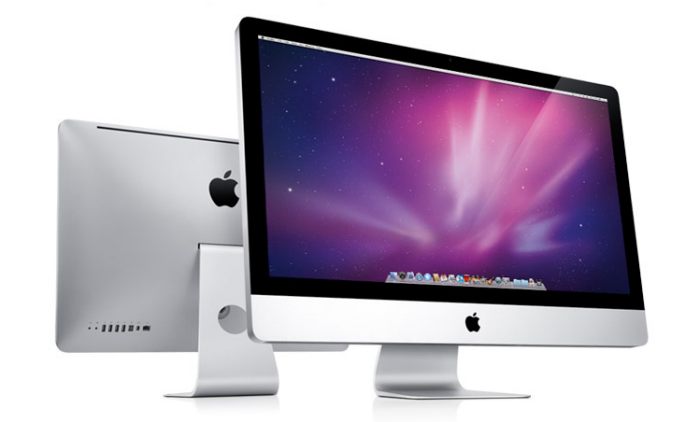
Summer 2010 27″ iMac.

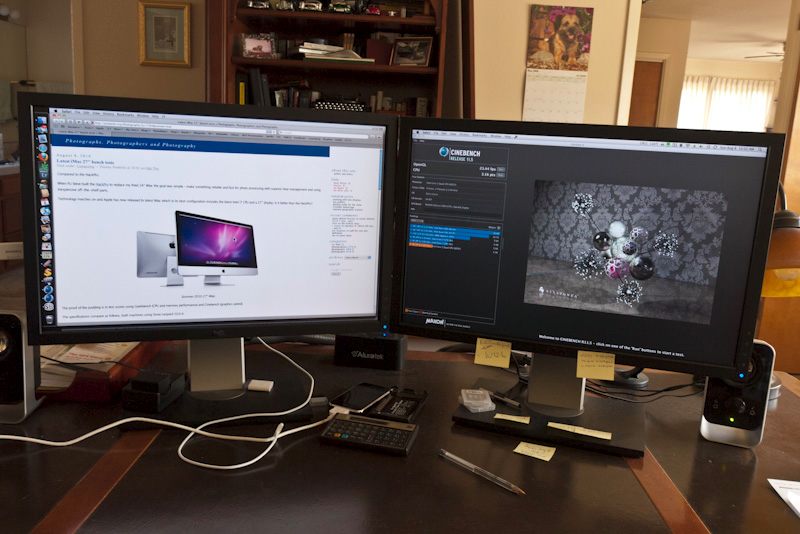
HackPro (under the desk!) running two Dell 2209WA monitors, fall 2009 vintage.

The proof of the pudding is in test scores using Geekbench (CPU and memory performance) and Cinebench (video and graphics speed).

The specifications compare as follows, both machines using Snow Leopard 10.6.4:

HackPro:

CPU: 2.83gHz Intel Core2Quad, Q9550
GPU: EVGA Nvidia 9800GTX+ with 512mB GDDR3 memory
RAM: 8gB DDR2 800mHz

iMac 27″ i7:

CPU: 2.93gHz Intel QuadCore i7
GPU: ATI Radeon HD5750 with 1gB GDDR5 memory
RAM: 8gB DDR3 1333mHz

Here are the test results using Geekbench and Cinebench, both in 64-bit mode:

Geekbench 2.1.6 64-bit:

HackPro (my tests):

Overall: 6731
Integer: 6430
Floating point: 10142
Memory: 3385
STREAM: 2545

iMac (Apple Insider tests):

Overall: 10052
Integer: 8868
Floating point: 15764
Memory: 5028
STREAM: 4258

Cinebench 11.5 64-bit:

HackPro (my tests):

OpenGL: 23.44 fps
CPU: 3.16 pts

iMac (Bare Feats tests):

OpenGL: Not stated, but I would guess 20-30% faster
CPU: 5.50 pts

What’s the fastest that Cinebench has tested? Here are the results from their database (12C/12T means 12 Cores and 12 Threads):

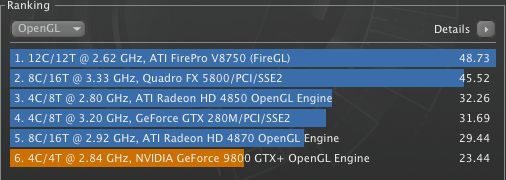
Cinebench R11 OpenGL test results – HackPro in orange.

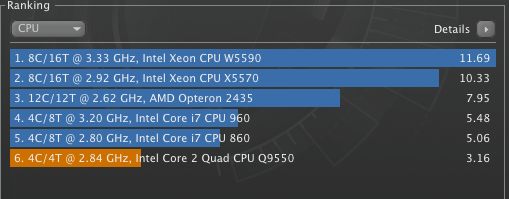
Cinebench R11 CPU test results – HackPro in orange.

The bottom line is that the top of the line iMac i7 CPU model smokes the HackPro with faster video, CPU and RAM performance. The price is competitive too. The top of the line iMac i7 with 8gB RAM sells for $2,399. The HackPro with a like screen (the Dell U2711), CPU, GPU and RAM would cost $2,000 to make.

So what’s to choose?

  • The iMac is $400 more
  • The iMac needs zero construction time. It takes an experienced worker 3-4 hours to assemble the HackPro, and klutzes need not apply
  • The iMac uses an LG 2560 x 1440 IPS display with a glossy glass cover; the screen only accommodates 72% of the AdobeRGB gamut. 1 year warranty.
  • The Dell U2711 uses the same LG display with a matte plastic cover; the screen accommodates 96% of the AdobeRGB gamut. 3 year warranty.
  • Reliability of the iMac is unknown.

So the iMac is a good buy if you can get over the unanswered reliability issue and think you can properly profile that garish screen with the very limited adjustments provided. My experience is that Apple makes some of the most unreliable hardware on earth, with heat managment consistently compromised at the altar of appearance. However, if this new iMac proves reliable then it’s getting very hard to justify the 100% premium asked for the separate box MacPro.

There’s no arguing with the value this time around. Further, if you want a second 27″ display, Apple’s newly announced (glossy, of course) Cinema Display will run you $1,000, which is much the same that Dell is charging for its comparable Ultrasharp 2711.

Am I tempted to upgrade? Not remotely. While I can increase the HackPro’s CPU performance by 20% by simply overclocking the CPU there is no incentive to do so, given my needs. The enhanced speed means little to me as my primary use is Lightroom 3 (where everything is super fast on my rig) and I do no video processing; were I doing the latter for a living I would certainly think about it, if I could get comfortable with the glossy screen and its poor handling of the Adobe RGB gamut. The most likely upgrade in my future is to a pair of larger Dell monitors – either the 24″ U2410 ($500 each) or the 27″ U2711 ($1,000). But that’s a discussion for another day. Stated differently, for my use the HackPro’s processing speed is at the point of diminishing returns, meaning I would have to spend a lot more for a relatively modest increase; the graphics display card remains state-of-the art and can drive anything out there but there are now considerably better and larger displays available, albeit at a price. Indeed, for my day job of money management, which uses lots of stock price, bond yield and live news data feeds, the only thing I would like in the HackPro is more screen real estate. It seems there’s never enough display space available in our information overloaded world.

As a matter of interest, as the HackPro is assembled from readily available off-the-shelf PC components, upgrading to the CPU and RAM specifications of the latest top-of-the-line iMac would necessitate a new motherboard, CPU and RAM at at total cost of $700. The GPU in the iMac is close in specs to that in the HackPro so no upgrade is called for. Everything else in the HackPro – case, coolers, drives, card reader, wireless, can be reused. Not something you can say of the iMac. And given that most of the HackPro’s components come with 3-5 year warranties, a fairer price comparison suggests adding AppleCare at $169 to the cost of the iMac which extends the one year warranty to three years.

How cool does the HackPro run with its five fans (two set on medium – case cooler and HDD cooler, three variable speed – CPU, GPU and power supply coolers)?

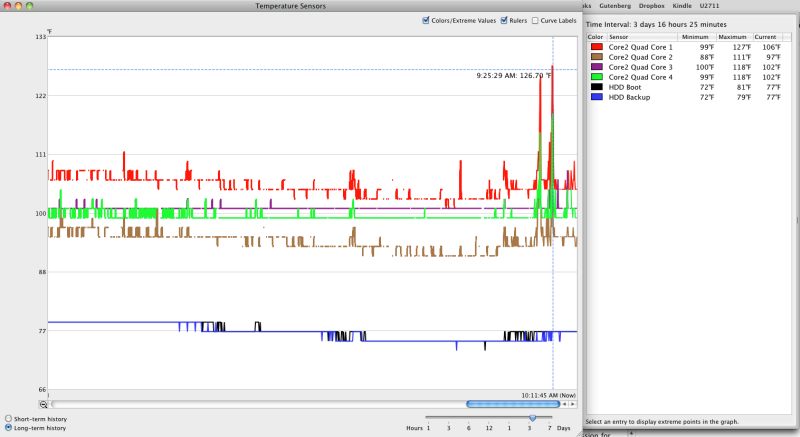
The spikes are from running the demanding Cinebench video benchmarks.

Sure would be nice to have that data for the new iMac; when running Lightroom the temperatures barely budge on the HackPro.

If you are spending someone else’s money, not your own, here are the latest MacPro prices, all without a monitor:

Prices for dopes.

Leitz 400mm f/6.8 Telyt

Another funky lens.

For an index of all Leica-related articles click here.

Templeton sunset. Leicaflex SL, 400mm Telyt f/6.8 with adapter #14127,
1/125, f/6.8, Kodak Gold 100, handheld with shoulder brace.

Continuing the saga of odd lenses, here’s another one I used for years before it gave way to modern automated technology.

This one is at the opposite end of the range to the 20mm Russar profiled the other day and is none other than the magnificent Leitz 400mm f/6.8 Telyt.

Leitz has a long and storied tradition of making great 400mm lenses, starting with the 400mm f/5 Telyt made for the 1936 Olympics – you know, the games where Jesse Owens so disappointed German hopes for white supremacy. Indeed, you can bet there are many images documenting his four gold medals taken on this very lens. The pre-war model was uncoated and once America had recapitalized them on the sound principle that a fat German was safer than a hungry one, the Germans updated it post-war with a new mount and lens coatings to reduce flare. While the lens was fairly special for its time – f/5 at that length was really fast – it used a conventional rotating helicoid to focus and was a handful to use owing to its great weight. Handling was hardly helped by the fact that the Leica screw mount body user had to first fit a mirror box, the Visoflex, to permit focusing and viewing. This device did Rube Goldberg proud. To make matter worse, Leitz also offered a simple mounting tube and an optical viewfinder, though how on earth you focused or, for that matter, composed accurately with that remains a mystery to me.

So Leitz went back to the drawing board and conceived a handy follow focus mount with a trigger. The user held the grip and, on pressing the trigger, could change focus with a trombone sliding action, with fine focus being accomplished with a turn wheel under the thumb.

The focusing device, the Televit, came in Leica M and R mounts for use on the fine Leicaflex cameras and accepted the lens heads from the 200 f/4 and 280 f/4.8 existing lenses plus two new head units designed specially for the Televit.

These were the 400mm and 560 f/5.6 Telyt lens heads, which could only be used with the Televit, unlike the 200mm and 280mm lenses which came with a traditional, and detachable, helicoid focus mount. The Televit was a big improvement in the focusing department but the whole thing still weighed a ton.

So Leitz tried yet again and, in the 1970s, released their best effort yet, the 400mm and 560mm follow focus Telyts with a modest maximum aperture of f/6.8. These used a simple two element construction and were long focus not telephoto, meaning the 400mm lens really was 400mm (16 inches) long. Like the Televit, the heads for the two optical units were interchangeable and the lens came with a shoulder stock. This was a nice idea but in practice was a pain to assemble, so most dispensed with it. I always preferred a monopod with a QR base with mine and mostly used the lens at f/6.8. Sharpness did not improve on stopping down and you generally wanted to avoid doing that as the aperture control was as rudimentary as on the pre-war f/5 predecessor, meaning click stops with no preset mechanism. Ugh!

I used my 400mm f/6.8 Telyt first on my M2 and M3 with a Visoflex 2 or Visoflex 3 mirror box (much improved versions of the earlier Visoflex 1, but still Goldbergish), then on my Leicaflex SL film body with an adapter where it worked well if slowly – exposure metering was a match-the-needles affair. A nicely balanced outfit. But it really came into its own when the Canon 5D came along and one more adapter ring now allowed use of the lens on a modern high definition full frame body with aperture priority exposure automation.

The 400mm f/6.8 Telyt dismantled for transit.

Assembled.

Built-in filter slot.

The focus release button for the trombone movement.

When I first bought the lens it had been sitting unused for many years and the grease in the trombone slide had dried out. $80 later it was relubricated and working superbly. You really needed no fine focus control as it was so nicely balanced that achieving fine focus just using the sliding motion was easy. This was probably as good as traditional manual focus technology every got with a lens of this length. They can be found for a song on the used market; just prepare to have yours relubricated before use.

As you can see the lens was no slouch:

Egrets off Highway 1, California. Canon 5D, 400mm f/6.8 Telyt with #14127 Leica-M to Leica-R
and Leica-R to Canon EOS adapters, 1/125, f/11, ISO 200, monopod.

The Telyt was sold (as it was in mint condition it went to a collector, needless to add – what a waste) and replaced with the Canon 400mm f/5.6 ‘L’ which is superior in every way – sharper, auto aperture, superb autofocus. Technology had moved on and it’s the reason you will never see a pro using a Leica at a soccer game – they still do not make autofocus long lenses to this day, and without autofocus you cannot compete. That Canon lens has, in turn, been largely superseded by the magical Panasonic 45-200 (90-400mm FFE) which offers 400mm equivalent length at the long end at f/5.6 and – here’s the magical bit – fits in your jacket pocket and weighs under one pound. And did I mention that it includes anti-shake technology?