Category Archives: Hardware

Stuff

Olympus 9-18mm MFT lens – Part II

Some thoughts on ergonomics.

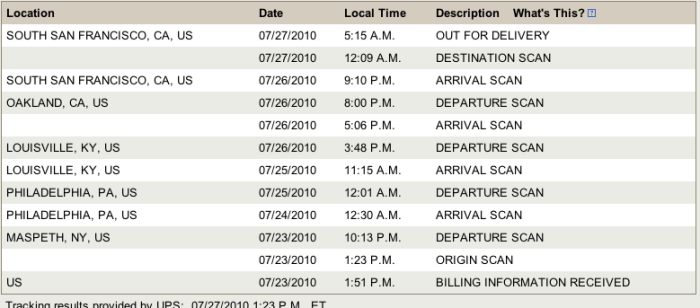
In Part I I looked at some of the design aspects of the Olympus 9-18mm MFT lens for the Panasonic G1. My Olympus 9-18mm MFT lens duly arrived on schedule, Bert the Border Terrier viciously attacked the UPS person (always a fun time) – and I have had a chance to try it on the G1. My first impressions relating to fit, finish and ergonomics follow.

Size and weight:

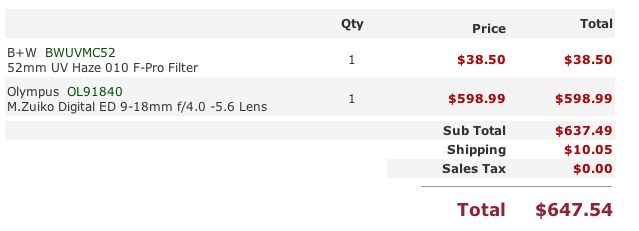
Collapsed the lens is smaller and lighter than the excellent 14-45mm kit lens. (Note: For Full Frame Equivalent focal lengths simply double what you see here, making the kit lens 28-90mm, etc.) The first thing I did was to attach a good quality B+W F-Pro UV-Haze filter for protection, identical to the one used on my 14-45 and 45-200 Panny lenses. I can confirm that there is no trace of corner vignetting even with the 9-18mm at its widest setting of 9mm.

Shutter interlock:

I rambled on about collapsible lenses in Part I and the bottom line is I do not like them. The Olympus is a collapsible lens. However, the maker has done a fine job of designing the collapsing feature. Attach the collapsed 9-18mm to a switched on G1 (no need to turn it off) and you get the “Please check that the lens is attached correctly” message. Press the shutter release and nothing happens. Now turn the zoom ring, which is very smooth (unlike the stinker on the 14-45mm) counterclockwise (anti-clockwise to our former oppressors in the UK) and you will feel a gentle click and the viewfinder of the G1 comes to life. There’s no need to depress the release catch on the barrel – just turn the zoom ring. For that matter, when extending the barrel you can simply pull it out by hand and give the zoom ring a slight tweak to lock it. The only time you do have to slide the release button forward is when you wish to collapse the lens for storage, which requires that you turn the zoom ring clockwise all the way – clockwise as viewed from the rear of the camera or by simply pushing the barrel in with the catch depressed.

Zooming:

Zooming is the opposite to that adopted by my two other Panny lenses (14-45mm and 45-200mm), meaning wide is clockwise and telephoto is counterclockwise. That will take some getting used to! Of the three lenses, the Olympus has the smoothest zoom action – you can operate the zoom ring easily with one finger, useful for street snapping. No way you do this with the gritty zoom ring of the 14-45mm and the 45-200mm is best held from below when zooming. The latter’s zoom ring is very smooth though it tightens up noticeably at 160-200mm. The Olympus is longest at 9mm and shortest around 15mm, extending a little from 15-18mm. The wonders of modern optics seem to have turned everything on its head.

Lens caps:

I hate lens caps and never use front ones, replacing them with a UV filter for protection. The rear is a matter of lens design. The 45-200mm needs no rear cap as the glass is always well recessed at any focal length. The 14-45mm does need a rear cap for while the glass is well recessed at 45mm you will likely put it away at 14mm and the rear elements are very exposed. The 9-18mm is a mixed bag. If you are prepared to store it extended the rear element is most exposed at 9mm but not especially so. At 18mm it is well recessed. No rear cap needed. However, once collapsed the rear element is every bit as exposed as that of the 14-45mm at 14mm and a rear cap makes sense. My inclination is to carry the 9-18mm non-collapsed for that reason and for the reason that all that collapsing and extending just results in wear. In that configuration a three lens outfit needs just one rear lens cap – for the 14-45mm. when it’s not on the camera. I like that. In no case does any of the three have a rear element which protrudes beyond the lens flange, so standing any of these lenses on a flat surface will not damage the rear glass.

Size in practice:

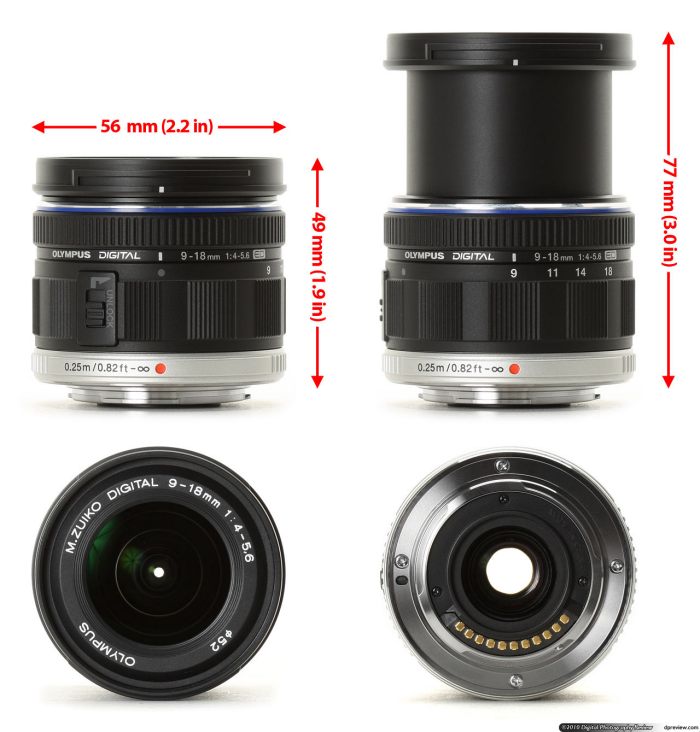
Why would you keep the 9-18mm extended at all times? Take a look – there’s little difference in size when it’s at 18mm from the 14-45mm and a little more at 9mm.

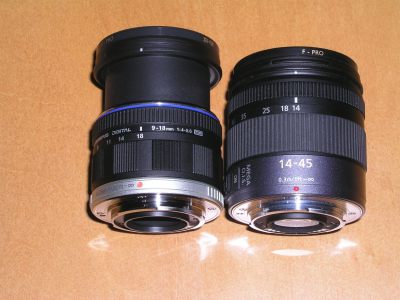
The Olympus lens at 18mm.

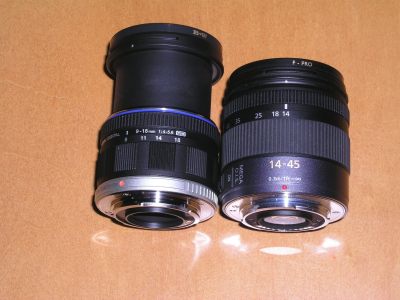
The Olympus lens at 9mm – its largest physical size.

Clearly it’s a practical answer to simply keep the Olympus in your bag set to 18mm and forget all the collapsing/extending nonsense.

Auto focusing:

Like the other two, the lens is near dead silent when autofocusing. Rather oddly it seems to ‘bounce’ beyond the focus point then comes back a bit and while that’s unnerving at first it’s also very fast and after a few frames you forget about it. Subjectively it’s marginally slower to lock on than the 14-45mm but the difference is minimal in practice. The 45-200mm is slower than both and has that disconcerting habit (which it shares with the Canon 100mm EF Macro at close focus distances) of going the wrong way through the focus range now and then before locking on. But I’m prepared to forgive that wonder lens this occasional quirk in exchange for a pocketable 400mm FFE optic. Thanks to the magic of the EVF it doesn’t matter what the lens aperture is or how poorly lit the subject. The EVF will make the subject equally bright under all conditions, even with the lens stopped down to check depth of field. Magic. So the modest f/4-f/5.6 (at the long end) aperture of the Olympus lens is simply not an issue. Sure, there’s no anti-shake technology unlike on the two Panny lenses, but this is a really wide lens – it’s hard to get camera blur at these wide angles. Use this lens on an Olympus MFT body and you benefit from the in-body anti-shake technology, if that’s important to you.

Indexing:

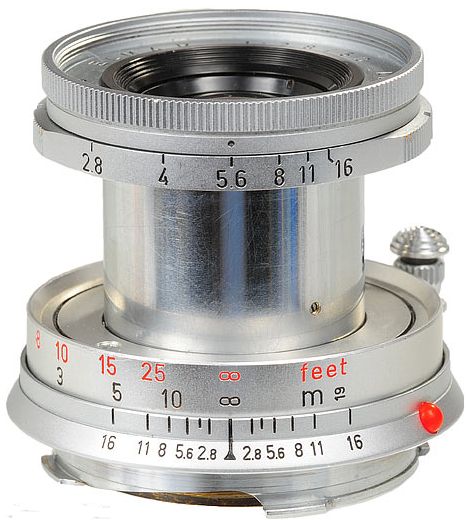
Only two manufacturers have ever got indexing of lenses right, in my opinion. Leica and Pentax. Both adopted a really large hemisphere of plastic (red on Leica lenses, white on Pentax’s) which you could feel even with gloved hands. Knowing from memory where the related dot was on the bayonet flange on the body of the camera, changing lenses by feel was a dream. You did not have to look. No way you are going to do this with the G1. Sure Panny thoughtfully provided indexing plastic blobs on its lenses but they are so small and hidden behind a flange on the rear of the lens as to be useless. Olympus’s approach is even worse and consistent with their earlier designs. They use a recessed red paint-filled index marker and the only way you are going to use that is by looking hard for it when mounting the lens on the body. Shame. A one cent piece of glued-on plastic could fix this so easily. It’s just lousy design thinking. You can clearly see the issue in the above pictures.

Fit and finish:

(i) Focus ring: The only time you need touch the focus ring is when focusing manually. Like with the two Pannys, the focus ring has no stops and is dead smooth. Set the G1 up right and apply a first pressure to the shutter release and you have what is easily the best high precision manual focusing system on the planet. Even with the camera on autofocus, as soon as the focus ring is turned the image in the EVF is greatly magnified and the lens switches to manual focus. And it’s really, really critical manual focus, owing to the magnification. Let go of the shutter release and the picture returns to normal size.

Now you really do not need this with a lens as wide as the 9-18mm which is very tolerant of focusing errors, but with, say, a macro, it’s a killer feature.

The Olympus uses a scalloped alloy zoom ring whereas the Panasonic lenses use rubberized grips. There’s no difference in practice but 35 years with Leicas make me a huge fan of the elegant scalloped design compared to the utilitarian rubber version. Sadly, Leica dropped that design when the accountants took over but Oly is sticking with it. Nice.

(ii) Feel: The lens is exceptionally light but nothing about it feels cheap.Some have accused it of feeling ‘plasticky’ which is meaningless to me. It feels fine. What did you expect? Stainless steel and brass in a 5.5 ounce ultra-compact optic? These people probably expect a Porsche 911 Turbo to deliver 100mpg too.

(iii) Wobble: All lenses with extensible mounts, be they zoom or collapsible, exhibit wobble. Grasp the front of the lens and you can feel it move from side to side as you work it. That was true of my Leica collapsible lenses, is true of the 24-105mm L zoom for the Canon 5D and is true of all three lenses for my G1. So here are my subjective ‘wobble’ evaluations, with each lens set to its longest dimensions:

  • 45-200: – very, very slight. No impact on definition.
  • 14-45: – very slight. No impact on definition.
  • 9-18: – same as for the 14-45.

(iv) Does the Olympus lens coexist with a Panasonic body?

I have encountered no issues with the use of the Olympus lens on my Panasonic G1 body. Except for the zoom ring turning the other way all camera functions are unchanged. Actually, I did have rather a funny thing happen when first looking through the EVF (I never use the LCD screen, considering it one of man’s worst inventions). Every time I focused by taking a first pressure on the shutter release the image would continue to wobble. Wait a minute, I said to the resident Border Terrier. What gives? I haven’t been close to the hard stuff in weeks and it’s only early afternoon. Even at my age I don’t wobble that early in the day. So I tried the two Panny lenses and there it was again. Everything wobbled after focus was achieved. Well, a quick check disclosed that I had accidentally moved the top left dial on the G1 from AFS (single point focus) to AFC (continuous focus) and what I was seeing was the lens hunting in modest internal light as it oscillated about the optimal focus point. Phew! Switching the dial back to AFS (Panny really needs to make the clicks stronger) all was well again.

None of the lenses discloses any discernible fit issues at the lens flange end.

Firmware:

My G1 is on firmware v1.5 (current version) and the Olympus is 1.0. At this time there are no firmware updates for the Olympus lens – the one out there is for the non-MFT similar spec lens.

So that’s about it for the ergonomics.

In Part III I show some pictures taken with the Olympus lens and comment on the optical performance in real life. If you want test charts, go elsewhere. I use my camera to take pictures, not test charts.

One final thought. Here’s my global travel outfit – total weight 4 lbs. Isn’t technology wonderful?
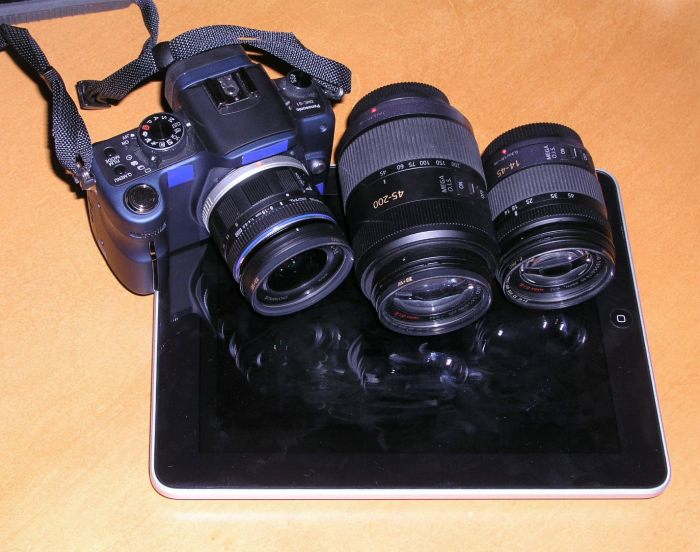
G1 kit and friends.

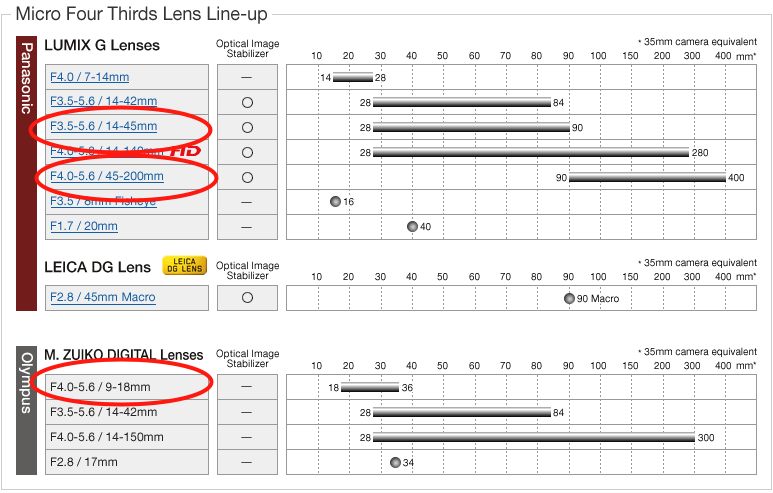
The current range of Micro Four-Thirds lenses appears below, with the ones I own circled in red. Using regular Four Thirds or even larger APS-C or full frame DSLR lenses denies the concept of the MFT system and makes no sense to me, generally sacrificing automation and adding bulk. If you need them, use them on the bodies they were designed for.

Olympus 9-18mm MFT lens – Part I

A new addition to my G1 kit.

I confess that when I first bought the Panasonic G1 a year ago it was with the sole intention of dedicating it to occasional street snapping forays. Small, inexpensive, light, fast and quiet with a killer kit lens, it offers everything a street maven requires. For ‘serious’ photography there was no question in my mind that my Canon 5D with its battery of lenses and accessories would continue to be the ‘go to’ hardware.

That scenario is increasingly being disproved, as I find that the 5D molders in its gargantuan kit bag while the petite G1 accompanies me everywhere. And the only good camera is the one you have with you.

A trio of discoveries has brought about this turn of events.

First, I added the compact Panasonic 45-200mm zoom. This immediately showed itself to be a superb performer at all focal lengths and apertures but, startlingly, offered the possibility of a pocketable 400mm (Full Frame Equivalent) monster lens without the weight and bulk of anything similar for a full frame body. Add built-in anti-shake technology and you have a compelling argument for the Micro Four-Thirds concept.

Second, I’m out of wall space for huge prints and I have done my big-print-one-man-show thing, so the need for pin sharp definition at big enlargement ratios is no more.

Third, the increasing affordability of big display canvases, also known as flat screen TVs, obsoletes the big, static print in much the same way that the iPod obsoleted the CD, and Netflix On Demand movie streaming is obsoleting space- and capital-wasting DVD collections. And given that the quality delivered by even a modest $150 point-and-shoot digital is more than adequate for display on a 40″ TV screen, the desire for the level of resolution that has made pixel peeping a favorite pastime – for those equipment fetishists incapable of taking a good photograph – makes no sense. And if you want an even better display medium than your TV, try the iPad’s 10″ screen. It’s the perfect venue for photo eBooks as my several recent examples here illustrate and is a whole lot nicer to ‘read’ than a computer screen.

This is a long winded way of saying that the 5D’s days are likely numbered chez Pindelski. Click on categories->photography->technique->ebooks in the right hand column above to see what I’m going on about, and do make sure to upload these files to your iPad. Most of these snaps were taken on the Panasonic G1. A few dozen snaps well displayed on a small screen beat one huge static print on the wall. And the latter not only takes huge amounts of time, cash and equipment to create, it also gets boring really fast. There are simply too many images I want to show to remain content with a static wall print.

So while I have been a huge fan of the big print for as long as I can remember, I do think its days are numbered. Times change. Change or die.

All of which brings me round to the topic of today’s column, the newest addition to my G1 kit.

Olympus 9-18mm MFT lens for the G1. Image from DPReview.

My hot little hands await in glee.

I expect to have this little wonder in my hands today, but if you want to read the geeky stuff about how it performs there’s no better place to do so than at DP Review which has done an excellent job of reducing the myriad tables and measurements which technical reviews generally present into a single, sophisticated, interactive chart. (You cannot see the chart on an iPad as it uses Flash, so use a laptop or whatever). Interestingly their charts show that in almost all respects, regardless of focal length, the lens performs better at large apertures. I suspect that, with the small physical size of the diaphragm, diffraction effects are hurting definition at smaller apertures.

I’m no great fan of lens test charts, goodness knows, but DPR’s work does at least offer the comforting assurance that my money hasn’t been blown on a dog.

Here’s what this little charmer ran me at B&H PhotoVideo – I splurged on a costly B+W filter because the same one works well on my two G1 lenses and on two day shipping as it was dirt cheap:

The only competition in the super-wide zoom category is Panny’s 7-14mm which, while optically outstanding by all accounts, costs almost twice as much, cannot accept a protective filter owing to its bulbous front element and is a tad bulkier. The filter thing is important to me as I refuse to use lens caps which are just one more impediment to getting a lens into action and because our eight year old is increasingly getting into photography but still has the uncanny ability of sticking his grubby fingers into a front lens element at a moment’s notice!

Of course, let’s not forget the collapsible part of the Oly’s design, and I do not mean that is a good thing. To make the lens usable you have to press a button and extend the barrel. This increases the bulk of the lens, though that’s not so bad a thing.

It can still be made much smaller for storage when collapsed as there is no rear protrusion, but it does mean one more thing to do to make the lens usable and suggests another thing to wear and go wrong in the long run. I have had more experience with collapsible lenses than most, having grown up with two Leica 50mm Elmars and one 50mm Leica Summicron in collapsible mounts for my Leica M bodies, but the collapsible feature of these was simply poor design. You see, when the lens was ‘collapsed’ what formerly stuck out in front now stuck out in back. The overall size of the lens barely changed! Leica’s design dicate was that, as long as you kept the lens on the body of the camera, things did in fact get smaller as the absence of a reflex mirror permitted retraction of the lens barrel into the camera’s innards. True. But, once you took the lens off, the design made no sense. And, by the way, if you forgot to extend the lens it was perfectly easy to take a bunch of out of focus blobs in lieu of pictures as there was no shutter interlock. A solution looking for a problem.

The poorly designed Elmar – as big collapsed as open.

The Oly avoids this issue as the above picture shows, the whole of the extensible optics portion being housed in the existing space of the focus unit.

The Oly lacks one other thing compared with the Panny 7-14 (neither has anti-shake). Width. Meaning the Olympus at its widest has a focal length of 18mm (FFE) whereas the Panny is considerably wider at 14mm. Flashing back to my Leica days again, I remember when all we impoverished Leica M users lusted after the seemingly impossibly wide 21mm Super Angulon, later the 21mm Elmarit. Lust was the emotion of the day as it comes into play any time you want something that’s more than you can afford. (Women, Ferraris, Leicas, you get the idea). When you did eventually get the coin together for the 21mm SA you also had to blow an additional egregious amount on a simply lousy clip on viewfinder as the Leica M’s built-in finder could at best go to 35mm or, later, 28mm at a stretch, and that was solely for those who did not wear glasses.

But 21mm was really wide and remains so for me to this day.

A simple test of how wide is wide is to question how often you find yourself cropping those ultra-wide snaps when processing. If it’s more often than not, then you do not need something that wide. However, I’m consoling myself here. 14mm is nicer to have than 18mm but the trade-offs in expense, bulk and weight allow me to rationalize in favor of the Olympus lens.

One final point. With three lenses in my G1 kit I have an FFE range of 18-400mm. And just look at the weight of these optics:

  • 9-18mm – 5.5 ounces
  • 14-45mm – 6.9 ounces
  • 45-200mm – 13.4 ounces

So a total of 1.6lbs. – the same as an iPad – for a focal length range one would have dreamt of a few years back. That’s what MFT is all about and you can bet on one thing. Sensor technology will continue to improve so that, before we know it, the MFT body of tomorrow will be equal in resolving power to the 5D of today. And the need (as opposed to desire) for anything greater is limited to 0.01% of the world’s working professionals.

In Part II I look at the ergonomic aspects of this interesting optic.

PDF file size and definition

What works best?

[column width=45% padding=5%]

Read the past few columns here and you will see that I have put into practice my enthusiasm for creating ePhotobooks for viewing on your monitor or, better, on the iPad.

The goal of today’s column is to determine the minimum PDF file size which will work well with the three most common display devices – an iPad, a computer monitor and a large screen TV.

[/column]

[column width=45% padding=5%]

One of the dictates for any data file which has to be downloaded is to make it as small as possible.

No one is going to sit around for ages waiting for downloads and this column is being written in America where time is money. Or is that debt? Residents of Club Med nations likely couldn’t care less, but they probably don’t have broadband in any case. Well, sunshine cures all ills.

When exporting a slideshow as a PDF from Lightroom 3, LR3 suggests a default file size, based on the setting of the Quality slider. For my At The Beach book in yesterday’s column that was a Quality of 63 on the slider:

[/column]

The default slider setting in Lightroom 3 for At The Beach.

[column width=45% padding=5%]

Optimal settings for the iPad:

I decided not to experiment with the output dimensions as 1024 x 768 is the native size of the iPad’s screen, so that seems optimal. Any more is overkill, anything less underutilizes the device’s capabilities.

[/column]

[column width=45% padding=5%]

To test things a little more objectively I exported four more PDFs in addition to the default one (63), using 12, 25, 50 and 75 settings on the Quality slider. Bear in mind that these are screenshots. The original is far sharper, effortlessly yielding pin sharp 24″ x 18″ prints. I know, because I made them on my HP DJ90 printer.

Here are the file sizes:

[/column]

PDF files sizes at five different Quality settings in LR3.

[column width=45% padding=5%]

Exporting all five to the iPad I could not tell any difference between image quality viewing all but the smallest (Quality=12) using GoodReader. Unpinching to magnify the image did show that the Quality=25 version broke up earlier than did the larger versions, but the three largest looked much the same at regular, unmagnified size. The Quality=12 version showed signs of pixelation in normal size and does not make best use of the iPad’s display definition, so it should be avoided.

This suggests that even at a low setting of Quality=25, a PDF intended for viewing on an iPad is more than sufficient in quality and does not compromise definition compared with higher settings and larger file sizes.

Optimal settings for a computer monitor:

There are a lot of variables here. Computer monitors tend to be viewed from very short distances and come in a wide variety of definitions and screen sizes. My two Dell 2209WA IPS displays are 21.5″ diagonally and display 1680 x 1050 using an Nvidia 9800GTX+ card, the latter still unequalled by the latest MacPro, despite nomenclature changes to fool the uninformed.

[/column]

[column width=45% padding=5%]

I would describe that combination as upper-middle display quality and a state-of-the-art graphics card.

(When my ship comes in I want to be able to migrate upmarket to a better display without having to blow more coin on a better GPU!)

The best way of illustrating the differences is to do a ‘rollover’ demo, but to see this you must be using a modern Webkit browser, meaning Safari or Google Chrome. The original image used here was taken on a full frame Canon 5D using the 24-105mm ‘L’ zoom lens stopped down to f/8, its optimal aperture – a sharp combination. If the mouseover pictures do not appear in your webkit browser simply refresh the URL and all should be well.

I have placed two pictures in the rollover demo – the top one is from the Quality=25 file, the rollover one from the Quality=75 slide. In each case these are screenshots from Preview with the Zoom ‘+’ button clicked twice for an enlarged image. The full image is 12.7″ x 19″ and shows signs of breaking up regardless of Quality setting. However, the rollover illustrates the degree of breakup between the two:

[/column]

Quality=25. Rollover for Quality=75

The difference is extremely subtle. You can just see noise disappearing from the white area of the registration plate and from the spokes of the wheel when you roll over the image with your mouse cursor.

Now here is the same exercise but this time the top image is Quality=12, the rollover remains Quality=75.

Quality=12. Rollover for Quality=75

[column width=45% padding=5%]

On my monitor there’s a big jump in quality from 12 to 75.

Bottom line? For my purposes the Quality=25 version is more than adequate for my computer monitor as long as the image is not zoomed in and also happens to be optimal for the iPad.

For even higher computer monitor display quality, you should increase the export image size in Lightroom 3 to approximate that of your monitor. If you click on ‘Screen’ in the size drop down (see screenshot above) LR3 will automatically adjust the export size to match your screen dimensions. Doing this for my 1680 x 1050 Dell 2209WA monitor, the Quality=25 file size grew from 2.1mB to 2.8mB. However, the perceived image quality was indistinguishable, suggesting that the modestly larger file size confers no benefit on image quality.

Finally, with export Quality=100 and set for the 1680 x 1050 Dell display, file size balloons to 24.9mB with slightly smoother tone characteristics in large areas of plain color. Definitely not worth it when comparing a 2.1mB Q=25 S=iPad file with the 24.9mB Q=100 S=Dell whopper.

Optimal settings for a large screen TV:

Increasingly we are using the large screen TV as a viewing device in lieu of making large and costly wall prints. So I displayed the 12, 25, 63 and 75 quality PDF on my 42″ 720p Vizio LCD TV (4 years old it’s somewhat removed from the state-of-the-art, but works for me at a very reasonable price).

I used a MacMini, the just discontinued version MC238LL/A which uses an Nvidia 9400M GPU and can resolve up to 1920 x 1200. My TV is 1280 x 720, and thus is

[/column]

[column width=45% padding=5%]

the limiting factor in the equation.

The very best viewing experience was already reached at Quality=50, viewed from my usual 10 feet but the quality drop when viewing the Quality=25 version was so slight as to be almost unnoticeable. The lower quality of Quality=12 was just distinguishable, but far less so than on a computer monitor or iPad.

Bottom line:

The best compromise for one file size for use on an iPad, computer monitor or big screen TV is Quality=25 when exporting a Lightroom 3 slideshow. That results in a file less than half the size of the default Quality=63 setting in Lightroom 3, meaning it will download more than twice as fast from a server.

Another user’s experience:

UK pro Roy Hammans shares my interest in the techniques discussed above and was kind enough to forward some samples created at different quality levels. Roy uses both 24″ iMac (1920 x 1200) and 24″ HP LP2475w (1920×1200) displays, and used the highest quality equipment to make these pictures. The first four were made with the 18-200mm VR lens at 24mm on a Nikon D300 in DX mode, 400 ISO. The second four were taken with the Nikon 10.5mm fish-eye on his NIkon D700, at 200 ISO, (in DX mode), the equivalent focal length becoming 15mm. He used the LR3 built-in lens profile correction for the 10.5mm to remove barrel distortion inherent in the design of the lens.

His PDF images were also generated using the slideshow function of LR3 – click the picture to download his PDF file:

[/column]

[end_columns]

Click the picture to download

So between us we are at Q=50 (Roy – great eyesight) and Q=25 (me – lousy eyesight) for the best compromise setting at an export size of 1024 x 768, whether for iPad or computer monitor display. Those using large 30″ computer monitors (2560 x 1600) should probably adopt the Q=50 setting. In any case Q=50 yields a file size much smaller than Q=100 (4.5 times the size at 1024 x 768), which is overkill in any scenario I can imagine.

The state of the art

Technology continues to amaze.

Two press releases from Panasonic today, detailing the features of their latest superzoom, the FZ100 and their newest ‘luxury’ compact the LX5 shows how the state of the digital hardware art continues to progress.

But does it make toast and coffee?

[column width=45% padding=5%]

The FZ100 offers a startling zoom range of 25-600mm (FFE) in a one pound body, movie mode and built in flash. The multi-position LCD from the G1 is included, as is 11 frames per second sequential shooting and a 15 megapixel sensor. You get all of this for $500. Whether anyone will ever get sharp pictures at 600mm absent a tripod (how many buyers will spend the necessary $200+ for a really sturdy one?) is debatable, but it’s an awful lot of camera for awfully little money.

At the luxury compact end (meaning you pay up for a Panny lens with a Leica sticker) the LX5 is no less impressive. The camera’s ‘Leica’ lens retains its f/2 maximum aperture but the zoom range is now a truly useful 24-90mm and you can now fit the so-so clip on EVF designed for the GH1.

[/column]

[column width=45% padding=5%]

That adds bulk and ugly, but you can see how the design experiences from the G1 range are reflected in both cameras.

Which leads me to the inevitable conclusion that the GF2 – a GF1 with the much better G1 EVF – will be here any day soon. A Leica shaped body with superior G1 range lenses and, finally, no faux prism hump.

So until that super zoom adds an f/2 aperture and a big sensor, the GF2 may be the next to see a home chez Pindelski. But the days of interchangeable lens DSLRs are surely numbered.

[/column]

[end_columns]

One year with the Panasonic G1

A pure delight.

A couple of years back I wrote of how I use iCal to track warranties, so what would appear on my pop-up list of reminders today but the fact that I have now completed one year with the Panasonic G1.

And what a year it’s been.

The G1 was intended to be a replacement as a street snapper for my Panasonic LX1 to which I had glued an external optical viewfinder to speed framing. The LX1 is a handy and small number but its shutter lag is so-so and the ergonomics are compromised by the small size. Further, with a very small sensor, image quality tends to suffer as you enlarge the finished image. But it remains a handy traveling companion in the car’s glovebox at all times.

Until the G1 came along there really was no adequate replacement for my collection of Leica M2 and M3 street snappers, sold a few years back to procure funds for the Canon 5D and its range of fine lenses. The Canon’s image quality left the Leicas in the dust but no one could accuse the large and loud 5D of being a street snapper unless you are of the persuasion that has it that a gun is a better negotiating instrument than a quill pen.

Here, finally, was a small, unobtrusive, quiet and fast camera with a high quality kit lens which suffices for most situations encountered by the street maven. Sure, the maximum aperture is pedestrian but throw in a very capable anti-shake system and you gain two stops of speed if not of narrow depth of field. Indeed, I have not been particularly excited about adding the 20mm f/1.7 Panasonic lens owing to its lack of the one thing street photography really benefits from and that’s anti-shake technology. The 20mm focal length of that lens is certainly in the sweet spot – most of my street snaps are taken in the 14-20mm range – but it simply does not add enough and takes away the very handy zoom range of the kit lens which, at 28-90mm in full frame terms is about as perfect a traveling lens as one could wish.

And while I have added the Panasonic 45-200 zoom, which is superb in every way, it’s that jewel of a kit lens is what you find on my G1 99% of the time. Fast focusing, as sharp fully open as stopped down, small and with decent flare resistance, it answers most of this photographer’s prayers. I keep a UV filter on for protection and refuse to use the ridiculous, gargantuan lens hood.

The G1 has been discontinued in favor of the G2 with a 14-42mm kit lens and a movie mode has been added. Neither change means anything to me so the G1 and I remain happy campers.

The only alternative out there for my purposes is the underwhelming and ridiculously overpriced Leica X1 which seeks to trade on the Leica name and the fabulous

ergonomic shape of the Leica M’s body. Sure, the 40mm equivalent fixed focal length lens is ideal (though why on earth you have to wait for it to extend when you switch on the camera beats me – Leica should have used a fixed mount lens), and the APS-C sensor sounds nice though from what I have seen it only improves on the G1’s smaller sensor above 800 ISO. In addition, reports suggest the focus is slow, the shutter lag high and, of course, there’s no credible viewfinder for street work. No, I do not regard an LCD screen, invisible in daylight, as an alternative to a proper viewfinder. And that’s all you get for $2,000 …. are you kidding me?

In the past year I have taken just over 6,000 street snaps with the G1 and have had no reliability issues. Once I had set all the myriad variables to my preferred working method – 320 ISO, aperture priority, single shot, etc. – I simply forgot about all the arcane options and programmed just two Custom settings – one for 320 ISO and the other for 800 ISO for poor light. Then all that remains is to hit the streets and bang away.

Complaints? Well, the zoom collar on the kit lens continues to feel as if someone had buried the optic in the sand at Brighton Beach (NY or Sussex – the sand is much the same either side of the pond) unlike that on the 45-200 which is butter smooth. It grates (!) compared with the overall jewel-like precision of the camera. The electronic viewfinder burns out highlights on sunny days all to easily making pre-visualisation a tad tricky at times but it’s not that big a deal. The final image is, of course, unaffected and the trade-off is the brightness of the image in poor light or in interiors, which is outstanding. Once or twice after changing lenses I have received an error message, fixed by simply giving the lens a bit of a tweak on the camera. And that’s about it. I have no complaints about the silly overload of menu choices as I have simply saved my preferred ones to the Custom choice on the top dial. Panny got it pretty much right first time and all that remains is to wait for the GF2 with no prism hump (not needed in an EVF SLR in any case) and an even smaller Leica-looking body. Nirvana.

If the G1 fails or is stolen or damaged, I console myself with the thought that I can go through a dozen and a half of these and still have change left compared to what that Leica M9 would have run me and, unlike the well heeled owner of that piece of jewelry, my fear quotient when it comes to loss or damage is zero. Plus I don’t have to pause to focus manually through a 70 year old, antiquated rangefinder with a viewfinder which offers at best an approximation of the finished image. Finally, this is a street snapper – you are not going to use it for 40″ x 30″ pin sharp landscape prints. I use the Canon 5D for those.

So, without further ado, just click the picture below to see a couple of dozen snaps from my past year with the G1 which has, quite simply, revitalized my street photography.

Click the picture for more.

To see more from the Panasonic G1 go to my Photoblog, which is named Snap!, believe it or not.