Category Archives: Hardware

Stuff

iMac surgery – Part I

Fixing cooling issues.

This piece is relevant to users of the 17″, 20″ and 24″ white iMacs with Core Duo (early 2006) or Core2Duo (late 2006) CPUs. These machines use the Intel GMA950, ATI 1600 and Nvidia 7300 (or 7600 on top end 24″ machines) Graphics Processing Units (GPUs), respectively.

When I bought my 24″ iMac I wrote here of my concerns of the poor cooling of critical components, occasioned by Apple’s obsession with looks at the expense of sound engineering design.

Many are doomed to fail owing to improper venting of hot air generated by the GPU. Indeed, if you look on Apple’s own discussion board at this thread, now some 28 pages long and counting, you will see the raft of complaints about blown GPUs on all models, regardless of GPU maker. Apple has yet to admit – if it ever will – fault, and life is simply too short to argue with them, so I decided to fix things myself. Plus they have $30bn in the bank and lots of mean lawyers ….

Things have come to an unhappy pass. Both my 20″ iMac (ATI 1600) and my 24″ iMac (Nvidia 7300) are showing advanced symptoms of GPU failure, despite the judicious use of Fan Control to speed up the GPU fan. Symptoms include horizontal and vertical lines on the screen, distorted areas and random rectangular colored patches. Add slower operation and many spinning beach balls and the machines are becoming simply unusable.

A PRAM reset, what you’ll likely be told to do by Apple, makes no difference.

Here’s the diagnostic language from Apple’s own repair manual:

Obviously they want it unplugged for two hours. It has to cool down, get it?

And while you are at it, cease being naïve – Apple is just another big corporation looking to maximize profits, bless them – the customer most certainly does not come first as this language in the same manual relating to dead LCD pixels clearly discloses:


“Don’t tell the customer”

So you are going to have to look after yourself, make some money on AAPL stock or elsewhere and get with the action. The guts of a modern Intel Mac are made by the same manufacturers used by PC makers – Intel, ATI, Nvidia, Samsung and LG Philips LCDs, WD/Seagate HDDs, etc., etc. They just come in a prettier (and costlier) box which, in this case, is poorly designed. Use the machines for the superb OS, but don’t expect too much costly integrity from the manufacturer. Read on.

Now Apple will charge you $900 to replace the logic board on the 17″ and 20″ models, whereon the GPU is well and truly soldered. Maybe less on the 24″ model where the GPU is a separate plug in module – I have read $400 or so. Either way, it’s highway robbery. And while iMacs start at $1200 new, there’s no alternative for users like us – and surely all photographers out there – who despise glossy screens. And, finally, there’s a simple sense of outrage at throwing away an otherwise fine machine after just 2 years of light use.

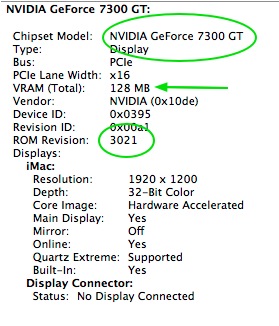
So we decided to repair things and not at Apple prices. My 20″ iMac’s logic board was shipped to Apples-R-Us for a $195 repair of the fried diodes and capacitors. For my 24″ model I had the choice of replacing the Nvidia 128mb GPU with a like model at $179 or upgrading to the faster 7600 model at $231 with 256mb, so I opted for the latter. This is a new part, not a fried recycler special (I asked) with a 60 day warranty.

Now surgery, the title of this piece, is meant to excise the bad and restore the patient to health. Simply replacing fried parts with new or repaired ones which would be fried again is pointless. So some thinking was called for to see how better to confer proper cooling on the GPU and its diodes.

First, extracting a motherboard (or logic board, as Apple calls it) from an iMac is …. a mother. Do yourself a favor and download the official late-2006 Apple repair manual by clicking below.

The tools needed are very few – Torx #6, 8 and 10 screwdrivers, a Philips #2, a magnetizer for the screwdrivers, a lollipop stick to remove the black sheeting around the LCD (20″ model only), lots of plastic baggies for all the fasteners you will be removing, a cool head and a pair of balls. The instructions in the Apple manual err in only two particulars. They forget to mention that the RH speaker has to be removed to remove the logic board and that the cooling radiator for the GPU has to be removed once the logic board is extricated, before shipping the latter for repair. Eight T8 screws – no biggie.

Let’s take a look at how Apple cools the GPU and related diodes. The design could hardly be more elegant.


The iMac radiator assembly in the 20″ model

It’s like a car really, absent the coolant pump. The coolant circulates by convection through the copper pipes, discharges its heat to the fin assembly (silver in the picture) whence it’s blown out by the large (black) fan. Snag is, El Jobso loves smooth, slim boxes, so the heat can only escape through a narrow slot at the top rear of the iMac. Given that heat rises, the width of the slot is useless. Basically, the GPU radiator is trying to discharge enormous amounts of heat through a 5″ x 1/4″ slot. Things are not helped by the fact that the power supply, immediately to the left, is trying to do much the same through its few inches of slot. It’s like non-taxpayers lining up for the latest bailout. Not enough taxpayers are available to feed the greedy unemployed masses. Not enough outlets for all that hot air in the iMac.

Simply stated, more outlets are needed to allow hot air to escape. Like so:


Holes being drilled in rear case of iMac behind radiator assembly

To do this, use a Sharpie marker and a Forstner 3/8″ drill bit after you have gutted your iMac. The grid is 3/4″. The Forstner bit cuts holes from the outside in, unlike a regular drill which cuts from the inside out and is guaranteed to cock-up (technical term) your placement as it skids all over the place. And you do want it to look half decent, even if the rear of your iMac faces a wall. The sharp central tip of the Forstner bit makes that child’s play.

The placement of the grid of holes is offset from center as is the position of the radiator. Use the above picture as a guide – I will post pictures for the 24″ model later. Be careful – you do not want to drill into the metal chassis underneath and you will if you get this wrong. You can get a Forstner at better hardware stores.


3/8″ Forstner bit in hand drill

When all is said and done, I will have 30 3/8″ diameter holes which will increase the area through which hot air can escape by 268%. Any burrs can be easily removed with a conical abrasive bit, and the Sharpie marks wiped off with isopropyl alcohol. So I’m optimistic that this is surgery, not placebo.

Oh!, by the way, you say you like glossy screens and your new iMac in aluminum and black is just fine? Well, be prepared. Reports of like failures of the GPUs in those are beginning to come in – and they have even less space for cooling inside. There’s that obsession with thinness again. Great for Vogue models. Not so good for electronics.

In Part II I provide detailed measurements for drilling the ventilation holes in a 20″ iMac, together with illustrations of how to install conductive aluminum mesh to both reestablish the electrostatic barrier provided by the aluminum liner in the case (which must be selectively cut away for the holes to work) and to filter out dust from the innards. The 24″ iMac will be addressed later – I can only deal with one Apple screw-up at a time.

Panasonic GF1

The rumor every Leica user wants to be true.


The Panasonic GF1? Click the picture for more.

Imagine the capabilities of the excellent G1 packaged into a miniscule body with an electronic viewfinder and interchangeable lenses. With a decent ultrawide – say a 10mm f/2.8 (=20mm full frame equivalent) and the outstanding 14-45mm kit lens, you would have a pocket sized camera (OK, a big pocket is needed) which would suffice for almost all your travel needs.

It seems the EVF is a clip on accessory, and not built into the body, which is a shame as it will add to the bulk and make the shape more ungainly. Still, any finder is better than an LCD screen.

Panasonic has already clearly stated that they could have made the G1 much smaller and that they left the faux prism hump in the design to make the camera look like a viable competitor to the raft of modestly priced DSLRs on the market. But surely there is enormous unsatisfied demand for a small camera like this and not only from disaffected former Leica fans like me? So while the picture may be a fake, something like this is only a matter of ‘when’, not ‘if’. But Panny, please integrate the EVF into the body – isn’t that just obvious, for goodness’ sake?

Meanwhile, the G1/GH1 are more than up to the task of acting the modern Leica.

Some G1 statistics

From Lightroom

Lightroom makes it easy to summarize statistical data about your photos, so after a month with the Panasonic G1 I thought it would be fun to see some analytics.

Of the 750 pictures I have taken with the camera so far, 275 survived the cull (36%) as ‘keepers’ and the following data are for these 275 keepers. My hit rate has really been little changed over the past 40 years or so – if anything, it’s increasing suggesting I am getting better at pre-visualization or less discriminating in my old age ….

I have the camera set for Aperture Priority with iISO (the camera selects ISO) for all of these.

As you can see, the CPU selects shutter speeds which favor the lowest possible ISO, consistent with the best image quality:

I select the aperture in Aperture Priority, and tend to the large aperture end of the range (f/3.5 to f/5.6 for the kit lens – 64% of the total), where the lens delivers its best quality – quite a tribute to Panny’s hardware and software genius; I also thus force faster shutter speeds to minimize definition loss from camera shake:

Here are the shutter speeds set by the CPU:

Interestingly, I have a significant preference for portrait orientation, with fully 58% being in portrait mode (LR incorrectly refers to this as ‘Aspect Ratio’):

And, finally, as will come as no surprise to readers of this journal, I am very much a devotee of color, though I started life as a monochrome snapper:


Home under the freeway. G1, 21mm, 1/500, f/5.6, ISO 160

I have yet to figure out how to summarize which focal lengths of the kit zoom’s are most used – that would be most interesting – but if I do, I will add a piece on that.

As for my preferred color palette, what most catches my eye on the street, red and blue seem to dominate, as this extract shows:


My G1 color palette

The snaps with a ‘2’ or ‘3’ at the top left indicate that the image has been round-tripped to Photoshop CS2 – 20% in this sample. This is almost always to correct leaning verticals as I am anything but a Photoshop maven. In fact, I detest the product and avoid using it whenever possible. Were Adobe to add perspective correction to Lightroom I would probably completely cease using PS.

Looking at your statistics can be both fun and a learning experience.

Working with Custom Sets

A useful feature in the Panasonic G1

Given the myriad of adjustments which can be made to the Panasonic G1’s custom settings, it’s nice that Panny has provided the option of saving up to three custom sets in the Custom Menu.

After banging away for a while and getting generally familiar with the camera over the past month, I have pretty much settled on a set of street snapper settings whose goal is to have a camera that is as responsive and fast to use as possible, while at the same time having a minimum of clutter on the EVF screen to get in the way of seeing pictures.

To save these setting, I start the camera in Aperture priority mode to which I apply the usual defaults, such as iISO (intelligent selection of ISO by the camera’s CPU), RAW picture quality (I have no use for RAW + JPG) and, of course, shake reduction. The EVF display is set to minimal display by toggling the ‘Display’ button on the rear, so that only Aperture, Shutter Speed and over/under exposure adjustment is shown, the latter set to 2/3rd stops under-exposed. I do not use the LCD screen on the rear and have it turned face in, as LCD settings are irrelevant to street snapper mode.

Custom Sets allow no fewer than ten additional settings to be saved, so with the camera still set on ‘A’ on the mode dial (for Aperture priority), I set the remaining variables as follows:

AFL/AE: AE. I want the rear panel button to lock exposure only, when depressed and held. I prefer to lock focus with a first press on the shutter button, when needed.

AFL/AEL Hold: Off. The problem with this setting is that the ‘hold’ remains in place after the picture is taken, which is exactly wrong. So ‘Off’ it is.

AF + MF: On. This allows for fine tuning focus, even though the camera is set to auto focus, by turning the focus collar on the lens. Very handy if you are shooting through a window or a wire fence, for example, as the camera can get confused and focus on the obstacle rather than on the subject.

Focus: Off. This allows the shutter button to work even if the image is not in focus. Better a slightly unsharp picture than none at all.

AF*: Off. This makes sure the bright red auto focus ‘assist’ light stays off in dim light. The very last thing you want for unobtrusive snapping is for a bright red LED to broadcast your presence.

P-AF: Off. This disables continuous pre-focusing before the shutter button is released. A waste of battery power and you need all you can get.

Fn: Set to Aspect Ratio. This dictates the action of the small Fn button on the rear panel. I have it set to allow choice of aspect ratio (4:3, 3:2, 16:9) as the other choices (RAW or JPG, Metering mode, iExposure or Guidelines) are of no use on the street. For that matter, setting the aspect ratio is of little use to me as I always use 3:2. You can take the man from his Leica but you cannot take the Leica from the man, and film Leicas are 3:2.

Auto Review: Off. The last thing you want is to be presented with an Auto Review of the last snap when you are desperate for the camera to free up for the next picture. Anyone who complains about the picture-to-picture times of the G1 being too slow is ignorant of this setting option. Unfortunately, Panny ships it with Auto Review set to ‘On’ which hardly helps matters.

NR: On. Reduces noise in long exposures. Why not?

Shoot without lens: Off. This allows adapted lenses to be used but, for now, I have all I need with the 14-45mm kit lens.

To save these, all you have to do, with the camera still in ‘A’ on the top mode dial, is to go to the Custom Menu->Cust.Set.Men (the very first choice), right arrow, hit Menu ->Yes and your settings are now saved to Custom Set 1.

Then rotate the mode dial to ‘CUST’ and the first Custom Set, the one you just saved, is in effect. If you create other Custom Sets, then you have to depress the Menu button and choose the one you want. For example, you may want an auto-bracketing set for HDR photography, or a ‘100 ISO’ only set for highest quality images, and so on. However, at my time of life, when I’m happy just getting the right leg in the right half of my pants, one custom set is just fine, thank you.


G1 – Custom Set 1 at work

Fighting for dynamic range

Lightroom 2 to the rescue

Sometimes there’s no alternative but to restore dynamic range using some manipulation at the processing stage. The Panasonic G1’s smallish sensor does not help in the dynamic range department – the Canon 5D’s, almost four times the area, is better in this regard.

The following is a case in point – I exposed for the brick wall, which is in bright sun, knowing the fire truck would be lost in gloom. Exposing for the fire truck would have burned out the wall and foreground.

After round-tripping the image from Lightroom 2 into PS CS2 to correct leaning verticals (Image->Transform) I saved back into Lightroom and used the Brush with AutoMask switched on to outline the garage bay, first hitting Option-O (this toggles mask visibility) to see exactly what I was masking. Then a quick tweak of exposure and an overall increase in red saturation and the picture was finished.

Here’s the ‘before’ and ‘after’ in Lightroom 2:


Shadow recovery – before and after

As the shape I was outlining had straight edges, I reduced the ‘feather’ setting to zero for a hard edged mask.


Fire truck. G1, 31mm.1/200, f/9, ISO 160

When God gives you lemons, make lemonade ….