Category Archives: Hardware

Stuff

Fixing viewing in the Nikon FE

A few bucks and some sweat equity.

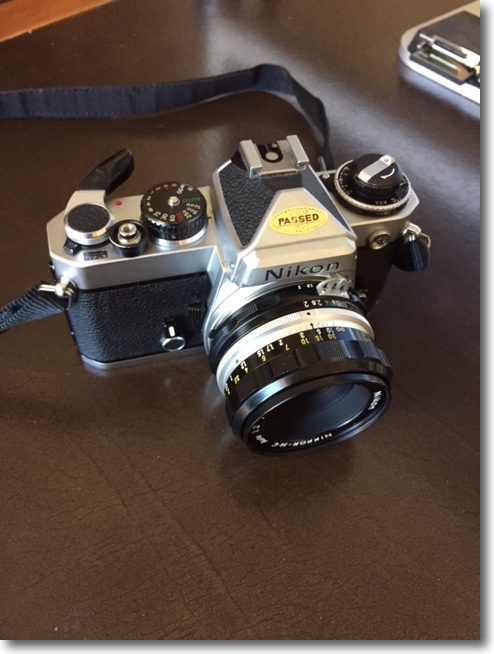
In my introduction to the Nikon FE I focused on the factory’s attention to ergonomics in this elegantly designed camera.

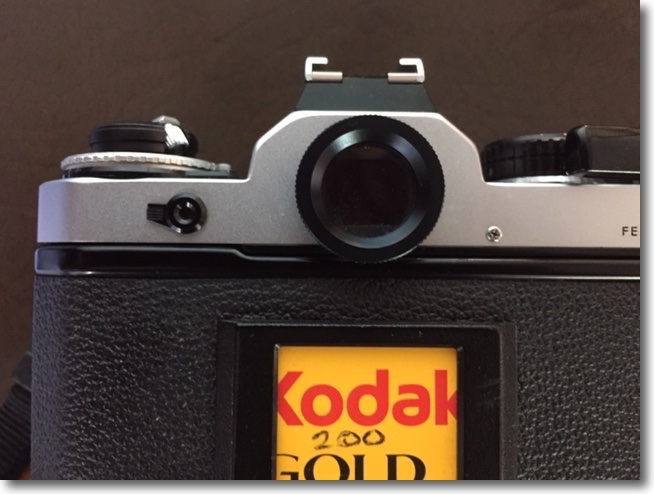
Mine came with a -2.00 diopter Nikon non-standard eyepiece which left much to be desired (meaning I couldn’t see a bloody thing) so I removed the correcting lens, a 19mm screw-in attachment, and had at it while awaiting a plain glass replacement. Nikon is asking $25 for the part which makes highway robbery seem a bargain in comparison, but I traced down a $5 clone on eBay and plonked down my cash. On installation it was immediately obvious that the external diameter is too large, preventing the camera’s back from opening:


Duh! eBay strikes again!

So it’s off to the bench grinder and after marking the right position a small flat is machined on the circumference. The thread is a single start one so, should you ever remove the eyepiece, replacement in the correct orientation is assured.


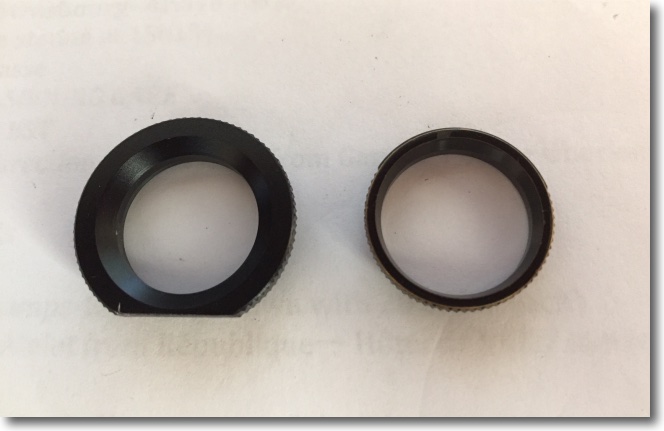
Showing the machined flat on the replacement eyepiece.
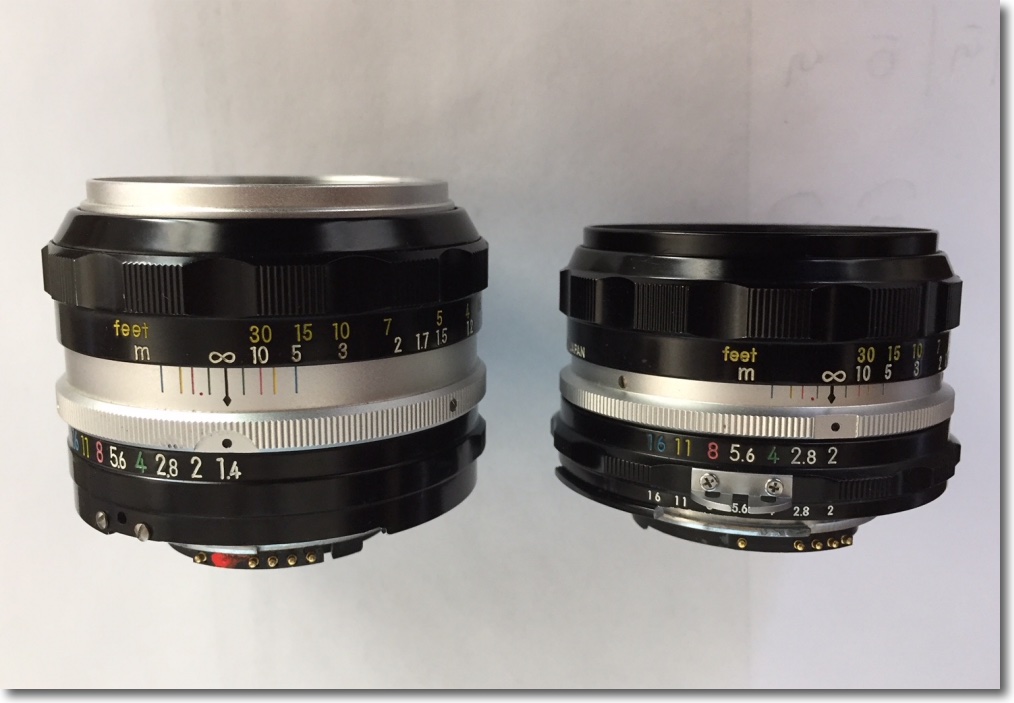
Stock size Nikon part on the right.

In practice the larger circumference of the aftermarket part is to be welcomed, providing a bigger contact patch for this snapper’s eyeglasses.

Here it is installed, a spot of black paint applied to the machined flat:


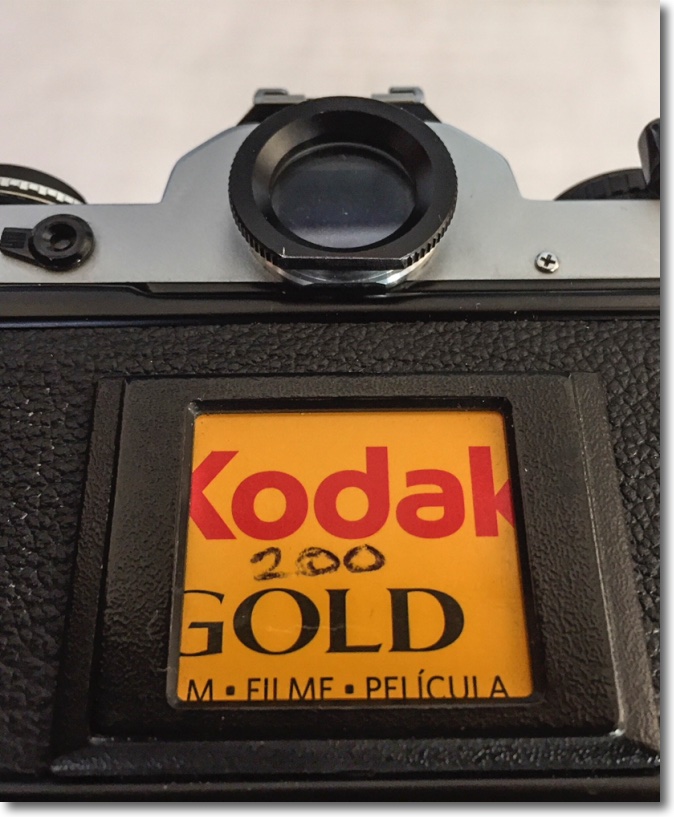
Installed, and correctly aligned.

Now for the other shortcoming of the stock FE body. In my earlier posting, I made mention of the fact that the Nikon FM and FE, and their derivatives (FM2, FE2, FM3, etc.) found great favor with professionals who did not need the bulk and weight of the big F series bodies nor all their flexibility. Nikon did not chintz on the feature set and every one of the cameras in the series – with the exception of the original FM which came a year before the FE – had interchangeable focusing screens. Nikon marketed three types – the stock Type K with a split image center and microprism collar defining the center-weighted metering area, the Type B matte which deleted the split-image aid but retained a microprism center and the Type E, like the Type B but with horizontal and vertical alignment lines added.

The stock Type K screen in the Nikon FE is underwhelming, being both grainy and not very bright. Also, the split-image focus aid partially blacks out with lenses of 200mm or longer focal length, rendering it useless.

However, Nikon did not rest on its laurels. The late 1970s was a fertile period for screen design with easily the best and brightest being the full area microprism one found in the 1968 Leicaflex SL, which remains a standard to aspire to to this day. (The earlier Leicaflex with the integrated, external CdS meter, only had a center focusing spot so it was brighter still, but the utility value was missing). When the 1983 FM2 and FE2 came along the bodies were fitted with an improved screen, the Type K2, E2, etc. Still a bit grainier than you might like but gaining 1/2 stop in brightness. There was more to come for in 2001, with the introduction of the FM3A, the brightness remained but the graininess was gone. This Type 3 (K3, E3, etc.) was the best and the brightest ever made for the FM2/FE series and, amazingly, can still be found new at Amazon for under $30. Continuous improvement, or kaizen, at its best. I bought one.

Do not be tempted to buy a beater on eBay. The new kit comes with the proper tweezers which make exchange simple with no fingerprints on your pristine screen. One end of the tweezers has a rectangular slot to grasp the protruding tab on the screen, as well as a small plastic extension to pop the locking catch in the camera’s body.


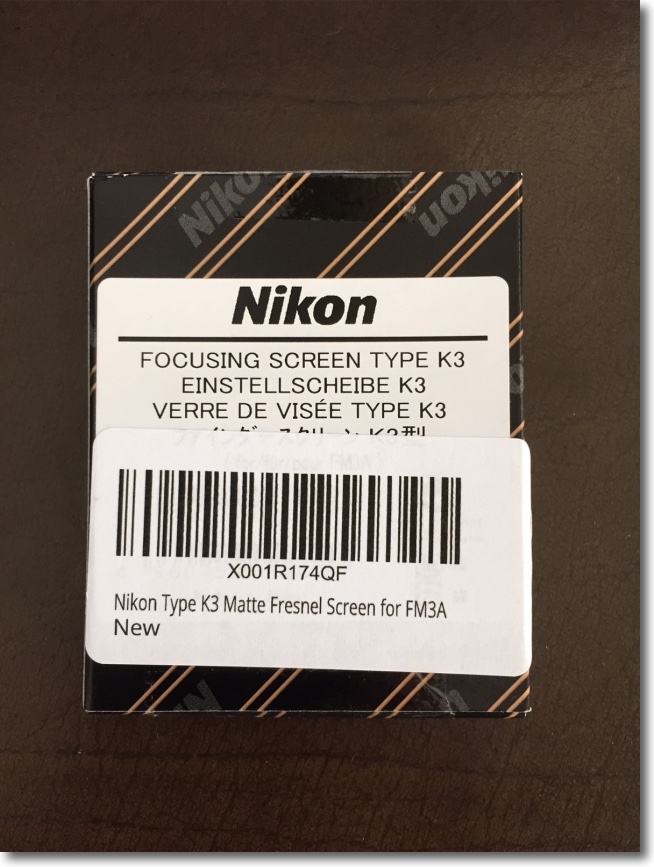
This is the right part.

The beater you buy on eBay will likely be filthy (just try and clean those fine fresnel etchings ….) and will probably be missing the tweezers. You really do not want to do the exchange without these. For those interested, the tab on the Type 1 screen has a plain leading edge, that on the Type 2 is notched whereas the Type 3 is engraved with the designation K3, E3 or B3. But however you try to rationalize it, paying $15 for a beater with no tweezers against $30 for the new part makes no sense.


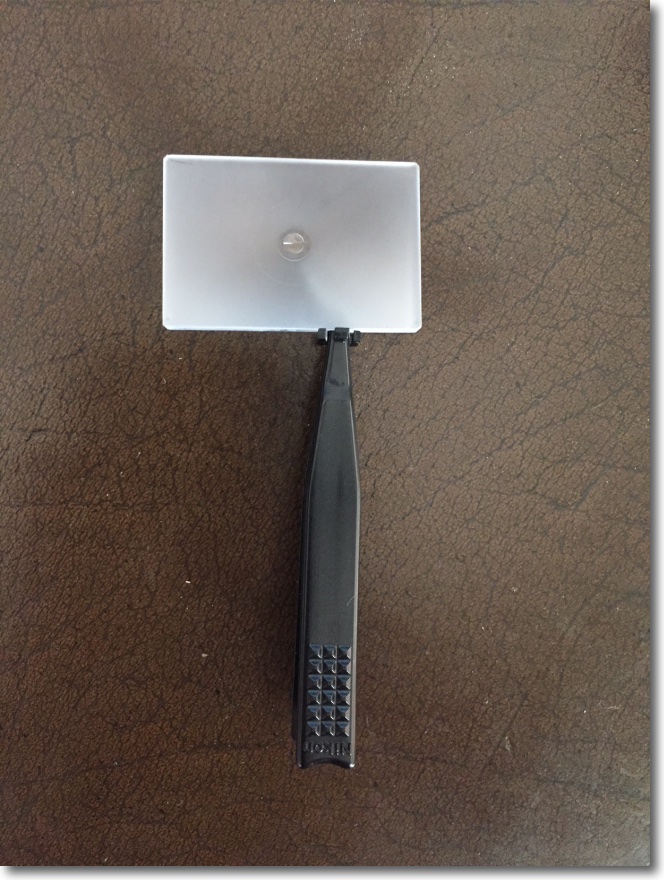
The Type K3 screen kit.


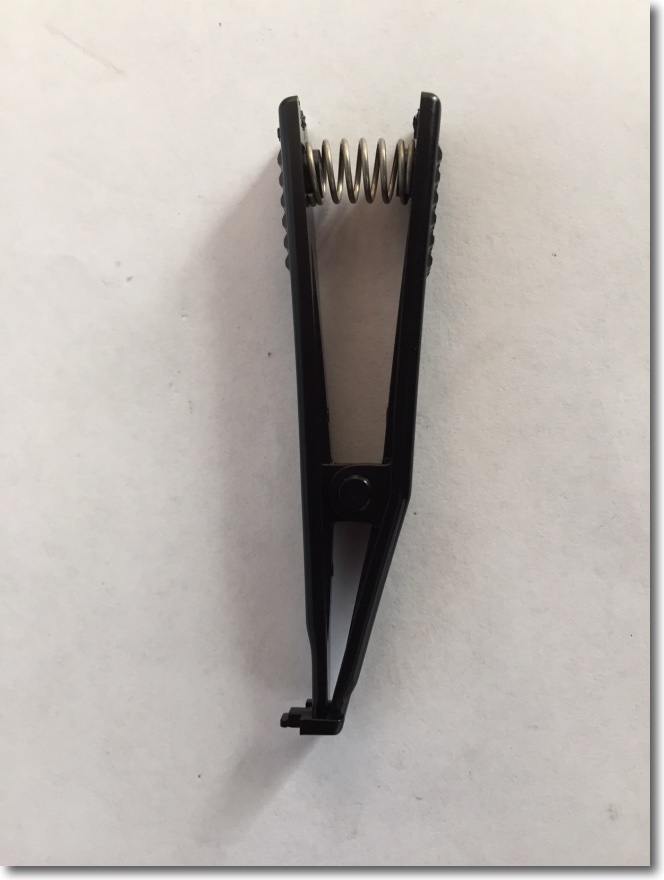
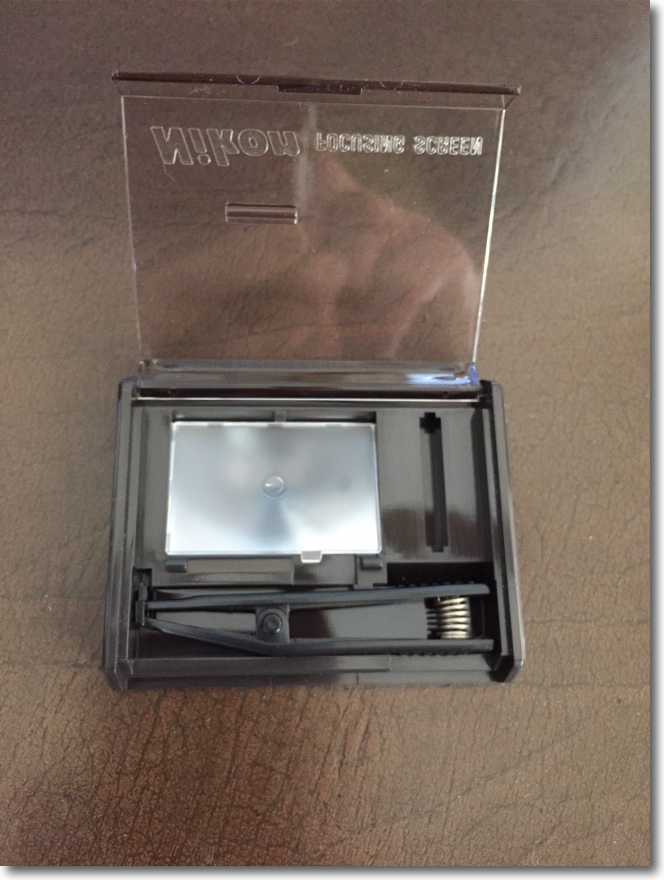
Tweezers. Far more than meets the eye.


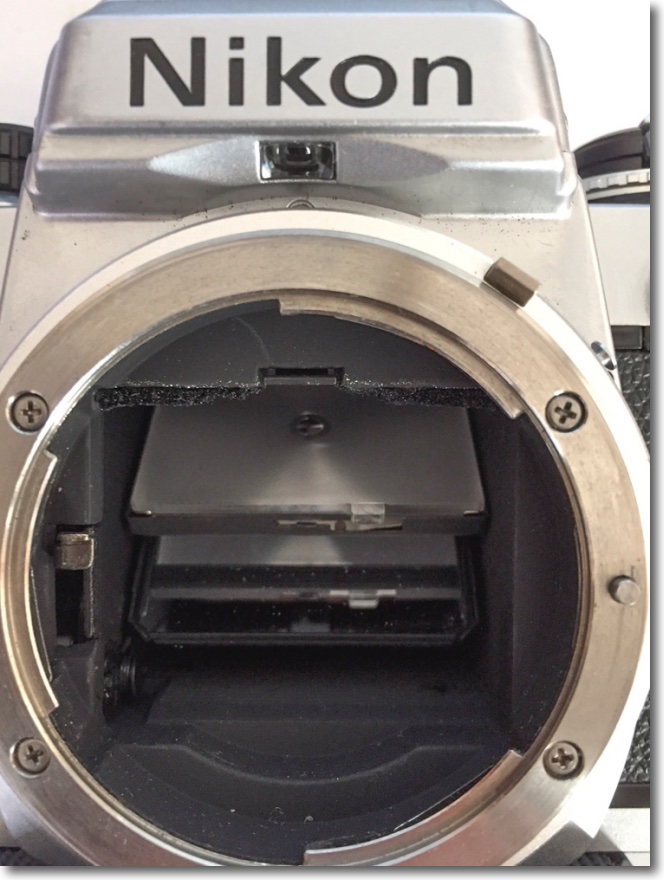
Screen frame released with the tweezer tool.


Once engaged, the tweezers grasp the tab using a small rectangular frame at their tip.

It’s a magnificent testimony to Nikon’s attention to detail that they lavished so much attention on something as seemingly simple as a pair of tweezers. Note the grip serrations on the tweezers which match those of the focusing collar design of later Nikkors!

So how well does it work? I opted for the K3 as I find the split image center works well for me with lenses all the way up to the 500mm Nikon Reflex and it is much, much better than the stock Type 1 screen, one half of whose split image focusing aid blacks out at 200mm or longer. The microprism collar in the Type K3 works well up to 200mm, starts to struggle at 300mm and is useless with the 500mm Reflex. Measuring the light in the finder eyepiece, the Type K3 screen is one-half stop brighter than the stock Type K screen, and one half stop brighter than the finder in the Nikon D3x, so the state of the art in optical finders appears to have peaked with the Type 3 screen.

‘Subjectively’ is a term used mostly by zonkers, strangers to the objectivity of the technological process, listening to antique stereo gear and paying $1000 for a 3 foot connecting cable, made by Japanese virgins in kimonos; not a one of these jerk offs could pass a blind A/B test. Must get into that business …. But, subjectively, the gain in screen brightness is far greater than the 1/2 stop measured gain suggests. So much so that you really will not want to revert to the stock screen once upgraded. And the gain in the utility of the split image center is reason enough to upgrade. As for themicro prism collar in the Type 3 screen, it seems little changed from that in the Type 1, and works better than the split image aid with very wide lenses.

The 1/2 stop gain in measured brightness means that the exposure compensation dial has to be set to +1/2 stop. More light is falling on the meter’s sensor so you will be under-exposing without this adjustment. Given that you really do not want to use the exposure compensation daily for anything else – because you will forget you have set it in the absence of any finder indication – this is hardly an imposition. After setting the dial thus, I obtained the exact same exposure readings with the FE as on the D3x and on a known external exposure meter.


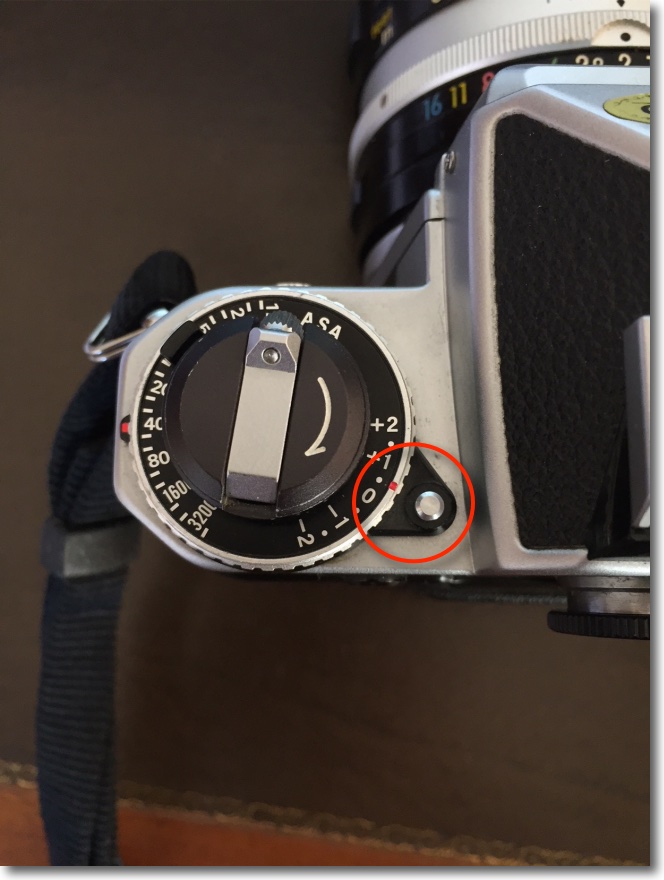
Correct setting with the Type 3 screen installed.

The FE with the K3 focusing screen retrofitted is now in the 21st century for viewing and focusing.

Nikkor-HC Auto 50mm f/2 lens

An ancient lens made even better.

I wrote about the excellent standard 50mm Nikkor lens for film SLRs years ago here. That lens first saw the light of day on the Nikon F in 1964 and Nikon made hundreds of thousands of them, a fair reflection of this optic’s outstanding performance, small size and toughness.

The last version made in the classic scalloped, metal focus collar style came to market in late 1972 and was optically identical with the happy addition of multicoating for better performance when bright light sources were in the image.

I had given away my 50mm f/2 H to a friend when the 50mm f/1.4 came along, that lens’s greater bulk balancing far better on the large DSLR bodies.

The f/2 continued to be made in later mounts with rubberized focus collars through 1979, though the optical formula remained unchanged.

When I recently added a film era Nikon FE to my little hardware collection I found I was hankering for the original 50mm f/2 as its small size would perfectly complement the compact FE body, and managed to snap up a mint HC, factory converted to Ai no less, for all of $70. Yes, I could have bought a beater for half that but why would you want to save $35 and suffer mental anguish every time you looked at the scarred black anodized finish which is as ugly as it gets? Here it is, mounted on the FE, the satin black front ring denoting multicoating, replacing the silver one on single coated lenses:

The factory Ai ring adds a second row of aperture digits which is read by the small mirrored assembly in the base of the camera’s prism and reflected into the viewfinder. Nice – you can see shutter speed and aperture through the eyepiece.

Nikon has a remarkably honest assessment of this optic’s performance on its site here and their statement about performance accords exactly with my experience:

The very minor vignetting at full aperture along with mild barrel distortion are both easily corrected using my lens correction profile in PS or LR and, if you install a CPU in the lens then that profile can be invoked automatically when you load your images into LR. CPU installation is very easy as no machining is required and the ‘Dandelion’ CPU can be found from commie vendors on eBay – just search for ‘Dandelion chip’, all of $20. My link in this paragraph includes my installation (Part I) and programming instructions (Part II) and you will not find any better. I have installed around thirty of these and they continue working fine after many years.

Here’s how the lens’s data appear – automatically – in Lightroom, for images made with a digital camera:

I find lens EXIF data extremely useful in the image catalog for, when searching for some long forgotten image, I tend to remember the lens used more than anything else. In the example above the image was snapped on the D2x with its 1.5x crop factor.

Here’s the data on the lens correction profile – while the image was snapped on the D2x, the profile was created on the D700 and that’s what I put in the file name for the profile:

The 50mm f/2 Nikkor is recommended without reservation and can be found in any condition you like for very little. You get Leica Summicron performance for 5% of the outlay and if you drop it, heck, buy another. Plus, it’s better made than the Leica lens.


The f/1.4 is larger and heavier. The epoxy is still drying on the f/2’s CPU!


An old friend. Nikon D2x, 50mm Nikkor H at f/2.

And while I’m at it, if you want a truly unbreakable DSLR in APS-C format for well under $500, you can do a lot worse than the Nikon D2x, which is backward compatible with almost every Nikkor ever made. At 12mp it’s no pixel monster but that’s fine for up to 40″ x 60″ prints and, of course, you make those all the time, right?

Field tests:

You can judge the extent to which the lens vignettes from the sky in these two images:


At f/2, straight out of camera.


At f/2, using my lens correction profile.


Center and edge definition – note the EXIF data from Lightroom in these screenshots, conferred by the newly installed CPU:


Center definition at f/2, 48″ x 72″ print. Note the gentle rendering out-of-focus areas.


Center definition at f/4, 48″ x 72″ print.


Extreme edge definition at f/4.


Like I said, Leica Summicron optics at a fraction of the price. Comparing performance in the extreme corners with that of the 50mm f/1.4 Nikkor of like vintage, the f/2 optic shows no noticeable flare compared with the f/1.4 (probably thanks to the multi-coating in the f/2) and is one stop sharper, meaning that the f/2 is as good at f/2 as the f/1.4 is at f/2.8. That said, either lens will make fine large prints at full aperture, sharp enough to please all but the meanest pixel peepers.

The cardinal returns

This time I was ready.

The bird is very shy, and wary of the rapacious quail and doves which dominate the feeder. If doves are the ornithological world’s idea of timidity then I fancy I would rather keep the company of vultures. An early attempt appears here.

The cardinal is impossible to miss. One’s peripheral vision immediately catches the flash of bright red, like an electric shock to the system.

This time I was better prepared, the 500mm Reflex Nikkor attached to the Panny GX7 set at ISO800 which delivered 1/320 second. This at the lens’s fixed f/8 aperture. While hand-held, that’s poor technique as a 1,000mm FFE optic really needs a solid support. I got lucky, aided by the critical focus option in the Panny which permits enlargement of a selected area for proper focus. Of the twenty snaps the first (go figure!) was the only one usable. I would guess that depth of field at 30 feet distant is no more than a couple of inches. The image is from the full frame. I passed the file through PS to remove the out-of-focus ‘donuts’ typical with catadioptric lenses, and often quite distracting. More on that technique appears in the link in this paragraph.

In lieu of the use of Mirror Lock Up which I advocate with a conventional DSLR to cut vibration, I use the GX7’s silent and vibration-free electronic shutter. A Panasonic MFT body is superior in every way to a conventional mirrored DSLR with this lens if you need 1,000mm FFE. You get a vibrationless electronic shutter, a very light rig which can be easily carried slung over the shoulder all day, Panny’s superior magnified focus aid and, best of all, a bright finder image as the electronics automatically adjust for the small f/8 aperture. And to get 1,000mm FFE with the full frame DSLR you have to cut out a large part of the image in processing, rendering your DSLR’s sensor effective pixel count the same as the lower spec of the MFT’s sensor.

Here are the ‘after’ and ‘before’ images:

The Reflex is a special lens, small, light with delightfully smooth focus action, but easy to use it is not. Add a small, nervous subject and you have your work cut out for you.

To learn more of the design history of Nikkor’s reflex optics under Teruyoshi Tsunashima click here.


GX7 with the adapted 500mm Reflex Nikkor. Arca-style QR plate fitted.

Apple. Con.

Don’t be fooled.

Many have accused Tim Cook, Apple’s CEO, of being nothing more than a number cruncher, a man untroubled by original thoughts.

The dearth of inventions since Steve Jobs died certainly adds credence to that opinion, and Cook’s financial engineering skills are testified to by the latest iPad campaign. This campaign, as I will show, is nothing more than a confidence trick in pricing.


$329 gets you very little.

Apple targeted the education market early on with its Apple II and Macintosh computers and did well. With the Mac’s introduction in 1984, students finally saw on the screen what they could print and the desktop computing world would never be the same. Then, around the fall of 2001 when the first iPod was introduced, Apple’s focus on the education market started to blur, to a point where now few in schools use Apple hardware. The iMac is ridiculously overpriced for what it delivers and the iPad is useless.

But that does not deter Mr. Green Eyeshades from trying to revitalize what is increasingly a failed product line – the iPad. His teaser offer to schools, a whopping $30 off to students, puts the device in your child’s hands, where it is waiting to be dropped, for $299.

But Wait! There’s More!

The stock memory of 16Gb (sixteen Gb!) is a straight forward cheat for what is a memory hungry device. Evert tried using a 16Gb iPad. I have. Useless once you have an app or two running. Thus you need the upgraded memory model, so add $100. The keyboard in the iPad is useless for extended typing, the sort of thing students have to do when cranking out those pieces on Richard III and his many depredations. So add a wireless keyboard (forget trying to use a wired one) and Apple has your number for a mere $93. Want to use that Apple Pencil to draw on the screen? $90 more. (Wow! $90 for a pencil ….) Then you have to support the tablet at 45 degrees to make it remotely usable at a desk and, hey, there goes another $20 and say hasta la vista to the iPad’s vaunted portability. And you don’t want little Johnny scratching that screen now, do you, so throw in $15 for a wallet/pouch. Let’s see, that’s $617. Plus tax.

Now let’s see what the sensible parent is buying. It’s called a Chromebook, comes with a folding screen like any laptop, no case needed, has a trackpad for drawing and all you need add is a mouse. Maybe not even that. Amazon lists some 500 of these little hummers for under $500. For the most part it’s hard to spend $250. Memory use is smart so you do not need much. Oh! and don’t forget too add $10 for a mouse. The laptop comes with the Google suite of apps (spreadsheet, word processor, calendar) and why, all 650 students and 120 faculty at my son’s prep school use those apps and no one is complaining.

Apple. Con.


A typical Chromebook. Touchscreen and tablet functionality included.

Big small storage

2.5″ spinning hard drives.


Dual 2.5″ drive enclosure compared to 4 bay 3.5″ behemoths. As the yellow label discloses, this Mac Pro runs a speedy 3.33GHz CPU.

As my movie collection grows, not helped by the 25GB size of ripped BluRay discs (compared with but 4GB for regular DVDs), so does the need for storage space.

Heretofore I have used Mediasonic 4-bay 3.5″ drive enclosures at $100 for the 4-bay version, and they have performed flawlessly for over 5 years now, loaded with Western Digital Red 4TB hard drives. The drives now retail for $135, which is a lot more than I paid years ago. The blue tape on these which you can just make out in the picture is to blank off the obnoxiously bright flashing LEDs on the fascia.

With traditional spinning disk technology refusing to die, and SSD prices still far too high for bulk storage, the much more compact 2.5″ hard drives have made huge leaps. 4TB capacities are now readily available in the smaller drive size. Seagate makes 4TB 15mm thick drives for $130 and two of these fit an inexpensive $40 enclosure. There are many versions available; just make sure the one you order will accommodate 15mm drives, which are a good deal thicker than the typical notebook drive. So the cost per 4TB of 2.5″ storage figures to $150, compared with $160 for the older tech 3.5″ drives, with great savings in space and, as importantly, far lower power draw. The enclosure of choice used here supports USB3 (though USB2 is perfectly adequate for movies) and comes with both USB2 and USB3 cables, as well as a power supply. I have added USB3 – having run out of USB2 sockets – using an Inateck USB3 PCIe card; the Mac Pro comes with USB2 native ports only and I happened to have a spare card lying around. USB3 is not a requirement here. The price of this card appears to have more than doubled since I bought mine.

A 4TB drive (the second drive is a back-up clone) will store some 160 BluRay disks, so this big little addition should see me happy for another year or two. The cost of storage per movie, along with the backup clone, figures at just $1.88.