Category Archives: Hardware

Stuff

Nikkor-N.C 24mm lens

A fine street snapper.

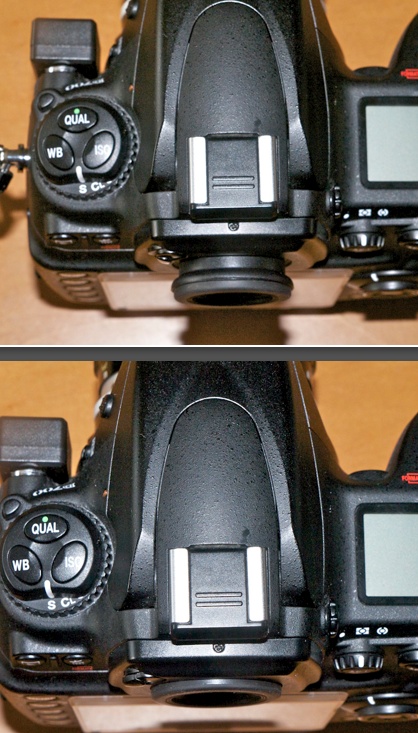
The 24mm Nikkor was the first Nikkor lens with floating elements. Disparate glasses – there are nine elements – move in a non-linear manner as the lens is focused, enhancing aberration correction. I have added a CPU to mine and the related ACR lens correction profile which is automatically recognized in LR and PS with any lens equipped with a CPU can be downloaded here. The profile is also manually selectable for non-CPU lenses.

Contrast is very high at all apertures, with central definition identical to my 16-35mm f/4 AF-S optic, but the old lens is simply in a different class when it comes to quality of manufacture. Edge definition in the modern optic is better through f/5.6 with the old 24mm N.C catching up at f/8.

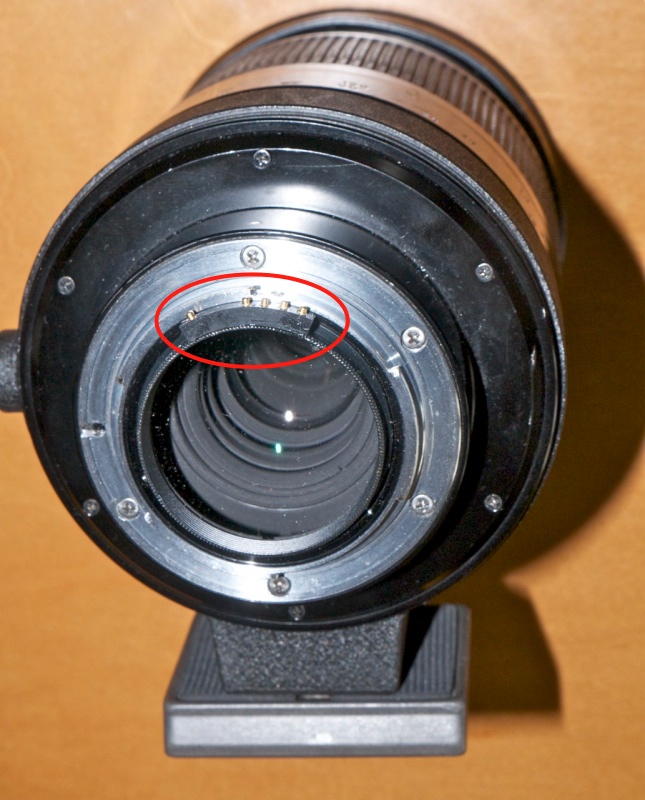
The lens vignettes noticeably (but see the note at the end of this piece), and there is very slight barrel distortion, with the sweet spot at f/8, but that does not stop me from publishing a few snaps from its first outing in San Francisco yesterday. The extreme corners are degraded through f/5.6 but that’s only noticeable if your subject is right at the edge of the frame. Small, exquisitely made like all early all metal Nikkors, my model is the later multi-coated version denoted by the ‘C’ in the description. Mine is Ai factory converted, allowing use on the D700 or other Nikon bodies with the aperture follower on the lens escutcheon without modification.
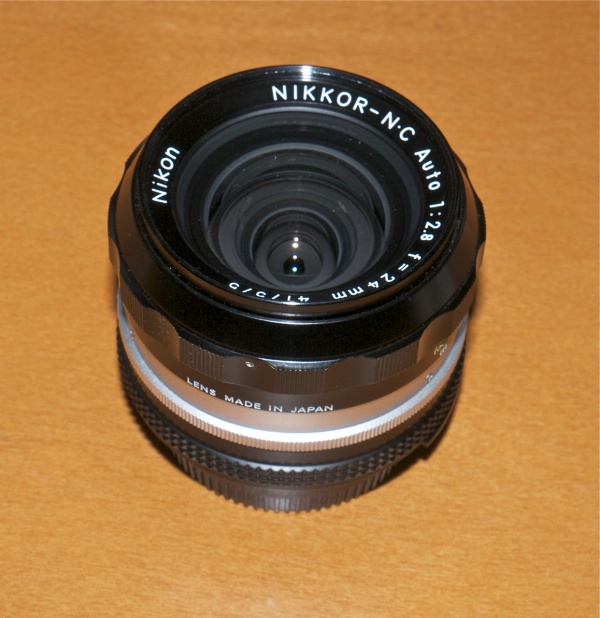
24mm Nikkor-N.C.

Here are a few snaps. all but the last from the vicinity of the magnificent Oakland Bay Bridge in San Francisco. Constructed at the height of the Great Depression by Real Men, it took a scant 39 months to build, opening in November 1936. Today it would take a decade.

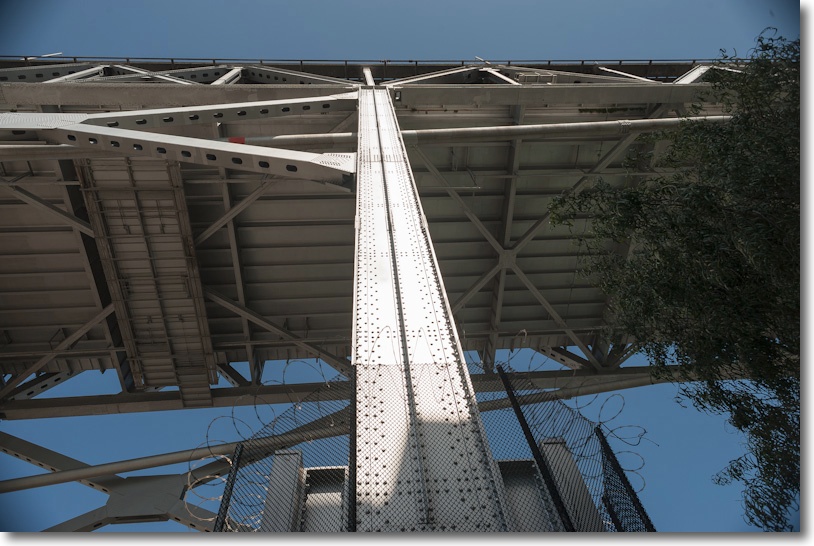
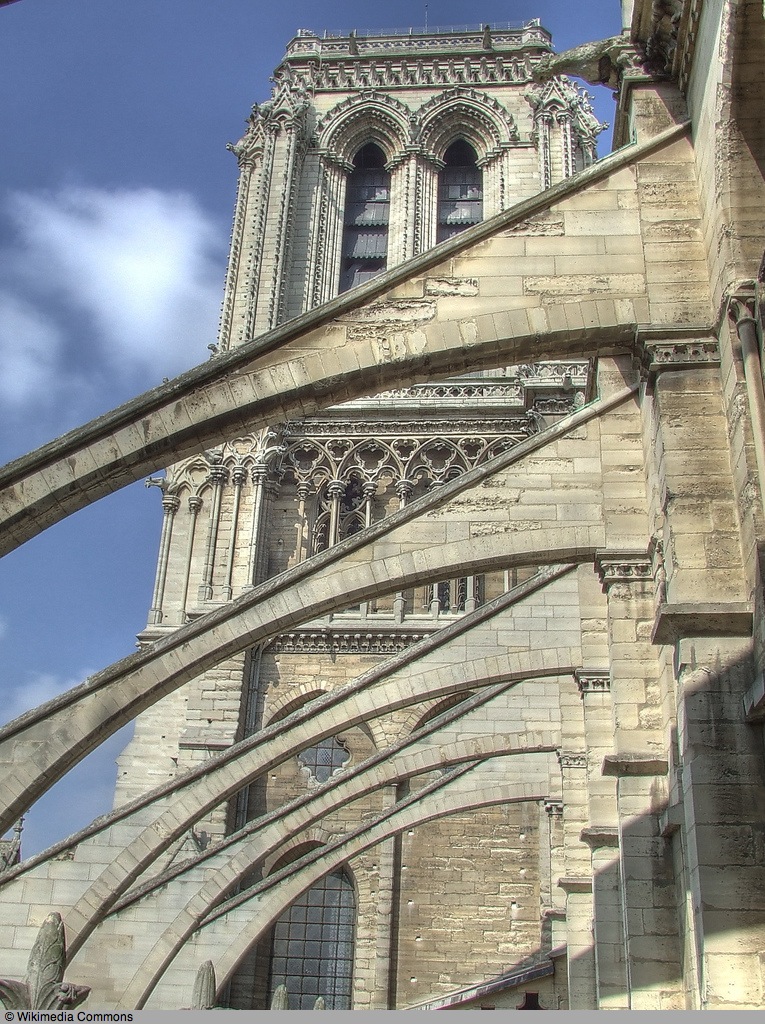
The power and majesty of riveted steel.

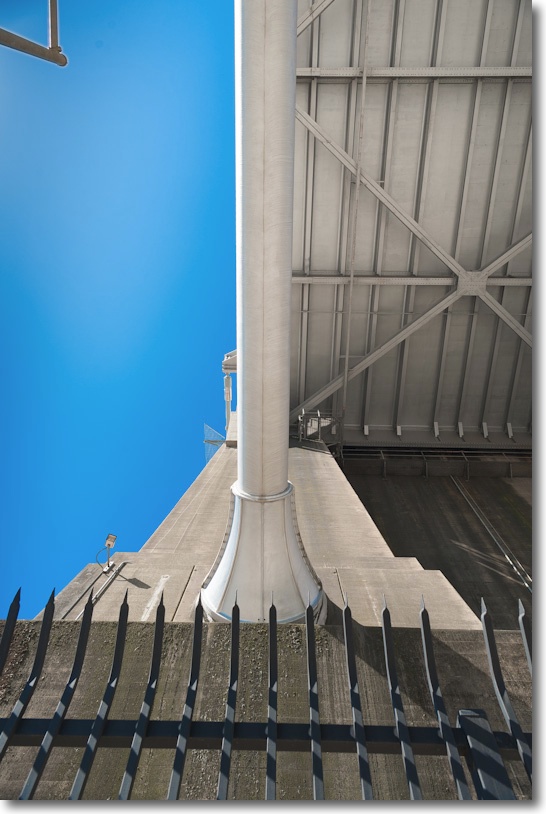
It’s almost impossible to convey the power of the construction.

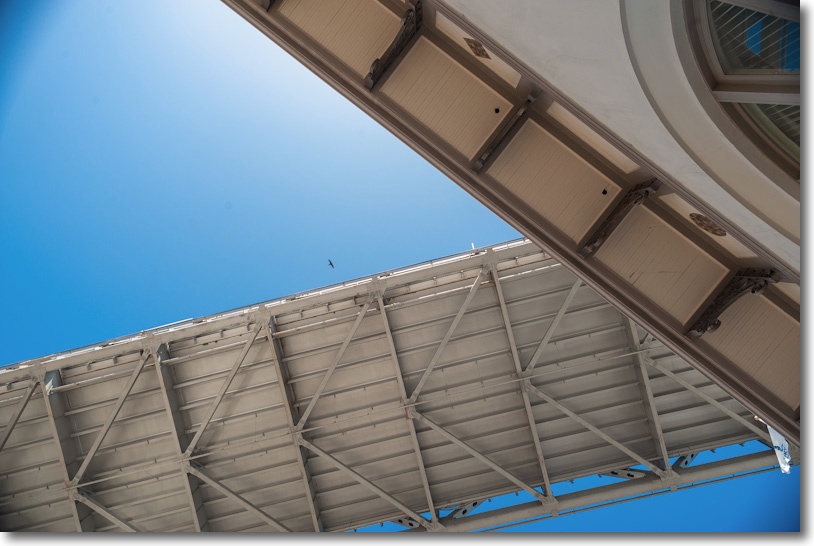
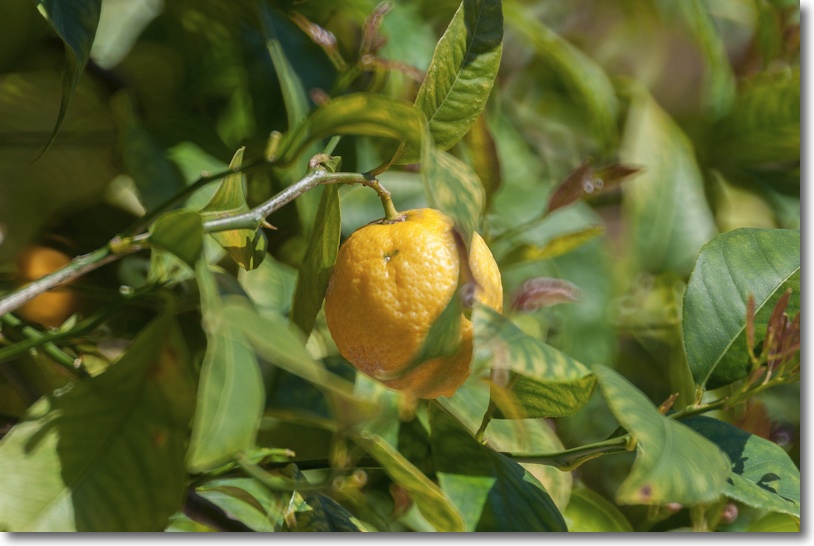
With bird. Flare is commendably low, using the HN-1 lens hood.

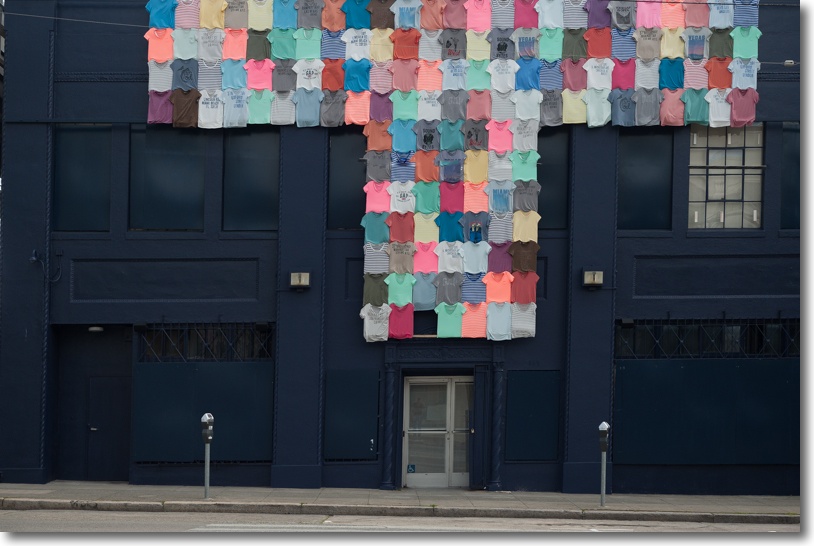
Steve Jobs is alive!

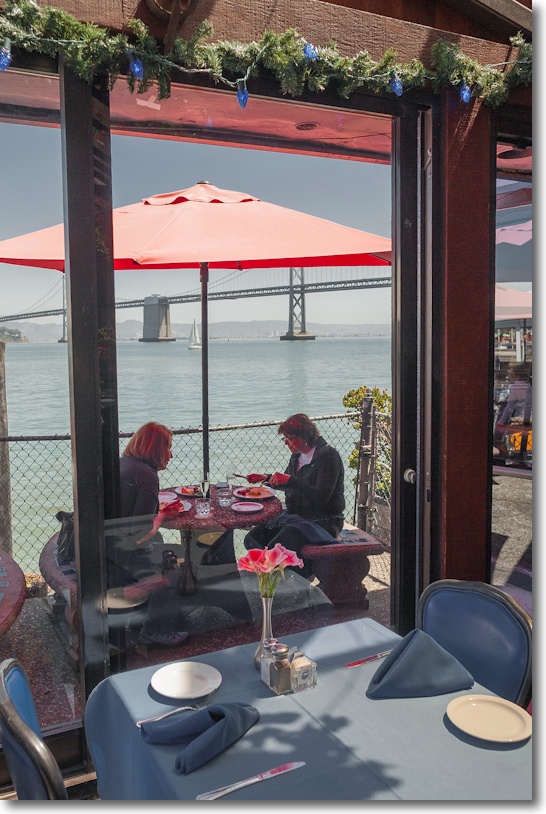
Lunch by the Oakland Bay Bridge. Click the picture to see the map location.

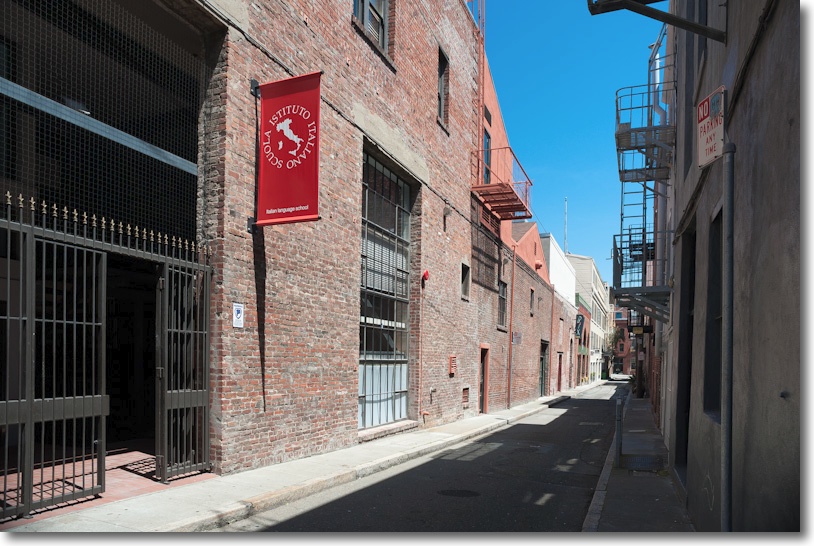
Gold Street, Jackson Square.

A note on filter use:

I rather suspected the corner vignetting at f/8 as being a mechanical not an optical problem, for example in the third picture above, and so it proved. I was using an inexpensive aftermarket filter which protrudes 0.21″ from the front of the lens. The stock Nikon HN-1 screw-in lens hood then mounts on the filter. Replacing the filter with a slimmer Nikon branded one, which protrudes only 0.15″, took away almost all of the vignetting compared to the un-filtered lens though, surprisingly, the merest trace of corner shading remains, which my lens correction profile will remove. So use a slimline filter not a stock one with this lens. A filter is recommended owing to the rather exposed nature of the front glass.

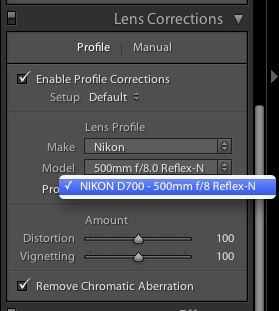
Lens correction profile:

Click here for the lens correction profile. This file includes two profiles, at f/2.8 and at f/5.6. LR and PS will use the closest match. The 24mm f/2.8 shows moderate vignetting at f/2.8 with minimal distortion at all apertures. By f/5.6 vignetting is negligible. An extraordinary piece of optical design.

SX-70

The invention of an American genius.

This wonderful advertisement for Edwin Land’s Polaroid SX-70 instant camera is thrilling to watch.

Click to play. Refresh browser if not visible.

Almost eleven minutes long, and reveling for a considerable part in the fabulous technology of the machine, there is no better way, other than using one, of appreciating what Dr. Land had accomplished with his magic machine. The sheer simplicity of the SX-70’s user interface would not be rivaled until the iPad came along forty years later, and having used both, I can assure you only one is magic, and it’s not the product designed in Cupertino.

The film was made by Charles and Ray Eames, whose other accomplishments include architectural and furniture design. Talent is seldom evenly distributed.

Film for the SX-70:

A bunch of criminally insane people in Holland got together, bought out the old Polaroid film making hardware and got down to making film for the SX-70, and you can still buy it here. Bless them!

Fotopedia

How a picture book should be done.

Our son was doing a homework project on the Spanish Missions in California and the one assigned, which he had to profile, was Mission San Gabriel. In contrast to the others whose roofs rest on adobe walls, San Gabriel has the roof resting within the walls, the latter reinforced by over a dozen vertical buttresses – large stone columns to bear the side load of the roof on the walls. It was an interesting project and we both learned a lot doing it, but at the conclusion I had to put the boy to right.

“Winston, old man”, said I, taking the lad aside, “when it comes to roof supports, there are buttresses and there is Notre Dame.”

And this is the picture I showed him.

Notre Dame, ÃŽle de France, Paris. Flying buttresses.

Seldom has there been a more perfect marriage of form and function than in these flying buttresses, light and airy, as befits the City of Light. Gazing at this of course made me long for Paris, and there is no better way of seeing that gorgeous city through photographs than by downloading the free Fotopedia – Paris app to your iPad. The app is custom designed for the iPad, and will not run on laptops, desktops or Zunes.

The design is a masterpiece, as you might expect from the former chief technology officer of applications at Apple, Jean-Marie Hullot. There’s an interesting piece on the man in the NY Times Blog. The app is not about hotels, or sightseeing or boat trips or restaurants. It’s about showing the most beautiful city in the world on the best display device in existence. I have run it on both the iPad1 and iPad3 and it works well on both.

The photo below is from Fotopedia – Paris by Magnum photographer Jacques Bravo and is of the roofs of Rue Mouffetard in Montparnasse, a particularly pleasant reminiscence for me as it was a snap of that very street which saw me first published in Leica Fotografie in 1974. On an iPad, touch the picture for the Fotopedia app. On a laptop or desktop, you can save by clicking on the picture and then syncing your iPad using iTunes.

Touch the picture on your iPad to download Fotopedia – Paris.

There are several other Fotopedias, but after this one, who cares? Oh yes, there’s one about the US National Parks for all those who believe landscapes start and end in Yosemite. Good for the Saint Ansel set, I suppose. And there’s one on North Korea (what?) for manic depressives. But Paris is the one to get for this street snapper.

Nikon Magnifying Eyepiece

I can see!

The Nikon Magnifying Eyepiece, DK-17M, is one of those “Why didn’t I think of this before?” accessories for the D700 and similar bodies.

DK-17M top, and stock eyepiece, bottom.

The stock viewfinder magnification of the D700 is 0.72x, identical to the fabulous range/viewfinder in the Leica M2 which I used for many years. That’s OK, and a whole lot better than the ‘tunnel vision’ you tend to get with APS-C mirror reflex DSLRs (MFT EVFs are far superior in this regard) but it could be better. With lenses up to 90mm and f/2 or smaller the Leica is far easier to focus manually than the D700, thanks to the finest rangefinder focusing device conceived by man.

The DK-17M is a 1.2x magnifier, so the 0.72x stock magnification rises to 0.86x with this eyepiece fitted, which is close to the 0.91x Leica users enjoy with the Leica M3 body, one I used for over three decades. And that one, predating the M2 by some 5 years (1954), was even better than the one in the M2 (1959). It seems the intervening half century has seen little improvement in manual focusing aids.

Some user comments at B&H and Amazon state that the corners of the finder view are vignetted and that the data display at the base is obscured when the DK-17M is installed. I wear vision glasses (I have astigmatism and modest near sightedness) yet suffer neither problem. While not cheap at $38, there’s no way I’m removing this from my D700. It’s well made, uses glass not plastic, and the only thing you have to remember is that the eyepiece shutter must be closed for removal/installation. As you can see the DK-17M protrudes a little further from the body than the stock eyepiece, but that has no negative effect in practice. I have no need for a rubber eyecup as those interfere with viewfinding for spectacle wearers in my experience.

Like magnifiers exists for APS-C bodies, though I believe the model number is different. The DK-17M fits the D1, D2, D3 and D700 DSLRs and the F3HP, F4, F5 and F6 film bodies according to B&H. I am not sure but would be prepared to bet it fits the D4, D800 and D800E also.

To put the difference in perspective, the hardest to focus MF lens I own is the 500/8N Ai-S Nikkor Reflex. With the DK-17M fitted I can nail focus 7 times out of ten when focusing by eye then looking to the focus confirmation LED as a cross check. Without the DK-17M my success rate is at best 3 out of 10 with final focus dependent on the LED.

One alternative is to have an aftermarket focusing screen fitted but that does not pass the smell test for me. First, why would Nikon fit anything substandard to their best bodies, with years of experience in optical design? Second, many of the aftermarket screens use a split image center focusing device. The effective base length (a measure of sensitivity) of these, compared to the finders in rangefinder Leicas, is pathetic and falls as the aperture falls. Further, the split image prisms (or microprisms in variants) tend to black out at smaller apertures and will not work with a 500mm Reflex lens with its modest f/8 fixed aperture. Finally, aftermarket screens cost over $100, typically, for an uncertain outcome, plus cost of installation. DIY is for the brave only.

The DK-17M works, being in equal parts a focus and compositional aid. Even with AF lenses where no focus assistance is required, the enhanced view is a revelation. This accessory is highly recommended as long as you have no finder vignetting issues. The view through the eyepiece reminds me of nothing so much as my Leicaflex SL, which also happened to have the best microprism ever devised. But that’s another story.

T. Brannan Street, SF yesterday. D700, 50mm f/2 Nikkor-H, DK-17 eyepiece. Click the picture.

The beautiful color rendering of this 40+ year old MF Nikon optic has to be seen to be believed. And you would have to try really hard to spend more than $50 on one, plus $30 for a CPU.

And, yes, look hard and that’s my ghostly reflection in the door ….

Me and T.

Making the Reflex Nikkor sing

A superb optic, but it can use some help.

I wrote at length about the Nikon Nikkor 500mm f/8 Reflex-N lens here, illustrating the results it can produce with several images.

Since then, I have made two enhancements which substantially improve results from this tricky to use optical masterpiece.

Read about this lens on the web and you will generally find it’s damned with faint praise. I believe this is the result of faulty technique more than anything. It’s very hard to hold so long a lens steady, leading to motion blur taking the edge off definition. A monopod is a huge help here. And it’s no easier focusing the lens which has a very shallow depth of field at its fixed f/8 aperture, which hardly makes for a bright finder image. Indeed, the depth of field is identical to a mythical 50mm f0.8 lens! Meaning that focus is a binary concept – there’s no ‘close’ and getting away with it. There’s no stopping down. The f/8 aperture is your sole choice. While use of a fast shutter speed and high ISO largely took care of motion blur, helped by the excellent high ISO performance of the Nikon D700, poor focus technique was the major cause of my high rejection rate on the first outing with the lens.

CPU installed in the Nikkor Reflex lens, glued to the rear protective filter.
Manfrotto QR plate below, for quick on and off with a monopod.

The first enhancement was to install a CPU in the lens. $30 from Singapore. The rear of the lens accepts a clear Nikon filter which protrudes just enough to provide a base for glueing on a CPU, a technique I discussed here. Epoxy is de rigeur as there’s little base for the CPU to adhere to. As luck would have it, the external dimension of the filter is the perfect size for proper mating of the CPU with the contacts in the camera’s body. Thank you, Mr. Tsunashima! The CPU, as delivered in stock form, has Focus Block switched On. This means that with the ‘C’, ‘S’, ‘M’ switch on the front of the D700 switched to ‘S’, the shutter set to ‘S’ on the top left dial and Custom Function ‘a2′ set to ‘AF-S priority selection’ not to ‘Release’, (phew!) a picture can only be taken when the focus confirmation light is on. Stated differently, you compose the picture, use the joy stick pad on the rear of the camera to place the focus rectangle over the part of the image you want sharp and then, holding down the shutter release button, rotate the focus collar until …. the shutter goes off! As long as your camera’s focus confirmation light coincides with optimum focus, your focus will be right. Alternatively, if the subject is moving, the shutter will be released when the subject enters sharp focus. If the focus confirmation light is inaccurate, it can be fine tuned using the programmability of the CPU, which I also discuss in the linked article on CPU installation. Magic!

If you want to disable the Focus Block feature, simple switch the ‘C’, ‘S’, ‘M’ switch to ‘C’ and the shutter can be released regardless of focus. I explain how to fine tune the CPU for absolutely critical focus here. As regards focus confirmation, Nikon states it works down to f/5.6 but I find it’s fine on my D700 at the stated f/8 aperture. On the other hand, the light in my older D2x absolutely refuse to work with the lens, so you may want to check it on your body of choice before committing to purchase.

If you check the Lens Correction boxes when creating your import preset in Lightroom,
the profile will be automatically applied when importing images using that preset.

The second enhancement is to use a tailored lens profile when importing images to Lightroom. The other significant advantage of the CPU is that when importing images into Lightroom 3 or 4, the lens profile I created for this optic can be automatically applied, and will remove the ‘hotspotting’ the lens suffers from (a bright central halo) as well as minor pincushion distortion. You can download my lens profile for the 500mm f/8-N Nikkor Reflex lens here. It has been very carefully created and makes an already good lens great. That link also shows how to ensure that the profile is automatically recognized and applied on import, using the related import preset.

At 1/1,000th, ISO 400.

To give you some sense of the shallowness of the depth of field, in this snap the stem of the lemon is critically sharp but the front of the fruit is already out of focus when pixel peeping a 40″ print. The ‘focus until the shutter goes off’ technique was used here. You can see a couple of doughnut out-of-focus highlights up and to the right of center, typical of mirror reflex lenses. For obsessives these are a bane. For artists, an opportunity.

So next time you read about how mediocre the 500mm Reflex Nikkor is, blame the writer, not the lens.