Frustrations and fixes.
Background:
Let me warn you that resurrecting an HP DesignJet printer from cold storage makes a date with Sophia Loren a piece of cake by comparison. After the lovely Sophia has turned up two hours late, wants a change of venue and has thrown a shoe or two at you, things go swimmingly well as you gaze into her lovely brown eyes and luxuriate in the prospect of her gorgeous lips on yours. But try resurrecting an HP DJ, by comparison – and it is every bit the exemplar of its caste as Sophia is of hers – and before you know it you will be the one using bad language and generally throwing things in frustration. Having just gone through that process (the HP, that is, not the date with Sophia) you would not be surprised to find some bad language in what follows.
The problems discussed below are by no means unique to the DesignJet. Use a printer as infrequently as I do and you will inevitably run into problems. These devices have many moving parts, some with very tight tolerances (like printhead jets) and occasional use does not help keep things running smoothly. Unlike a monochrome laser printer, color inkjet printers will give you trouble and they will need maintenance.
It’s a couple of years since I wrote about head cleaning for the HP Designjet 30/90/130 wide carriage ink jet dye printers. (A much improved piece, dated April, 2023, appears here). My HP DJ90 is capable of making quite outstanding prints and the Vivera dyes used in the ink cartridges come with an 80+ year life. My latest box of paper from HP says that Wilhelm Research certifies the paper to be fade proof for 82 years when used with HP Vivera inks. So if the print I gave you fades, sue me. I’ll long have been fertilizer.
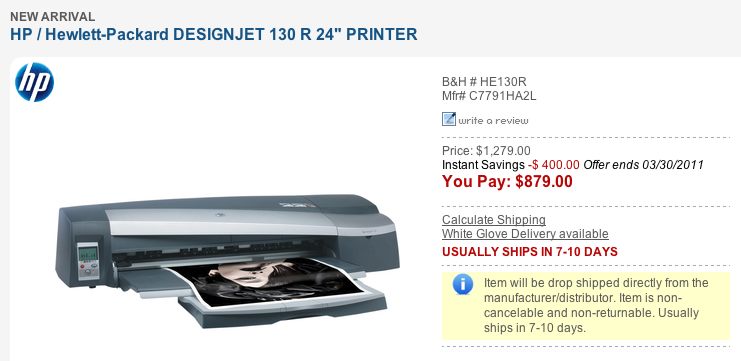
Here’s an update of my recent experiences with the DJ90 (18″) and everything here should apply likewise to the smaller DJ30 (13″) and the larger DJ130 (24″). This line of printers may have been discontinued for a couple of years now but parts, ink and paper remain available and the small footprint of the machine and its excellent print quality make the effort of maintenance and repair worthwhile. A replacement will be well over $1,000 for the larger variants (a 24″ current model HP starts at $3,500 whereas Amazon still lists new DJ130 models for under $800 delivered – talk of a bargain!) and while the newer machines use allegedly even more fade proof pigment inks (dyes soak into the paper, pigments rest on it, so paper choice is important) you are dealing with a whole new world of hurt when the replacement inevitably fails. And it will.
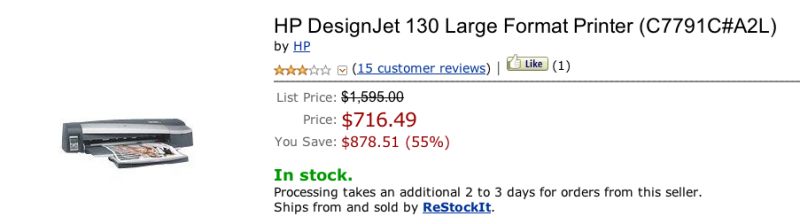
The 24″ DJ130 remains available new – a tremendous bargain.
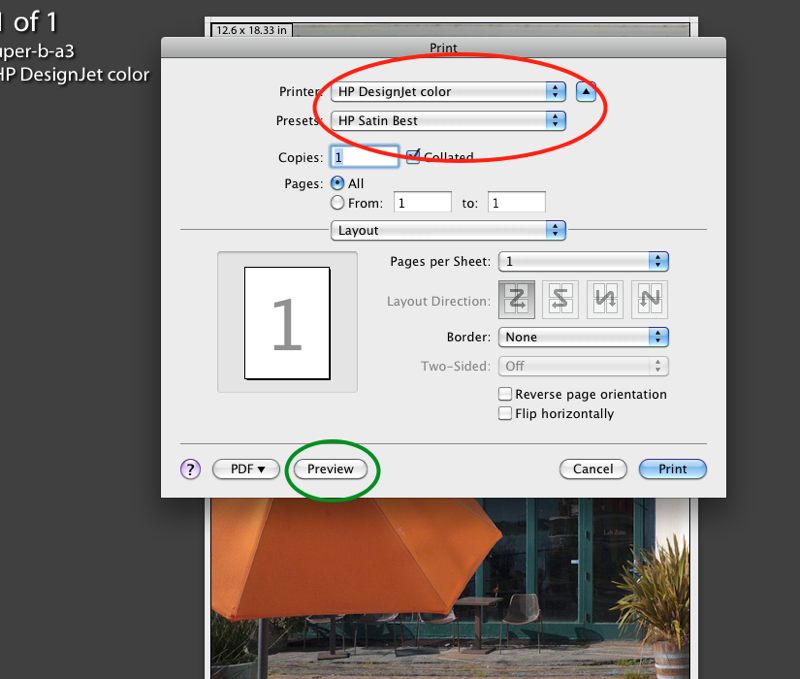
So for me it’s a case of ‘Better the devil you know’, and have you ever tried moving and installing one of these behemoths? I would stick with the non-roll capable model illustrated above (rolls of paper are a pain to mount, align and uncurl after printing) and the network capable one is a waste of money if you use a Mac as you can network a regular model using just the capabilities of OS X. The poor ratings at Amazon seem largely concentrated on problems with paper rolls. I have had no issues using the front loading paper tray.
Snow Leopard:
Mac OS X Snow Leopard changed the way printer drivers are installed. Instead of coming with a bunch of drivers with the operating system, SL determines the make and model of your printer and goes out to the web to download the appropriate driver. That’s nice, as it means less clutter on your hard drive, but the problem with SL is that it no longer permits the HP Maintenance Utility to work. HP has stated they will not be updating their Utility for SL. However, if you follow the front panel button press sequences illustrated earlier, and repeated below, you can get most of the functionality of that Utility without running any software, which is just as well as the software sucked even when you could get it to load from HP’s crappy servers; the alternative is to run maintenance tasks through Windows but life is too short to go there:
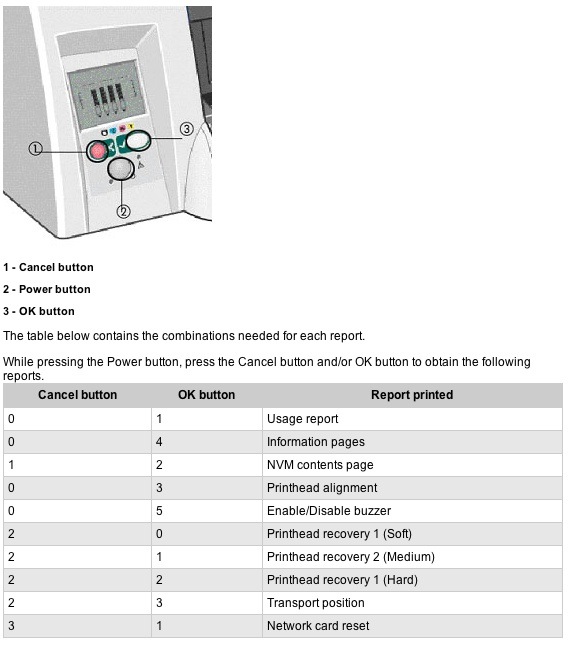
However, there are two snags with HP’s diagnostic and maintenance routines:
- Faulty heads are detected and reported sequentially, one at a time. If you have more than one faulty head, only the first one is reported. Replace it and the next faulty one is reported. And yes, I have homicidal feelings towards the engineer who designed it that way.
- The push button sequence above will not work until all your heads are reported as working properly, so until they are, you cannot run the head flush (‘printhead recovery’ in HP-speak) sequences. Now I’m loading my Dirty Harry Magnum 44, ‘The Most Powerful Handgun Made’, and searching out the SOB who designed it that way.
Paper and ink choice:
The DesignJet uses ink dyes so the paper you use must be capable of absorbing these. Not all papers are absorbent, so either buy HP paper or look for paper which works with HP Inks #58, #72, #84 or #85. The DesignJet uses the last two. Alternatively look for paper which specifies suitability for HP DeskJet 9300 DeskJet 9600, HP Photosmart 8750 or HP DesignJet T1100, T610, 30, 90 or 130.
I always use HP ink cartridges (HP 84 C5016 Black, HP 85: C9425A Cyan, C9426A Magenta, C9427A Yellow, C9428A Light Cyan, C9429A Light Magenta) as I believe the savings from refilled cartridges do not outweigh the risk of using unknown inks. Further, the DesignJet is a very frugal user of ink. There are also aftermarket continuous flow ink systems with high capacity ink tanks for high volume printing but I have no experience of those.
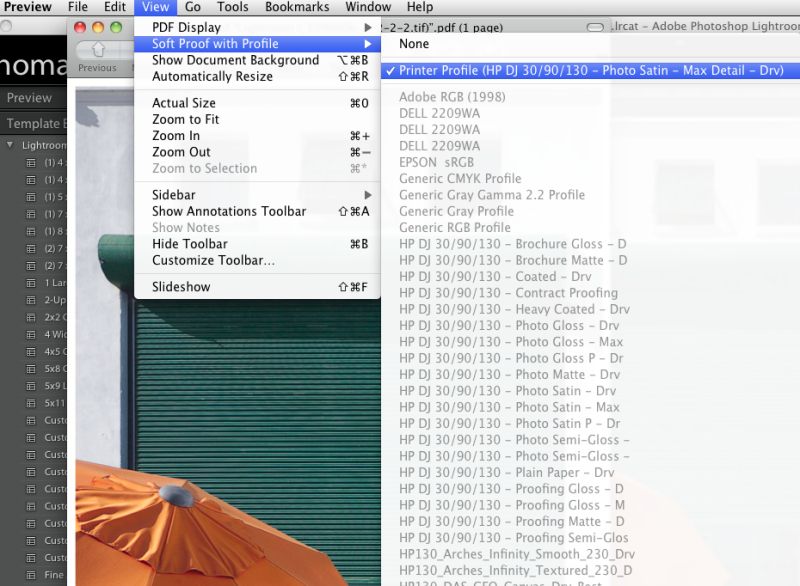
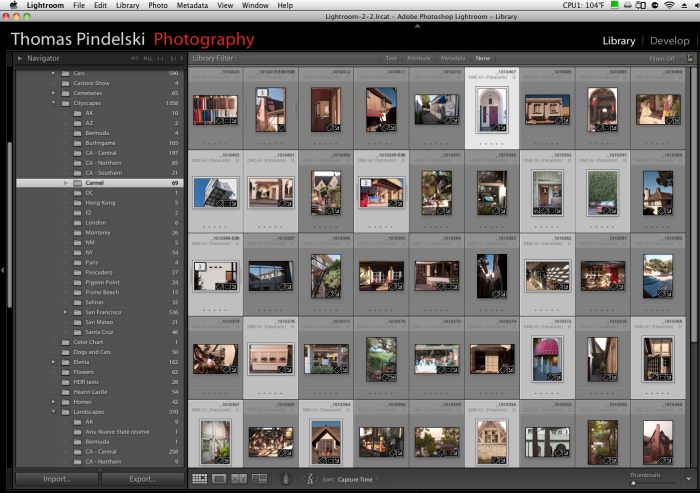
Paper profiles:
Everything you need to know about profiling paper for your DesignJet with Lightroom appears here.
Frankly, your best bet is to use HP Premium Plus Photo Paper – Satin. It’s tested 82 year fade proof and glossy is awful for exhibition use. There are ‘icc’ profiles available from HP specific to this paper and the DesignJet printer. Further, the surface sheen changes little when heat mounted and you know that the inks are being properly absorbed as the paper is made to HP’s specifications. Use something else and you have no certainty of knowing whether the print will fade or not.
HP Support:
Forget about it. It’s useless. Paying for someone who cannot speak English to tell you to reboot your computer is not support. Man up and do it yourself.
Print heads and the cold storage problem:
Leaving the HP Designjet printer unplugged is an extremely bad idea, as my recent experience testifies. The printer was unplugged for a few months while being relocated and when I finally plugged it in, all sorts of problems cropped up. If you switch the printer off but leave it plugged in to the mains the green front panel light will stay on and if you open the ink cartridge drawer cover you will find that the area in the vicinity of the heads is permanently warm. That’s because HP heats the heads even with the printer off to prevent ink drying and clogging. Bottom line is NEVER UNPLUG THE PRINTER FOR ANY PERIOD OF TIME. By all means turn it off with the front panel button but leave it plugged in. The green diode stays on to confirm it’s warming the heads but the fan is off, saving on wear and tear and taking away the noise.
I already knew this but like a fool disregarded that inner voice, (moving is hell), so when I switched it on after a few ‘cold’ months it was hardly a surprise to see the printer reporting a faulty Light Magenta head, evidenced by the blinking symbol on the LCD panel. I get my HP supplies from Atlex and have for years. They have cartridges, heads and the special HP paper for the DJ series, so I ordered a replacement LM head, which was on my doorstep in one day’s time. How they consistently manage this incredibly fast delivery from Illinois to northern California I don’t know but it’s a superb business and you should give them some of yours next time you need HP supplies. They have been around seemingly for ever.
Switching on the printer and opening the head/ink cover, you wait a few seconds while the head assembly moves left then right, open the head cover (toward you, up, away from you) and pull out the old head, pushing in the new. Switch off, fire it up again and …. , now the Magenta head is flashing. So I get mad, pull the Magenta head (it makes no sense to keep six heads on the shelf for an amateur user like me) and hold the swine under a purified water tap for some 15 minutes until the tint of colored water coming out is almost gone. During this process I’m directing the water stream into the orifice on one side of the cartridge, meaning I’m forward-flushing it. Given the minuscule size of the exit jets it’s not realistic to back-flush. Plug it back in and … no joy. I consult the resident Border Terrier who keeps calm and points a very cold nose to the Hackpro, suggesting I stop being silly and order a Magenta head. This I do and one more day and, another $43 later, Atlex delivers again. This time after plugging in and waiting 10 minutes for the DJ90 to grind away as it does its new head thing, all is well and nothing is flashing on the LCD panel. Both the BT and I sigh in relief and I run the Print Head Alignment job, using the button sequence above. I do this three times until I get the tick mark at lower right – the first two runs return an ‘X’ meaning the process has to be repeated. I use plain paper in the DJ90 for this process. I’m not made of money, you know.
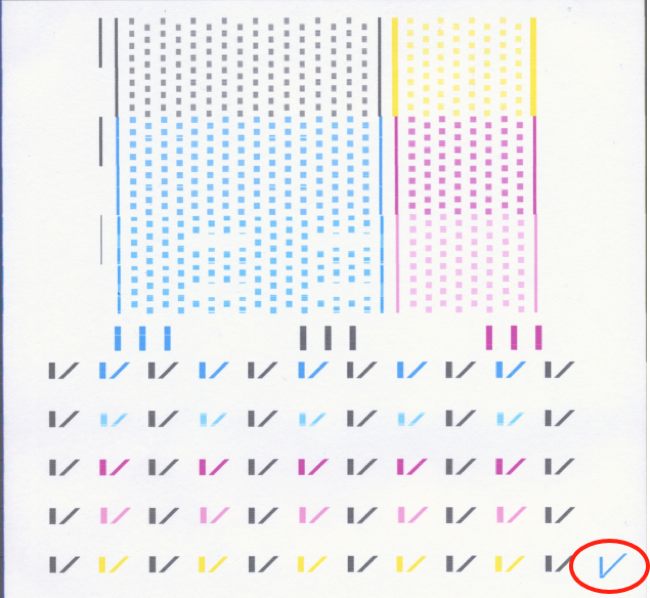
Good head alignment print – note the check mark (circled) lower right.
The Yellow Problem:
For some reason the yellow ink is the one most most prone to clogging the supply tube which routes it from the cartridge to the printhead in the DesignJet. It’s not a printhead problem – the LED panel on the DJ continues to report a perfectly fine yellow printhead yet your diagnostic reports show yellow to be faint or missing. The tube is clogged.
There are two options to fix this.
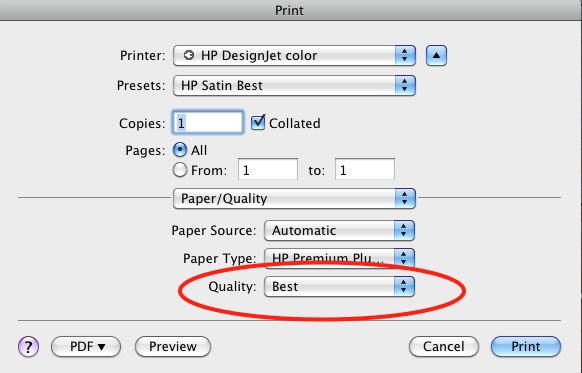
First, print a dozen or so copies of this file on plain paper in your DesignJet. Load it in any app where you can make it fill the page and set ink use to ‘best’ and/or ‘heavy’. You are simply forcing a lot of yellow ink through that clogged tube to try and clear the coronary thrombosis it’s suffering.
Second, if that fails, replace the ink tube assembly using the below linked supplier and the instructions you will get by clicking the ‘Download’ logo below, which will get you details on how to remove and replace the tube assembly.
Chances are you will end up replacing the tube assembly. It’s some $50.
Wonder about the magenta tint in the reports below? Yup. The Yellow Problem.
Replacing the feed tubes:
Download the Service Manual below and it has excellent and fault free instructions on replacement of feed tubes. I used the supplier mentioned in this article and the replacement came in an official HP box. I downloaded the manual to GoodReader on my iPad and followed along. Links are interactive so jumping to a page is a touch away.
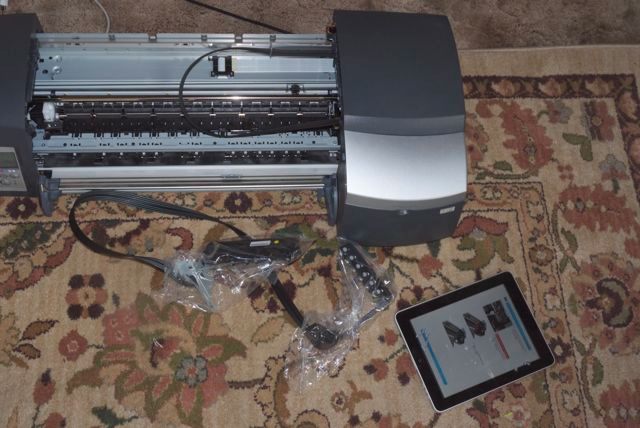
New feed tubes ($50) and the manual on the iPad.
The whole replacement process took me 45 leisurely minutes. The trickiest part is replacing the right hand head cover, but do it just so and nothing will break. Not for klutzes. You will need Torx 8 and 10 screwdrivers and a flat bladed one to help release the catches on the right side cover. Use the wrong type of screwdriver and you will be buying a new printer. The following picture makes everything clear. The yellow feed tube is clogged:
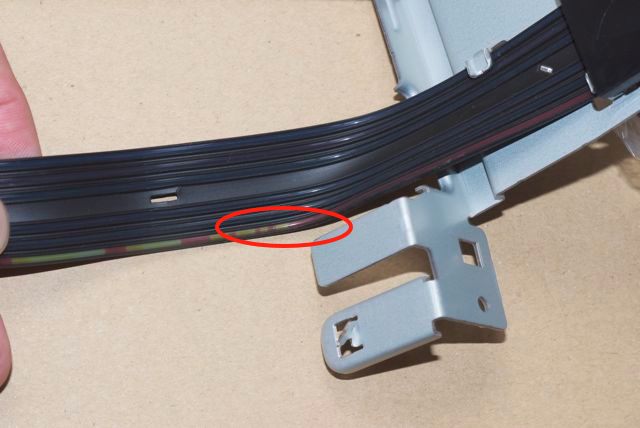
Yellow clogged feed tube is circled in red.
The feed tubes from the ink cartridge to the head are extremely fine so I gave up on any idea of blasting them through with compressed air or cleaners. You can see just how fine in the following snap:
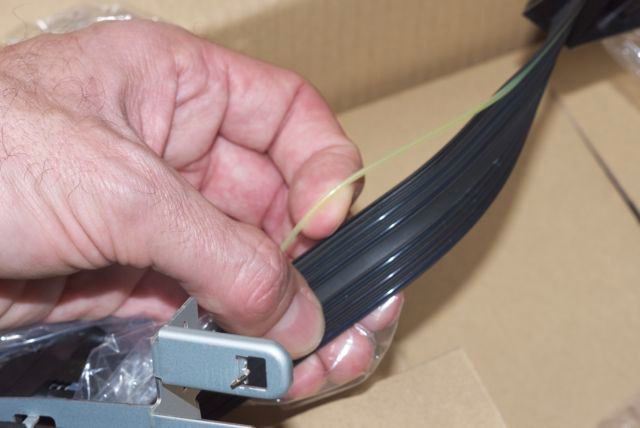
One feed tube – yellow – pulled away from the rubber guide strip.
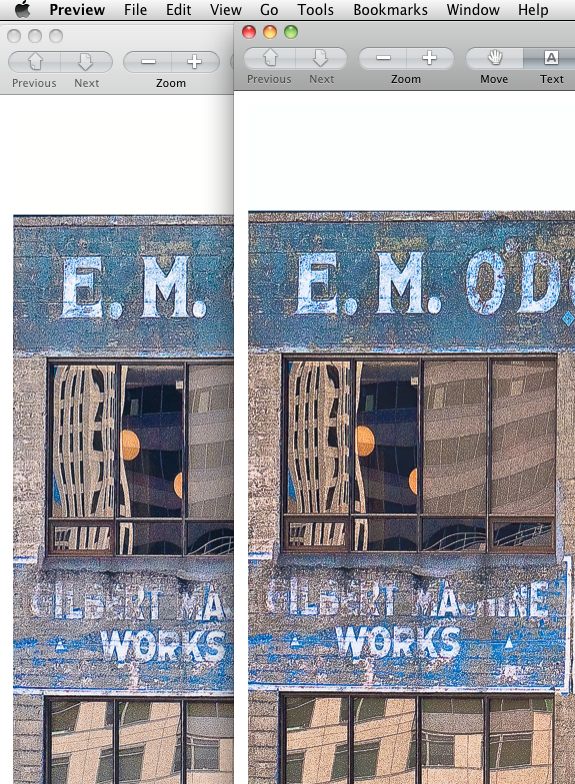
After doing this you need to prime the new feed tube assembly using the button sequence in the Service Manual. Though the manual says not to prime tubes which have already been primed (meaning the ones in your machine) I did the priming process anyway (not being about to replace six heads) and all went well. Thereafter a quick head alignment and an Image Quality Diagnostic print confirmed that my yellow was back as evidenced by the proper colors of the two large green color squares in the test pattern – compared with the original I made when the printer was new five years ago.
Bizarre patterns on the head alignment report:
One reader of this piece contacted me with a picture of a strange pattern he was getting on the head alignment report. I annotated it and it looks like this:
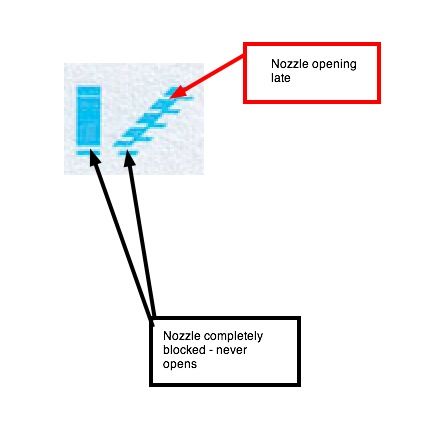
Strange ink pattern from a reader’s DesignJet.
His Image Diagnostics print was OK – some head alignment issues but nothing major – but three of the colors were producing the above pattern on the head alignment print.
After some discussion it transpired that his DesignJet uses a power source subject to occasional brown-outs and power-on spikes. This suggests that three of his heads were fried by an inductive power-on spike and need to be replaced. Head cleaning – soft, medium and hard – made no difference. If you see this on yours, change one affected head first before throwing money at it. With a set of new printheads running some $200 you can solve the math to see whether it makes sense to install a surge protector in your printer’s power feed.
Follow up: It turned out no to be an electrical issue after all. Reprinted below, with permission, is Dave Shankie’s email explaining how he resolved the issue:
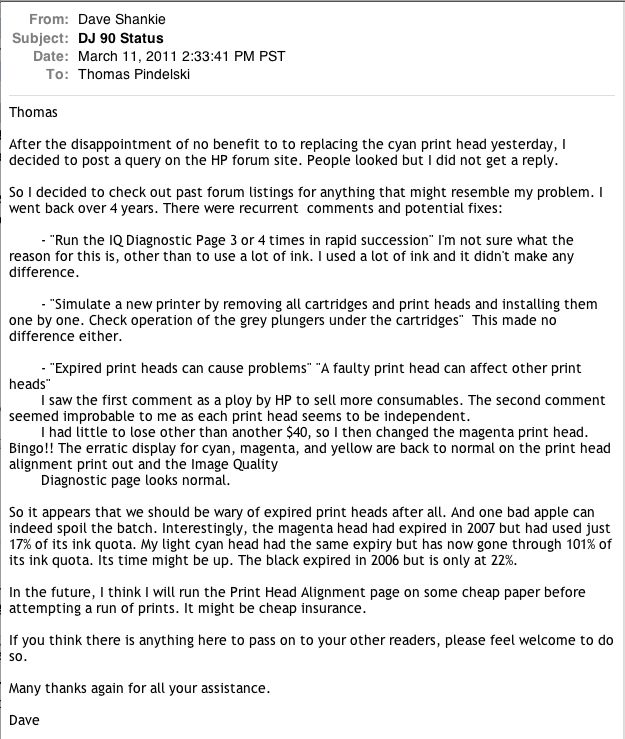
Thanks, Dave – this will help other Designjet users on the recovery trail. The HP site Dave refers to can be found here.
Resuscitating bad heads:
While I have had no joy trying to bring back bad heads to life with water or isopropyl (rubbing) alcohol, whether wiping on the spray ends or by dunking the whole thing, the same reader with the above ‘fried head’ problem (Dave S. from beautiful Vancouver Island) managed to bring a clogged head back to life using more caustic solvents. He first wiped the head with acetone, then with methyl alcohol, followed by a distilled water wipe.
Some warnings are in order. Acetone is nasty stuff. Do not soak a head in acetone – the plastic will melt, destroying the head. Use eye protection. Avoid open flames. Don’t breathe the fumes. Methyl alcohol is not much friendlier. Take the same precautions. Keep the family pet well away. The stuff in your Bloody Mary is ethyl alcohol, so don’t take a shot of the methyl if things don’t work out. Both methyl and ethyl can make you blind if ingested in quantity, but it’s usually a permanent result with methyl.
Printheads have a finite life – something like 3-4 of the large ink cartridges per head (which is a lot of prints) and will eventually need to be replaced. However, Commenter ‘design-jetset’ (see Comments below) managed to salvage his heads whose contacts were oxidized from extended cold storage, using a product named Deoxit, available from Amazon in both the US and UK. Be sure to get the one linked – ‘D5’. There are many variants.
Spare parts:
I’m a big believer in fixing it if possible. HP DesignJet printers are unlike modern digital cameras – it actually makes economic sense to fix them if you do the work yourself. Spare Parts Warehouse lists many replacement parts for the Designjet series (the link is to my base model DJ90, no network card or roller mechanism). I bought my replacement feed tubes from them (see above) and they came in the ‘official’ HP-branded box in short order. They seem to have everything from drive belts to motors, so it’s nice to know a long life awaits my DesignJet.
The feed tube assembly for the DJ90 is part # Q6656-60103; for the DJ130 it is # Q1292-60235 – use these numbers to search for replacement parts in your browser. Amazingly Amazon lists both as of March, 2015 – $166 for the (rarer) 90, $65 for the 130. I have not tried it but would bet that the 130 part can simply be cut down to fit the 90 – the end fittings at the printhead and ink cartridge ends are identical.
Reports:
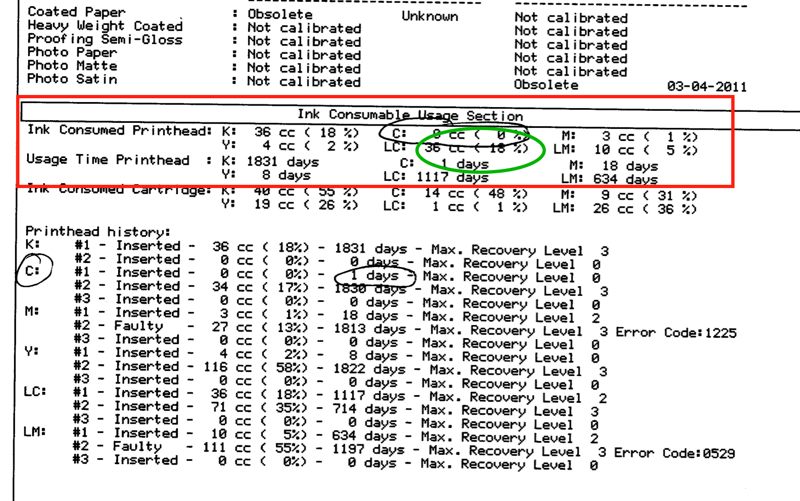
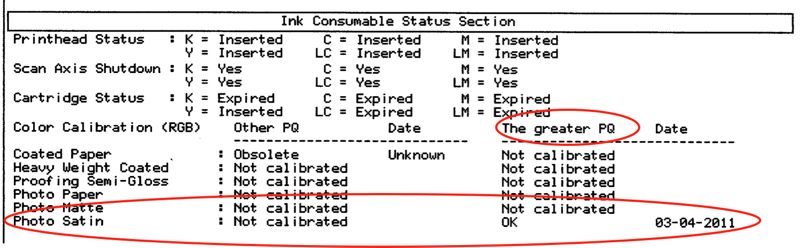
The following reports were run before replacing the feed tubes to cure the clogged yellow one, hence the magenta cast, clearly visible on my profiled display. After feed tube replacement they print in solid, neutral black, as they should.
The usage report (see above for button sequence) for my DJ90 reports a modest 460 print jobs (HP cannot add properly – see below) so I expect many more years of life from the behemoth.
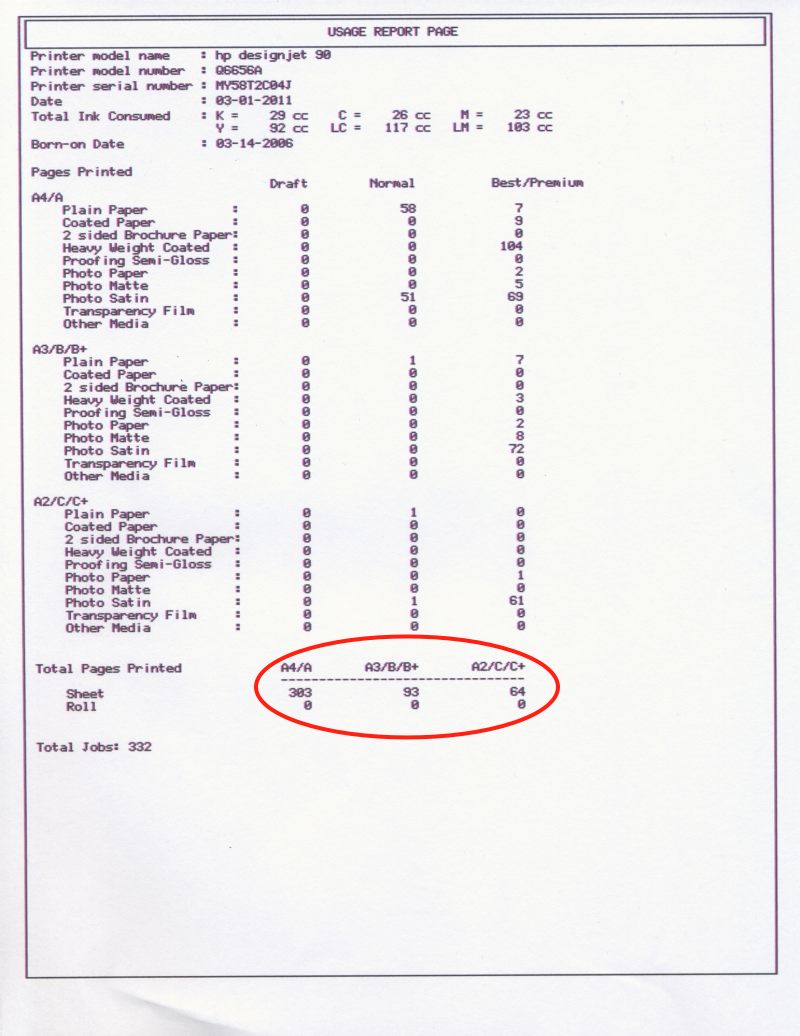
Use report. Holding the Power button press the ‘OK’ button once to generate this.
To get the more detailed Information report, holding ‘Power’ press ‘OK’ four times; here’s an extract of the two page report:
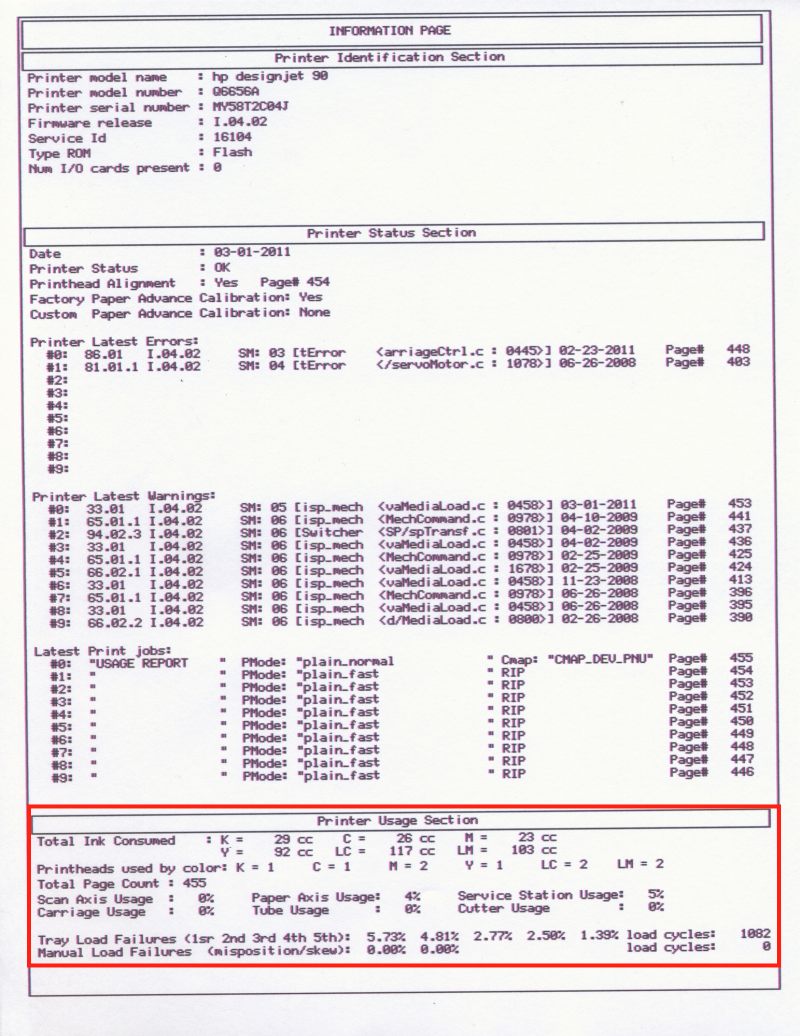
Information Report, Page 2.
If you are contemplating buying a used HP DJ 30/90/130:
A good, used DJ90/130 is one of the cheapest ways of getting large format, high quality printing.
Don’t pay more than $350 for a used DJ90 or more than $500 for a used DJ130 and only buy ones which can run the above report – which means that all the printheads are functioning as you cannot run the report otherwise. Don’t buy one where the seller claims he cannot run the report because ‘….one of the ink tanks is empty.’ Move on to the next one. Try and buy locally to save the beating UPS will give it. Inkjet printers are not robust devices.
The above report will tell you whether the machine is a pro’s beater (many DJs were used in print shops and you really want to avoid those) or an amateur user, like mine. Note in the red box, above, you can even see how many times the print heads have been replaced! A high count here is a sure indicator of heavy use or recurring problems – avoid. I’m not sure of the meaning of ‘Service Station Usage – 5%’ in the above but suspect it refers to the area where ink overflow from the cartridges is dumped. If I am right then you can see my DJ90 has had a very easy life indeed.
I suspect a used DJ30 (13″) is a waste of money as a new printer with that modest size capacity can be had inexpensively.
Printing over a network:
You do not need the network version of this printer if you use Mac OS X. All you need is an Airport Extreme or Airport Express wireless router, or a lot of time to mess about with aftermarket routers. The Apple products, when used with a Mac, are truly ‘plug-and-play’.
In its previous location my DJ90 was hard wired to my Mac with a USB cable. No more.
My workhorse HackPro, whence I print, resides in the home office and gets its network connection wirelessly from a remote Airport Extreme router in another room; the HP DesignJet 90 is connected to that Airport Extreme, using an USB cable and added to the list of available printers in System Preferences->Print & Fax.
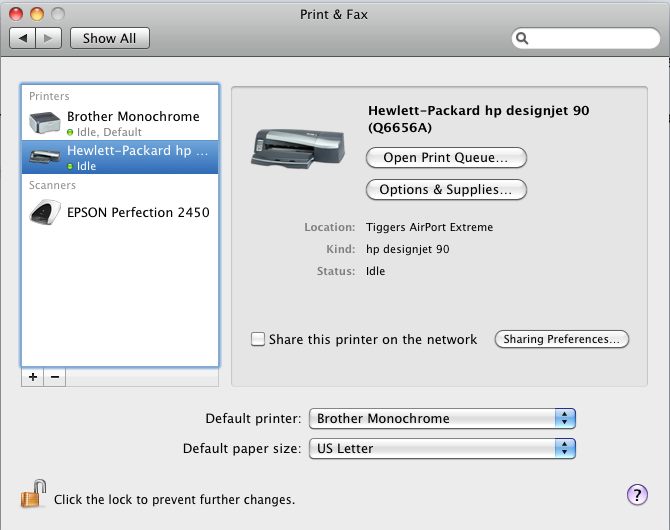
No need to check the network sharing box with Bonjour.
Printing wirelessly from the HackPro is easy as can be. You don’t need high speed networks for this sort of thing as the printer is the slowest link in the chain and it is slow compared to any other peripheral you may have attached. Plus, OS X buffers the print job to disk if you use PS or LR so the application need not even be running once the print job is spooled out. I mention this as Apple’s Bonjour wireless technology which is being used here was a complete dog in the early versions of OS X but is now seamless and trouble free. Back then it was named ‘Rendezvous’ which is about as inaccurate as it gets.
You can even print to an HP DesignJet connected to an Apple router from your iPad or iPhone if you use an app like FingerPrint!
Well, the DJ90 is back in action …. until the next time.
Error codes:
The DesignJet has extensive error code diagnostics – here are the error codes if you need to repair yours; you can see some error codes (paper jams) in the report above:
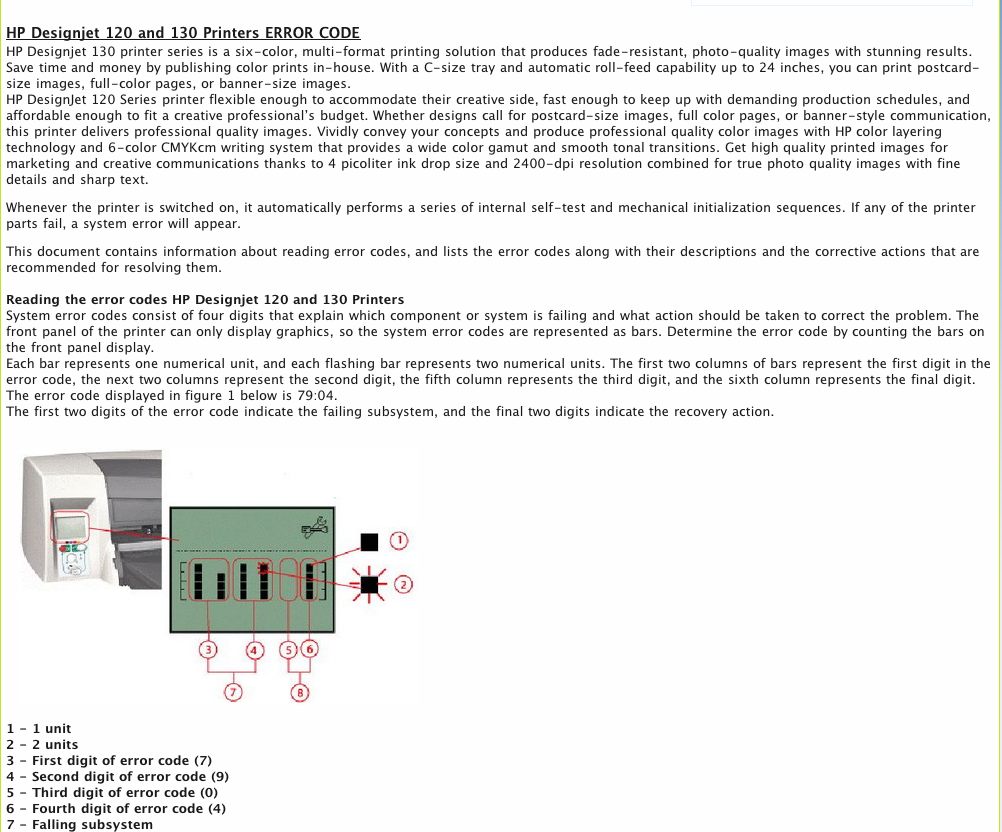

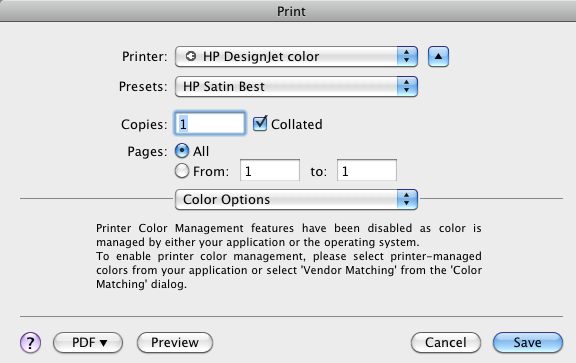
Image Quality Diagnostic Page and Color Calibration:
Now here’s the real snag.
You can only print the Image Quality Diagnostic Page (see my earlier piece for an example) and recalibrate the printer for the latest HP paper using Leopard or earlier if you are on a Mac. That’s because Snow Leopard and later Mac OSs will not allow you to run the System Maintenance Utility. So either borrow a Windows computer (no files are transferred – the printer stores everything you do), use a Windows emulator like Virtual Box or Parallels or do as I do, use an older Mac running Leopard or Tiger. I use our old PPC G4 iMac running Leopard 10.5.8 and it works fine. You can still download the System Maintenance Utility from HP’s web site.
Finally, for the really serious:

Click to download the HP DesignJet Service Manual brochure.
This is the official service manual and if it’s not in here it probably does not exist. The software section is Windows-centric, wouldn’t you know it, but there are complete dismantling and replacement instructions toward the back which should ensure your DesignJet has the longest possible life! The file is some 8.9mB in size, so it will take a while to download. All versions of the DesignJet 10, 20, 30, 50, 70, 90, 100, 110, 120 and 130 are covered.

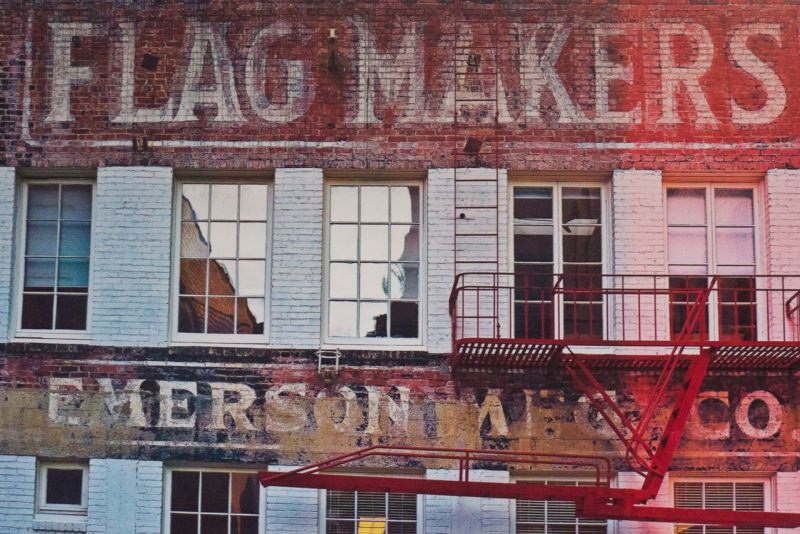
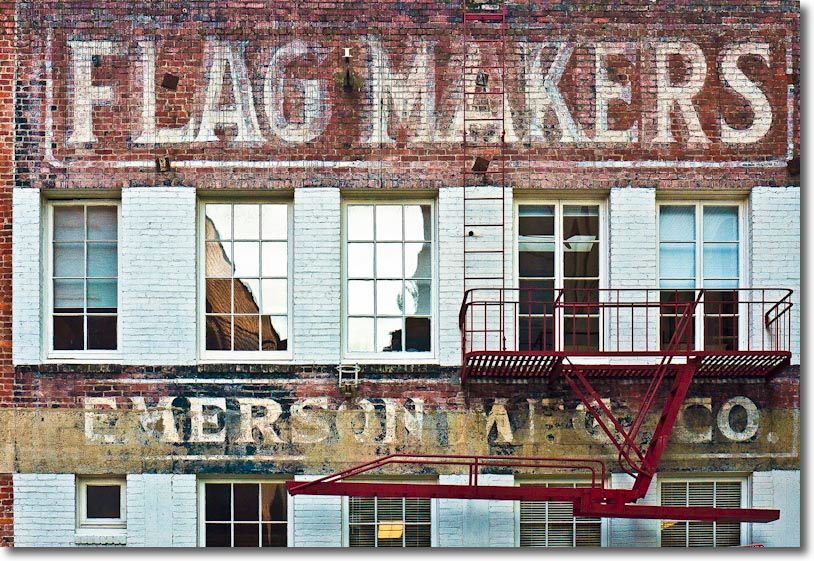
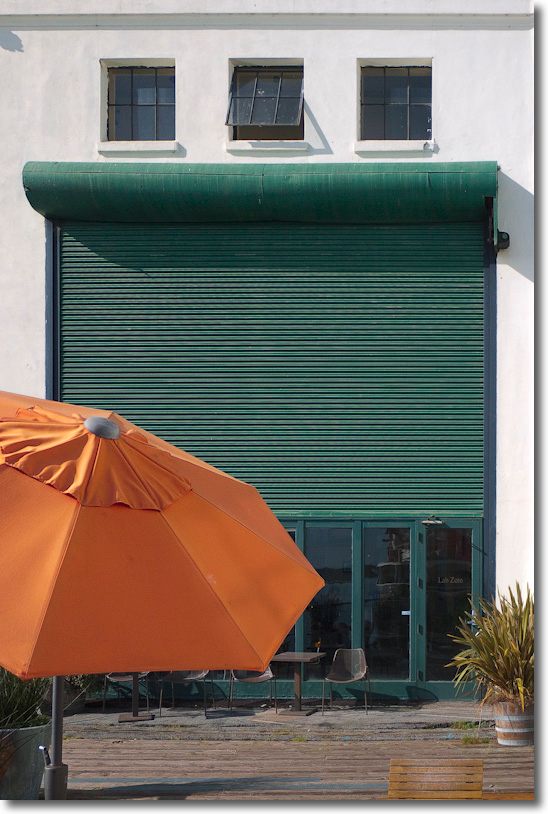
Finally, a big print.


