Category Archives: Technique

Some outdoor HDR experiments

It looks like a steady tripod is essential to do things right.

As regards image quality my invariable goal is to secure a level that permits the making of Really Large Prints so with this goal in mind I took the Canon 5D to the local Main Street yesterday, seeing as it was Independence Day, to experiment with High Dynamic Range photography with a view to learning what it takes to preserve image quality.

It bears adding that my goal with HDR has nothing to do with some sort of distorted presentation of reality, with exaggerated colors and tonal ranges. Far from it. Simply stated, all I wish to accomplish is good scene details, from shadow to highlight, where ordinary one shot photography will not do. Typically, this means the use of HDR is germane to high contrast scenes. If you want truly garish HDR results you need go no further than Google. Some of these efforts make Thomas Kincade’s genuinely foul painting look tasteful by comparison.

To try to see if this sort of thing could be done with a hand-held camera I set the 5D to take three exposures, each 2 stops apart, with the camera set on multiple exposure motor drive. Then all it takes is to take a manual reading of a mid-tone area, focus and keep the shutter button depressed. The 5D bangs off three exposures in one second, one correctly exposed, and one each 2 stops over and under. You can do less than 2 stop steps, but 2 seems to be the done thing in the HDR world.

When I got home I had 36 pictures on the CF card, meaning 12 sets of three each. Because of Aperture’s superb engineering, I dropped these RAW files into Apple’s application and seconds later all 36 snaps were on the screen. Then, dialing in Stack->Auto stack, I told the program to stack all images three or fewer seconds apart and, hey presto!, I had 12 stacks with three images each. Seconds later I had exported one of the stacks as high quality JPGs (12 mB each) to a new folder on the hard disk. Opening up Photomatix’s stand alone progam I executed Automate->Batch Process and told the application to ‘Align Images’ before processing, which took some 2 minutes. Photomatix exports the HDR JPG in a new sub-folder where the images reside, and the JPG can then be dropped on Photoshop for final adjustments – meaning the highlight slider in Levels is moved to the left, Smart Sharpen is applied (300/1/0 for the 5D is what Canon redommends) and the file is saved.

Back into Aperture, import the result and add it to your stack as the first image and you are done. It’s nice to keep the original RAW files as doubtless some day a better HDR application will become available, thoguh I find it hard to criticize Photomatix.

Here’s how it looks:

The Aperture screen with the HDR image on left with source images.

And here is a larger view of the result:

The HDR processed result.

As you can see, the very natural looking result preserves a full tonal range despite the extremely harsh midday sunlight. But there is a snag. Look at the car’s wheel rim and you will see that the images are misaligned. I didn’t get this problem when doing indoor tests on a tripod (see the previous columns) and examination of the other HDRs from this outing disclosed the problem in varying degrees in each picture. What appears to be happenning is that I am slightly twisting the camera between pictures, probably reacting to the noise of the motor drive. As a result, whereas the centers of all images are sharp, the peripheries show clearly overlapping images. So for this photographer, at least, it seems a tripod is de rigeur for mulit-image HDR pictures. The indoor shots taken with a tripod disclose no image degredation when compared with the originals.

Here’s one more example of what HDR can do for tonal range:

The Aperture screen with the HDR image top left, with source images.

And here is a larger view of the result:

The HDR processed result.

There’s less edge blurring in this one – I must have been steadier – but when you enlarge the result it’s still there.

It’s no great secret that I think Ansel Adams was a mediocre photographer, at best. What made his pictures jump out at you is his superb darkroom technique. He would think nothing of spending days over a print, messing with chemicals, paper grades and manual dodging and burning. If the poor sap had only waited, he could have snapped up a copy of Photomatix and saved himself a lot of trouble. His example is instructive, though. Good technique cannot make a great print from a poor original.

After these few experiments with HDR I think I understand what good technique means. Now I have to take some good originals!

Redwoods redux

The next trip will be to take VR panoramas.

While I wait for my panorama head to be delivered, there’s a three week waiting list, here’s the first venue I will be visiting for some ‘serious’ virtual reality panoramas:


Redwoods. Crown Graphic 4″ x 5″, Kodak VC160.

I’m hoping that a 180 x 360 degree panorama, where you will be able to mouse up, down and all around, will finally convey the sheer size of these magnificent California redwoods, something I have never done to my satisfaction with regular still pictures. No, I will not be using a film camera….

You can read more about Virtual Reality photography here.

One of the best practitioners of the genre is a fine French Photographer named Eric Rougier and I urge you to visit his web site and enjoy the many panoramas there. To really see what VR is all about, just take a look at the interior of Notre Dame in Rougier’s magnificent interactive panorama.

Virtual Reality comes to town

Not something you can print and hang on the wall.

If you had told this photographer a while back that he would be creating three hundred and sixty degree virtual reality pictures with a computer and photo stitching software a year ago, chances are the response would have included a recommendation to visit the local loony bin for an extended stay.

What got me intrigued about the possibility of making a Virtual Reality picture was probably a combination of factors. I had long been fascinated by the Virtual Tours that realtors place on their web sites brokering homes. You click and then pry around some unsuspecting stranger’s home. Shades of James Stewart as the Peeping Tom in Hitchcock’s Rear Window. Later I came across 360 degree VR pictures on the web of landscapes and famous places like the Eiffel Tower and St. Peter’s Basilica and wondered in awe at this new technology for making pictures. I hesitate to call them movies as the viewer is in charge of what he looks at and in what detail. Hose the cursor this way and that with your mouse and you can look around the Sistine Chapel taking in all the details of Michaelangelo’s ceiling painting, or descend to the depths of the Seine at the foot of Notre Dame.

Simply stated, none of this was possible before the days of computers; once digital cameras became affordable anyone could do it. I’m not sure of this, but I believe the technology was invented and patented by Ipix a few years ago, offering true 360 degree views around a subject of choice. Doubtless before long we will have holographic television with the image floating in space and viewable from all angles.

Lots of smart people have worked around the patents to offer inexpensive alternatives to Ipix; meanwhile Ipix books $2mm of revenue a quarter from its great invention. Another cheer for American entrepreneurship.

The poor man’s approach, then, is to take a bunch of overlapping pictures around a horizontal cylinder (you turn the camera from shot to shot using a tripod head) then add one for the zenith (top) and nadir (base). The zenith can be done on the tripod by tilting the camera up ninety degrees; the nadir is taken hand held by removing the tripod and snapping the ground, trying to avoid your toes.

A bit (OK, lots) of research on the web showed that this is still very much a nascent technology when it comes to art photography. No one place really seemed to explain how to do things, but piecing them together and reading bulletin boards and chat rooms got me on the right path.

I thought that a fisheye lens of some sort was essential to making Virtual Reality pictures but it turns out that is far from the case. Any reasonably wide lens will do. The wider the lens the fewer pictures have to be taken to generate the 360 degree whole; for that matter, you do not have to go the whole hog and can simply generate flat wide panoramas for viewers to enjoy. However, as I am having such great fun with Canon’s full frame Fisheye lens I thought I might give the 360 degree rendition a shot in the interest of less work. Less work is always a good thing.

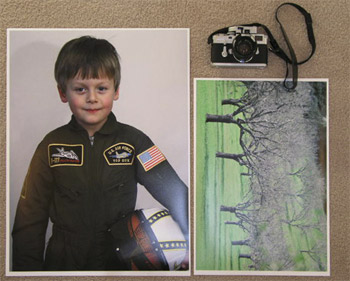
My earlier efforts with stitching flat pictures from my Rolleiflex together into panoramas were disappointing. I used Photoshop and really struggled to get things to line up. So I put the idea to the back of my mind a few years ago. Look at the following picture taken in 2003 and you can see the objectionable bowing out of our house front, not to mention the stitching.

The Atherton estate at dusk. From four pictures on a Rolleiflex 3.5F,
Kodak Portra, stitched in Photoshop CS.

Now the chaps who are really serious about VR photography think nothing of spending $600 on an expensive tripod bracket which allows the camera to be rotated around the nodal point of the lens, rather than around the axis of the tripod bush. The nodal point is the right way to go to minimize distortion. Well, I wasn’t about to blow that sort of coin on an experiment, and after sniffing around a software package or two concluded that as long as you held the camera at the same height when taking the multiple pictures for your VR composition, and didn’t tilt things too much, you stood a pretty decent chance of getting a good result.

What do you need to make VR panoramas?

A camera with a 50mm lens or wider which can be set to manual exposure. Film or digital, though film will be a lot of work.
A tripod or monopod, or a really steady hand and good eye.
Software to stitch the pictures together.
A viewer to allow playback on your computer.

For a camera I used the Canon EOS 5D with the 15mm full frame Canon fisheye lens, using my trusty Bogen/Manfrotto monopod and Leitz ball head to mount the camera at a constant height.

Pictures are taken with the camera oriented vertically to maximize height and minimize the size of the holes at the zenith and nadir of the sphere that have to be filled in. As the Canon full frame fisheye has an effective vertical angle of view of some 88.41 degrees (Canon says it’s 91.73 degrees but that’s incorrect for this use), six pictures will nicely complete a circle with substantial overlap, making stitching easier. From what I have read a circular fisheye needs only four pictures but I would guess that the edge aberrations are significantly worse than with a full frame one. Speculation on my part as I have not used a circular fisheye.

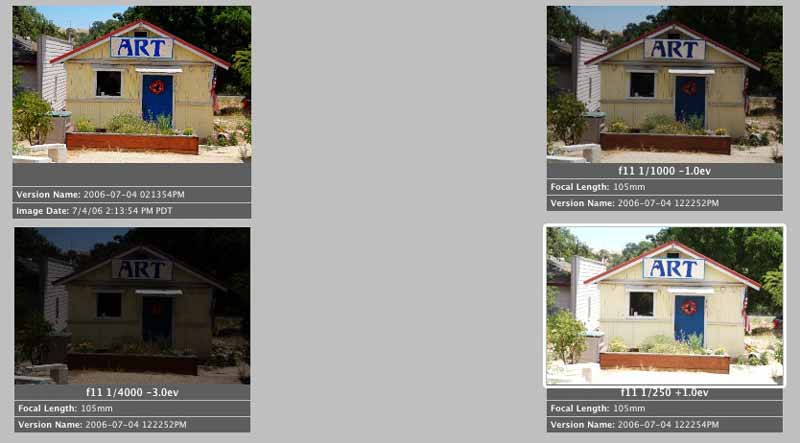
One other thing to remember before snapping the pictures is to switch off auto exposure (you want sky tones constant), switch off auto white balace if using a digital camera (much the same reason) and switch off autofocus. You want a small aperture with maximum depth of field for this to work. Don’t ask…. Exposure has to be determined so as to accommodate the brightest and darkest parts of the scene where details are required. Not as easy as it sounds. I measured both and averaged. Finally, switch off the auto-rotate feature in your camera or you will spend time later turning each picture through ninety degrees – the stitching application does not support auto-rotate so the picture will come in horizontally, which is not what you want.

To keep things simple I set the camera on JPG, not wanting to convert a bunch of RAW images, and opted for the lowest quality setting to keep file sizes down. Each picture file was some 1.3mB in size.

Stepping outside the front door, 5D and fisheye on the monopod, I took ten pictures from one position, generously overlapping each with its predecessor. Ten, as I was not too confident about getting away with six – better too much overlap than none. Then I pointed the camera up and snapped the zenith picture – mercifully the Canon fisheye does not flare into the sun, so I could get away with this. Then taking the camera off the monopod, the nadir image was recorded by pointing the camera down.

The application I used to stitch these together is called PTMac. It costs $59 and runs on Apple Macs only. A downloadable database stores settings for lots and lots of cameras and lenses – here’s just a partial list:

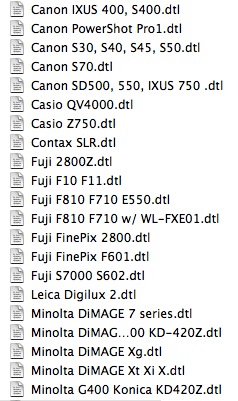
Of course, wouldn’t you know it, the 5D + 15mm Canon EF fisheye is not in the list. After some messing about and help from chat boards, I determined the settings which are as follows – you can save them in a database of your own:

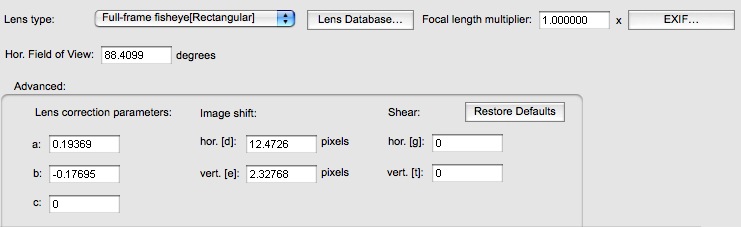
Getting these parameters right is key to a frustration-free path to generation of a VR picture.

Now PTMac is a tad clunky. Little is automated. Sort of like using logarithm tables in lieu of a scientific calculator. Mercifully, the current version (4.x) automates the generation of what the vendor calls ‘Control Points’ – points in areas of overlap between adjacent images which tells the program how to stitch things. It generates no fewer than ten control points for each pair of images – something that would take hours to do manually. When it comes to panorama generation, I save the file in the QuickTime Cubic VR[.mov] format. Control point generation and stitching took some five minutes on my 2 mHz PPC iMac G5 which is equipped with maximum RAM of 2 gB. That’s not too bad when you think of the insane number of calculations the application is going through – witness the loud fan noise from the iMac’s normally near silent self. That CPU is working hard.

To view the panorama you need Apple’s QuickTime which is available free here. There are versions for Mac OS X and for Windows.

I clicked on the generated file and got a somewhat distorted picture:

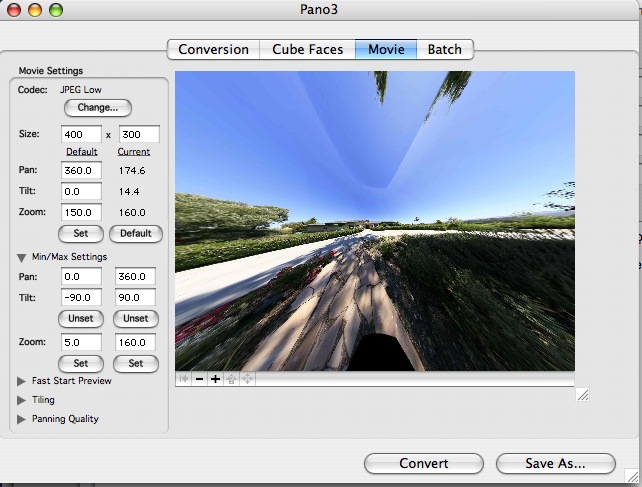
Zooming in fixed that, but I did not want the viewer to have to do that, so after some more hunting around on the internet, I came across Cubic Converter from an Australian company company named ClickHereDesign and after a quick trial I determined you could save a zoomed-in version which was much nicer to look at. Another $49 gave me a license to save the revised file in Quick Time format. Now things looked like this:

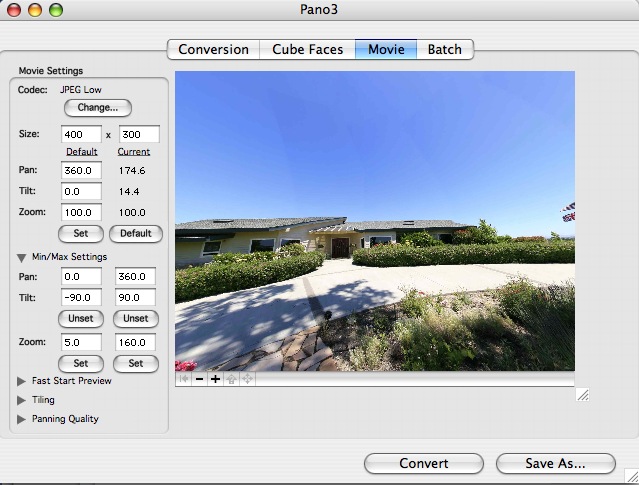
Cubic Converter also has the ability to allow the viewer to start looking at the picture while the file is still downloading, with increasing quality resulting as time passes. Instant gratification in the best tradition of The American Way.

Here is the result – my first Virtual Reality picture. The file is 1.5 mB in size, so a broadband connection is recommended. You can zoom in or out by using the Shift and Control keys or by clicking the + or – signs on the screen.

While some of the limbs of the tree need work, I’m pleased as punch at this first pass and much of the learning curve is behind me. Getting smooth gradation in the sky is no mean feat. Next I’ll get more serious using a tripod with a degree marked pan and tilt head (actually a felt tip pen and some ingenuity, before you get too excited) to get things just so. The $600 fancy tripod head can wait.

HP DesignJet 90 – Part IV

A very capable monochrome printer

In addition to doing a very poor job of emphasizing the DesignJet 90’s self calibration capabilities, courtesy of the built in colorimeter, Hewlett Packard does an even worse job as regards explaining quality monochrome printing. You have to delve deep into their web site to find a document named ‘ICC Profiles – for black and white images’. This leads you to downloading a file containing 8 Jpgs, each containing 7 copies of the same monochrome photograph with slight tint variations. You start by printing the Neutral profile Jpg on paper of your choice then select the picture with the most pleasing tint. Say it’s the one captioned ‘Magenta’. You then proceed to the Magenta profile and print that Jpg, electing the best. Then all you have to do is download the related ICC profile from the HP web site and drop it into the /Library/Application Support/Adobe/Color/Profiles folder and choose that profile when printing in Photoshop.

It all takes less time to do than to describe and, once again, HP’s instructions are outstanding. I did this using the three sheets of free HP Photo Matte paper provided with the printer, which is recommended for monochrome ‘art’ prints, whatever that means. As Himmler once remarked, “When I hear the word ‘Art’, I reach for my gun”. Frankly I find the surface of this paper to be deader than yesterday’s news but I suppose it’s fine if you want to mount 4″ x 6″ prints in 30″ x 40″ mats, sign in 2B pencil and make sure you append a 1/10 designation. This confirms for the twit with a big checkbook that this is none other than a Limited Edition of ten, and the price, of course, is inversely proportional to the size of the photo.

Here’s a snap of three of the profile pages and a 13″ x 19″ print made with the profile of choice on the DesignJet. This is an outstanding fine tuning capability, though I think I will stick with HP Photo Satin paper as I like a little life in my print surface.

In the original print a very full tonal scale is retained, though a glossier paper would improve on this further.

HP Designjet 90 – Part III

An 18″ x 24″ print emerges after a spot of calibration

I can think of several dozen things I would rather do than calibrate a photo printer. Like pulling weeds, bathing the dog, polishing shoes, changing the oil in the car, stripping old paint, and on and on.

However, it rained today so that ruled out the weeds and paint. The oil is fresh. Bertie the Border Terrier is clean and my shoes look fine. So the inevitable came to pass and I spent a big part of the day calibrating the HP Designjet 90 for optimal results. By that I mean that the screen and printed images must be as close as possible with regard to colors and tonal range.

I concentrated my efforts on HP Premium Plus Photo Satin paper, which I expect to use the most. On more critical examination, it has slightly less sheen than Epson Premium Luster and slightly finer stippling. Either way, both papers retain detail well without the specular reflection problems of glossy surfaces.

First I learned what I had done wrong to cause the paper jam yesterday. The HP’s paper source tray is large and must abut just so with the body of the printer for the paper feed to work properly. I really do not have enough room behind this monster to load paper from behind and in any case I like the idea of the paper being properly supported as it wends its way past the print heads. I fancy a touch of furniture polish on the sides of the source tray will do wonders to ease the stiction between the mating plastic surfaces which makes full insertion of the tray tricky. Epson has it all over the HP here, as the paper is simply dropped in the feed slot from above and things work fine.

Still, 18” x 24” is a lot larger than 13” x 19” and cavalier handling of the paper will result in creases and malfunction. I found myself (literally) on the carpet more than once while loading the large size paper into the source tray, for lack of a large enough flat surface to place things on.

As regards color calibration, one thing I did not have to do is re-calibrate the screen with the Monaco colorimeter, as that profile was fresh. That still leaves a ton of variables and where the Epson preferred to deny Photoshop any color management, the HP’s instructions are quite the opposite and very detailed. There are so many steps it’s easy to miss something.

When I finally printed my first 18” x 24” it was like being back in the darkroom 35 years ago.

Breathtaking.

Simply breathtaking.

No question about it for this photographer. Nothing beats a Really Large Print.

Color matching is near perfect. I can do better but we are very much in the area of diminishing returns here. As for resolution, smoothness of tone, ease of creation of the original file, I challenge any medium format photographer to equal the output and sheer involving quality of the Canon EOS 5D’s full frame sensor. And I’m still only using JPG Fine here. RAW has yet to come.

I struggled a bit with nomenclature. It seems that 18” x 24” is called ‘Arch C’ in that moronic European size naming convention that printer manufacturers have adopted. For goodness sake, what the devil does Super B3, or JB5 or A2 mean to you? Now 12” x 15” or 16” x 20” we can all understand. Well, the engineers be damned. I scrawled ‘Arch C’ with one of those indelible pens beloved of graffiti artists all over the box of HP’s paper, the better to know what to dial in next time.

How much larger is 18” x 24” than 13” x 19”? See for yourself – the Leica is for scale (no, not for sale):

Yes, that’s our boy Winston on his fourth birthday. I learned from one of Canon’s tutorials on the web that setting the Threshold slider in Photoshop’s Unsharp Mask (what a stupid name for something that is intended to sharpen – engineers at it again) to 1 or 2, rather than zero, takes the bite out of facial pores and makes for a nicer look in portraits, so I dialed in 250/1/1 for this portrait. Despite being at 400 ISO and some two stops underexposed (ooops!) it’s near perfect as regards definition and tonal range once fixed in Photoshop.

There’s a lot of nonsense written about printers on the web. One ‘prominent’ site gave the HP a mediocre review, accusing the machine of color casts. Now I have no axe to grind for any particular manufacturer. I’m not paid by Hewlett Packard, or anyone else, and I do not get free printers and supplies to play with. I will use what works for me. But I cannot help suspecting that the boob writing this piece is fairly clueless about proper calibration of a printer which starts with the use of a colorimeter to profile the screen. He makes no mention of using one. The old rule applies. Garbage in, garbage out. I may denigrate technique as a means – nay, a hurdle – to an end, but you have to have it to get there consistently at a high level of quality

Want lousy prints from the HP? I have several I can offer you from today’s efforts. Want lousy prints from the Epson? Same answer. But want stunning, drop dead gorgeous framed pictures from either and you only have to calibrate things properly to be assured of the best results. The only way you will be able to tell the difference between Epson and HP prints is by the size. The market is simply too competitive for it to be otherwise.

Ink jet printers have not come very far in the last six years, based on my experience. Meaning the Epson 1270 was terrific back then and remains so today. Maybe inks are more permanent, maybe manufacturers’ paper profiles are better than before, but my standard for comparison is the old Epson 1270 and, believe me, that’s a very demanding benchmark indeed. I think I’m almost there in matching it with the HP Designjet 90. The only difference is that I can now go larger.

So if you want a good large format printer at some 60% of the price of the 17” Epson, you could do worse than the HP DesignJet 90. Or get the 130 model for a bit more if you need 24” wide. They do versions with a roll paper feed, and I avoided that like the plague. Ever tried to get roll paper to lie flat? They also do a version with a colorimeter for screen profiling, but as I already had one the base model printer worked for me.

‘Expert’ reviewers seem to overlook the fact that the HP DesignJet has a built in colorimeter to aid creation of a perfect paper profile for each of their papers. This does not obviate the need for a screen colorimeter like the Monaco to create a screen profile, but it ensures the paper’s profile is accurately defined.

Here’s how it works. You insert an 8.5″ x 11″ piece of HP paper of your choice and run the Calibrate Color utility. It prints a test pattern and then sucks the paper back in and, using the built in colorimeter, compares ideal against actual, adjusting the paper’s profile as appropriate. That is very clever and HP does a lousy job of marketing a feature that no other consumer priced printer offers, as far as I know.

I have created three profiles thus – Satin, Gloss and Matte. Once done you throw away the pattern and get on with life. As with any paper, you have to remember to tell Photoshop which surface you are printing on but the rest is automatic.

By the way, the 18″ x 24″ print took 13 minutes to make and the HP Photo Satin paper is 76 lb. weight compared to 67 lbs. for Epson Premium Luster.