Category Archives: Technique

Cleaning HP DesignJet print heads

A blast from the past.

The HP DesignJet 30/90/130 printers (10″/18″/24″ maximum paper width, respectively) were as good as pro-amateur color printers were ever made. The three models, which date from 2006, use the same ink cartridges and print heads, six of each. The Vivera ink dyes used require special swellable HP paper which absorbs the dyes and is good for over 80 years of permanence.

I wrote extensively about the maintenance and care of these printers in a series of articles which you can find here. Suffice it to say that you will not find better blacks from any printer and even with glossy paper there is not so much as a hint of metamerism (bronzing). I have displayed prints for almost two decades in bright sun without a hint of fading.

When HP discontinued these printers I stocked up on the special paper at ten cents on the dollar and also bought a remaindered set of OEM print heads and ink cartridges. While I had all the prints I needed for home and exhibition display I knew that one day I would revisit making large prints so it made sense to lay in those supplies.

Well, the other day I decided that I wanted to make some new prints for framing, having become bored with what I had and knowing that some gems awaited printing in my catalog. But my HP DJ90 had seen no use in seven years and though I had kept it plugged in (and switched off) all those years, to enable the head warmers and the occasional automatic ink flush which HP’s engineers had cleverly built in, the display panel showed all sorts of weird symbols and no ink levels were to be seen. So I pulled all six print heads, cleaning the mating surface in the printer with a rag soaked in distilled water, and replaced them with the new OEM ones which I had kept in their sealed, foil wrapping. At the same time I replaced all the ink cartridges. After an extended period during which the printer primed the cartridges and supply lines (meaning they were filled with ink and air was purged) the printer fired up and worked perfectly! Joy.

Now the snag with these DesignJet models is that paper is no longer available, and ink and print heads, if found through web search can be very costly indeed. And as for spare parts they are largely unavailable so one day my printer will be so much landfill. Welcome to the disposable society. I had made a half-hearted attempt at cleaning clogged printheads in this piece which turned out to be so much time wasted. This time, rather than throwing the old heads away, I determined to do the job properly.

The print head comprises four parts:


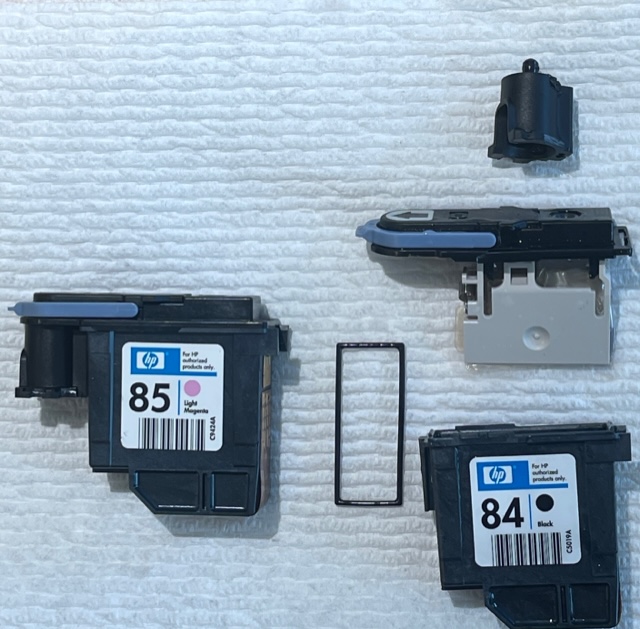
Assembled head at left, dismantled, cleaned one at right.

In the above image these are:

  • The needle unit, top right
  • The cap with bellows – these act as an ink buffer
  • A rectangular gasket which seals the cap to the reservoir
  • The reservoir, bottom right

The design of the #84 (black) and the #85 (colors) heads is identical.

The print head is easily dismantled using a small, flat bladed screwdriver. First, put on some rubber gloves. Those dyes, once on your skin, are absorbed and hard to remove.

Then remove the needle unit, insert the blade of the screwdriver at the location shown in this image:


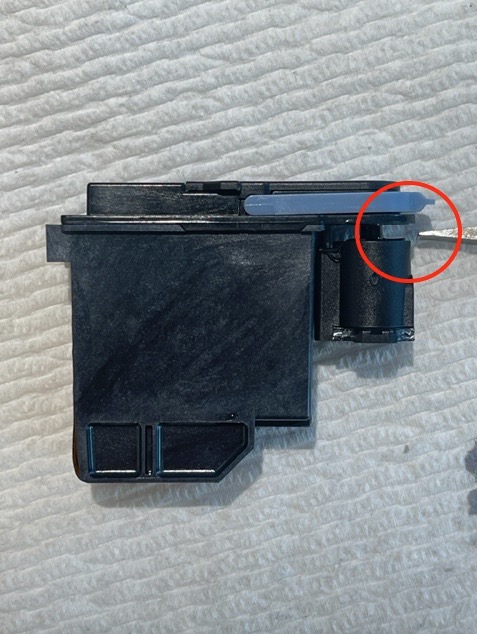
Removing the needle unit.

Carefully twist the screwdriver and the needle unit pops off.

Now it remains to remove the cap with its attached bellows.


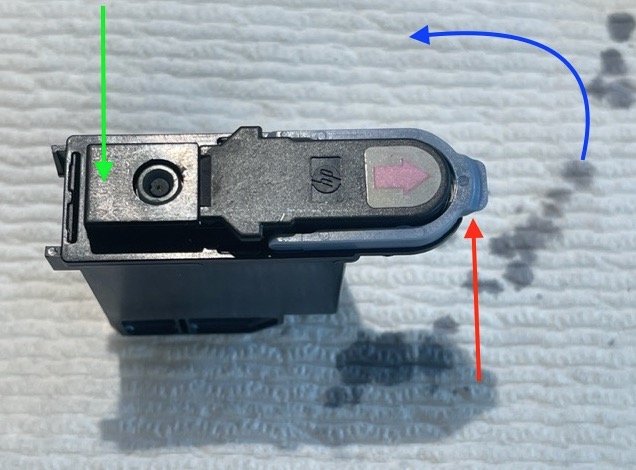
Force application to separate the bladder unit from the reservoir.


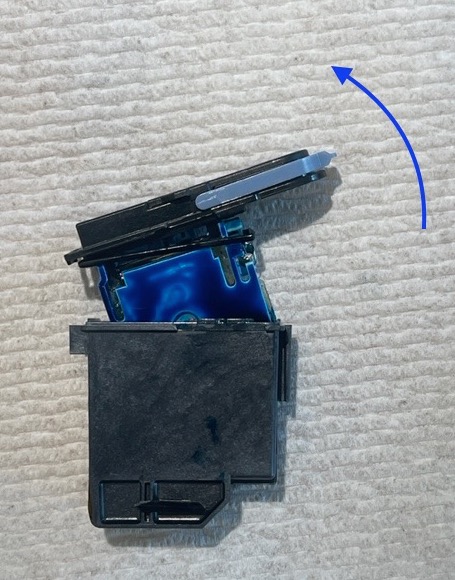
How the cap with bellows assembly and reservoir are separated – side view.
Do this gently. Rotate too hard and too far and parts will break.

No tools are needed. Place your thumb at the location of the green arrow, the side of your forefinger at the location of the red arrow (on the underside of the protruding plastic, not at the side) and apply force in the direction shown by the curved blue arrow. The two will separate easily.

Being careful not to lose or damage the rectangular gasket which is between the bladder unit and the reservoir, flush all the parts with hot water from the tap, then soak them overnight to remove the last vestiges of ink. There is no need to use volatile solvents. Flush once more, air dry, then reassemble in the reverse order, being sure to place that rectangular gasket over the bellow assembly before snapping on the reservoir. The gasket nestles in a rectangular groove around the base of the bellows assembly. Be sure it is securely lodged in that groove, helping it along with a jeweler’s screwdriver if necessary, before snapping the reservoir and bellows assembly together. The needle unit is replaced last, snapping into place.

Your HP DJ print head is now ready to be put back in service. There is no need to pre-fill it with ink. The HP DesignJet will do that for you when first turned on with the new print head(s) installed. Give it 30 minutes or so to complete this process.

A handy Apple ProRAW converter for the iPhone

Getting Apple ProRAW into Lightroom.

One of the nice features of recent iPhones is the option of taking pictures in Apple ProRAW, Apple’s uncompressed and relatively unmanipulated photo format.

What prompts this piece is the excessive default sharpening of JPG images by the iPhone. As a colleague has pointed out, this has been worse and worse since iPhone 4.

The snag is that my Lightroom is version 6.4, and as I have no need for later ‘enhancements’ or the annuity toll they bring, I have not ‘upgraded’. Nor do I need a cloud-resident version of LR open to Adobe’s potential piracy and fee extortion. My LR is bought and paid for – once. But it cannot import Apple ProRAW files from the iPhone.

Wanting to compare the Apple ProRAW files with JPG I needed to get the former into Lightroom, and found that one way of doing this quickly is to connect the iPhone to my Mac Pro, logging on to iCloud Photos. That’s at iCloud.com, not Photos on your local drive.

After selecting the desired image, click and hold the mouse pointer on the file to be downloaded and you will see:


Downloading a RAW as DNG.

The resulting DNG file can now be imported into Lightroom. In my case the JPG was 4mb and the DNG (which is an uncompressed version of the RAW file) came in at 26mb. But, heck, storage is cheap.

The differences in compression and the related artifacts are very noticeable. First the DNG file needed +1.4 stops of exposure increase to match the JPG. Here are enlarged center sections:


JPG on the left.

You can do this in batches in iCloud Photos. Highlight selected files using the shift or control key and download as above.

The DNG files can now be sharpened as deemed necessary in Lightroom, avoiding the excessive native sharpening in the iPhone for JPG images.

4mp is all you need

The lunacy of the pixel race.

These images are of the same subject with the two best lenses I own – the ‘pro’ Lumix 12-35mm at 25mm (50mm FFE) on the Panasonic GX7 and the Nikon D700 with the 50mm f/2 HC MF Nikkor. The GX7’s sensor is 16mp on 3/4 sq. in., the D700 has 12mp on its 1.5 sq. in. sensor. Both at 400 ISO and f/5.6.

The image below enlarges the center 40x, so a 40” x 60” print. Note the greater warmth of the Nikkor optic. To properly display focal length in the EXIF data I have installed a CPU in the Nikkor lens, which has nothing to do with its optical quality. No extra sharpening – just the default of 25 in Lightroom, no other processing:

These images display maybe 1 mp of the sensors’ pixel counts.

In the next image I have increased the GX7 sharpening from LR’s default of 25 to 70. The Nikon image is unchanged, using default sharpening:

The results are indistinguishable as regards definition.

Here you can compare the shadow details – GX7 at left. The D700 has one of the best sensors for rendering shadows in the business:

The results are again indistinguishable.

The madness of the sensor pixel race, with FF sensors now approaching 50mp, dictates that users upgrade their lenses as all the ‘faults’ of older optics are now on display when pixel peeping. The reality is that no one makes 40″ x 60″ prints and that users would be better off sticking with modest sized sensors and old lenses. The 50mm f/2 HC Nikkor used in the above dates from 1973 and can be found in mint condition for $50. A mint Nikon D700 with low shutter actuations can be had for $450 or less. And you will not have to wait all day for the images to render in Lightroom owing to the modest file sizes.

4mp is all you need.

Digitizing slides

Micro Nikkor to the rescue.

I have some old Kodachrome slides I wanted to digitize, but my Canon and Nikon dedicated film scanners were sold long ago. My first attempt was using an Epson 2450 flat bed scanner with transillumination and a dedicated film holder. The result was awful.

An alternative method suggested itself, using my 55mm Micro Nikkor macro lens, an optic of exceptional performance in the close-up range, fitted to a Panasonic GX7 MFT body using an inexpensive adapter. The Nikkor goes down to 1/2 life size on a full frame body, but down to life-size on MFT. Nice, as the 35mm slide will exactly fill the MFT sensor in 3:2 mode.

Here’s the setup:

An iPad is used as an illumination source/light-box. After experimenting I found that 2 sheets of wax paper (from the kitchen) had to be used between the slide and the iPad, otherwise the latter’s pixels would show. Parallelism is a piece of cake – just align the camera until all four sides of the opening in the slide mount are parallel to the frame in the finder or on the LCD screen. Here’s the rear view:

Even with the LCD blurred you can see that the slide is correctly aligned. The screen magnification function in the GX7 is used to establish critical focus with the MF Nikkor, as easy as it gets.

Exposure on a very solid tripod and head was made using the electronic shutter of the GX7 which is truly vibrationless. I made five exposures at one stop intervals, thinking that HDR merging might help. The Nikkor was set at f/8, its sweet spot.

The original slide has exceptionally high contrast and HDR merging did nothing to improve matters. So after importing the best image from the GX7 into LR I dropped it into PS CS5 and messed about with curves and exposure, not to mention the magic lasso on the faces, coming up with something half decent.


The original slide photographed with the GX7 and Micro-Nikkor.


The massaged image after some time in Photoshop.

That photograph was taken on June 16, 1990 in lovely Encino, Los Angeles, when the original owner (left, above) of my BMW R90/6 motorcycle delivered it to me upon sale. I continue to ride it to this day! Other than the top case and some better shocks, it remains pretty much stock, right down to the mechanical points ignition which is as reliable as a hammer. The difference between this machine and modern bikes is that the latter will be useless junk 25 years hence when replacements for failed electronics are no longer available, whereas the R90 – whose electronic content is zero – will be happily soldiering along, hopefully with my son riding it. Oh! and I should add, modern BMW machine are ugly rubbish. This is how a motorcycle should look:


My 1975 R90/6 airhead twin in Scottsdale at my home, snapped the other day.

The bike runs as well as it did 28 years ago and no, I do not miss slide film or film of any kind, for that matter. How on earth did we exist before digital?

Film image: Olympus Stylus Quartz. Digital: Panasonic GX7.

HP dye printing paper

Grab it while it lasts.

Click the image for the vendor’s site.

If placing a large order for the 13″ x 19″ paper, you can save a lot of money on shipping by going directly to eWholesaler.com’s website and ordering there. Looks like only 13″ x 19″ glossy is available but that is the premier surface for the highest quality prints.

The HP 30/90/130 DesignJet remains the finest large format color printer ever made for home use. The printer was discontinued by HP a few years back but as so many were sold, especially to print shops, parts, inks and paper have remained easily available.

Currently parts and inks remain easy to find (even HP USA still lists them as available) but paper is another matter. HP no longers lists any and it is getting very hard to find – most vendors listing it end up reporting their sites are wrong and that they are out of stock. The swellable special paper HP sold for these DesignJets is really the only one to use. Its surface absorbs the ink dyes, in contrast to modern papers and printers which use pigment inks which simply dry on the surface and do not have to be absorbed. The absorbent quality of the genuine HP paper is what gives the prints the DesignJets make their superior blacks, as well as conferring a total absence of ‘bronzing’ despite using just six ink cartridges. (Modern pigment ink printers add a special anti-bronzing finisher, further complicating matters in printer designs that are absolutely guaranteed to clog printheads, unless used constantly. The HP 30/90/130 printers use head warmers and as long as you leave the printer plugged in, albeit turned off, you will never suffer from clogged heads – I testify to that fact after 10 years of ownership. Sometimes I do not print for 6 months and a perfect print then emerges first time.)

Now and then remaindered lots of HP paper come to market and I have done my bit in procuring a lifetime supply of 13″ x 19″ and 18″ x 24″ supplies. Here is my 13″ x 19″ stash – some 500+ sheets which will see me to the grave. My average remaindered cost was under 40 cents a sheet and as the paper does not ‘go off’ with age, holding large quantities makes sense:


A lifetime’s supply.

Get it while it lasts!

The article index for my writings on the best large format printer ever made appears here. That link also shows the product numbers for the various HP paper sizes and finishes. Trust me on this – do not use pigment papers which claim they are ‘compatible with dye inks’. My tests elsewhere on this site shows the claims to be lies, and the prints thus made fade to oblivion in just a few weeks of exposure to light. By contrast, some of my DJ prints on HP’s swellable paper have been in bright sun >3,000 days (this is California, after all) and show zero fading.

B&H continues to list HP84 (black) and HP85 (five colors) ink cartridges and printheads. It makes no sense to stockpile inks as you want them relatively fresh – I keep a spare of each color) but if printheads start proving hard to get then I will stock up. The average printhead seems to last for ink throughput of some 200ml (meaning three 69ml cartridges of B, LM, LC or Y) or seven C or M whose cartridges are only 28ml in capacity.


Current B&H ink and printhead listing.

As I have often advised in the past, use of aftermarket inks is sheer lunacy. Untested, unknown longevity, potential damage to your machine – you really want to do this to your art work and hardware? The ultimate in false economies, regardless how low your opinion may be of the criminal cabal that is Hewlett Packard. That ’82’ sticker on the paper boxes above means an 82 year life when used with HP’s inks – not the bird droppings after market cartridge refillers offer.

For heavily discounted OEM HP84 (black) and HP85 (colors) printheads, try this link.