Category Archives: Technique

Correcting verticals

A simple Photoshop routine.

The eye is exceptionally sensitive to parallelism and hence to leaning verticals. Hang a picture on the wall just a few minutes of arc out of level and anyone will spot the error immediately. Leaning verticals in photographs, where none are called for, are every bit as objectionable.

Correcting these is easy and better done in Photoshop than in Lightroom with its limited controls.

Click the picture for the instructional video and watch out for the phone call at the end! It seems that no matter how hard one tries to switch of all the sounds that pervade our lives, there’s always at least one sound source to be missed.

Click the picture for the video.

The video is 8 minutes long.

Background Blur

Making the subject pop.

I have referred to the need to blur backgrounds in pictures made with short focal length lenses often. As cameras get smaller, focal lengths shorten. The 35mm FFE lens in the iPhone 4S, for example, has a focal length of but 4.3mm, meaning just about everything is always sharp. At a given aperture, depth of field is solely a function of focal length, having nothing to do with sensor size.

To put this in perspective, the 50mm FFE lens on a full frame 35mm camera or DSLR become 150mm on a 4″ x 5″ sheet film monster, 80mm on a 6×6 medium format Hasselblad, 25mm on an MFT body and just 6 mm on the typical cell phone with its microscopic sensor. Compared to a 6mm, the depth of field of a 150mm lens is miniscule – everything is in focus with the former, little is with the latter. So selective focus on small cameras, absent help from software, is not going to happen ‘in camera’, yet.

If a picture is worth a thousand words an instructional video is an order of magnitude more efficient, so I have made a brief video explaining how to confer background blur using Photoshop CS5, which you can see by clicking the image below. While I start and end the process in Lightroom3, that’s not a required part of the workflow. Use whatever database you like for storage.

And remember, the only people who will know you used this technique will be those you tell in advance.

Click to view the 8 minute video.

One day this technology will be built into software in cameras. The user will be able to restrict the zone of sharpness to the main subject. Cameras already have face recognition. Selective focus is a rational extension of this thinking. Meanwhile, PS CS5 does just fine.

Simple animation

A time lapse movie is easy to make.

Our 9 year old son likes to get traditional games from Mindware, a source which specializes in non-electronic toys and games with the common theme of making a child (or adult assistant!) think.

His latest is a study in criminality, also known as the building of Manhattan. First you assemble a jigsaw puzzle of Manhattan, complete with cutouts for all the buildings, then you insert the buildings in chronological order showing how Manhattan, as we know it today, grew. The oldest is the 1812 City Hall, the newest the Millennium Tower, that monument to hubris and stupidity which is an open invitation to terrorists for an action replay of 9/11.

When assembling the puzzle, Winston reminded me that he had taken a movie animation class during his summer holidays, so it was a matter of moments to set up the G3 on a tripod, hand him the wireless remote and instruct him to press the button after each building was inserted. This he proceeded to do with great aplomb, giving the remote a dramatic swing and press each time. David O. Selznick would have been proud.

You can download the result by clicking the picture below. Two things are immediately obvious – the white balance control in the Panasonic G3 sucks (as it did in the G1) and I really should have used a constant light source like an electronic flash. A couple of frames are unsharp, probably the G3 waking from sleep and failing to focus in time. Further the inevitable bumps of the tripod make the result move around a bit. Finally, the Statue of Liberty was not the oldest structure, but as a proud American, Winston insisted of placing it first.

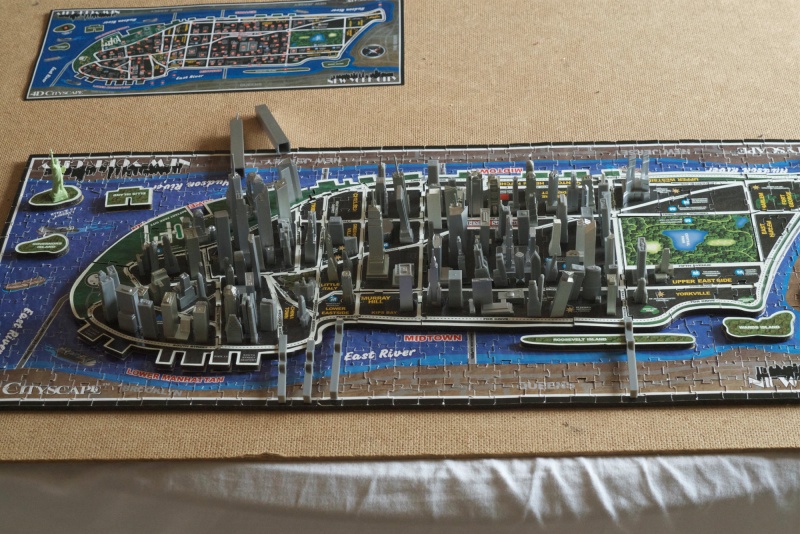
Click the image to download.

I have a pretty good knowledge of Manhattan’s architecure from having lived there many years and because architecture fascinates me, so it was no surprise to find that the easiest buildings to place were those built before 1960 with the hardest dating from the International Style boxes which dominated the subsequent decade. I mean, how do you tell one smooth-sided slab from another? I’ll make honorable exceptions for Seagram for its quality and Lever House for its airiness, both on Park Avenue, but the rest of that period would benefit from a wrecking ball. And if you want something quite unsurpassed for sheer ugliness, try the grandly named 1 New York Plaza on Water Street at the tip of Manhattan, where I worked at Salomon Brothers in the 1980s. The miscreant designing this had some sort of obsession with those early touch type elevator buttons because that’s all it resembles.

While you can get a far higher quality result than in this case, the technique involved is simple. Dump all the pictures into iPhoto, click Command-A to select all, then drop them in a New Project in iMovie. I used iMovie ’09. Hit Command-A in iMovie to select all the images then hit C for Crop. Click on Crop to avoid the Ken Burns effect default, which does not work for time lapse movies. Then export the movie (‘Share’). This one has 127 images/buildings, one second for each. The download is just 11mB in size.

Using GPS coordinates

Easy with an iPhone.

Many photographers like to record GPS data with their pictures, thus saving the exact location of the snap. While GPS receivers are gradually making their way into cameras and some makers offer add on gadgets to record such data – the poor man’s route is available to anyone with an iPhone. I suspect Android phones offer the same technology, but do not know. My cell phone is an iPhone 3G – two generations old, soon to be three generations old.

Any picture taken on an iPhone records GPS coordinates which can be viewed in Lightroom 3, iPhoto or any number of other processing applications.

Here’s an example using the snap of my lunch at Nova Bar the other day, imported into LR3:

GPS coordinates for lunch.

Simply typing these into Bing Maps (I refuse to use products from the criminal cabal that is Google) you get the location:

The location of the photo on a map.

In a Bird’s eye view the coordinates disclose the location on the wrong side of the road, all of 30 yards out. Not bad.

Nova is on the other side of the road – pretty close!

So unless you have the latest and greatest in camera technology, a quick snap with your cell phone will allow you to save the GPS locations for your latest ‘shoot’.

Rotating your artwork display

Mirror retainers do the trick.

As any art museum creator what fraction of his inventory is on display at any time and you will learn that most of the catalog is in the basement. Museums rotate displays all the time, thus exposing new works from their basement for all to see and making the viewer’s repeat visit always fresh, without overloading the visual senses.

For large prints I have long standardized my mounts at a 22″ x 28″ size. This allows the use of like-sized mats with varying apertures, be they 8″ x 10″, 13″ x 19″ or 18″ x 24″. Traditionally I have glassed and framed these into what is a pretty costly ‘per print’ assembly, and a labor intensive one at that. At $70+ a framed, glassed original, two-thirds of the cost is comprised of the frame and glass.

I am moving away from this semi-permanent approach by using mirror mounts to hold prints on the wall. The prints are not glassed or framed. The mirror mounts run $2 a packet of four at the hardware store and the provided, ugly, drywall screws are replaced with 1″ roofing nails. These have a large, flat, shiny top and can be hammered into place in seconds, needing only a spirit level to get things aligned just so.

Mirror mount and roofing nail in place.

Using a 3/16″ mount and standard thickness mat, the mat + print + mount ‘sandwich’ can be replaced with another like-sized print in seconds, simply slid into place using the existing mirror retainers. The thickness of the sandwich is just right to allow the mirror mounts to gently hold things in place, the rest being done by gravity. The mat is glued to the mount using 3M Double Sided tape.

The finished display is simple and elegant, with the mirror fasteners sporting a pleasant Art Deco retro look. And, like that museum curator, you can switch what is on display with ease.

Redimat sells archival mounting board in 22″ x 28″ for $7.10 with mats running some $22.05 plus shipping. So call it $26 a print if bought in quantities of more than ten. That’s a lot less than a glassed, framed print will run you. It’s also a great presentation for those interesting in selling their work, requiring just the addition of a glassine envelope ($0.50) for protection when displayed in a sawhorse at an art show.

Want to distinguish a photographer from an equipment fetishist? Simply ask what percentage of his annual outlay is on gear compared to prints. The higher the percentage, the lower the quality of the work, for the most part.