Mac Pro 2009 Part XII

Power consumption, stress tests and diagnosis.

Power consumption:

Using the calculator here I input the components for the modified Mac Pro:


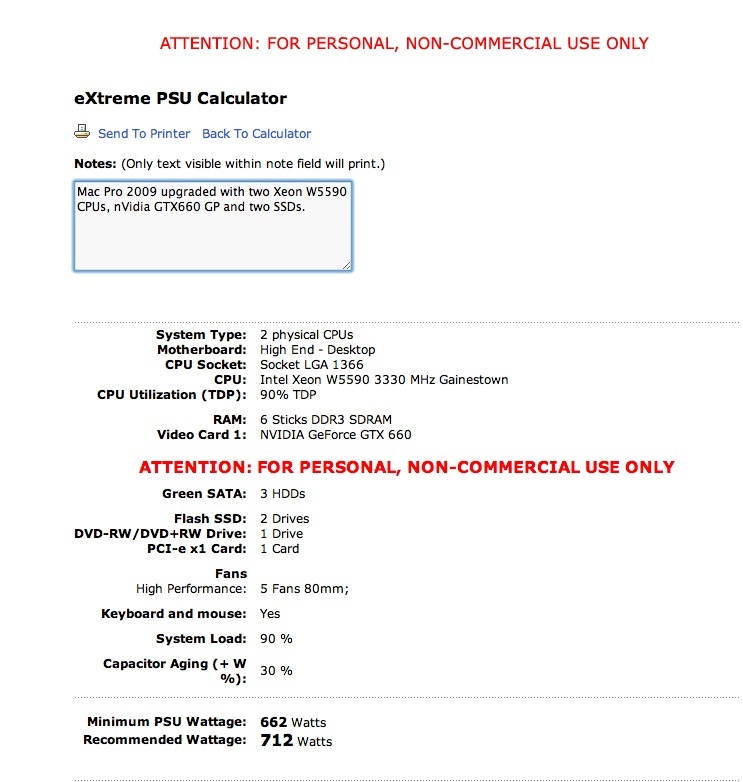
Worst case power consumption data.

This assumes everything is running flat out. The PSU in the Mac Pro is 980 watts maximum continuous power, call it 1,400 watts peak power, more realistic of real world ‘spiky’ power demands, so it’s comfortably able to handle even the thirsty W5590 Xeons. At a more granular level, the two backplane sockets for powered GPUs are limited to 150 watts total, with the PCIe slots capable of delivering an additional 75 watts, for a total of 225 watts. So a GPU like the latest nVidia GTX780, which can draw as much as 250 watts, is demanding unsafe power draws when maxed out. If in doubt, add an external power supply to power extreme GPUs. If you use two of these, external power is essential.

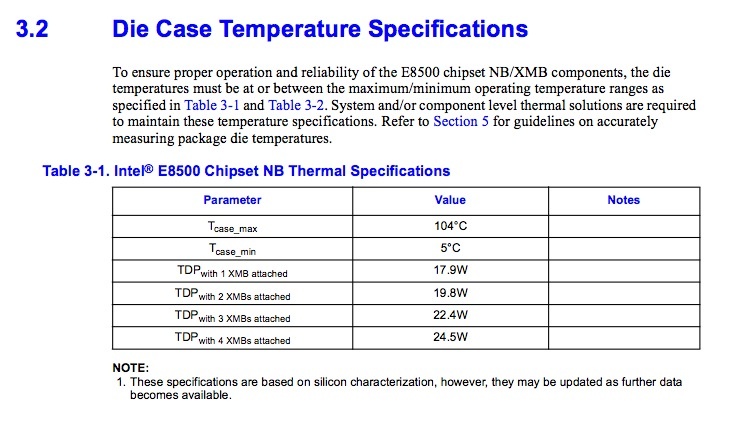
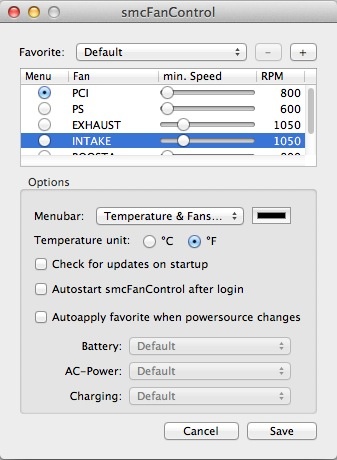
Using the stock E5520 Xeons (2.26GHz) the BOOSTA and BOOSTB fans (inside the two CPU heat sinks) run at 1100rpm. The E5520 have a Thermal Design Power (TDP) of just 80 watts, at which point the CPU is throttled back to prevent meltdown. By contrast the W5590 CPUs have a TDP of 130 watts, so they will run hotter under load. At idle, my CPU fans run at 1,650 rpm, considerably higher than stock. As these fans are buried inside their respective heat sinks and the exceptionally robust case is well sound insulated, the increased fan speed results in no discernible increase in noise, which continues to be approximately 44dB at ear level, two feet distant from the front of the Mac Pro, which stands out in the open to the left of my desk.

Other fan speeds (PSU, processor cage, PCIe space, GPU) remain unaffected by any of the enhancements made.

With the components shown above, my Mac Pro idles at 188 watts. Set to Sleep it consumes but 9 watts.

Stress tests:

Ordinarily I test stability by ripping a DVD then compressing it in Handbrake. While this really exercises the CPU and memory, it’s not the best test out there. Handbrake does not work every CPU core and thread to the maximum.

There is a Stress Test function in Geekbench. This application is ordinarily used to test CPU and RAM performance, but go to Geekbench->Benchmarks->Run Stress Tests and this is what Geekbench will do to your 16 threads, or how ever many you have:


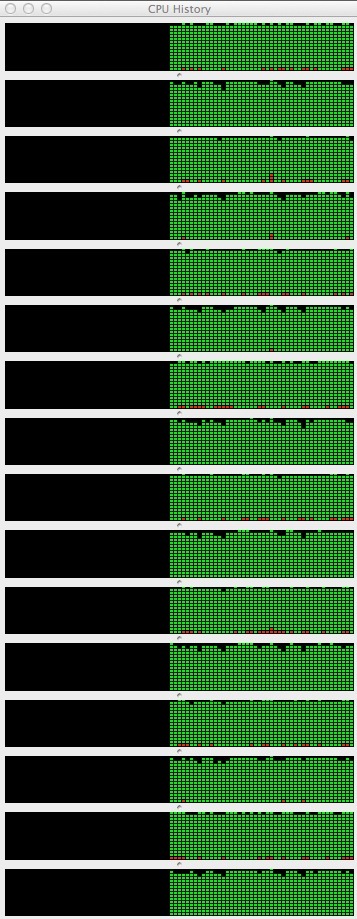
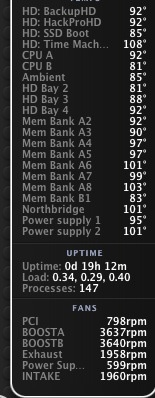
Stress Tests, viewed in Activity Monitor. Geekbench left, Handbrake right.

Well, I ran this Stress Test and after 30 seconds …. the Mac froze! No kernel panic, no messages, just frozen. Incidentally, trying Handbrake it froze also!

As all my memory was properly reported in System Profiler, my first thought was that there was an application causing the problem, yet removing applications one by one made no difference. The Mac Pro continued to fail the Stress Test. So it’s not an application issue.

Suspicion then fell on the memory as Geekbench tests both the CPU and the RAM. Four of my six 4GB sticks migrated from the Hackintosh where they had performed perfectly for 2 years. Two more were added recently to take advantage of the three channel Xeon CPUs which optimally address three sticks of RAM each. Three sticks for each CPU, for a total of 24GB.

So I pulled four sticks and ran the Stress Test, leaving just 8GB installed. Perfect. Stress Test passed.

Added back two more. Still perfect. Stress Test passed again.

Added the last two …. still perfect!

Conclusion? One or more of the memory sticks was not properly seated and was causing failure of the stress test. Quite how a stick can get improperly seated beats me, but it’s not the first time I have encountered the ‘badly seated memory sticks’ issue, although this is the first time I have been the victim.
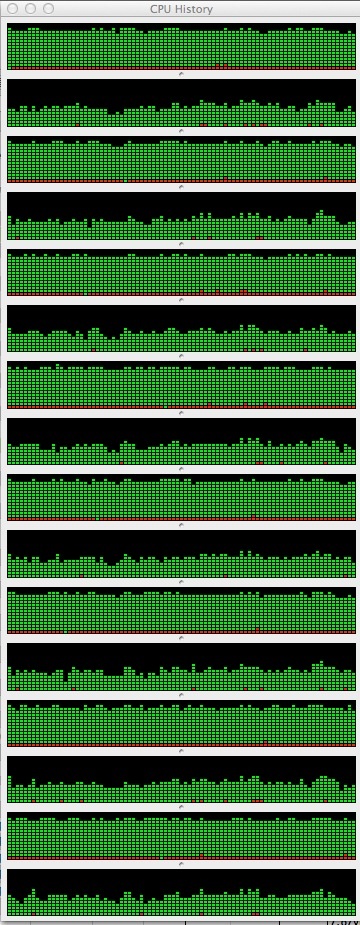
And the result?


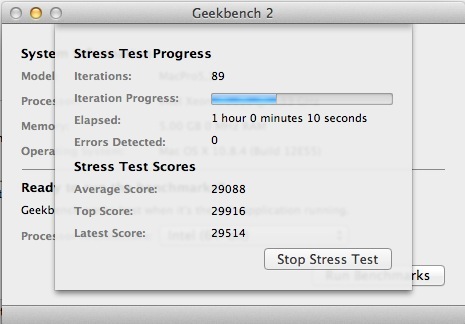
Passed with flying colors.

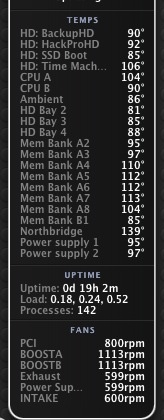
Temperatures? Benign – the highest I saw was 140F for one of the CPUs, everything else in the 100-110F range. The fans never broke a sweat despite the brutal nature of this test, running at minimum speeds throughout.

I’m now satisfied the Mac Pro can take just about anything I can throw at it.

The Diagnostic process:

With a host of variables in play the only way to diagnose issues is to remove or replace one variable at a time. For example, to pull memory sticks and close applications at the same time would be a pointless process. If the issue was solved as a result, you would not know which was the cause of the problem. It may seem slower to work one variable at a time, but, net, it’s the fastest diagnostic approach.

By the way, all that pulling and replacing of memory sticks is hardly onerous in a 2009 or later Mac Pro. The design makes the removal and replacement of the processor/RAM assembly a speedy affair.

With the dinosaurs

Stunning recreations.

The local fairground has a show featuring animatronic dinosaurs in full size, so my boy and I could not resist the opportunity of checking out these denizens of the Jurassic and Cretaceous periods.


Not everyone enjoyed the roaring sounds.


Winston holds his triceratops. The ‘real’ thing is behind him.

Nikon D3x, 35mm f/1.4 Sigma at f/1.4, ISO800.

As the data disclose, the lighting was very poor, a problem which the wonderful Sigma dispatched with aplomb.

Mac Pro 2009 Part X

Temperature issues.

For an index of all my Mac Pro articles, click here.

Long time readers will recall that what drove me to using a Hackintosh five years ago was that I managed to fry the GPUs in three iBooks and two iMacs in quick succession. The last two were just out of warranty, naturally, and my efforts to better ventilate the nVidia 7300 GPUs and then to replace the 7300 in one with a 7600 all failed. Further, Apple denied any cooling issue existed even though their own discussion boards were replete with complaints. This led me to put out the iMac in disgust to a location better suited to its abilities:


The garbage awaiting collection

Thus it comes as no surprise that I have kept a watchful eye on operating temperatures ever since and even though the Mac Pro comes with state-of-the-art cooling, it’s a hard habit to shake.

The purpose of this piece is to address Mac Pro temperatures and suggest one minor enhancement.

The Mac Pro is exceptionally well cooled, with six fans in the 8-core model. (The 4-core has five, as it has one processor, not two). One pair of fans cools the processor cage in a push-pull configuration, each massive processor heat sink contains a fan, the PCIe fan cools the space occupied by the PCIe cards and disk drives and the large 980 watt power supply has its own fan.

The other day I ripped a movie then compressed it using Handbrake. That’s a stressful process which exercises all 8-cores in the two Intel Xeon CPUs used in the 8-core Mac Pro. It was an exceptionally warm day and the Ambient (case vicinity) temperature reported by iStat was 90F. All the operating temperatures of the various monitored components were fine, running in the 120F range, but with one exception. The Northbridge chip was reporting 165F. The fans did not spool up and the job ran fine, a full length uncompressed movie being reduced to a compressed iPad M4V version in 25 minutes. Nice.

Well, I did some reading of chat boards and they were – how to put this politely? – innumerate.

Thus, I went to the source, the excellent Intel web site, to check on the Northridge thermal specifications. Northridge is the chip which controls communications between the CPU and RAM, and Wikipedia has a fine piece on it here. Note that the increasing drive to integration saw the Northbridge chip move within the CPU case by the time Intel produced the later Sandy Bridge CPUs, which is what my Hackintosh used.

Intel’s thermal specs provide the definitive answer in their Northbridge Thermal Guide. Here’s the key extract:


Northbridge temperature limits.

I’m strictly a Farenheit guy and water boils at 212F at sea level in my world, so Intel’s 104C converts to 219F as the case temperature limit for the Northbridge chip. One commentator on a chat board stated he removed the chip and refreshed the thermal paste, but the loss was only 4F, which hardly seems worth the effort.

Nonetheless, as I never like to see high temperatures, I did some measurement. Here’s my iStat reading with the Mac Pro just doing some modest surfing:


Stock, static temperatures.

I then fired up SMCFanControl, which you can download free – click the link, and increased the fans speeds of the processor cage Intake and Exhaust fans from 800rpm to 1050rpm, thus:


Intake and exhaust fan speeds.

The processor assembly is the part-withdrawn assembly in the picture below (4-core above, 8-core below), holding the two CPUs, RAM and, yes, that hot Northbridge chip. There are two CPU fans within the heat sinks on an 8-core machine, named BOOSTA and BOOSTB, the first barely distinguishable in the image above:


Processor assembly partly withdrawn.

This assembly nests within the processor cage which I earlier removed to install an Airport card on the backplane board:


The ever diligent hound guards the processor cage.
Note how the fans have been moved in 1/2″ toward the center of the cage.

Those fans, which work in a push-pull configuration, are the ones we want to speed up if more air flow is to be directed over the Northbridge chip.

The modest speed increase for the minimum fan speeds from 800rpm to 1050rpm resulted in a 1-2dB noise increase at my working location, in practice barely detectable. But the benefit in terms of Northbridge temperature drop was excellent:


Northbridge temperature
drops 24F after modest fan
speed increase.

That’s a good noise:efficiency trade-off in my book and I’m leaving those two fans at that speed.

To satisfy curiosity, I cranked those two fans up to 3600+rpm, resulting in an unnacceptable noise level of 60dB. Not for daily use, but handy if you need quick cooling on a stressful task in excess of that offered by the automatic variable speed fan controllers in the Mac Pro. The Northbridge now dropped from 139F stock to 101F:


The fans cranked up.

Bottom line? For the temperature-obsessed, like me, a slight increase in fan speed to 1050rpm from the stock 800rpm for the intake and exhaust fans on the processor cage provides peace of mind.

It’s hot and I want to leave the cover off:

That is a bad idea. The Mac Pro’s massive alloy side cover plate is part and parcel of the thermal design. Look hard at the inside and you will see insulating rubber gaskets which seal the enclosure when the cover is in place.


The rubber seal inside the Mac Pro’s side cover.

With the cover in place the tunnels formed by the cover are completed, presenting a side-sealed conduit for the push-pull processor cage fans, resulting in optimal cooling. Leaving the cover off actually compromises cooling performance. Do not do it.

Mac Pro 2009 Part IX

The value proposition.

For an index of all my Mac Pro articles, click here.


The Mac Pro’s interior – engineering elegance redefined.


The interior of the Hackintosh –
made by the same people who assembled Fiats in the 1960s.

Here I take a quick look at the differences in the cost of acquisition between an used 8-core 2009 Mac Pro and a new Core i7 Ivy Bridge Hackintosh.

I am focusing on differences only. Displays, memory, SSDs, hard drives, GPUs, keyboards, mice, cables and so on are identical for like-equipped machines and can cost as much or as little as you desire.

The comparison commences with an 8-core 2 x 2.26GHz Intel Xeon 2009 Mac Pro, at the price I paid. The only additions to the chassis to make things comparable are a used Airport card, with the GT120 stock GPU being sold. Both machines can use a GPU of choice – it’s not a component of difference.

The stock twin Intel Xeon CPUs in the Mac Pro deliver performance identical to an Ivy Bridge i7. They can be readily upgraded for less than $500 for a 50% boost in performance – the Xeon is not easily overclocked. The Ivy Bridge is pretty much maxed out stock, though the unlocked version can be overclocked for maybe a 25% performance gain. At that point the Mac Pro will be the faster machine, and will be considerably superior on multi-threaded operations.

The Mac Pro is stripped of dated components including its memory, hard drive and the GT120 graphics card, the latter still in production and commanding a good used price. That GPU is a dated slowcoach, not up to modern demands.

Now you can see why a Hackintosh no longer makes economic sense. The Hack’s Corsair Obsidian is a nice case, but at 25lbs of pressed steel to 41 lbs of machined alloy it cannot hold a candle for quality, robustness or modularity to the Mac Pro. For that matter, nothing can. The Mac Pro has to add USB3, built-in on the Hack’s Gigabyte motherboard, whereas everything in the Hack – PSU, motherboard, CPU, cooler, fans and so on, is extra.


Elements of difference – Mac Pro vs. Hackintosh.

The cost is near-identical between the two machines but the Mac Pro owner, in addition to pride of ownership, never has to tinker, hack or worry about OS upgrades. He will never know the misery of ‘Boot0’ errors or arcane fixes to get online to the AppStore. He will also enjoy a resale value exceeding 80% of cost whereas the Hack owner will lose 50% over the next 3 years. While a well engineered Hackintosh can be reliability personified – mine was – any major OS change involves much research, reading and delay before implementation, for fear of breaking something. The Mac Pro user, by contrast, simple clicks on the ‘Upgrade’ box. What’s your time worth?

The Mac Pro buyer’s biggest issue is finding a nice, clean 8-core machine – a task made no easier by my series of articles on the value offered! After that, he’s ahead of the game economically, psychically and operationally.