A few changes.
Five years ago I published one of those Q&A sessions you see occasionally in the press, so it’s fun to revisit that and see what has changed. Where there have been changes the older answer appears in parentheses.
Who Inspires You: Cartier-Bresson, Erwitt, Penn, Parkinson
Favorite (re)discovery: Old Nikon MF lenses. (Digital imaging)
Best gadget ever: The iPhone. (Those clip on eyes for the old Leica M mount 50mm DR Summicron)
Best camera you ever used: Nikon D2X. (Leica M2)
Best lens ever used: 50mm f/1.4 Nikkor-S, MF made in the 1960s. (A tie. 90mm Leica Apo-Summicron-M Asph/Canon 85mm f/1.8)
Best picture ever taken: The one I just snapped. (Darling, there are so many it’s impossible to say)
Most capable camera you ever used: Nikon D700. The 5D’s capabilities with better build and a far better sensor. (Canon 5D which I use to this day. A jack of all trades and master of most)
Best computer for photography: My Hackintosh HP100+ built by my buddy FU Steve (New question and answer).
Favorite photo venue: The Mission District, San Francisco. (The streets of Mayfair, London, preferably on a sunny day)
Favorite watch: My Patek Philippe Nautilus. (Any Patek Philippe; an Audemars Piguet Royal Oak for sports wear)
Favorite champagne: None, I no longer drink the stuff. (Bollinger NV)
Jeans: Levi 501 button fly. The classic.
Favorite writing instrument: The Bic Cristal ball pen. Another classic.
Shirts: Ralph Lauren. (Brooks Brothers and L L Bean)
Suits: I no longer wear a suit. (Paul Stuart, Madison Avenue)
Favorite restaurant in the whole world: Ristorante Rocca, Burlingame, CA, where I am amongst friends. (La Grenouille in Manhattan, but only if I have a gorgeous brunette to accompany me. On my own it would be any McDonald’s whose stock and food I adore)
Most exciting location you have ever dined in: Windows of the World, 107th floor, World Trade Center, north tower.
Favorite car: Ferrari. It has avoided me so far and somehow continues to do so.
Photographic ambition: A biography of the best of the best in photography, made as a movie documentary, with a highly opinionated voice-over by yours truly, of course.
Greatest fear: That soon 51% of US voters will be working for the government
Favorite leaders: Churchill for his courage, Reagan for his optimism, Thatcher for her determination, Golda Meir for her guts.
Favorite actresses: Meryl Streep, Diane Keaton, Rachel Ward, Claudia Cardinale, Eva Green. (Rachel Ward, Claudia Cardinale, Eva Green)
Favorite actors: Brad Pitt, George Clooney. (Who cares?)
Favorite city: Los Angeles. (Beverly Hills. A focus of vapidity in a sea of pollution)
Least favorite thing to do: Listen to some moron vent about politics. I never fly. (Commercial air flight)
What you do to relax: Read women’s fashion magazines – Vogue, VF, Bazaar, Elle. Walk my dog. Watch Formula One. Read philosophy.
Person who irritates you most: Anyone in, or running for, public office.
The greatest crime in a free society: The religious right. (The Income Tax)
The greatest influence on you as a photographer: Caravaggio
Painters who mean most to you: Caravaggio, Giorgione, Mantegna, Ucello, Corot, Manet, Degas, Seurat, Sisley. (Caravaggio, Giorgione, Mantegna, Ucello, El Greco, Gericault, Corot, Manet, Degas, Seurat, Rothko)
Favorite music: Chopin, though I rarely listen to music. (Chopin when I’m depressed. Mahler when I’m really depressed. The Rolling Stones when I’m recovering)
Favorite dog: Any Border Terrier, but especially mine.
Favorite musician: Horowitz
Favorite composer: Chopin
Favorite woman: The one I wake up next to.
Favorite photo: The one I haven’t seen or taken yet.
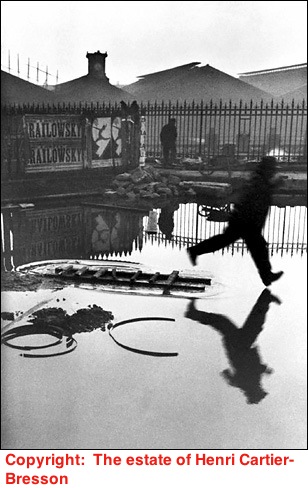
Favorite photo you have seen: I suppose it has to be The Great Brailowsky. HCB at his luminous, spontaneous best.