How we spend money.
This may seem a bit dry but bear with me.
The CPI is the US Consumer Price Index which is a US government scam used to fool most of the people most of the time. The stated uses of the CPI appear on the government’s web site as follows:
- As an economic indicator. As the most widely used measure of inflation, the CPI is an indicator of the effectiveness of government policy. In addition, business executives, labor leaders and other private citizens use the index as a guide in making economic decisions.
- As a deflator of other economic series. The CPI and its components are used to adjust other economic series for price change and to translate these series into inflation-free dollars.
- As a means for adjusting income payments. Over 2 million workers are covered by collective bargaining agreements which tie wages to the CPI. The index affects the income of almost 80 million people as a result of statutory action: 47.8 million Social Security beneficiaries, about 4.1 million military and Federal Civil Service retirees and survivors, and about 22.4 million food stamp recipients. Changes in the CPI also affect the cost of lunches for the 26.7 million children who eat lunch at school. Some private firms and individuals use the CPI to keep rents, royalties, alimony payments and child support payments in line with changing prices. Since 1985, the CPI has been used to adjust the Federal income tax structure to prevent inflation-induced increases in taxes.
The reason I refer to the CPI as a scam is that I’m the one who does the grocery shopping chez Pindelski and I have been seeing the grocery bill rise steadily over the past year, despite the government’s lofty pronouncements that the nation is threatened with imminent deflation which is why they are printing ever more money. I’m also an investor, which is what I do to allow me to afford those groceries, and it is not lost on me that global commodity prices for everything from aluminum and palladium to corn, wheat and soy beans have been going through the roof. But if you read the above uses (especially the third bullet) of the CPI and you run the government, it is very much in your interest to misstate the statistic erring on the low side. It suggests you have inflation under control while simultaneously allowing you to deny pay raises to a host of workers and pensioners.
Anyway, these were the thoughts that prompted me to check the components of the US CPI to better understand what’s going on. Well, it’s pretty obvious when I tell you that housing and rent comprise no less than 40% of the index and unless you are blind, deaf and dumb, it will not have escaped your notice that US house prices have been falling 20% annually for the past two years, thanks to the bubble blown by the criminal cabal that is Wall Street. Now 20% of 40% is 8%, so right there you have an 8% drop in the CPI; with the government telling us that CPI is rising at 2% annually, that means that everything else is rising at 16.7% for the math to work ( (8+2)/0.6 = 16.7 ). Aaah!, now I understand what’s going on and why our grocery bill is rising so steeply.
While nosing around the Bureau of Labor Statistics web site I delved into the CPI some more and, lo and behold, ‘photography’ is in the index! It’s in the Recreation section which accounts for a total weight of 6.437% – here’s how that section breaks down:
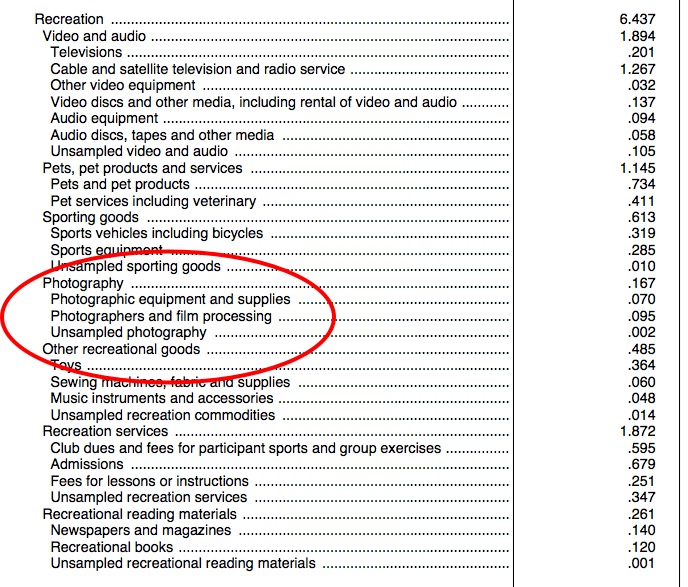
Recreation and photography in the CPI.
So Americans spend about eight times as much on cable TV as they do on photography. They spend in a similar ratio on their pets! It’s also depressing to note how little is spent on books – near the bottom of the table.
Well, the point of this column is not to harangue with tales of government lies; you already know that your government lies to you, no matter where you reside. Rather, it’s to place focus on some interesting data on how much we spend, as a nation, on taking pictures relative to other pastimes, most of which are passive, meaning TV and sports. In one simple table you can learn more of the interests of a nation than any amount of subjective chatter will provide and, yes, we are living in a high inflation economy whose housing stock remains greatly overpriced.