A pastoral interlude

The charm of central California’s wine country.

After the overwhelming power of yesterday’s picture, something more placid is called for. Nothing is finer than a gentle drive on the traffic-free back roads of central California’s wine country, which happens to be where I live.

And this little bit of nothing was a nice little something to chance upon. No drama. No message. Just some gentle beauty.


Central California wine country. 5D, 85mm, 1/1000, f/8, ISO 250. Processed in Lightroom.

With that combination of camera and lens, Canon could fairly claim, as Kodak did a hundred years ago, “You take the picture, we do the rest”. Processing was limited to the addition of a bit of vignetting, using Lightroom’s sliders to make the subject pop.

Some mood music helps, so why not the best?


Chopin, Mazurka in B minor, Op. 33 #4. Horowitz.

Arnold Newman: Evil

Arnold Newman got it right.

Some three years ago I wrote about Karsh’s wonderful portrait of Churchill, a portrait which is very much a confirmation of the man’s qualities. The unyielding, courageous bulldog. To say that it had an impact on me is an understatement. Our son is named Winston.

But there’s another portrait of a powerful man which needs to be mentioned, though the subject in this case is at the opposite end of the moral scale. It’s by Arnold Newman.

While Newman excelled at powerful pictures of powerful men, never did he surpass the portrayal of evil than when he took the picture of the exemplar of that trait, Alfried Krupp.

Now quite what the Krupp Steel PR machine was thinking of when they had a famous Jew photograph a famous Nazi is hard to understand, but Newman did not let them down. Krupp, for those not up on him, used slave labor to produce the Nazi machines of war in his steel works and, worse, got away with it.


The personification of evil

A magnificent picture which need no words from me.

Tracking warranties

iCal to the fore!

I explained – and quantified – why the arithmetic of extended warranties on consumer gee-gaws made it a slam dunk for the writers of the insurance and a losing proposition for the buyers here. So photographers should know when the warranty expires on their latest camera or lens.

Machines fail when very new or very old/very used. No secret there. Look at light bulbs. Cars. Cameras.

Which brings me to tracking warranties.

As I have recently written, my trust in Apple quality control has been severely shaken over the past year when my new MacBook, Extreme router and wireless keyboard all broke down during the (measly) one year warranty period. In each case I had to scratch around to determine whether the first year of ownership had passed. Apple is a key photographic tool vendor for this user.

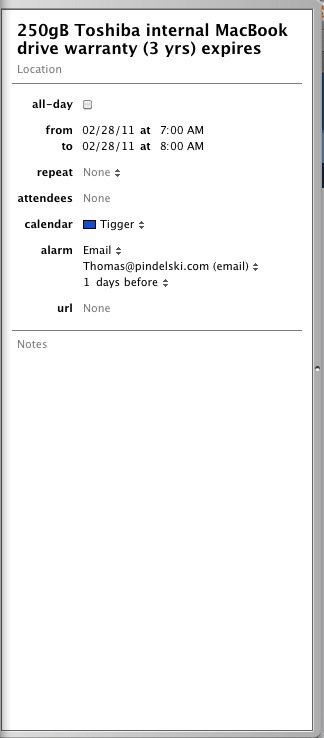
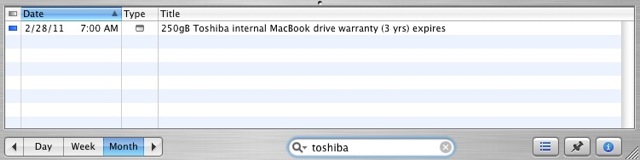
Then it struck me. Might as well use Apple’s own tools to track their failures and warranties, so now any time I buy a new toy, the warranty expiration date goes right into iCal with an email reminder to me. And if I do want to check, I simply search iCal for the name of the gadget.

So, Toshiba, I’m not about to forget about the three year warranty on that new hard drive. No way.

To make matters easy, all the receipts go in a three ring binder in chronological order. Easy.

And if I do want to check if something fails, or find the date of the invoice for a warranty claim, I simply search iCal for the name of the gadget – Apple-F in iCal.

So watch out, Apple, Toshiba, Canon, Panasonic, big screen TV maker, et al. You are being watched. Though, in fairness to all but Apple in that list, these manufacturers’ products have been failure free.

There is one far more important reason however, and it is a life saver.

This technique has saved half my net worth on more occasions than I can name. Now that I no longer have a secretary charged with reminding me of these things. To be safe, I put in vital dates twice, with two week and one day reminders. Who said computers don’t save you money?

Lightroom and round trips

To Photoshop, that is.

While the slightly up-tilted camera distortion is not that bad here, a quick round trip (Command-E on a Mac) from Lightroom to Photoshop CS2 and a few seconds with the ImageAlign plug-in sets things dead straight. Command-S in CS2 saves the corrected version as a TIFF file in Lightroom. ImageAlign is not just for de-fishing fisheye snaps!


Cropping of the perspective-corrected result in Lightroom – a superbly implemented tool.

Here’s the before and after – a subtle change but worthwhile:

Here’s the final result. Magical late sunlight. California sky.


Tough neighborhood. 5D, 20mm, 1/750, f/11. ISO 250.

You can see some lens vignetting but I left it uncorrected as it heightens the center of interest. My shadow works – at least for me!

The power of RAW

Two stops under does the trick.

Because very high dynamic range pictures will result in burned out highlights, notwithstanding the fine CMOS sensor in the Canon 5D, I underexposed this one two stops (spot metered on the sky) then brought the detail in the foreground back with the processing controls in Lightroom. Here’s the Before and After – a very well engineered function in Lightroom allowing all sorts of comparisons.


Lone oak. 5D, 20mm. 1/4000, f/8, ISO 250. RAW.

As the controls in Lightroom indicate, I had to add substantial noise reduction and sharpening. As the sun was directly behind the tree, regular exposure would have made the branches unrecoverable – sort of like halation in films of days past. This magnitude of correction could not possibly be done in a Jpg file. The histogram testifies to the complete absence of burned out highlights – there’s no crowding at the right end.


Adjustments made in Lightroom.

I also boosted the Tone Curve substantially in the shadows – this control is perfectly implemented in Lightroom – I used the small pointer tool, which you can see at the top left of the following screen picture,allowed me to see the tone curve in the shadow range by placing the pointer in the foreground of the picture. This helped me determine where to adjust. The dotted line shows the reference starting point.

Here’s the final result after slight straightening of the horizon – the sunlight was quite blinding and it was not easy to see much in the viewfinder!

Once stopped down the rather ‘iffy’ Canon 20mm lens is free from color fringing, so no lens corrections were needed.