Monthly Archives: June 2006

Kodachrome

Everything looks worse in black and white

Smirking with ridiculously self-satisfied glee at a joke he has just told to the wife of one of his flunkies, Hitler reaches for the cookie bowl. His pasty faced complexion contrasts strangely with the tanned, Aryan health evidenced on the woman’s beaming face, her gingham dress replete with red and white stripes.

Turn the page and there’s a post-Bitzkrieg Warsaw in September, 1939, its ancient buildings just so much rubble, with a proud, well fed line of Wehrmacht soldiers guarding their spoils, grey helmets shining in the sun, the sky a pure azure, doubtless wondering about that evening’s forthcoming excesses at the cost of their Polish captives.

One more page and Rotterdam is in ruins, one hour after the German bombardment, the sky a threatening dark indigo this time.

One more page and it’s the turn of the French, surrounded by German troops, brown shirts everywhere.

Yet another page and there’s a rotund, self-satisfied German actress in Hitler’s Chancellery, massive gold necklace and ruby red lips glistening just so in the Berlin of 1940. Enjoy it while you can, baby.

The sheer depressing nature of these pictures, blow after blow after blow, each speaking to the Master Race’s self-pronounced superiority, has a strange way of jolting the viewer into reality. Suddenly you are wide-eyed with amazement when you realize all these pictures, by unnamed photographers, were taken on Kodachrome.

Many, many years later Paul Simon was to crystallize the essence of this very American invention in the lyrics of his song. He was doubtless writing about the demise of TriX:

When I think back
On all the crap I learned in high school
It’s a wonder
I can think at all
And though my lack of edu—cation
Hasn’t hurt me none
I can read the writing on the wall

Kodachrome
They give us those nice bright colors
They give us the greens of summers
Makes you think all the world’s a sunny day, Oh yeah
I got a Nikon camera
I love to take a photograph
So mama don’t take my Kodachrome away

If you took all the girls I knew
When I was single
And brought them all together for one night
I know they’d never match
my sweet imagination
everything looks worse in black and white

Kodachrome
They give us those nice bright colors
They give us the greens of summers
Makes you think all the world’s a sunny day, Oh yeah
I got a Nikon camera
I love to take a photograph
So mama don’t take my Kodachrome away

Mama don’t take my Kodachrome away

Mama don’t take my Kodachrome
Mama don’t take my Kodachrome away

Mama don’t take my Kodachrome
Leave your boy so far from home
Mama don’t take my Kodachrome away
Mama don’t take my Kodachrome

Mama don’t take my Kodachrome away

And if you want to catch the spirit of the piece, go no further than the lovely Coneheads on DVD, to see what I mean.

The Leica may have been the greatest machine invented for photography, and its gritty, grainy black and white film stock enshrined an era seen through the eyes of street photographers everywhere. But the snaps were not color. And pragmatic Americans, ever looking for the latest gadget, the true reality, wanted color. So Kodak gave them Kodachrome.

The single greatest photographic invention since the Leica.

The book is ‘Kodachrome, 1939-1959, The American Invention of our World’, and you can get it for chump change from Amazon.

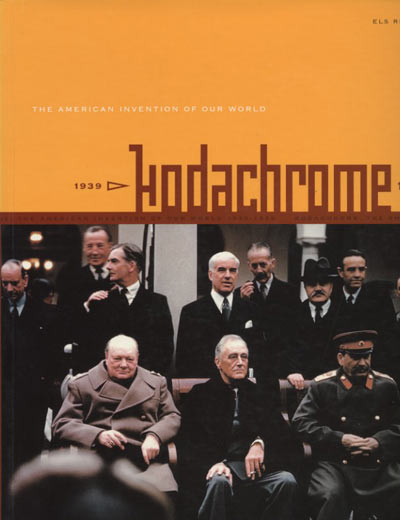
Yalta, 1945. Stalin decides the future of Western Europe while WSC and FDR look on. Click the picture.

It is, perhaps, unfair to refer to this as Kodak’s invention, though Kodak deserves credit for letting two professional musicians, one a pianist, the other a violinist, take up laboratory space in upstate New York in 1930. Leopold Mannes and Leopold Godowsky, Jr. just happened to be keen amateur photographers and geniuses at chemistry. Clearly, God did not allocate talent equally. After thirteen years of research, Kodak announced Kodachrome on April 12, 1935 as the first continuous tone color film. Imagine a thirteen year development cycle for anything today.

That early emulsion faded badly but by 1938 the Leopolds (‘Man’ and ‘God’ as they were known in Rochester) got it right and the Kodachrome you can still – if only just – buy today is little changed. Best of all, unlike any other color film ever made, processed and properly stored it is virtually fade proof. History may not record how Mannes and Godowsky felt about their emulsion being used to photograph the creator of the Final Solution, but the oh! so satisfying picture of German prisoners of war in a prison cage on Normandy beach (page 44) doubtless warmed the cockles of their hearts, especially as it was taken on the emulsion they created.

Kodachrome in 1938 was some 12 ASA in speed. Later, as Kodachrome II it became 25 ASA, where it stayed until being discontinued, now as Kodachrome 25 (I suppose that sounded faster) a couple of years ago. Meanwhile Kodak had also added Kodachrome X (later Kodachrome 64) and Kodachrome 200. For years, such was the repute of this emulsion, National Geographic would only accept Kodachrome slides for reproduction in its pages.

Jane Russell frolicked in the hay for all to admire for a poster for her film ‘The Outlaw’ in 1944. Howard Hughes, who bankrolled the movie, famously remarked “There are just two reasons to go and see her”, summarizing succinctly what every American male was thinking. Americans were happy in 1944, if not gay, and Kodachrome captured Jane’s …. womanhood just so. No one organized a protest, men continued to eat red meat and smoke Marlboros, and women had 2.4 children and craved a starter home in the San Fernando Valley, north of Los Angeles. Political correctness, refuge of cowards and lawyers, had yet to raise its ugly head. Marlene Dietrich looked ravishing in Kodachrome and jewels in 1948 (it’s OK, she was on our side) and General Douglas MacArthur could look macho in his jeep in 1950. Doubtless the vain General liked what Kodachrome did for him, even if Harry Truman later fired him for insubordination. Too bad we don’t do that with the generals today.

So a vital part of the chronology of American life, of what it meant to be American, is recorded for all time on fade free Kodachrome, in true colors that tell how it was.

There’s Elizabeth Taylor, ravishing in a white dress. The young JFK with Jacqueline Bouvier, film stars both, enjoying a game of tennis. Brooklyn Dodger Jackie Robinson helping destroy one of the last great bastions of White American bigotry, baseball. Marilyn entertaining the troops, her generous lines lovingly rendered. Hitchcock looking like … well, like Hitchcock, ruddy pink face and cigar. Kodachromes all. The El still ran in New York and Kodachrome proves it. Gamine Audrey Hepburn and blowsy Jayne Mansfield showed their true colors. Tarty Shirley MacLaine juxtaposed with a sneering Elvis. Zapruder used Kodachrome in his 8mm movie camera to record JFK’s murder in Dallas. Tricky Dick tried to look like presidential material next to Ike. Not very successfully, let it be said. Even Kodachrome could not hide the fact that his sly smile might just be something to worry about. And even the great Walker Evans got in on the act with a storefront snap in Kodachrome, though in this instance it’s only fair to add that he should have stuck to black and white.

I used Kodachrome exclusively during the period 1977 through 1990. The absence of grain, the consistency of processing by Kodak, the tonal range and color accuracy, all were simply wonderful. Eventually color negative films would rival, maybe surpass, these qualities, and once you could scan the originals and save them to properly backed-up hard disks, fading ceased to be an issue. For in much the same way as I used TriX during the years 1971-1977, Kodak showed what world class products were all about.

You can still get Kodachrome. K25 is no more and Kodak doesn’t want you to know about the alternative as evidenced by a search on their web site:

But go the the B&H web site and Kodachrome 64 can still be had in 35mm cassettes, in 64 and 200 ASA speeds. Only one lab remains in America that can perform the wildly complex processing of this emulsion, and the lovely 120 film size disappeared years ago, as I found to my cost. Unearthing two rolls from the dark recesses of the film shelf in the fridge the other day, it transpired that no one, not even Kodak UK, processed this size any more. Oh! well, I had to throw them out. Just think, through the late 1950s you could get Kodachrome in sizes up to 8″ x 10″. Imagine that. Today it’s 35mm or nothing.

And the inventors? Kodak’s historians have wiped them from the memory banks. Search on Mannes or Godwosky and you get nothing. Shameful.


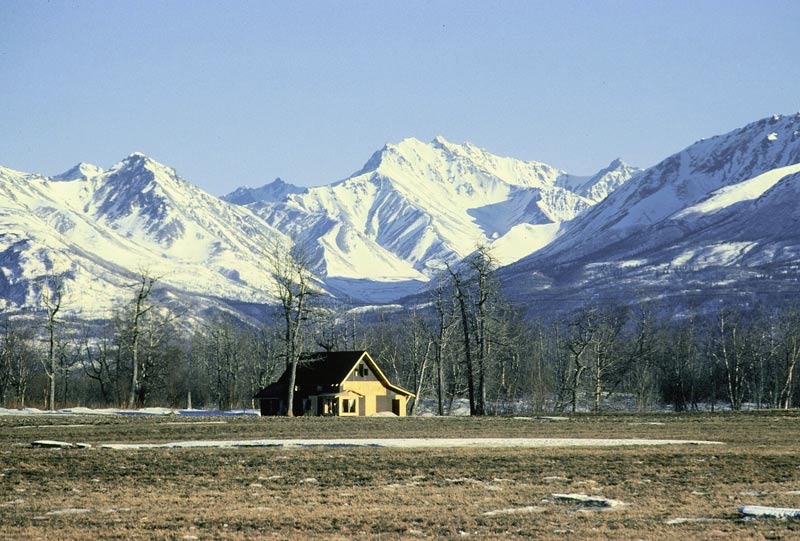
Matanuska Valley, Alaska, 1978. Leica M3, 50mm Summicron. Kodachrome II.
Taken by this newly affluent immigrant shortly after arriving in America.
At last I could afford not just color film, but Kodachrome, no less.

So if you still use film but have never used Kodachrome, please rush and get one of the remaining rolls now. Your scanner’s dust removal software will not work (silver is required in the emulsion for that and Kodachrome has none), it’s not especially fast by today’s standards, but do you really want to go to your grave and say “I never used Kodachrome?”. No, I didn’t think so.


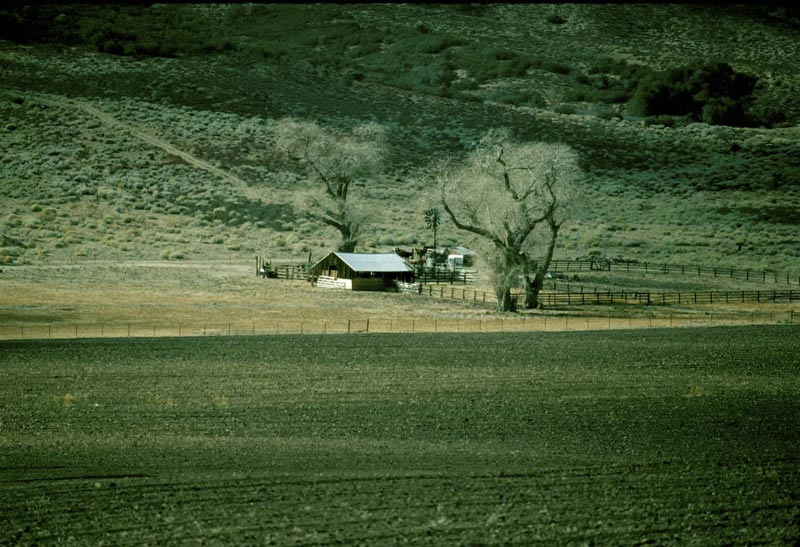
Lake Elizabeth, California, 1990. Leicaflex SL, 180mm Apo-Telyt-R. Kodachrome 64. One of my
last Kodachrome pictures. After that, scanners became affordable and Kodak color negative film,
impermanent as it may be, provided a far faster processing turnaround.

It’s the software, stupid

Software can yield far greater improvements than optics.

You might fairly accuse me of worshipping at the altar of the gods in Wetzlar when it comes to optics. For the last 75 years of the twentieth century, Leitz Wetzlar, as it was most of that time, created two great cameras – the screw thread Leica and the M3 and its variants – and dozens of the best lenses known to photographers. And while I may have moved away from Leica rangefinder cameras in the absence of a digital option, I have had the rare pleasure of using many of Wetzlar’s lenses on my rangefinder and reflex Leicas.

My first Leica lens was the 50mm Elmar. It’s sole limitation was the boob behind it pressing the button on the M3. Twist the mount counter-clockwise and the lens neatly collapsed into the camera body, passing for what was compact back in 1971 when I got mine. August 2, 1971 to be exact. The 90mm Elmar and a superb 35mm Summaron followed. In each case these were the ‘beginner’s’ option (meaning cheap, by Leitz standards), and only years of hard work later did a Summicron grace the M3. That was the incomparable 50mm Dual Range, the brass mount having last seen duty as the main engine bearing in a Panzer tank. And I’m afraid that mention of any of the dozen others that came and went would be a tedious exercise in the overuse of superlatives. For the M these included the 21mm Asph Elmarit, the 35mm Asph Summicron, later and mercifully lighter versions of the 50mm Summicron, a 90mm Elmarit, Tele-Elmarit, Elmar-C and Asph Apo-Summicron, a 135mm Hektor, Elmar and Apo-Telyt, 200mm, 280mm and 400mm Telyts, and on and on. Each magical in its own way.

Map reader. 1973. Leica M3, 50mm Elmar, TriX/D76.

For the most part, these lenses were designed the old fashioned way. Hard graft with calculators and logarithmic tables, long hours melting ever more exotic glasses, interspersed with occasional bouts of sheer lunacy. The ‘we made it because we could’ lenses like the original 50mm f/1.2 Noctilux with its aspherical grinds, the NASA commissioned 180mm f/3.4 Apo Telyt R which finally brought the red spectrum in line with the rest of the colors to give an image of startling definition, the fabulous 75mm f/1.4 Summilux (if only you could focus it right – that sort of thing needs an M3 vewfinder!). And while computers played an increasing role in the design of later lenses, the long heritage of optical excellence at Leitz, Wetzlar, West Germany saw to it that they were programmed right. The reality is that if lenses for 35mm cameras can get any better no one will notice as the magicians at Wetzlar had long ago exceeded anything film could resolve.

These thoughts have been coursing thorugh the old brain increasingly as I look at the modern processing workload. Now bear in mind that this is coming from someone who adopted a beginning to end pure digital workflow only earlier this year with a Canon 5D. Until then it was film + scanning, which took over from film + color lab, which in turn had supplanted film + darkroom/bedroom. And what strikes me most is how much software has become a dominant part of picture processing.

Start with the in-camera software that tells the sensor RAW or JPG, maybe with various amounts of contrast, sharpness and other processing included. In to Aperture or Photoshop where chromatic aberration (color fringing) at the edges has to be repaired. Then the barrel distortion has to be removed at the wide end of the zoom. Another tweak and the vignetting is gone. Three aberrations I simply do not recall having to deal with in the days of the Summicron and its brethren. Because if they were present, they were not visible. So on that scale, I suppose, one would rightly argue that Canon lenses simply do not hold a candle to those from Leitz Wetzlar. OK, so you have to laboriously manually focus the Leica lens, and the aperture is manual and the only way to zoom is to walk closer or fall in the water…. But from the sheer standpoint of optics, if I had to bet my life on resolving power and freedom from aberrations, it would have to be Leica every time.

The reality is, it no longer matters. Good software can correct all those problems in seconds. Further, because the digital ‘film’ in the 5D is far superior to the one from Kodak which I used in the M3, the overall result is better in every conceivable way, and it’s mostly due to software. I believe designers are getting the message. Increasingly we are seeing new technologies like image stabilization add more definition than any film based user could hope for, and we are probably very close to the point where very large aperture lenses with vast zoom ranges with minimal bulk are around the corner. The necessary optical compromises will be corrected in the camera with tailored software. For that matter, the lens need no longer be interchangeable as the zoom range will be so large it will accomodate all conceivable needs.

Sceptical? Look at the Kodak P712 digital camera announced earlier this week. The lens is equivalent to 36-432mm (432mm!) with a smallest aperture of f/3.7. F/3.7! The camera costs $499 and weighs probably under one pound. Compare that with the 400mm f/4 DO Canon lens, at $5,200 and 4.3 lbs. And it doesn’t even zoom. Sure, I have no doubt the Canon lens is better, but how long do you expect that to last?

Case in point. My Panasonic LX-1 (click on the entry at right) has a Leica lens that reads ‘DC Vario-Elmarit 1:2.8-4.9/6.3-25.2 ASPH.’ Phew!. Not like saying 50mm Summicron now, is it? To make sure things are not blurred the camera has image stabilization, because some unnamed brilliant engineer at Panasonic thought it up. Auto focus makes sure it’s focused right adding yet more definition to the competitive equation. This lens is like a 28-112mm on a regular camera. At its longest setting it extends 1.5″ from the barrel on the camera’s body.

So, supposing I want a 24-105mm f/2. That would translate to a 5.4mm – 23.6mm lens which, fully corrected, would doubtless be a lot bulkier than the one on the DP. Now throw out the large front element, there to reduce vignetting. Get rid of several of the others there to confer minimal color fringing. And the hell with barrel distortion. Curvature of field and all those insurmountable problems with edge pixels and wide angle lenses? Nonsense. Just bow the edges of the sensor towards the lens as the focal length changes. Flexible sensors? Why not? Zoom? The next generation of sensors will obsolete optical zooming and do it all electronically. About time. Program around all of that with some smart software, fix the image on the fly when saving (or even when viewing if it’s that horrible to look at) and your 24-105mm f/2 zoom is now 1″ in diameter and 1″ long. Wow! So we gradually return to the days of the Box Brownie with its miniscule single meniscus lens, but with an image readily enlarged 12 times or more.

And who will be the genius designing these new ‘lenses’? It won’t be a god the likes of Max Berek or Walter Mandler in Wetzlar. It will be some kid who is really sharp at coding who happens to like a superb picture from the one ounce piece of plastic passing for a lens attached to his camera. The great days of optics are yet to come and their designs will emanate from the keyboard of some unknown master even now getting his lips around the teat on that plastic milk bottle.

Gorilla. 2006. Panasonic Lumix LX1, 6.3mm DC Elmarit Asph, ISO100, image stablizer.

Digital Leica – not!

Panasonic disappoints with the L1.

I should preface this by saying I have not used the newly announced Panasonic L1, so it’s really premature to criticize, but a review of the specificationss underwhelms.

I was really looking forward to this camera, hoping it would be the digital Leica all ex-Leica M users like me are waiting for, at a non-Leica price. They will sell for $2,000 with the Leica zoom lens. Not bad.

The disappointing Panasonic L1.

Now the ergonomics look promising. A real shutter speed dial, a pretty exciting Leica lens (alternatively designed by Leica or Panasonic, depending on where you read on the Panasonic web site) with manual zoom and iris controls, and a nice M-look camera body. Throw in image stabilization, a vibrator to shake off sensor dust and a 16:9 widescreen picture option and what’s not to like?

How about a lousy viewfinder? The L1 shares the prism optics of the Olympus E-330, which uses a side flapping mirror (like their Pen F half-frame film camera did some thrity years earlier) and mirrors in lieu of a pentaprism to turn the image right way round. Result? A very dim image. Don’t believe me. Check out the on line reviews.

How about a lousy sensor? Use it above 400 ISO and all is lost in noise. It’s the same sensor used in the E-330. Don’t believe me. Check out the on line reviews.

How about a very small image in the finder? It’s the same optics used in the E-330. Don’t believe me. Check out the on line reviews. And if you don’t know what I’m talking about, just look through a Canon 5D after trying a Rebel or 20D/30D. I have. Night and day. The L1/E330 is like the Rebel in this regard.

As for all that ‘live preview’ nonsense, why did they waste their time? No one needs this in a professional grade camera. And the E330 does it better, if you must have it, for less.

Too bad. I was kind of excited about that Leica lens. Guess we’ll have to wait for the Digital Leica M but, no, I’m not holding my breath. I’m just holding on to my wallet.

Another hosing for the taxpayer

If all else fails, rip off the military for their photography needs.

Tax payer ripoff of the week – DALSA Semiconductor Delivers World’s First 100+ Million Pixel CCD Image Sensor Chip.

From the press release: “DALSA announces that it has successfully produced a 111 megapixel CCD. The active area measures approximately 4×4 inches and 10560 x 10560 pixels. The record-breaking chip is developed for the Astrometry Department of the U.S. Naval Observatory to assist them in the determination of the positions and motions of stars, solar system objects and the establishment of celestial reference frames.”

Now let Professor Pindelski, with the benefit of thirty years of hard earned Wall Street experience, translate this to English for you. And forget about all that garbage about astronomy. How dumb do you think we are, DALSA?

“We came up with this great idea for the spies and gooks in the CIA. You know, these fools still use film for photographing enemy encampments from the air. How about we lay it on them and say how everyone, even Uncle Fred, has gone digital, and isn’t it high time you did too? Tell ’em we can see the brand name of the cigarette the terrorist is smoking from 10 miles up. And just think of the margins when we sell this piece of crap to the poor unsuspecting US taxpayer at $250,000 a pop. Man oh! man, that will make the proverbial $1,000 hammer we used to sell to NASA look like a sick joke.”

A moment’s thought and a tap or two on the old HP12C’s keyboard, discloses this technology is underwhelming. The top of the line Canon full frame digital – I forget the model number, it’s 1DSmark32B Version 3a/II or something asinine – has a 1″ x 1.5″ 16.7 megapixel sensor. Upscale that to 4″ x 4″ and you get 178.1 megapixels, or 60% more than the DALSA version. So our wonderful spy agencies could go to Canon and ask them to stick a few of their sensors together and stitch the images with software and stick a lower bill to the taxpayer. Cost – probably $15k a pop and doubtless the nice people at Canon would give us a quantity discount. Give them a tour of the White House and they would probably do it free. But that wouldn’t do now, would it? Imagine the Pentagon buying from the Japanese. Plus all those retiring generals are going to want to go to work for a company that at least speaks their language, as reward for all those contracts. You get the picture.

And so will the Pentagon. Better buy DALSA stock.

Professor Pindelski’s budget balancer and lie detector – $10 used.

Virtual Reality comes to town

Not something you can print and hang on the wall.

If you had told this photographer a while back that he would be creating three hundred and sixty degree virtual reality pictures with a computer and photo stitching software a year ago, chances are the response would have included a recommendation to visit the local loony bin for an extended stay.

What got me intrigued about the possibility of making a Virtual Reality picture was probably a combination of factors. I had long been fascinated by the Virtual Tours that realtors place on their web sites brokering homes. You click and then pry around some unsuspecting stranger’s home. Shades of James Stewart as the Peeping Tom in Hitchcock’s Rear Window. Later I came across 360 degree VR pictures on the web of landscapes and famous places like the Eiffel Tower and St. Peter’s Basilica and wondered in awe at this new technology for making pictures. I hesitate to call them movies as the viewer is in charge of what he looks at and in what detail. Hose the cursor this way and that with your mouse and you can look around the Sistine Chapel taking in all the details of Michaelangelo’s ceiling painting, or descend to the depths of the Seine at the foot of Notre Dame.

Simply stated, none of this was possible before the days of computers; once digital cameras became affordable anyone could do it. I’m not sure of this, but I believe the technology was invented and patented by Ipix a few years ago, offering true 360 degree views around a subject of choice. Doubtless before long we will have holographic television with the image floating in space and viewable from all angles.

Lots of smart people have worked around the patents to offer inexpensive alternatives to Ipix; meanwhile Ipix books $2mm of revenue a quarter from its great invention. Another cheer for American entrepreneurship.

The poor man’s approach, then, is to take a bunch of overlapping pictures around a horizontal cylinder (you turn the camera from shot to shot using a tripod head) then add one for the zenith (top) and nadir (base). The zenith can be done on the tripod by tilting the camera up ninety degrees; the nadir is taken hand held by removing the tripod and snapping the ground, trying to avoid your toes.

A bit (OK, lots) of research on the web showed that this is still very much a nascent technology when it comes to art photography. No one place really seemed to explain how to do things, but piecing them together and reading bulletin boards and chat rooms got me on the right path.

I thought that a fisheye lens of some sort was essential to making Virtual Reality pictures but it turns out that is far from the case. Any reasonably wide lens will do. The wider the lens the fewer pictures have to be taken to generate the 360 degree whole; for that matter, you do not have to go the whole hog and can simply generate flat wide panoramas for viewers to enjoy. However, as I am having such great fun with Canon’s full frame Fisheye lens I thought I might give the 360 degree rendition a shot in the interest of less work. Less work is always a good thing.

My earlier efforts with stitching flat pictures from my Rolleiflex together into panoramas were disappointing. I used Photoshop and really struggled to get things to line up. So I put the idea to the back of my mind a few years ago. Look at the following picture taken in 2003 and you can see the objectionable bowing out of our house front, not to mention the stitching.

The Atherton estate at dusk. From four pictures on a Rolleiflex 3.5F,
Kodak Portra, stitched in Photoshop CS.

Now the chaps who are really serious about VR photography think nothing of spending $600 on an expensive tripod bracket which allows the camera to be rotated around the nodal point of the lens, rather than around the axis of the tripod bush. The nodal point is the right way to go to minimize distortion. Well, I wasn’t about to blow that sort of coin on an experiment, and after sniffing around a software package or two concluded that as long as you held the camera at the same height when taking the multiple pictures for your VR composition, and didn’t tilt things too much, you stood a pretty decent chance of getting a good result.

What do you need to make VR panoramas?

A camera with a 50mm lens or wider which can be set to manual exposure. Film or digital, though film will be a lot of work.
A tripod or monopod, or a really steady hand and good eye.
Software to stitch the pictures together.
A viewer to allow playback on your computer.

For a camera I used the Canon EOS 5D with the 15mm full frame Canon fisheye lens, using my trusty Bogen/Manfrotto monopod and Leitz ball head to mount the camera at a constant height.

Pictures are taken with the camera oriented vertically to maximize height and minimize the size of the holes at the zenith and nadir of the sphere that have to be filled in. As the Canon full frame fisheye has an effective vertical angle of view of some 88.41 degrees (Canon says it’s 91.73 degrees but that’s incorrect for this use), six pictures will nicely complete a circle with substantial overlap, making stitching easier. From what I have read a circular fisheye needs only four pictures but I would guess that the edge aberrations are significantly worse than with a full frame one. Speculation on my part as I have not used a circular fisheye.

One other thing to remember before snapping the pictures is to switch off auto exposure (you want sky tones constant), switch off auto white balace if using a digital camera (much the same reason) and switch off autofocus. You want a small aperture with maximum depth of field for this to work. Don’t ask…. Exposure has to be determined so as to accommodate the brightest and darkest parts of the scene where details are required. Not as easy as it sounds. I measured both and averaged. Finally, switch off the auto-rotate feature in your camera or you will spend time later turning each picture through ninety degrees – the stitching application does not support auto-rotate so the picture will come in horizontally, which is not what you want.

To keep things simple I set the camera on JPG, not wanting to convert a bunch of RAW images, and opted for the lowest quality setting to keep file sizes down. Each picture file was some 1.3mB in size.

Stepping outside the front door, 5D and fisheye on the monopod, I took ten pictures from one position, generously overlapping each with its predecessor. Ten, as I was not too confident about getting away with six – better too much overlap than none. Then I pointed the camera up and snapped the zenith picture – mercifully the Canon fisheye does not flare into the sun, so I could get away with this. Then taking the camera off the monopod, the nadir image was recorded by pointing the camera down.

The application I used to stitch these together is called PTMac. It costs $59 and runs on Apple Macs only. A downloadable database stores settings for lots and lots of cameras and lenses – here’s just a partial list:

Of course, wouldn’t you know it, the 5D + 15mm Canon EF fisheye is not in the list. After some messing about and help from chat boards, I determined the settings which are as follows – you can save them in a database of your own:

Getting these parameters right is key to a frustration-free path to generation of a VR picture.

Now PTMac is a tad clunky. Little is automated. Sort of like using logarithm tables in lieu of a scientific calculator. Mercifully, the current version (4.x) automates the generation of what the vendor calls ‘Control Points’ – points in areas of overlap between adjacent images which tells the program how to stitch things. It generates no fewer than ten control points for each pair of images – something that would take hours to do manually. When it comes to panorama generation, I save the file in the QuickTime Cubic VR[.mov] format. Control point generation and stitching took some five minutes on my 2 mHz PPC iMac G5 which is equipped with maximum RAM of 2 gB. That’s not too bad when you think of the insane number of calculations the application is going through – witness the loud fan noise from the iMac’s normally near silent self. That CPU is working hard.

To view the panorama you need Apple’s QuickTime which is available free here. There are versions for Mac OS X and for Windows.

I clicked on the generated file and got a somewhat distorted picture:

Zooming in fixed that, but I did not want the viewer to have to do that, so after some more hunting around on the internet, I came across Cubic Converter from an Australian company company named ClickHereDesign and after a quick trial I determined you could save a zoomed-in version which was much nicer to look at. Another $49 gave me a license to save the revised file in Quick Time format. Now things looked like this:

Cubic Converter also has the ability to allow the viewer to start looking at the picture while the file is still downloading, with increasing quality resulting as time passes. Instant gratification in the best tradition of The American Way.

Here is the result – my first Virtual Reality picture. The file is 1.5 mB in size, so a broadband connection is recommended. You can zoom in or out by using the Shift and Control keys or by clicking the + or – signs on the screen.

While some of the limbs of the tree need work, I’m pleased as punch at this first pass and much of the learning curve is behind me. Getting smooth gradation in the sky is no mean feat. Next I’ll get more serious using a tripod with a degree marked pan and tilt head (actually a felt tip pen and some ingenuity, before you get too excited) to get things just so. The $600 fancy tripod head can wait.