Yearly Archives: 2006

High Dynamic Range photography

Not quite as new as it sounds, but much easier today.

Stumbling the ten yards down the main drag from bedroom to office this morning, I tripped on not one but two border terriers. Which is strange as, last I checked, the Pindelski estate was the proud owner of just one of these fine beasts. So either there was some serious hanky panky in the night or something else was afoot.

Now, come to think of it, yesterday was Friday night and it happened to coincide with a presentation of Steve McQueen’s superb film, Le Mans, on the big screen. Anytime one sees a brute Porsche 917 race the gorgeous Ferrari 512 is an occasion for some serious medication to calm the nerves and suffice it to say that the gin martinis were flowing freely.

Which probably accounts for the presence of that second border terrier this morning.

Sitting down at the computer and erasing all those email suggestions that I could not possibly satisfy my woman without a horse’s dose of Viagra, my first reaction was to do something more exciting like paying the bills, but I gave one of the HDR links in a clean email a passing click only to come across this page from Photomatix. When the first thing I saw was their exhortation ‘Increase the Dynamic Range of your Photographs’ I wondered whether this was some sort of spam, and that in fact this was yet another attempt to sell me performance enhancing chemicals. Look, I know I grew up in England where the average male prefers a hot water bottle to a cuddle with his girlfriend, but this was going a bit too far.

Anyway, I scrolled the little wheel on my Genuine Apple Mighty Mouse down the Photomatix page and, well, saw a revelation. What their application does far better than Photoshop can (no surprise there) is to combine three photographs, identical except as to exposure, to create a result with huge dynamic range. You now see the highlight and shadow details that were missing before. The revelatory aspect of this is that the Photomatix software does this with one click, even working on RAW files. All the photographer has to do is take three exposures, 2 stops under, correct and 2 stops over, then let the software work its magic.

Not that this is all that new. Unknown to me I have been an HDR devotee for most of my photographic life. With black and white prints it meant overerexposing, underdeveloping, then printing on a contrasty grade of paper with lots of burning in using the hands over the easel. Then for a long time, having migrated to color film, it was either displaying the slide on a screen using a projector, which confers tremendous dynamic range, or living with prints which either opted for burned out highlights or dungeon dark shadows. Once those slides could be affordably scanned in the 1990s they took on a new lease of life as dynamic range could be restored to some extent with software. Plus, while a computer screen cannot compare to a projected image for dynamic range, it’s a lot better than a print in this regard. The way I would do it is to simply use the Highlight-Shadow slider in PS, later the far better one in Aperture, and bring back the details. For example, take these two snaps of a shaving shop on St. James’s Street in London, taken in 2000 on Kodak Gold 100 negative film:

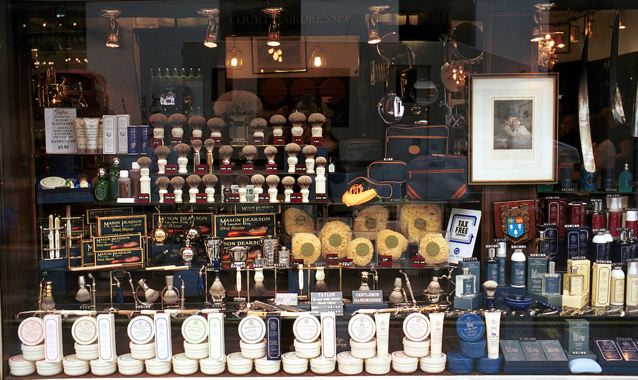
The original, scanned using a Nikon Coolscan scanner.

With Highlight-Shadow correction applied using Aperture.

There’s life in those old pictures yet!

With more recent pictures, taken using RAW in the 5D, the manipulation range is far greater. In this example, I underexposed by a couple of stops to preserve details in the exterior, then corrected exposure and used the Highlight-Shadow slider in Aperture to balance interior and exterior lighting. The Aperture RAW converter was used.

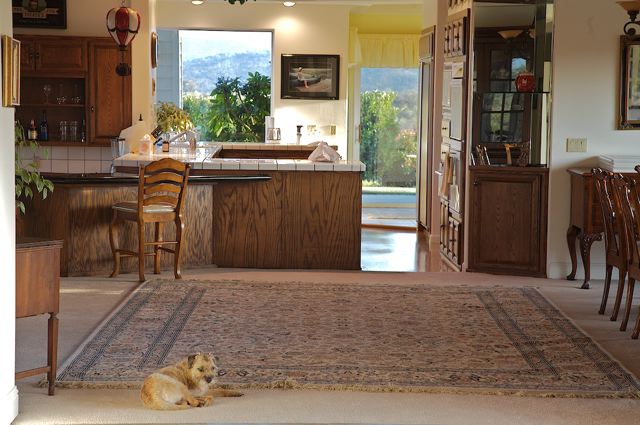
This suggests that, if I do indeed have two border terriers, one was away at the time this was snapped.

So maybe HDR isn’t so new after all. Indeed, look at what chaps like Canaletto did when lazing around Venice trying to make some coin from his oils:

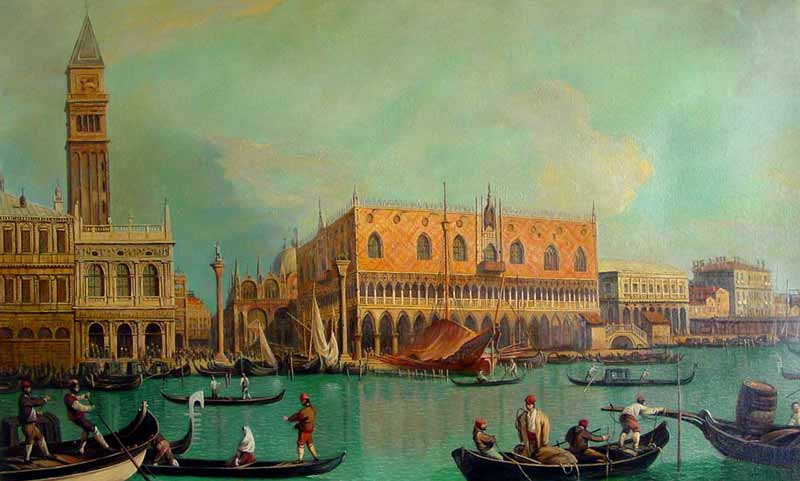
Canaletto has a go at the Grand Canal

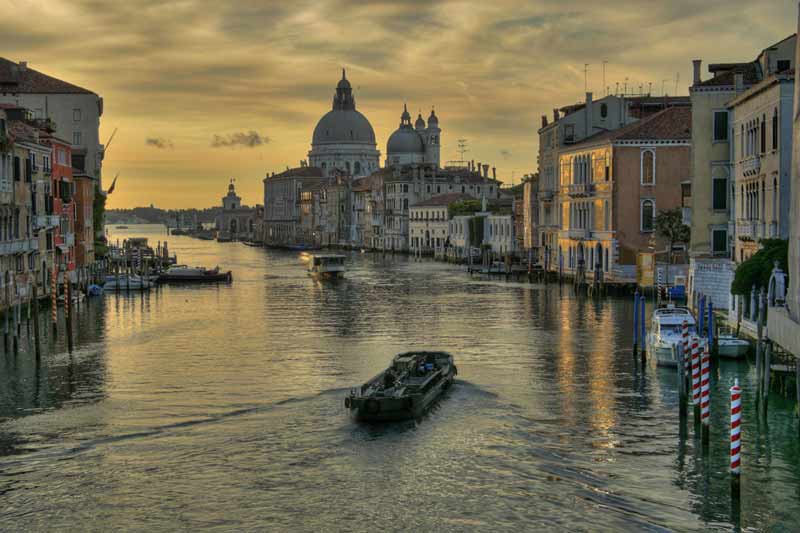
A latter day Canaletto from the Photomatix web site.

It’s little wonder that modern HDR photographs tend to look like oil pantings, as they recreate the great dynamic range that the old masters were creating intuitively. I sort of doubt that Pope Julius II would have ponied up the lira had the ceiling of the Sisitne Chapel been delivered with blown out highlights.

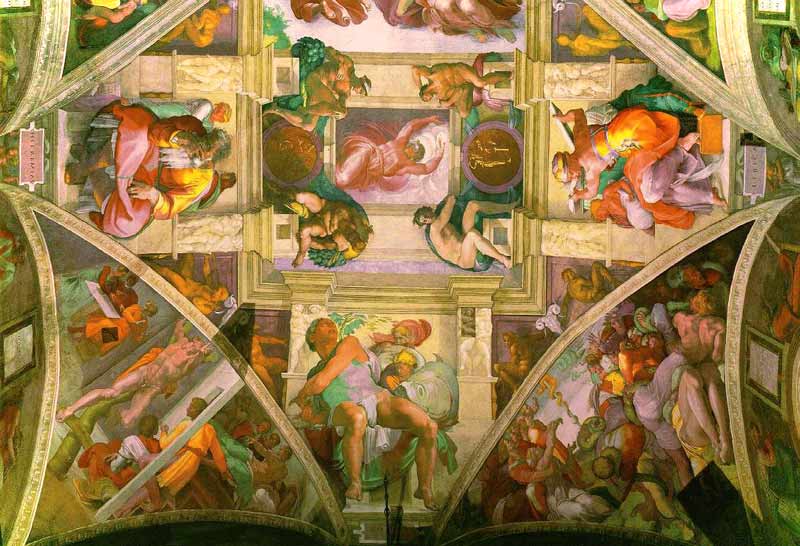
Michelangelo. The Sistine Chapel, 1512.

So Michelangelo was into HDR some 500 years ago. Clearly, he did not use Windows or he would never have finished the job.

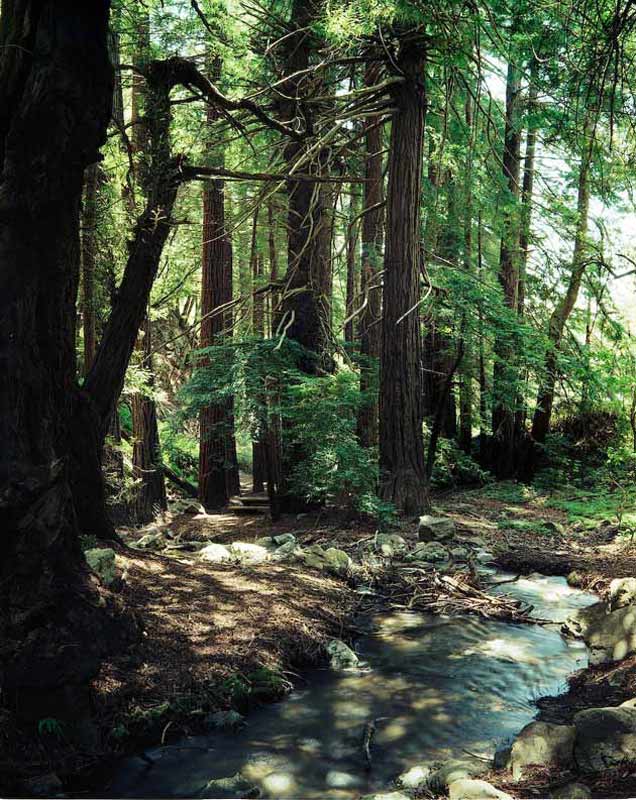
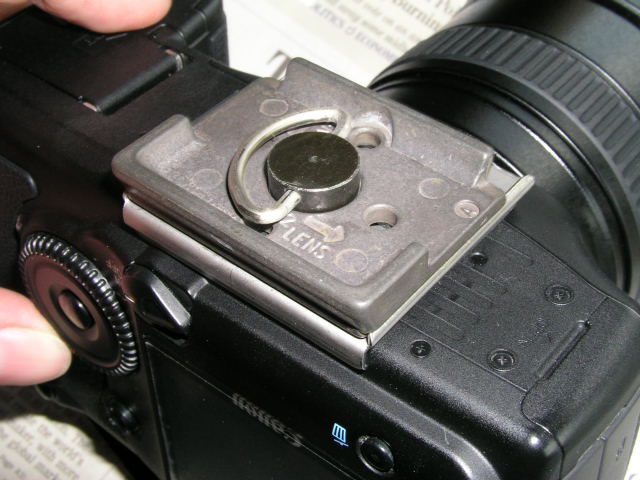
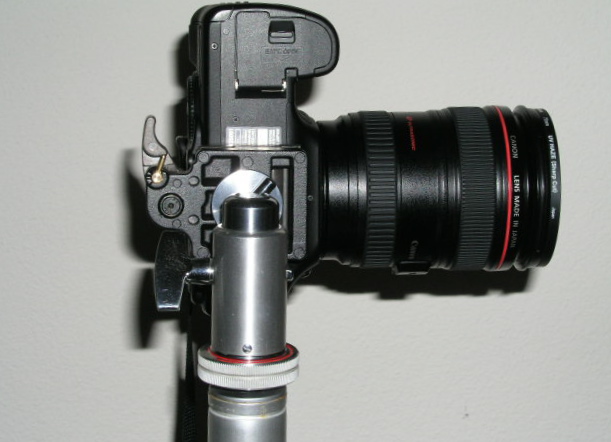
In my early experiments with Virtual Reality photography, I mentioned the challenge posed when it came to correct exposure. To permit seamless stitching of the panorama, the camera has to be set on one fixed, manual exposure while all the pictures are taken. To do otherwise is to ask for trouble. The issue, of course, is that means the likely huge dynamic range of a panorama will results in exposure problems in some of the frames. Now it seems that the automated approach offered by products like Photomatix would cure that. True, you have to take at least three pictures for each frame and there’s a little more work to do in assembling the panorama, but cameras like the 5D allow automatic bracketing at two stop intervals – press the button in burst mode and the camera takes three pictures in one second.

So now it looks like my return trip to the redwoods will call for some burst mode under and over photography. More when I have the pano head in my hands. Which probably means my own head will be in my hands shortly thereafter.

By the way, here’s another picture where I used HDR. I wanted a picture of our home theater in daylight, to show the environment and photographs on the walls, but I also wanted the screen filled with a movie picture.

The Home Theater. Canon EOS 5D, 24-105 at 24mm, PS CS2, RAW

I simply exposed for the room, reckoning the fabulous sensor in the 5D would preserve data for the screen image, even if it would be washed out. After converting the RAW file to PSD in ACR, I used the Lasso tool freehand to highlight the screen area then used Levels to bring back the detail. Hey presto!

Redwoods redux

The next trip will be to take VR panoramas.

While I wait for my panorama head to be delivered, there’s a three week waiting list, here’s the first venue I will be visiting for some ‘serious’ virtual reality panoramas:


Redwoods. Crown Graphic 4″ x 5″, Kodak VC160.

I’m hoping that a 180 x 360 degree panorama, where you will be able to mouse up, down and all around, will finally convey the sheer size of these magnificent California redwoods, something I have never done to my satisfaction with regular still pictures. No, I will not be using a film camera….

You can read more about Virtual Reality photography here.

One of the best practitioners of the genre is a fine French Photographer named Eric Rougier and I urge you to visit his web site and enjoy the many panoramas there. To really see what VR is all about, just take a look at the interior of Notre Dame in Rougier’s magnificent interactive panorama.

So you thought f/1.4 was fast?

How about f/0.85 back in 1934?

‘Glamor’ lenses for 35mm cameras, the ones with bragging power, have either entailed large apertures or extreme length.

On the extreme length end, it was rather like the cubic capacity of motorcycles. Once you hit the magic thousand, you had bragging rights. So when Vincent motorcycles (then known as HRD) came out with its magnificent Series A twin in 1936, it was a ‘thousand’ (actually 998 ccs) that graced the frame and made it the talk of the town. On the lens front, thousand mm lenses have been around for ever, even if they were never priced at amounts the amateur could afford. No, you had to use someone else’s money to buy a Zeiss Mirotar 1000mm mirror lens for your Contarex back in the sixties. That or choose between a car and that lens. Nikon already had lenses of this length and greater. Canon had a 1200mm ages ago and it was a regular refractive rather than mirror optic, some 853mm long. That’s almost three feet! Get one of these and you could say yours was longer than anyone else’s with little fear of contradiction.

The Canon 1200mm f/8 telephoto lens

Quite how you were meant to keep this monster steady unless your tripod was built like the Maginot Line is unclear to me, but hey!, you were the big guy on the block so who cared? Sure, Nikon had the 2000mm mirror lens, weighing in at 40 lbs. but, let’s face it, it was barely two feet long so the only bragging rights it conferred was how long it took you to recover from the hernia induced by lifting it on your tripod. Or, for that matter, from lifting the tripod sans lens if it was one sturdy enough.

The Nikon 2000mm f/11 mirror lens

So long was long and nowadays these monsters are as passÄ— as bell bottoms and wide flower ties. Reminders of silly one upmanship and passing fads. The longest Nikon and Canon lenses I can find in the B&H catalog are 1000mm (a mirror lens with a modest f/11 aperture) and 600mm (with a whopping f/4 maximum), respectively.

But for the average man in the street, fast was always more intriguing than long. If his ship came in, a nice 50mm f/1.4 was more likely to grace his camera than a 2000mm f/11. Heck, you could actually use the thing. Indeed, even before WW2, Leica and Zeiss offered f/1.5 50mm lenses. Back as far as 1925 Erich Salomon was taking his great candids with an Ermanox 4.5 x 6cm plate camera fitted with an f/1.8 lens. So speed goes back a few years. Once modern anti-reflective coatings started to be used about 1942 (wars and technological progress being synonymous) these lenses began to transmit something close to their stated apertures. Later Leica gave the world the Summilux, an f/1.4, originally a 50mm and later joined by 35mm and 75mm versions. All superb.

In 1953 Zunow came out with an SLR, largely made of pure cheddar with an f/1.1 lens. Four were sold and have never been heard of since. I recall seeing one and that lens was certainly impressive to look at. In 1956 Nikon equalled them with an f/1.1 for its screw thread Leica clones.

So in 1961, not to be outdone, Canon came up with the 50mm f/0.95 for its Canon 7 rangefinder cameras which used a Leica thread mount. So large was the lens it had a separate external bayonet mount to fit around the standard mount on the camera body. User comment suggests this was truly one of the worst lenses of all time but, what the hell, it was under f/1.0! “Brighter than the human eye” the advertisements screamed. I’ll bet it sold a lot of Canon 7 bodies with f/1.8 lenses. You could always say you could get three faster lenses in case of need – f/1.4, f/1.2 and this worthless wonder.

The Canon 50mm f/0.95 lens. Like most marketing exercises, fast and worthless.

By the way, Canon tried again with a 50mm f/1 lens in their ‘L’ line early in the 21st century. Testifying to the poor performance of that lens, suggesting Canon had learned little from their prior experience, that lens was discontinued a couple of years ago and now has, you guessed it, collectible status. Must make for a nice paperweight, I suppose.

Leitz’s approach was different. The German character, not renowned for its sense of humor, reckoned that anything faster than f/1.4 actually had to be capable of taking sharp pictures, so they took it in baby steps, first coming up with the f/1.2 Noctilux with its exotic and costly aspherical element. Needless to say, the lens was superb and the limited production run of some 2,000 has ensured its collectible value. Meaning, sadly, hardly anyone uses one of these any more, most rotting in some collector’s cage.

It took Leica another 10 years to work out how to do it with spherical glasses and how to make it faster, and the f/1.0 Noctilux was born in 1976. It remains in production to this day and is probably the first useable f/1.0 lens for a 35mm camera ever made.

But Leitz always were horrible at marketing. Had they but searched their long and distinguished history, they would have found this and it was made in 1934 with an aperture of f/0.85! Or maybe they knew and were embarassed that 42 years later they could only manage f/1.0?

The Leitz 75mm f/0.85 Summar. From Theo Scheerer’s ‘The Leica and the Leica System’, Fountain Press, 1962

And you thought f/1.4 was fast?

By the way, want a $300 f/0.70 lens which will blow any of the above away for definition? Simple. Place that inexpensive Canon 50mm f/1.4 on your EOS 5D, set the speed to 1600 ISO and enjoy finer grain than TriX film at 400 ISO. Two stops gained from f/1.4 make it an f/0.70 with the depth of field and definition of an f/1.4. So Canon finally made a decent sub-f/1.0 lens, by virtue of that wonderful full frame sensor in the 5D!

Jack Dykinga – nature photographer

A master of the modern Western US landscape photograph.

If Eliot Porter’s nature photography appeals to the romantic side of one’s personality, Jack Dykinga’s appeals to the other extreme. A more formal, studied approach. Classical, if you like. That sounds boring on paper but the reality is that his work is astonishing. Whereas with Porter’s work the reaction tends to be “Hmmm, I need to think about that” with Dykinga it’s a more simple “Wow!”.

As is often the case in aesthetic matters, I chanced on his work by accident. It was 1983 and I was half way though my six year stint in New York City. The excitement I had first felt for the city was increasingly turning to dismay. Corruption, dirt and congestion. I reckoned I could get the same in Los Angeles and at least have good weather thrown in at no additional cost. So somewhere about that time I began thinking of going west.

Now there’s a lot that is good about Manhattan. Museums and art galleries everywhere. Restaurants of all ethnicities easily found. Central Park. Carnegie Hall. The Met. Broadway. Wall Street. Street photography opportunities to die for (sadly, literally true in the early 1980s, far better now) and those mom and pop grocery stores (mom and pop being Vietnamese or Korean) open 24/365, seemingly on every street corner.

But one of the best things about the City is the large selection of book stores, both traditional brick and mortar establishments, and the street vendors, just like in Paris. So it was some time around 1983 that I came across a magazine named Arizona Highways at just one of those places. Large format, slim and with no advertising, the photography, limited to Arizona, was stunning. There are no advertisements as the magazine is bankrolled by none other than the State of Arizona, or at least its taxpayers. To cut a long story short, it was there I first encountered the work of Jack Dykinga.

Best as I can tell, Dykinga still works with large format film and I was prompted to write this entry after pulling his book ‘Desert: The Mojave and Death Valley’ from the bookshelf the other day. If Arizona Highways was one reason I moved to the great landscape of the American West in 1987, then Dykinga’s photography was the catalyst.

In the winter of 1997-98 the heavy rains brought by the El Nino weather system produced a tremendous flowering of desert plants in the Mojave, and Dykinga was there to capture it. While large format is not necessary for the modest size of the book – some 10″ x 11″ in size – the photographs are simply magic. Far more than record pictures, Dykinga takes extraordinary pains over composition, thinking nothing of being up with the birds or going to sleep when the owls are coming to.

Thanks to the phenomenon that affects all photography books, you do not have to pay the $49.50 I did back in March, 2003 when this was published, as Amazon will sell you a new hardcover copy for the grand sum of $19.98. Add a fine and relevant text (rare attributes those, in photography books) by Janice Emily Bowers, and you have a treasure. I would spill the beans and tell you all about ‘The Racetrack’ but that section of the book is so extraordinary, so simply unbelievable, that I am going to keep mum and suggest you send some money to Amazon and find out for yourself. You will not believe your eyes.

And supporting a hard working photographer makes far more sense than throwing more money into the corporate coffers of Nicansonypan for the latest gadget. You can see Dykinga’s work on his web site. It does not do his work justice. Buy the book.

A great Quick Release tripod attachment

A fine QR head system that can only have been designed by a photographer.

A few years ago the very idea of a tripod was anathema to this photographer. Sure, I knew about them and tended to regard them with emotions somewhere between pity and contempt. As a Leica using street photographer there was no way on this God’s earth I was going to use a tripod. Lenses longer than 90mm simply did not compute and TriX, pushed if necessary to 800ASA, and those wonderful, fast Leica lenses, all suggested a tripod was – well, just not done.

Then, as my interests graduated to include landscapes and longer lenses, the tripod once more reared its ugly head, so a few years ago I picked up a nice old Linhof for a few dollars. The good thing about this tripod is that the legs are cantilevered, meaning extra bracing with little increase in weight. The bad was that it came with a pan and tilt head which has to be one of the worst designs of all time. The scale markings are never visible when needed, they are not calibrated, and the locking knobs are so small and inaccessible that they represent nothing so much as an accident waiting to happen. A few dollars later and a nice, if well used, Leitz ball and socket head graced the top of the Linhof’s center column.

I came across that genuinely rotten pan and tilt head the other day when first dipping a toe in the waters of Virtual Reality photography. Since that first encouraging experiment, I have decided to invest in a proper panorama head with a rotating base and nodal point correction, so this time it really is curtains for that pan and tilt head. I have yet to find any use for this wretched design in the field of still photography. A ball and socket head is not only easier to use, when it comes to turning the camera through a right angle there’s simply no contest.

Enough grumbling. When I got sort of serious about tripod use I realized all that screwing the camera on and off the tripod was just so much waste of time, not to mention the risk factor of dropping the camera while messing about with the locking knob. So I searched around only to be astounded at the ridiculously high prices asked for most quick release devices, many tailored to a specific manufacturer’s tripod line. Finally I tracked down an importer of Sima products who did a nice resin QR base with small and light plates which attached to the camera’s base. These worked OK, though truth be told they were somewhat overpowered by larger cameras and lenses. After the effort of selling all my medium format gear and replacing it with the Canon EOS 5D, I decided to rethink the QR issue, especially now that the camera body whose life depended on the QR head ran some $3,000! A good used Leica M2 or M3 body at $1,000 is no joke, but we are talking the price of three of these in that full frame digital wonder that is Canon’s claim to the Greatest Camera on Earth.

What finally forced me to get my act together was the enthusisam I feel for Virtual Reality photography. Given that this requires a tripod to be lugged to the venue of choice and much mounting and unmounting of camera, panorama head, etc., I did some serious research and came up with a very reasonably priced range of quick release tripod adjuncts from Manfrotto (imported by Bogen to the US). So while waiting for the three week backlog on the panorama head of choice to clear (more about this later) I procured a handful of Manfrotto’s best and have to say I am delighted with both the quality, the ergonomics and the price. That’s a combination I have yet to encounter in a woman. Whenever the first two factors are just so, you can bet the third is out of sight.

Here’s the #3299 base ($28) with the included camera plate. The base has an ingenious safety lock which has to be released to permit the large lever to move which, in turn, releases the camera plate. The metal used is a light alloy, more than up to the job. It’s the sort of pot metal used in low stress car components like door handles on German cars or just about anywhere in the case Italian automobiles. Manfrotto is, come to think of it, an Italian company.

For a fairly heavy camera like the 5D you really want to avoid torquing sheer hell out of the attaching bolt in the interest of the camera’s safety. Even though the camera plate has a substantial rubber platform, a long heavy lens with no tripod socket of its own (like Canon’s 200mm f/2.8 ‘L’ say), with the camera oriented vertically is going to need more fastening torque than I am comfortable with. Manfrotto thought of that when they designed the #3157NR plate ($12) (11/2008 update: the plate is now named the 200PLARCH-14RC2, is identical and now costs $19 from Amazon – it now comes properly assembled for use with the 5D and no messing with the circlip is required) :

Note the finger hold which precludes the need for a screwdriver when attaching the plate to the base of the camera. The essence of this plate is that it has a small lip which abuts the base of the camera, replacing torque with physical restraint, as shown in the following snap:

Depending on the design of your camera you may have to remove a small retaining circlip (E clip) for the bolt and flip the head around as I had to do this with the 5D which requires the lip abuts the rear of the camera. On others it may have to go towards the front, which is how it is shipped. No big deal, and clearly explained in the excellent instructions. While the camera plate does block access to the small battery compartment for the camera’s clock, in practice that has only to be accessed every five years or so, so it’s hardly an issue.

Here’s the whole thing mounted on my Linhof with its Leitz ball head:

In this underside view, with the camera oriented for portraits, you can see the small brass quick release lever – note the unrestricted access to the main battery compartment:

To attach the camera, you simply place the base plate with camera attached, front tilted slightly forward, into the tripod base. As you level the camera into the tripod base the camera plate depresses a small brass button in the tripod base which in turn releases the lever and locks the camera in place. You then rotate the brass safety lever which has the effect of locking the release lever in place. On one of the two tripod bases I bought the big lever would not click all the way home without manual assistance but after a few mount/dismount cycles all was well. Nonetheless, I would suggest you press the big lever home just in case, to ensure all is tight. Then operate the brass safety lock.

To remove the camera, release the safety lock and pull back on the big lever.

How does it compare size wise with the little Sima? See for yourself:

The overall size of the tripod base is much the same but the surface area of the camera plate is maybe twice the size. And no screwdriver is needed unlike with the Sima. The whole assembly is very rigid, even with a really heavy camera like the Crown Graphic with a heavy telephoto lens extended all the way.

If you are buying one of these, do realize that the tripod base comes with one plate (no lip) so buy additional plates as needed for your equipment. I used the two flat plates for my 4″ x 5″ Crown Graphic where the lip would not work owing to the large flat mounting surfaces involved; the Crown takes one plate either side so it can be switched effortlessly from landscape to portrait mode. One of the tripod plates went on the Linhof tripod, the other on the Manfrotto monopod. And lest you think that small Leitz ball head can’t handle it, let me assure you these things were probably used to raise the Golden Gate Bridge during construction. Doesn’t have to be big to be strong, and you can pick these up for some $100 used, which is a lot less than the going rate for all those exotic ball heads on the market. I mean, really. $750 for a ball head? That is God’s way of telling you that you have too much money.