Uncle Joe would be proud.
I have been ticking along for many years with Photoshop CS2 and been quite happy with it for my modest needs. I’m no Photoshop expert, goodness knows, my primary use being for round tripping images from Lightroom to fix leaning verticals, where PS does a better job (Edit->Transform->Distort) than the rudimentary controls in Lightroom 3. A related, occasional use is to remove overhead cables and the like using the clone tool where, once again, the LR tool does not cut it.
A while back I tried CS4, a loaner from a friend, and noticed a couple of things. First, it’s an Intel app in the Mac version, meaning it runs far faster than the older PPC CS2, which has to run through the Rosetta emulator. One simple example is that even on my fast HackPro desktop, CS2 takes 20+ seconds to load whereas CS4 takes 3, using an SSD drive. Everything else is faster too.
Now that speed increase alone is not enough to make me shell out for CS5, the current version but, as luck would have it, I was riding the Caltrain from the South Bay to San Francisco the other day, merrily reading my iPad, when the chap next to me started up a conversation. Turns out he’s an engineer at Adobe which makes its home on Townsend Street, a few hundred yards form the SF Caltrain terminus, our destination. When I told him I was still on CS2 he gently reprimanded me after picking his jaw up off the floor. Consider me reprimanded! “Dude”, quoth he, “You just have to try CS5. Content Aware Fill will blow your mind. And you gotta try the new outlining tool”.
This was both flattering (being a ‘Dude’ just shy of 60 years of age feels pretty good) and intriguing, based on his explanation of Content Aware Fill, which can do a smart job of replacing pixels in an image based on the surrounding details. And the enhanced outliner would be nice for those times I want to use Auto Blur when the ‘everything sharp at all times’ curse of the small sensor on the Panny G1 dictates manual blurring of a distracting background.
A little bit of digging made things more intriguing. CS5 is the first version of Photoshop which runs in 64-bit mode on the Mac. Further, Adobe offers a $199 (at Amazon) upgrade which will work all the way back to CS2! (Trying to upgrade from within CS5 is a waste of time, returning page errors. Adobe- wake up!) No way I was going to pay the $700 asked for CS5, especially as I own CS2, long registered at Adobe, which started life as CS1 on my G5 iMac a few centuries ago. Finally, as the next version of the Mac OS, Lion, will no longer support Rosetta/PPC apps, I have to do something as I’m not about to get left behind by sticking with Snow Leopard when that cat’s time has passed, and while I do not love PS, I do need it now and then. The icing on the cake is that Adobe offers a 30 day free trial of CS5, so before you could say ‘dial-up’ I had the software downloaded and installed. Well, you actually need broadband because downloading this 700mB whopper would take longer than life is worth with dial-up. It would be cheaper to buy the disc! And I’m not talking CS5 Extended – just the basic CS5-only version.
Let me pause and jump to some recent history before writing further of Content Aware Fill. When the British and Americans gave away Eastern Europe at Yalta in early-1945 to a grasping Stalin, the Cold War commenced. For reasons never quite clear to me, FDR and Churchill, the donors of countries they did not own, referred to Stalin as Uncle Joe; it’s tough to ascribe avuncular qualities to the greatest psychotic mass killer in history, but FDR was gaga by then and WSC was down to his uppers (and about to lose a General Election to an ungrateful nation), having just barely saved Englishmen from having to learn German. So I suppose while Eastern Europeans would disagree, those two Western leaders might be excused for their poor judgment. Heck, I still named our son Winston. Great men have great faults.
The point of this historical flashback is that Uncle Joe would have loved (I almost wrote ‘killed for’) Content Aware Fill (CAF). You see, in those days before Photoshop, when he would whack the occasional cabinet member just to keep the other boys on the Politburo in line, photo retouchers would have to set to and start editing out the whackee from all know official pictures. Then, after hundreds of hours of careful retouching to eliminate all trace of Comrade Whackee, the history books would be republished – pity the poor proof reader who missed a name – and schoolchildren indoctrinated afresh in whoever the new leaders were. People would literally be ‘disappeared’ from photographs, which took a good deal longer than two shots in the back of the head. Suffice it to say that Content Aware Fill is so good that Uncle J would have been at the front of the line at Adobe on Townsend Street, San Francisco, credit card in hand, long before the ink was dry on the first glowing reviews a year ago. Mercifully, UJ has long been six feet under, thus saving the lives of many soon-to-be-whacked photo retouchers, as their work could now be done in minutes instead of months.
The best way to illustrate CAF is with a ‘before and after’.
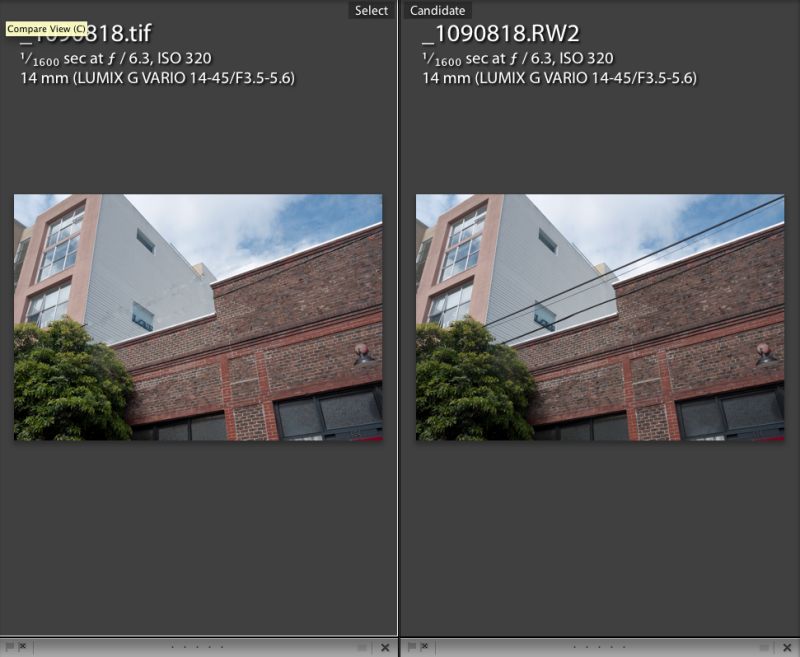
After and Before applying CAF
The overhead wires, a bugaboo of architectural and city photographers everywhere, took all of a minute to replace. I simply dragged the Healing Brush tool along them, regardless of background, hit Enter and after a few seconds of the spinning gear wheel here is what I got. It’s not perfect once enlarged, but a little local fixing wth the regular Clone tool and it’s done. Doing something like this in areas with complex detail would have taken ages using the Stamp and Clone tool.
Here’s another far more extreme example, which took 15 minutes to do:
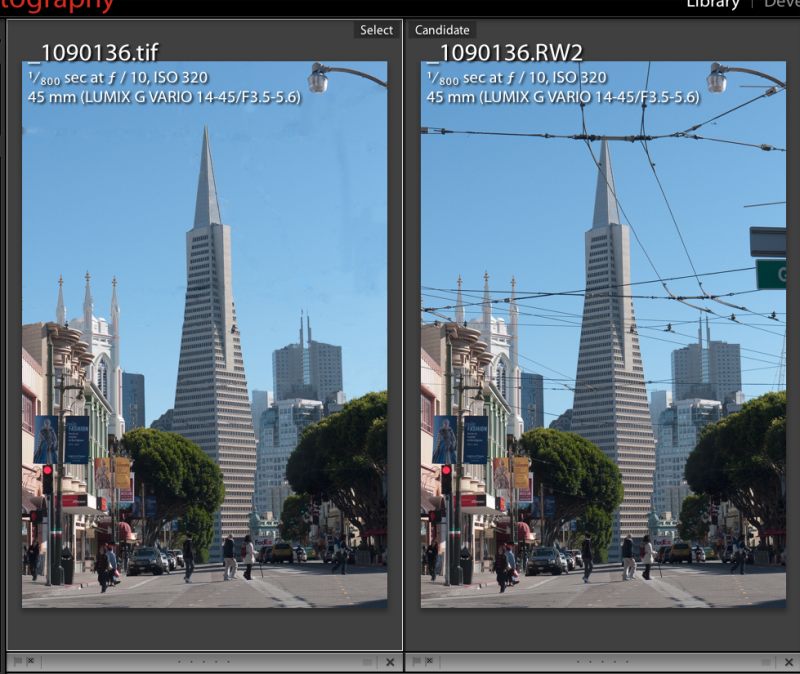
CAF at the max. Streetcar lines be gone!
Where fine detail is involved I have found that using the Healing Brush to confer CAF is more effective than the alternative method. That method has you using the lasso tool to select a large area to be replaced, then clicking Shift-F5->Content Aware. The latter method takes a larger, cruder surrounding data sample in doing its thing, and tends to be best on a subject against a uniform background.
A handy related use of CAF is when you use the Edit->Transform->Distort tool in PS to correct leaning verticals. If the nature of your stretching of the original image leaves white areas within the picture, you can use CAF to fill those in.
CAF is not perfect. It likes a fair amount of surrounding area to sample and if that area includes other image elements, it will unnecessarily place them in the fill, but after a bit of use you get the hang of it and learn how much has to be sampled around the object to be replaced. It’s pretty remarkable technology and Uncle Joe would be proud as must be his many latter day descendants across the world. Judging by the fact that even the HackPro spins its gear wheel when doing CAF you really need a powerful CPU and GPU in your Mac unless you place little value on your time. There is some very complex processing going on here.
I fancy Adobe and Amazon will be finding themselves $199 better off when my 30-day Photoshop CS5 trial is up. Meanwhile, my hat is off to Adobe for a superb idea, well executed. Version two will likely be able to remove whole armies without a shot fired.
Here’s how UJ did it – before/after whacking Comrade Yezhov:
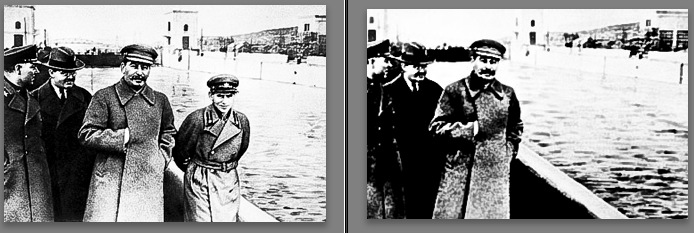
Now you see him, now you don’t.
You can read about Uncle Joe and Comrade Yezhov here.
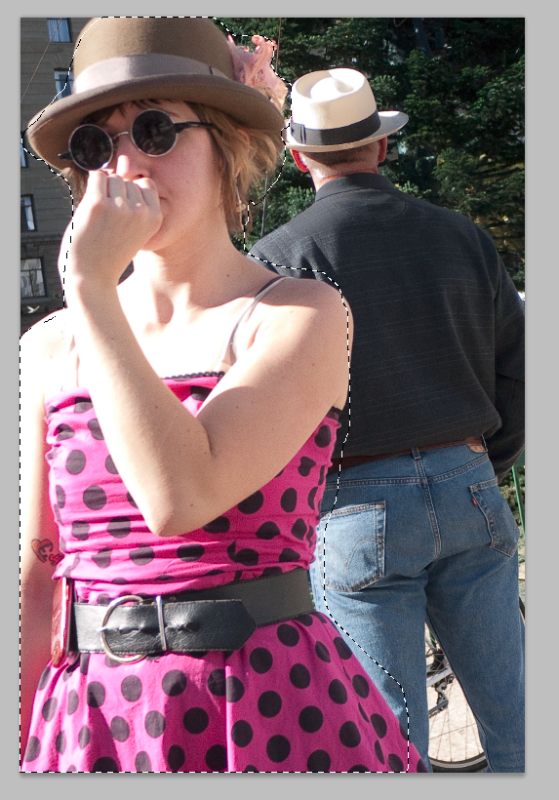
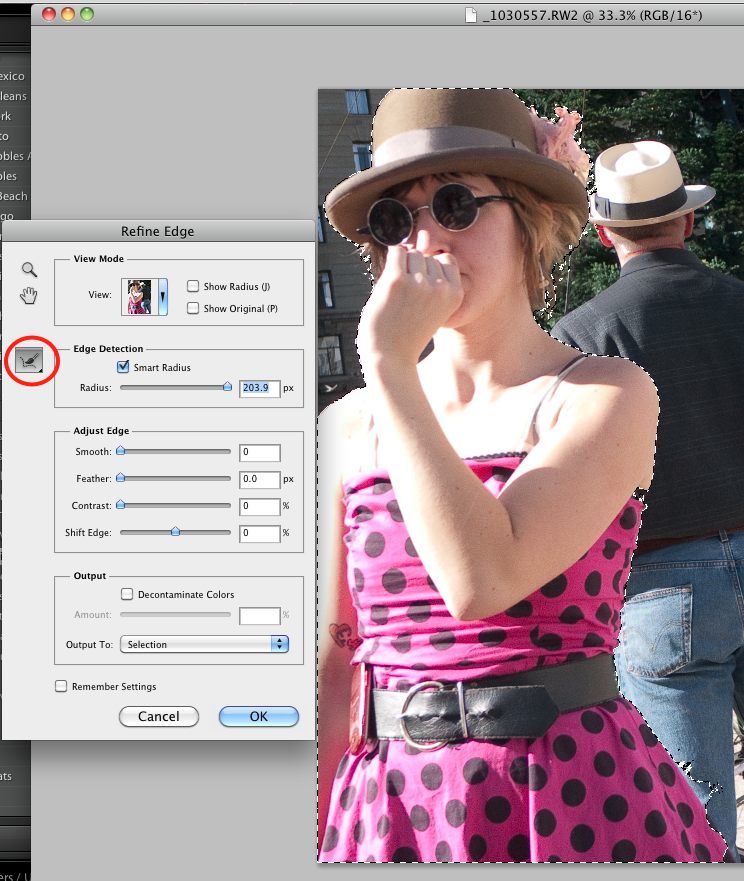
As for the enhanced outlining tool mentioned by my new found friend from Adobe on the train, more of that later.