Category Archives: Hardware

Stuff

SSDs and TRIM

Easily added.

Snow Leopard users should be aware of Apple’s latest sleight of hand.

TRIM – garbage management for SSDs which maintains their performance – has been added in Snow Leopard 10.6.8, the last version of Snow Leopard before Lion comes to market in July, 2011.

But that’s not all good news. You see Apple, in its greed for every penny they can squeeze from buyers of its overpriced jewelry passing as computer hardware, has made sure that TRIM support will only be available if you bought your computer with its SSD from Apple. Meaning you were well and truly hosed down at a 100% premium compared to what you could have bought an SSD for yourself. Or, worse luck, maybe that SSD option was simply unavailable when you bought your hardware so now you are forced to use an aftermarket SSD to upgrade. No TRIM for you, my lad. So much for backward compatibility and planned obsolescence.

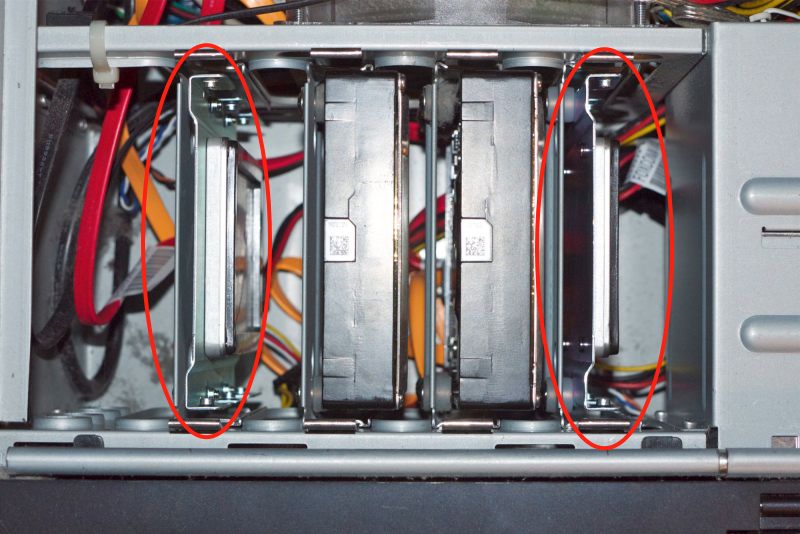
Apple has made it extremely easy to replace HDDs in MacBook Pros and MacPros (and extremely hard in iMacs and Minis) but if you slot that nice new SSD into your MBP/MacPro/Mini, TRIM will not work. Upgrading your HDD to an SSD in your MBP, a plug-and-play operation which does not invalidate the warranty, is the single best thing for the performance of your laptop. However, when you do so, this is what OS 10.6.8’s System Profiler will report:

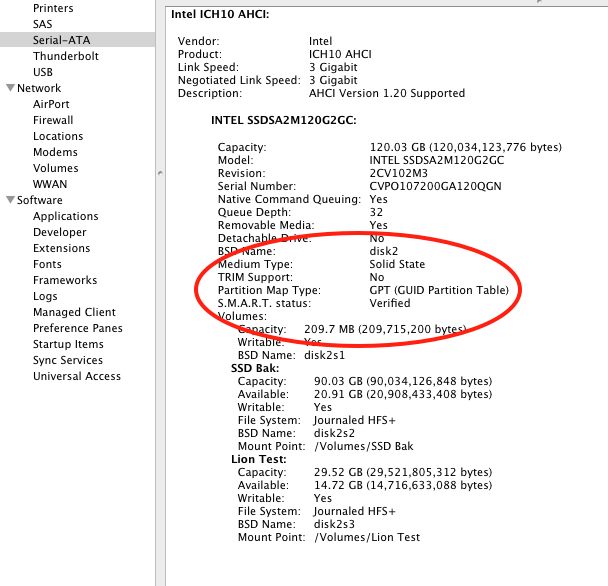
No TRIM for you, sucker.

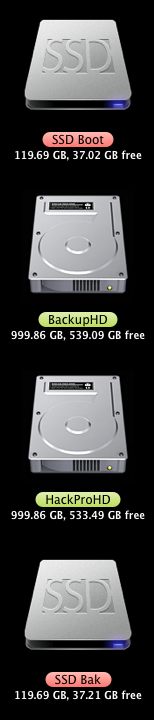
Mercifully, there are many smart people out there who believe in freedom of speech and refuse to be stolen from. Hop over to the good people at Groths and you can download their utility and have TRIM up and running on your aftermarket SSD in no time at all. My SSDs are recent Intel X25-M 120gB models, and this fix works perfectly on both, after a restart.

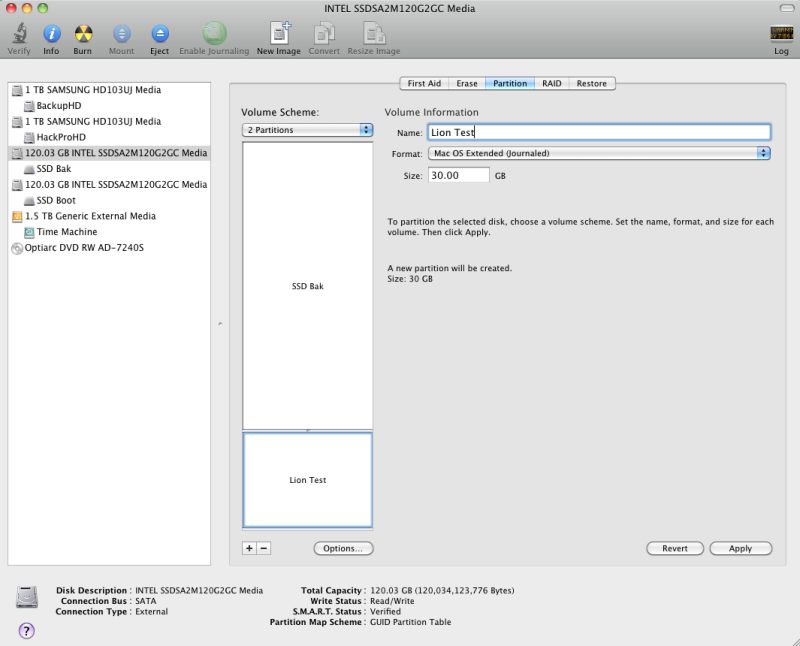
As usual with these things, I suggest you try this on a bootable backup drive first, to be on the safe side. After you complete the installation, your System Profiler->Serial-ATA->SSD should look like this, and your SSD’s performance will be enhanced for the long term:

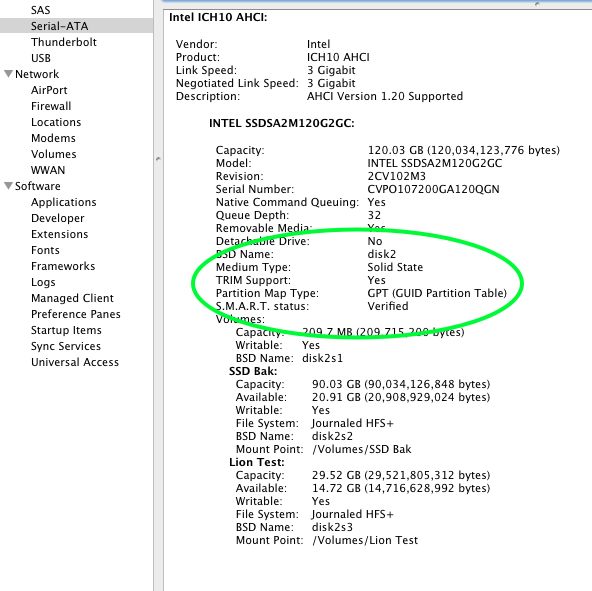
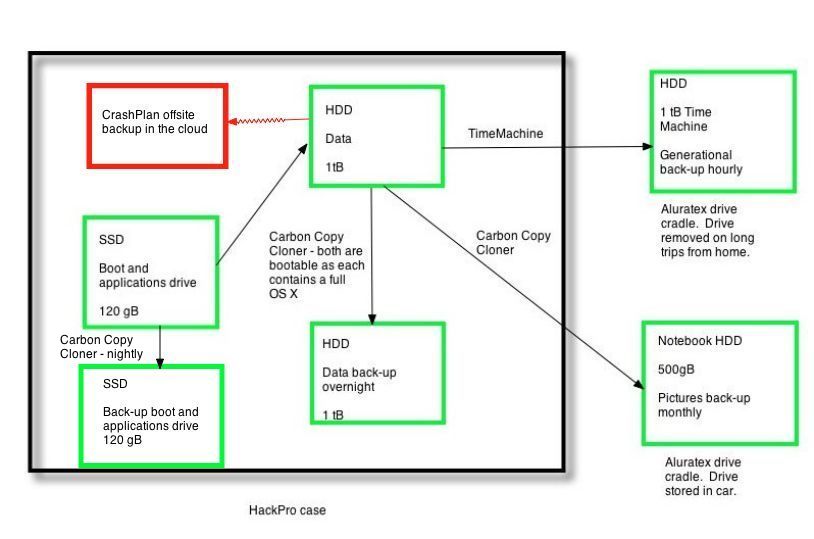
TRIM enabled on the HackPro.

As you can see, the fix uses no space, merely modifying existing files, speaking loudly to Apple’s increasingly cynical attitude toward its customers.

If you have been using your SSD without TRIM for a while, as I have, Lifehacker has information on how to clean it up here.

Another SSD for the HackPro

Gearing up for Lion.

As OS X Lion will likely involve the usual amount of experimentation to get it working properly on the HackPro, I have added a fourth drive to the computer and its second SSD, so it now contains two SSDs and two HDDs.

The SSDs act as OS and application drives (boot and back-up) whereas the HDDs contain data and back-up data. They also contain OS Snow Leopard as EyeOne Match, the profiling utility for my EyeOne colorimeter, will not work with Lion.

In addition to having an SSD for experimenting with Lion, I also gain a super-fast back-up boot drive. On monthly testing of the HDDs as boot drives I have been increasingly struck by just how slow these are when booted from. After four trouble free months with my first Intel SSD it made sense to add a second. For the test phase I will partition it into two partitions, using Disk Utility; one will contain a straight clone of the existing SSD boot and application drive, and Lion, once released, will reside on the other until fully debugged. Thereafter both will be converted to Lion and Snow Leopard will remain on the HDDs for use with EyeOne Match.

The second SSD will continue to act as a low risk testbed for any new software changes or upgrades.

This is how things will look:

Drive topology after adding the second SSD to HackPro.

I strongly recommend you add an SSD to your work computer. Once you have experienced the speed there is no going back. I paid $230 for each Intel X25-M 120gB SSD.

The HackPro with two SSDs installed.

The incremental heat output and current draw of the second SSD are so low that no additional cooling precautions need be taken in the exceptionally well ventilated Antec Sonata III case with its generously spec’d 500 watt power supply. Installation, which means attaching the SSD to the provided mounting plate and the plate to the Antec’s slide in carrier, plus the connection of power and data cables took FU Steve all of twenty minutes. Carbon Copy Cloner took 27 minutes to clone the existing SSD Boot drive to the new backup SSD, and it needed but two more minutes to verify that the backup was bootable and to add the backup job (Boot->SSD Bak) to Carbon Copy Cloner’s list of automated, nightly backups. You really don’t want to forget that last step!

Partitioning:

As the new backup SSD will also be used as a test bed for OS Lion, to be released next month, I first partitioned it into 90gB and 30gB partitions, using Disk Utility. The latter partition, named ‘Lion Test’, at 30gB, will be more than large enough for OS and selected application testing.

Partitioning the SSD Bak drive to make space for OS Lion.

TRIM:

TRIM is the software code which helps manage garbage on an SSD drive. Apple’s just enabled it in OS Snow Leopard 10.6.8 (the last release before Lion) and it will be included in Lion. At this time the OS will only permit TRIM to be used on Apple installed SSDs. Let’s hope that changes, as many Mac users will be replacing the HDD in their MacBook Pro with an aftermarket SSD to avail themselves of the enhanced speed and lower power consumption. Even if Apple does not step up to the plate here, hacks already exist to make TRIM in Lion work with non-Apple installed SSDs.

Meanwhile, is there anything useful to be divined by comparing the space on the 3 month old SSD in my HackPro with the newly installed backup SSD?

Here’s are the drives inside HackPro as reported on the Desktop:

HackPro drives before partitioning SSD Bak.

In the case of the SSD drive pair, the base drive reports a little more space than the backup one, but not enough to make any difference. Both the backup drives, which include a full Snow Leopard OS, are bootable. So after three months of intense use of the first SSD (top of the above screen snap) there seems to be negligible difference in available space, suggesting that the absence of TRIM has made no material difference. However, be assured I will be looking into adding TRIM support once Lion is installed and will be explaining how to do that in these pages.

Update June 2012: For data on the newer, faster SATA 3 6gd/s SSDs, click here.

The ‘new’ Leica M9P

What a scam.

It’s five years since I sold my first – and last – Leica and sadly the former German masters of design have given me no reason to regret that decision.

You thought $7,000 for a camera body with no lens, no autofocus lenses available and a sixty year old viewfinder design, allied with a noisy shutter was a lot?

You are a piker.

Because for a mere $1,000 extra you can have the 2 cent red paper dot on the front (you know, the one that says you are rich and screams ‘steal me and my owner’s wallet’) removed and the word ‘Leica’ engraved in script on the top plate like they used to do twenty years ago. And lest we forget, Leica has made the LCD glass tougher than the one made of pure cheese on the ‘base’ model. Such a deal.

Here’s the latest blurb from the antiquarians at Leica Camera:

Hey, but “Hang on a minute”, you say. I get one of the smallest cameras out there. The factory says so.

Uh huh. And for a bit less you can get a Panny G3 whose modern sensor will rival the M9’s dated Kodak one (so much for a ‘lifetime camera’), offers auto everything, is super quiet and comes with a great choice of lenses, some even branded (if not made) by Leica. No red dot at those prices, though. But you do get a pro-quality movie mode to compensate. As a point of reference, the red outline of the M9 is superimposed on the G3 body below.

And you can buy 13 of those for the price of one M9P or a mere 11 for the price of one regular M9. That way, when your Panny blows after 50,000 exposures you recycle it and pull the next one out of its box. Better still, get smart, buy one, and upgrade to a G4 in 18 months. It will be even better.

As for logo removal, my roll of black electrician’s tape should last the next five generations in Dr. P’s lineage.

A fool and his money are easily parted.

Pentax Q

Aptly named.

Some wag at Pentax must have named their new forthcoming toy camera, for the ‘Q’ designation is nothing less than a loud Question as to who on earth needs this?

The Pentax Q. Or is that Q?

It’s truly depressing to see Pentax make a camera with a minuscule digital sensor and interchangeable lenses. The very thought of the mistaken market research that went into the decision to commit significant amounts of capital to engineering and producing this camera and its five lenses for a market which does not exist boggles the mind.

Look at the specs. The sensor is one eighth the area of the MFT ones found in Panny and Oly offerings. The lens still sticks out a lot. There’s no eye level finder but you can blow another $250 on top of the $800 for the camera to buy a bulky optical one, limited to one focal length. To make matters worse, the standard lens has a full frame equivalent length of 49mm – way too long for most snaps and the zoom alternative destroys what compactness the body offers.

This is what happens when you design cameras by committee and market research – both functions doomed to report the past and incapable of encouraging original thought. Heaven forbid that Pentax might actually ask photographers what they want. That advice would be free and on point. The folks at Pentax obviously do not read their Santayana, denying the wisdom of “Those who deny history are doomed to repeat it”, having made an almost identical error with their short lived, overpriced and ill considered Pentax 110 film camera. This was another toy, using a truly ghastly film format but engineered at a level way in excess of the capabilities of the medium. And while I’m at it, who on earth designed that execrable extending flash in the Q? My boy can do better with Lego bricks.

Pentax’s previous exercise in stupidity, the 110 film camera.

If I were Pentax, a business on its last legs and likely not here for the long term, I would take one last great risk and return to my roots of truly original design. Spotmatic or ME Super, anyone? Forget the me-too DSLRs, Pentax. You have little to offer there. You are RC Cola to Coke, doomed to remain on the lower shelf, scraping for pennies. What Pentax could have done, given the company’s undeniable design skills, is take a hammer to Fuji’s poorly executed, over-priced and over-engineered X100 and made a fixed focal length APS-C or MFT snapper, with a proper EVF or optical finder, a speedy wide angle f/2 or f/1.4 lens and sold the thing for $500. Don’t these people realize that there is an enormous demand from decent photographers (meaning they can take good pictures, not that they are moral!) who are sick and tired of lugging bulky DSLRs around and just want something small, sharp and super-responsive, at a reasonable price?

Pentax Q lenses – two ‘Toys’, a fisheye and a bulky zoom, plus the standard one.

To compound their silliness, Pentax is offering two self-described ‘Toy’ lenses where you will be able to pay hundreds of dollars when you could just buy a piece-of-crap Holga for $10. Better still, forget the $10 and mess up your image in Photoshop. Why, you don’t even have to wait for the processed film to come back that way.

And finally, they are making a fish-eye which, I predict, will sell no more than a dozen world wide. Sure, every snapper really needs one of those.

The picture below shows the size of the Pentax Q (red rectangle) superimposed on the Panasonic G1 (my current snapper) and G3 (on order) – you get a picayune sensor in exchange for a very small reduction in bulk. The thickness dimensions vary little:

Pentax Q outline superimposed on the Panasonic G1.

Pentax Q outline superimposed on the Panasonic G3.

That equation does not solve for this photographer.

500gB iPad

It’s happening.

The two biggest disabling issues making it impossible for serious photographers to use the iPad as a portable photo processing device are the paucity of good photo processing apps and the iPad’s low storage capacity.

The former issue is being rapidly resolved as new processing apps geared to touch screens seem to be appearing wekly.

The latter has finally been addressed by some clever people at Hitachi.

Click the image for the Hitachi site.

The device, priced at $200 and available in 4 weeks, will behave as a wireless hard drive for your iPad. So, if it works as advertised, that means that you should be able to download your RAW files to the device and then process the images from your iPad. Whether direct download from a USB card reader to the G-Connect is possible is unclear, but if it is and if delivers as promised, I’ll be in line.

Given that the primary (only?) reason to buy a 64gB iPad over the 16gB one, a poky 48gB storage increase, is if you want to store lots of videos or RAW files on your iPad, why not get this device instead? The price increase is the same, the weight penalty minor – it’s likely little larger than a notebook HDD – and you can use it as a wireless disk with any computer.