Speed, speed, speed!
You can’t be too rich, too thin or too fast. And while adding a Solid State Drive to your work computer doesn’t demand great riches, it is thin and, my goodness, is it fast.
My first hard disk drive was bought in 1982, It was the size of a shoe box, made loud clicking sounds when accessed, stored 10 megabytes and cost $1,200. Today our home has no less than 12 terabytes of storage, or more than one million times what that shoebox stored, the whole thing is the size of that same shoebox and the replacement cost is …. $1,200. The spinning disk drives making up that storage may represent a technology in the last quarter of its life, but that technology is a triumph of function over form, and represents the peak of American engineering and materials science genius.
Sharp eyed readers will have noticed that Western Digital, a large HDD maker, just bought Hitachi’s HDD business last week. Well, there’s an old saying in investment banking of which WD is blissfully ignorant: “If you tie two rocks together, they still sink”. It’s a bit like getting into LP manufacture based on some nut’s claim that “the sound is so much better”. Uh huh.
Within a generation all that spinning disc storage will have been replaced by flash memory, which is already the only storage found in every iPad ever made and in most iPods. It’s no surprise to learn that Apple purchases 60% of the world’s flash memory chips. Laptops increasingly use it and if you want to give your G3/4/5 PPC Mac a last lease of life, flash storage in the guise of an SSD is the single best thing you can do for it.
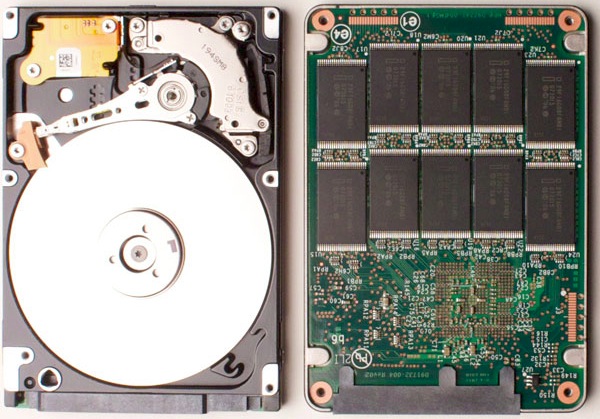
Out with the old, in with the new.
What clued me in to the idea of adding an SSD to the HackPro, my daily workhorse, was the outstanding operating speed of my MacBook Air, which despite using a very small SSD and a poky 1.4gHz, dated, Intel CPU mated with a modest 2gB of RAM, spanks the HackPro for overall speed, despite the latter’s 4 core Intel CPU which runs at 2.83gHz with 8gB of RAM.
And because I’m constantly in and out of Lightroom, Photoshop, iWork Numbers, Safari, Firefox, iCal, Mail, NetNewsWire, Excel and Word, as well as several stock market systems for my day job, the difference in operating speed of the HackPro compared with the MBA was beginning to irritate me.
So when the HackPro’s builder, the pseudonymous FU Steve, was in the vicinity the other day, he offered to pop my newly acquired Intel SSD into the Hackster. FU did the work, I snapped the pictures and screen shots.
SSDs are still expensive. I bought a 120gB Intel SATA model from Amazon to place the OS and applications on it. I opted for Intel as it has the lowest failure rates and the most capital supporting it. It has a three year warranty and cost $230. By contrast, a 500gB spinning disc notebook drive can be had for well under $100. Is the SSD worth it? Read on.
In time, SSDs will become as cheap as traditional drives are today, a related appeal being the SSD’s lower power consumption. A typical notebook drive uses 1-2 watts compared with 0.15 watts claimed by Intel for its latest 35nm technology second generation (G2) SSD with no moving parts. If you are interested how Mac OS X handles TRIM for an SSD (garbage management), click here. I am unaware of the absence of TRIM yet being a problem in Macs.
Here’s the size of the relevant directories on my HDD which will have to be moved to an SSD for the OS and applications to work:
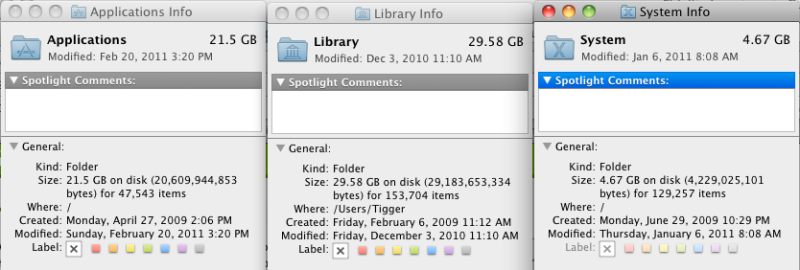
FU Steve says you can chuck the CD which comes with the Intel SSD if you use a Mac. It seems that those afflicted with Windows need it – an OS at the same point in its life cycle as the spinning HDD. Before installing the SSD, FU formatted it in my Aluratek USB cradle which ordinarily plays host to my TimeMachine HDD, using Disk Utility (Mac OS, GUID, journaled). That took all of 30 seconds.
Using the external cradle allowed FU to test everything. He copied the above directories to the SSD, adding in Users but excluding my user data files (pictures, movies, music, etc.) and 95 minutes later we had this, using Carbon Copy Cloner.
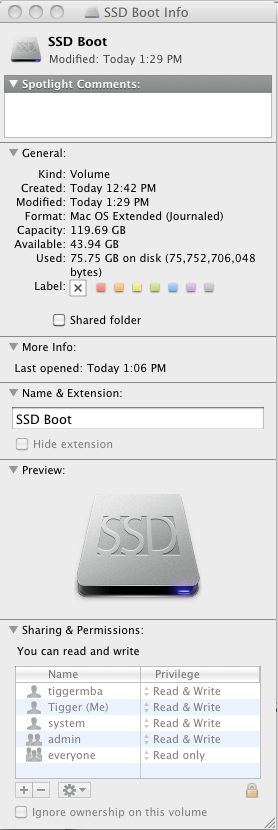
By purging old, unused applications,
I now have almost 60gB of free space.
There’s still a lot of space left on the SSD for new apps and OS upgrades. If you want to add that nifty SSD drive icon which FU used, surf the web looking for ‘Mac ICNS files’, download the icon of choice, then do a ‘right-click, Get Info’ on the SSD and drag and drop the ICNS file on the small top left picture, above.
One of the best ways to see what is taking up space on your disk, and hence determine what can be erased, is to use a product like OmniDiskSweeper, which will show space use by directory and size. Of the 60gB or so used on my 120gB SSD, no less than 10gB is for WinXP + VirtualBox. I would dearly love to get rid of XP but it’s still essential for the occasional business application where no OS X version exists. If you erase apps, use something like AppCleaner which will erase not just the app but also any related files which may be lurking in other directories.
Before going further FU Steve made sure to install the boot loader from the HDD to the SSD to make the drive self booting. It does not get copied over otherwise and your SSD will not be bootable. If you don’t know what he’s doing here, click on ‘Hackintosh’ in the right hand column and read the build articles. The boot loader is a small piece of code which fools the OS into thinking it’s looking at a regular Mac. FU booted from the cradle-mounted SSD and all was well.
Next came installation. Here’s what’s needed from the box, plus the Antec case mounting plate from the Hackpro:
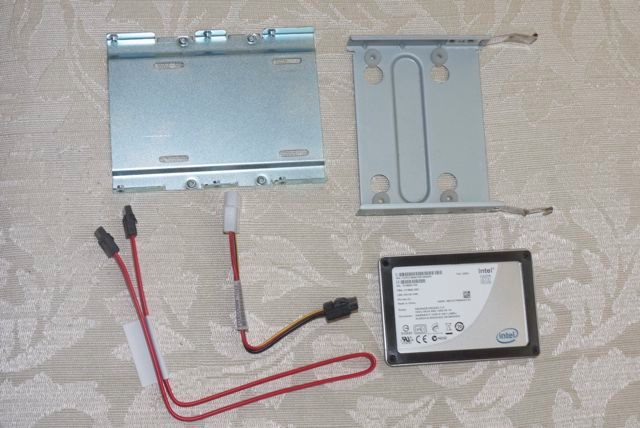
Adapter plate top left, Antec Sonata HDD plate top right, data and power cables, Intel SSD
There’s no need to buy an adapter plate to fit the notebook-sized SSD in the regular HDD drive bay. Intel thoughtfully provides it. The SSD is screwed to the adapter plate using the small screws provided. If you use the excellent Antec Sonata III case which FU used in the HackPro, the other set of screws is too short to mount the SSD on the silicone shock resistant bumpers which Antec provides for its hard drive mounting plate. Use the long collar screws provided by Antec.
Here’s the SSD mounted with the (locking) cables in place:
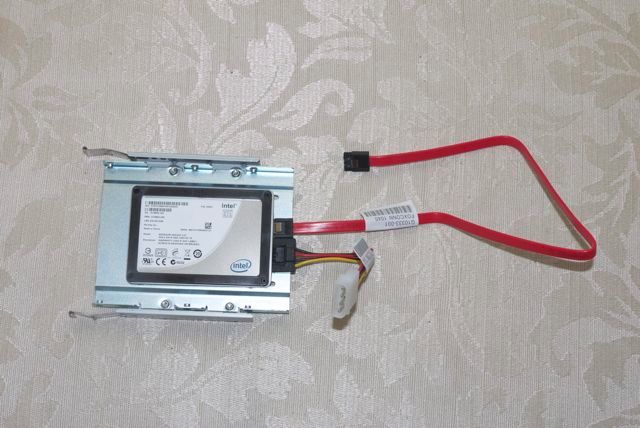
Installation in the HackPro was trivial for FU – he simply connected the power and data cables and slid in the assembly, connecting the data cable to an open SATA II socket on the motherboard. The Antec case has so many redundant power supply cables that finding a free one for the SATA power connector was not an issue. The whole mechanical part of the installation took FU Steve maybe 30 minutes, much of it spent undoing his neat tie wraps of all the unused cables so as to fish out an additional power cable for the SSD. His snipping off of the old tie wraps had me looking away, I confess. As usual, FU made sure all the loose cables in the HackPro were anchored with new tie wraps before replacing the cover.
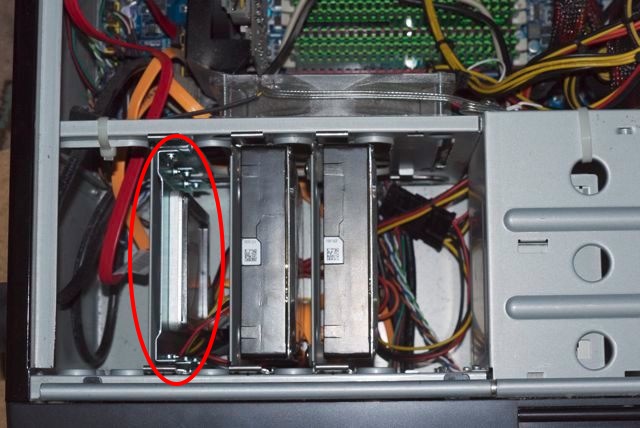
Intel SSD in the HackPro. Two 1 tB Samsung HDDs to the right.
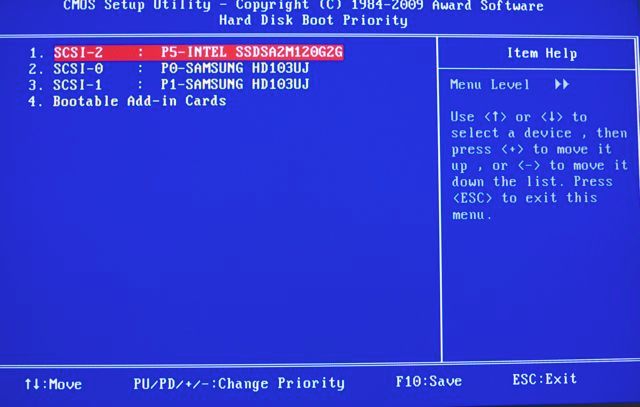
Finally, a quick change in the BIOS (hit ‘Delete’ at boot) to make the new SSD the boot drive:
Heat:
Temperature Monitor reports that the Intel SSD runs at room temperature. There is no temperature rise. The two Samsung 1tB HDDs show no rise either and all three drives have a large fan almost in contact with them to draw away any heat. You will not get this sort of heat management in your Mac, where looks trump function.
CPU:
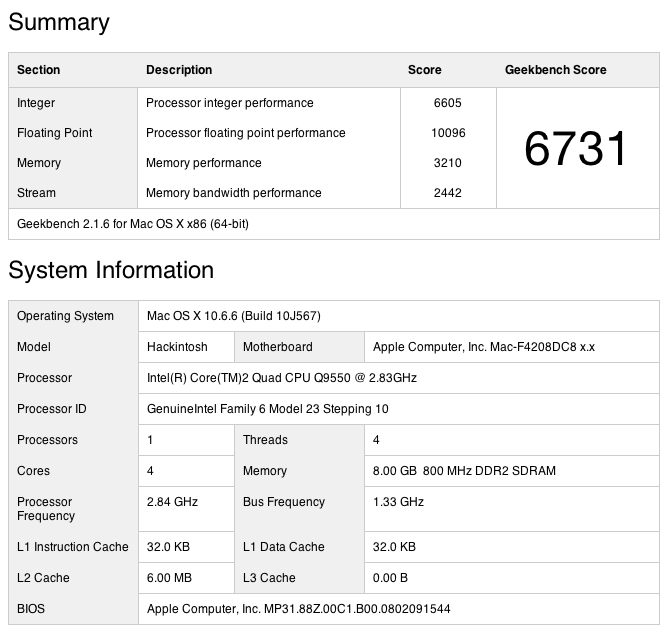
My HackPro uses an Intel Core 2 Quad Q9550 CPU; I have read that the later i5/i7 CPUs, like those found in the latest Macs, require a firmware update for the Intel SSD to work. That means you have to download the firmware from the Intel site while running on your existing HDD, load it to the SSD then proceed. You should do your research first if you are using an i5/i7 Mac. The Intel link is here.
Other applications:
Some precautions/changes are called for when you first boot from the SSD.
Photo processing
You have to tell Lightroom, Photoshop, Aperture and iPhoto where to look for data files. Likewise most other apps which use databases are clueless until pointed appropriately. Be sure your Carbon Copy Cloner settings for overnight backups are correct.
To redirect iTunes, which is now booting from the SSD, hold down the Option key while starting iTunes then point it to the library on your HDD data drive.
Make sure Lightroom Preferences use the SSD for the Cache – cache files are created by LR when you roundtrip RAW files to Photoshop:
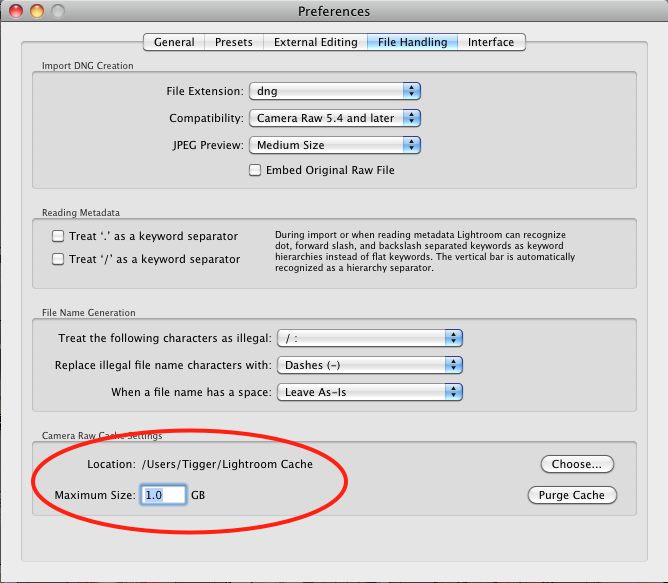
Lightroom3 directory created on SSD Boot->Users->Tigger (me!)
Next, make sure Photoshop is using the SSD as the scratch disk for temporary processing files – PS can get pretty disk intensive with complex photo processing:
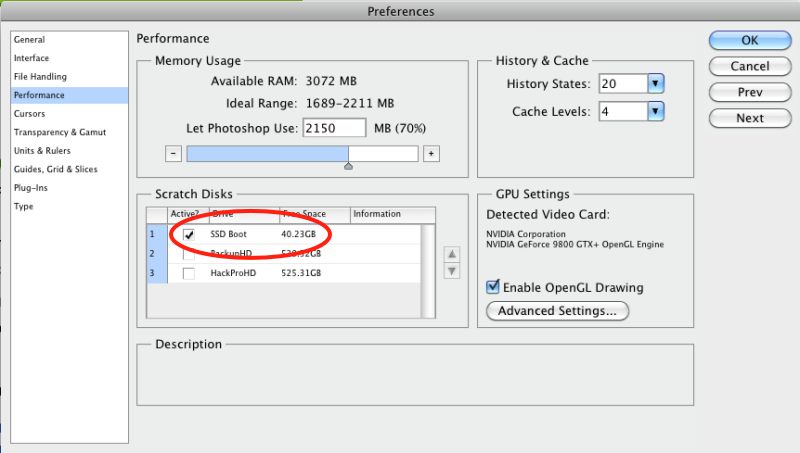
Photoshop Preferences for the scratch disk.
Finally, if you use TimeMachine, check that it’s backing up from the right data drive to the TimeMachine drive. I left the OS on the HDD I previously used to boot from, in case the SSD blows, so there’s no need to backup the SSD.
1Password:
If you use the excellent 1Password app to keep your passwords and software licenses securely sync’d on all devices using Dropbox, delete the 1Password.agilekeychain in your cloud Dropbox folder, and send the new file from the SSD to your cloud Dropbox folder, using 1Password->Preferences->General->Data File->Move to Dropbox.
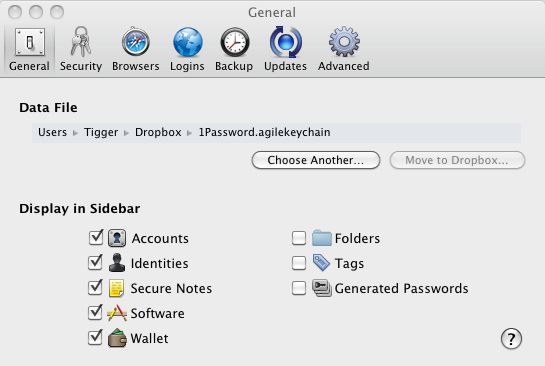
The data file shown is on the SSD, NOT on your old HDD.
If you fail to do this your local changes on the SSD’s 1Password will disappear at the next automatic sync and will leave you scratching your head!
Speed?
Time is money. Any statement to the effect that SSDs are too costly in $ per gigabyte is trying to solve an equation with a missing, key variable – the value of time.
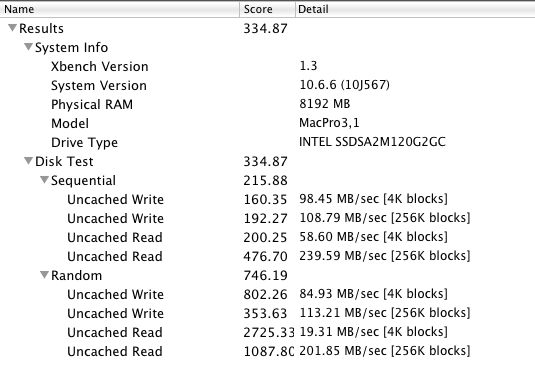
Boot and related times for common apps are 2-4 times faster. Here are some examples (current application versions unless indicated otherwise):
Lightroom: 3-4 seconds
Lightroom – create TIFF file from RAW and open it in PS CS4: 5 seconds if PS is open, 8 seconds if PS needs to be loaded
Lightroom – Create a 240dpi print file from a RAW original and open it in Preview for soft profiling: 8 seconds
Photoshop CS4: 3 seconds
Aperture 2.5 : 3 seconds (I gave up on Aperture after this version)
iPhoto (8.1.2): <3 seconds
iCal: <1 second
Apple Mail: <1 second
NetNewsWire (RSS reader, 50 feeds): 2 seconds
MS Word (2008): 3-4 seconds
MS Excel (2008): 3 seconds
iWork Numbers: <1 second (startlingly fast)
iWork Pages: <1 second (even faster than Numbers)
iTunes: 2 seconds
Bento (database): 4 seconds
Win XP SP3 (under VirtualBox): 25 seconds (no comment!)
Cold boot: Not measured. My HackPro runs 7 by 24 and is never switched off, so cold boot time is irrelevant to me. That said, it's probably twice as fast - MacSales has some videos which make all sorts of comparisons.
MacBook Air, 11" 1.4gHz Intel i5 CPU: This speedy machine takes one-and-a-half to twice as long to load all of the applications listed above, except for Aperture and Win XP, which I have not tested. I will not be testing those, having better thing to do with my time.
Here are the xBench HD scores. Higher is faster. These data bear out the '2-4 times faster' claim I made above.
First the 7,200 rpm 1tB Samsung HDD:
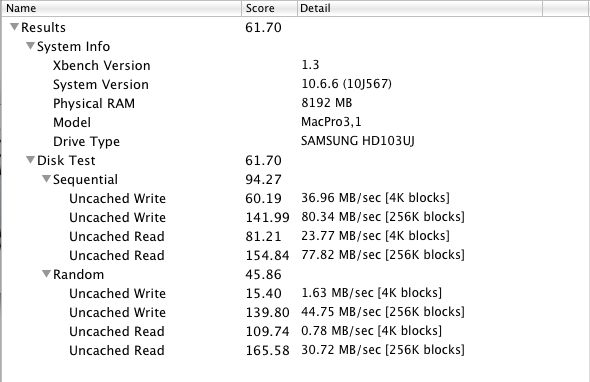
Then the Intel SSD:
Once you have an SSD, there’s no going back.
Current drive topology:
Here are the drives in and around the HackPro:
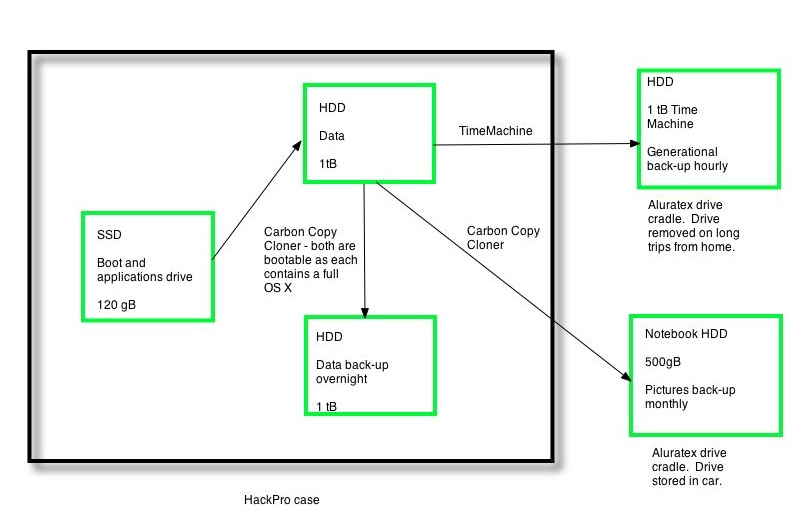
Drives in and around the HackPro, with thanks to FU Steve.
Here’s the thinking:
- If the SSD blows I can boot from either internal HDD as each has a full bootable OS on it.
- If the SSD and one of the internal HDDs blow, I can boot from the other internal HDD.
- If the HackPro gets incinerated, I can restore from the external TimeMachine back-up.
- If the HackPro and the full TimeMachine back-up get incinerated, I can at least restore my Pictures from the notebook HDD in my car, though the OS and apps are lost..
- If the Big One hits locally I’m SOL.
- No back-up in the ‘cloud’. Just don’t trust it or its custodians.
- And I would rather lose the lot than entrust anything to some schmuck bankster’s safe.
There are four additional remote drive enclosures, each containing two 1 terabyte mirrored Samsung drives, for movies. Those are not shown here, and will soon be obsoleted by the growing ‘cloud’ storage of movies.
Doing this on a real Mac:
You can buy SSD options in new MacBook Pros, iMacs and MacPros. Cost premia are little more than buying your own. If you want to install an SSD later, it’s plug-and-play in MacBook Pros and MacPros, and a real pain in iMacs (where the glass cover has to be removed with suction cups) and MacMini’s (which are hard to dismantle). In MBPs your warranty is not invalidated; I don’t know about the others. For the MBP user, there’s an attractive option to remove the DVD drive and install an SSD in its place, if you do not play DVDs. This allows you to retain the HDD which came with the machine. MacSales and other vendors have the kits.
Use the drive in an external enclosure or cradle:
If internal installation is too hard, you can always have your Mac boot from an external SSD. (System Preferences->Startup Disc or hold the Option key when starting your Mac). When FU Steve was setting mine up using the external cradle, he tried booting from it and overall speed was comparable to when he eventually installed it inside the HackPro. That’s surprising as it compares a relatively slow USB connection (cradle) with a SATA II one (internal). A viable solution when you cannot open the computer’s box or do not want to and ideal for older G4 and earlier iMacs which are hell to open up.
What’s next?
Unless you are doing heavy video editing, the ever increasing clock speeds and number of cores in CPUs and GPUs are of little practical use. Few applications take advantage of multiple CPU cores and your rig is only as fast as its slowest part. As an example, my HackPro is little faster with 8gB of RAM than with 4gB and overclocking the CPU adds stress to the hardware with little effective speed gain.
A speedier graphics card with more video memory is an excellent investment if you process pictures or video (or play games), if your motherboard will support it. It will do more for your productivity than faster CPUs and RAM. The HackPro uses an EVGA Nvidia 9800GTX+ with 512mB of RAM; there are faster cards but for photo processing the 9800 is probably more than you need already.
In practice, for users accessing the web or the ‘cloud’, that slowest part, by far, is their broadband connection. The US is cursed with very poor broadband speeds compared with Europe and Asia, so until those improve, loading up with faster CPUs and RAM accomplishes little. Optical fiber, like Verizon’s FIOS, is slowly being rolled out and promises speeds far higher than the modest 5-10 megabits/second common with regular broadband. But it’s costly to install, so don’t hold your breath.
Then, when you finally get through to your web site of choice, you are beholden to the speed of its servers, which can be frustratingly slow, especially at peak use times.
So while an SSD would not be the first item on my list when in search of overall operating speed, it was the next logical step, as I already had a very competent CPU and GPU and cannot do anything about AT&T’s poor broadband speed. (I use Uverse which, unlike FIOS, still uses copper wires for the ‘last mile’ to the home and when they tried to ramp me up from 10 to 15 mb/s my speeds actually dropped!)
* * * * *
Thank you, FU Steve, for once more moving the HackPro to the front of the line.