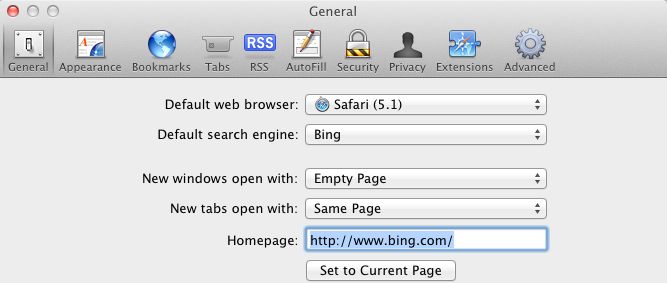
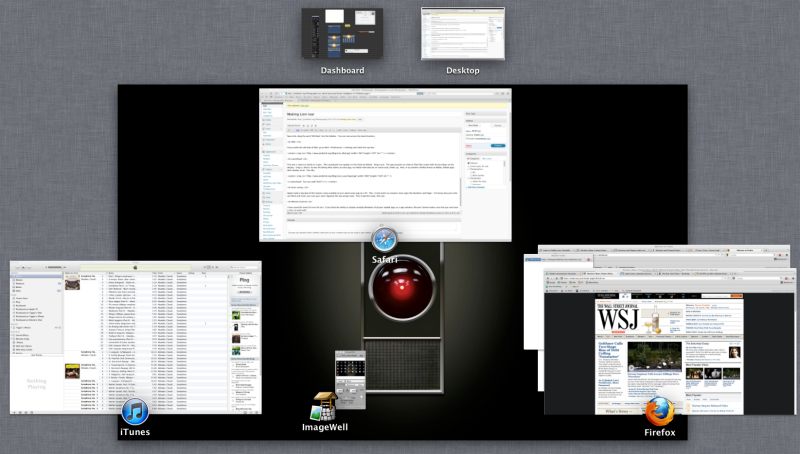
A bit tricky, but now working.
My Hackintosh was resolutely refusing to download Lion from the App Store, telling me the new OS cannot be installed. Despite trying every trick in the book, I was stuck. My Hackster is the original Adam Pash Lifehacker build (click Hackintosh menus at the bottom of the page) and despite many upgrades to hardware – RAM, HDDs, two SSDs, better cooling, you name it – has been rock solid for the past two years, running 7/24. I have little need for the new things in Lion, many of which seek to emulate the IOS experience and to some extent dumb down Mac OS, but am aware that once you fall behind, Apple has every incentive to brick your machine so they can sell you a new one. As I got tired of recycling Apple’s poor hardware and of the related burning smell from its graphics cards, I very much decided to go with OS Lion ASAP to keep my Hackster burbling along, if not boiling.
Time to call FU.
What follows was written by my old geek buddy FU Steve, who was responsible for building the HackPro originally. ‘I’ refers to FU in what follows:
*****
So I went to Thomas’s MacMini (Core2Duo CPU), had him pay $29.99, downloaded Lion and, before hitting install, copied the installation file to an 8gB USB flash card – like the one used in cameras. The Lion license applies to all machines you own – no more Family Pack premia. Thomas uses the Mini as a Home Theater PC only – it’s too lightweight for his heavy duty processing needs.
After experimenting with various methods, I settled on the Kakewalk one, mainly because it provides specific support for Thomas’s Gigabyte EP45-UD3P motherboard. This mobo uses the Intel Core2Quad (Q9550) CPU, clocked at 2.83gHz and while that’s considered dated, your Mac is as fast as its slowest part which, for Thomas, is his mediocre AT&T broadband. There’s no reason to junk the mobo, CPU and RAM just because something theoretically faster on paper is out there. If Kakewalk works as well for you as it does for me, please be sure to make a donation to the author.
You can download Kakewalk here. It supports a very large variety of motherboards and graphics cards; the complete list is here. You will also need Chameleon 2.0 RC5-r1083 – Google it. That’s the small app which makes a drive or partition bootable. With the Lion flash card in one USB slot and another empty 8gB flash card in another USB slot (both originally formatted Mac OS Extended (Journaled), GUID partition), create the USB installer on the empty flash card. Now here’s where the Kakewalk instructions failed me. I restarted and tried booting from the Kakewalk USB flash drive, as instructed. No go. Some research disclosed others were having difficulty here, so I did what follows.
First, be aware that Thomas uses two SSDs in his Hackintosh. Boot and Backup. (His Data and Data backup are on HDDs).
- I divided the Backup SSD into two partitions – 110gB and 10gB, the latter named Lion.
- I then used Carbon Copy Cloner to clone SSD Boot to SSD Backup and tested that I could boot from SSD Backup.
- I then cloned the Kakewalk USB flash drive to the SSD Backup – Lion partition.
- Next I ran Chameleon and applied it to each of SSD Boot, SSD Backup and SSD Backup-Lion, testing the first and second in turn to make sure I could boot from either.
- Then I removed the Kakewalk USB flash card from the USB port (essential or the system freezes), restarted and told the Hackintosh to boot from the SSD Backup-Lion partition. Tons of script scrolled by and the installer started.
- I told the installer to install Lion to SSD Backup (which contains Snow Leopard and all Thomas’s applications) and after about 5 minutes (SSDs are fast) the installation was done.
- Next I restarted and told the Hackster to boot from SSD-backup and all was well.
What’s going on here? The Chamelon app works off a hard drive or SSD but will not work off a USB flash card. By cloning the USB install data to a partition on the Backup SSD I made it possible to boot the installation ‘disk’ from the SSD. An HDD will work as well, but will be slower.
This is what greeted me after restarting from SSD Backup:
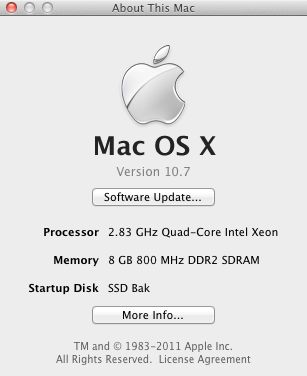
The CPU is actually an Intel Core2Quad, but Kakewalk is fooling the OS into believing it’s a Xeon as the Core4Quad was never shipped in any Mac.
The beauty of this approach is that you are installing onto a drive which already contains all your apps, so no use of Migration Utility is required.
Thomas had me run a bunch of tests on apps and hardware he uses most. Here are the results.
First steps after installation included downloading the Java update from Lion’s Software Update, updating Apple Mail (click), updating SpamSieve for Mail (click-click), installing the updated 1Password (essential for Thomas) and generally getting a feel for things.
What does not work:
First, the OWC Sales/Newer Technology USB->DVI adapter no longer works, meaning Thomas has lost the use of the third Dell 2209WA display he uses; the Hackster has but one Nvidia 9800GTX+ GPU card and that supports only two displays. The third needs the USB->DVI adapter. This will have to await a software update for Lion; System Preferences->Displays still ‘sees’ the third Dell. (See ‘Anomalies’ below).The alternative wireless dongle from Newer Technology does not work, another candidate for a software update. No old PPC apps work – Quicken 2003/5/6/7 (Thomas converted all his Quicken 2005 data to iWork, the least bad alternative, and they are all bad), EyeOne Match for the EyeOne Display2 colorimeter, as discussed earlier here.
Update: OWC has released an updated driver for the dongle and all is now well.
Sleep:
I could never get Sleep to work in Snow Leopard – any version. If you put the computer to sleep using the mouse or to timed sleep (System Preferences->Energy Saver) the BIOS would be reset and the Hackintosh would refuse to restart, requiring a complete boot cycle. As Thomas requires ‘instant on’ functionality, he simply left his Hackintosh running 7-by-24. Very energy wasteful.
Well, Sleep still does not work with the factory provided Lion OS; the BIOS is trashed and has to be recovered on restart. Even worse than with Snow Leopard. But I have finally managed to get it working in Lion – keyboard/mouse or timed. You need to replace the SleepEnabler.kext kernel extension in Lion. To do so, download the Kext installer here – it’s named KextBeast. Then download the replacement SleepEnabler.kext here. Install it. Sleep now finally works. Set your preferences for Sleep in System Preferences->Energy Saver.
What does work:
Sound and wireless broadband (TP-Link card with an Atheros chip emulating Airport) worked immediately.
Photography applications:
- Lightroom 3.4.1 with Camera Raw 6.4.1 – no issues. Running in 64-bit mode.
- iPhoto ’09 v 8.1.2 – no issues.
- Bonjour printing – all Thomas’s printing is wireless. Brother HL-2170W monochrome laser printer – perfect. Hewlett Packard HP DJ90 color inkjet dye printer – perfect. Tested by making a big print from Lightroom. Phew! Real deal breaker for Thomas if this failed.
- Photoshop CS5 v 12.0.2 64-bit – no issues
Speed benchmarks:
Geekbench – CPU performance:
In OS Snow Leopard 10.6.7:

On OS Lion 10.7.0:
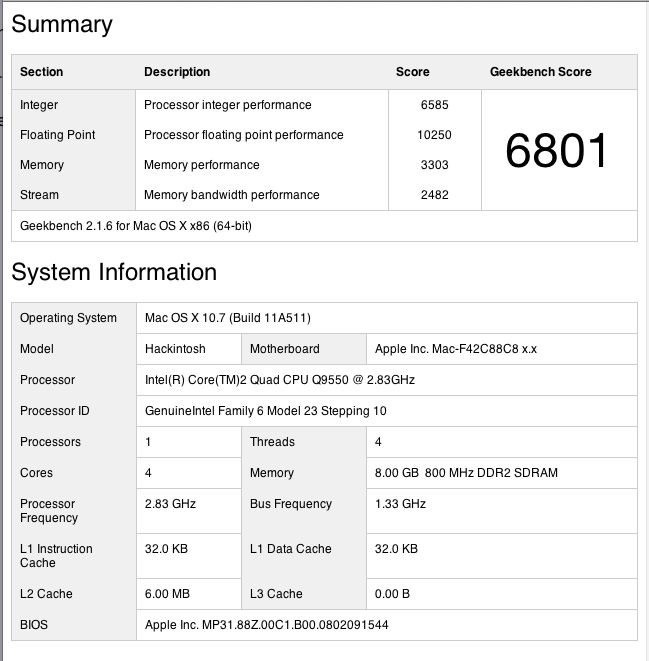
That’s virtually identical.
For reference, here’s Geekbench running on my MacBook Air, the one with the 1.4gHz Intel Core2Duo CPU:
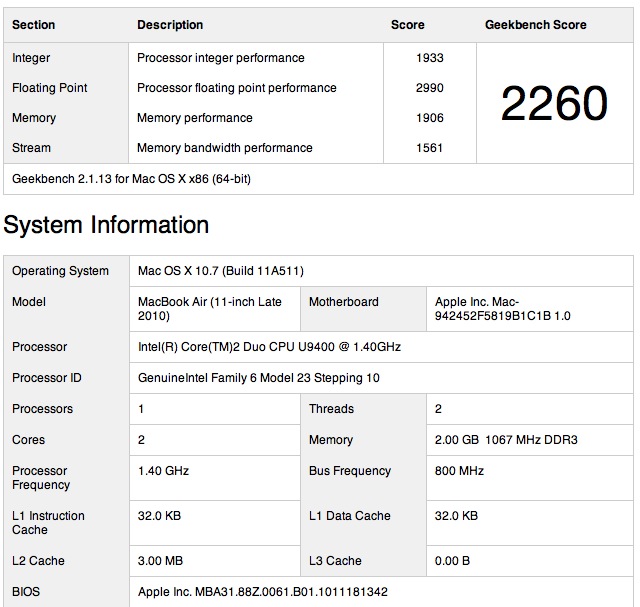
Those running Intel Core-i7 CPUs with 1333mHz RAM can expect a score of around 12,000 with up to 16,000 on the fastest (and costliest) systems.
Cinebench:
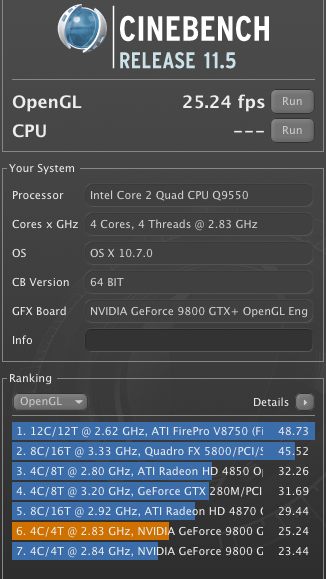
You can see how Thomas’s Hackintosh compares with some of the fastest machines out there in this test – here’s the Open GL test. The GPU is an Nvidia 9800GTX+:
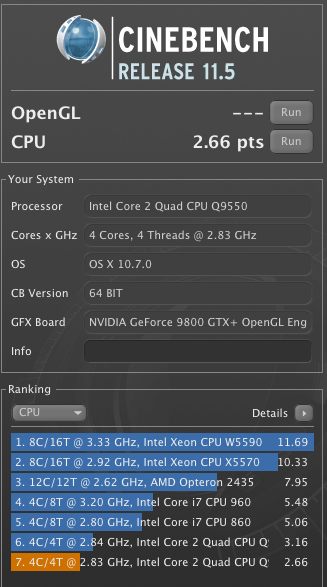
And here’s the CPU test – you want to make sure your machine is really well cooled before doing these:
CPU operating temperature:
The key design brief for my Hackintosh was exceptional cooling. Thomas lost several MacBooks and iMacs to overheating. Here’s the recent history of the steady state idling CPU temperature in his machine:
OS Snow Leopard 10.6.0 through 10.6.7 – 107F
OS Snow Leopard 10.6.8 – 115F
OS Lion 10.7.0 – 115F
Snow Leopard 10.6.8 incorporated much of the Lion code and accounted for the 8F temperature rise. Lion keeps it unchanged, so realistically Lion runs 8F warmer than Snow Leopard. That’s never a good thing, but with a case temperature operating limit for the Intel Core2Quad Q9550 of 176F, there’s lots of headroom left. If your CPU is a Core2Duo the operating limit is higher – check it at Intel’s excellent site.
Other useful apps which work fine (nearly all have been reviewed by Thomas here – click the search box at the top of the page):
- Total Finder – Finder with tabs and split screen
- Moom – screen splitter
- HideSwitch – shows invisible system files
- Firefox 5.0.1 – second rate browser
- Fingerprint – print from an iPad or iPhone
- Transmit – with an update
- Dropbox – what MobileMe should be
- MouseLocator – flashes a green circle to help find the mouse cursor – see ‘Anomalies’ below
- NetNewsWire – RSS feed aggregator
- ImageWell – used for posting images to blogs
Other applications which do not work yet – meaning they probably do not work on genuine Macs either:
- LogmeIn – remote desktop. Update July 25, 2010 – LogMeIn just issued a new desktop Lion app upgrade and the app now works properly.
- Realtek Wireless Utility for Newer Technology wireless USB dongle – fixed – new driver installed
- Newer Technology USB to DVI display adapter and software – fixed – new driver installed
- SecondBar – shows the menu bar on all displays – fixed – see ‘Anomalies’ below
- TrimEnabler – garbage management on SSDs – fixed – just re-download and re-install the current Snow Leopard version
Anomalies:
- Thomas uses Dell 2209WA displays, which come equipped with two USB pass-through sockets per display. These USB sockets have ceased working though I have confirmed that the related sockets on the Hackintosh work fine. There’s a driver update here and once installed the third display comes back to life and the Dell USB pass through sockets become live again! Further, the new driver finally allows screenshots to be made from the related display.
- The Hackintosh has a built-in Sony SDHC card reader. This has ceased working. However, plugging Thomas’s SDHC card into an inexpensive Transcend USB card reader and plugging this reader into one of the two front USB sockets on the Hackintosh has the card recognized and readable.
- Re-downloading TRIM Support Enabler and reinstalling it has TRIM working on both SSDs, as confirmed by System Report-Hardware-SerialATA.
- MouseLocatorAgent – causes jerky mouse cursor behavior, so switched off in System Preferences.
- AirDrop, Apple’s new file sharing technology, does not work on the Hackintosh, but is fine on other Lion-equipped Macs.
- Second Bar is a wonderful utility which permits display of the Finder menu bar on multiple displays. There’s an update for Lion, though it does not work on USB-DVI connected displays. The Snow Leopard version is unstable.
- AirDisplay, which permits the use of an iPad as a second (or third or fourth or ….) display, needs a new driver for the Hackintosh.
Final steps:
With everything working well, I used Carbon Copy Cloner to clone SSD-Backup to SSD-Boot and restarted from SSD-Boot, the default startup drive. I left the SSD Backup Lion partition in place in the event Lion ever needs to be installed elsewhere, or reinstalled. If the drive with the installer fails, Thomas has the SDHC flash card installer which can be cloned to a new drive from which a fresh installation can be made. The beauty of this approach is that a fresh install can be made to any drive. The latter need not contain any predecessor OS.
So if you, like Thomas and I, are a reluctant but resigned upgrader to Lion and use a Macintosh, things overall do not look too bad. I expect Thomas to get an easy two more years from his HackPro.
*****
Thank you FU Steve, for all your hard work in keeping the HackPro current.
This blog post was written and posted from within Lion.
Does a Hackintosh make sense? An addendum from FU Steve.
With the latest iMacs increasingly price competitive and very fast, do the blood, toil, tears and sweat involved in crafting a Hackintosh still make sense? Thomas addressed this at length here. In summary, if you want the last word in robustness, reliability, easy parts availability worldwide and low repair costs there is no Mac, whether Mini, iMac or Pro, which compares with a Hackintosh. Further, modern software ‘builds’ allow the OS to be updated using Software Update, with manual labor only involved at major version changes. If you need the latest in CPUs/GPUs/RAM speed you would be building a Hackintosh with Intel’s fastest i7 CPU, an ATI Radeon HD5970 graphics card and 16-32gB of 1666 mHz RAM. Your all in price would still be less than half that of a MacPro and parts availability/upgradability infinitely better. So it’s a ‘horses for courses’ decision. With the exception of the MacPro, there is no Mac made which I would trust when it comes to reliability under hard use, all failing the test of proper ventilation/cooling with exorbitant repair costs when they break once out of warranty.
Since Thomas wrote that piece, the iMac and Mini have added Thunderbolt high speed data ports; this is Intel’s LightPeak technology on which Apple has a one year exclusive, meaning that PCI-E LightPeak cards will become available for PCs some time in early 2012. Tests confirm that this technology is faster than USB2 by an order of magnitude (meaning ten times faster) and is faster than eSATA. If you are moving large quantities of data – like video files or BluRay movies – this is a worthwhile investment and Thomas has told me he will likely ask me to add a card to the Hackster once disk drives sporting Light Peak connectivity become common and affordable.
The capacious box of the Hackintosh not only provides ample space for cooling radiators and fans, it also accommodates many drives:
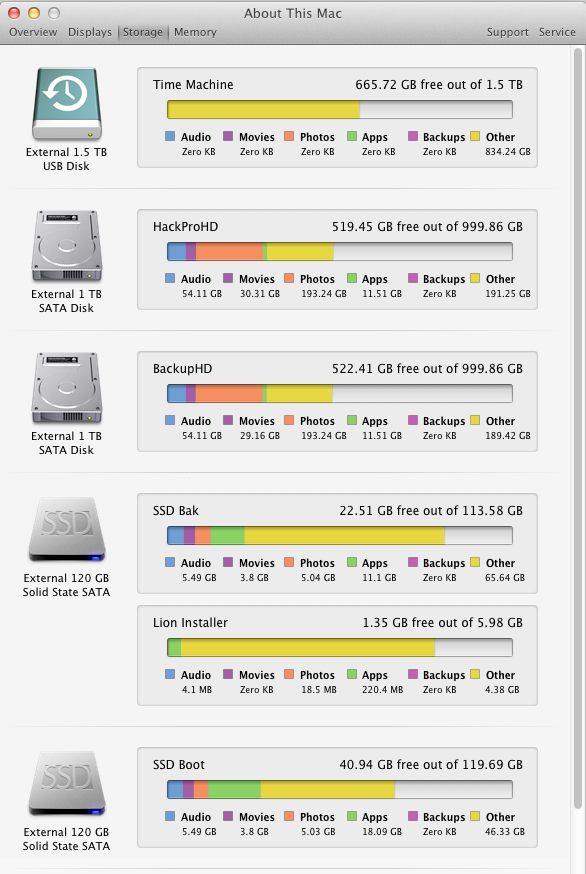
Drives in the Hackintosh. All are internal (labels are wrong) except
TimeMachine which is in an external cradle.
You can see how all these drives work together by clicking here.