Category Archives: Photography

PDF camera manuals on the iPad

A great use for the device.

It’s debatable which is more obscure – the US tax laws and regulations (appropriately known as the Internal Revenue Code) or the printed manual for the Panasonic G1 camera, a piece of hardware I like to think I know and definitely know I love. Try to find anything in that manual’s execrable printed booklet which comes in the box, 168 pages of poorly organized materials with a genuinely worthless index, and you will redefine the meaning of frustration.

Well, GoodReader and the iPad to the rescue.

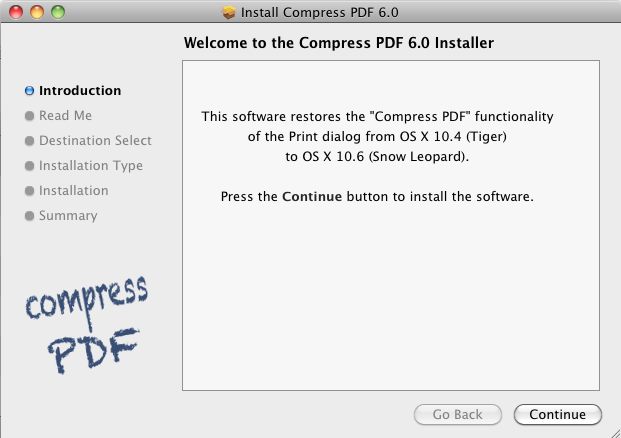
Simply download a PDF of the manual from Panasonic then upload it to the iPad – I have done this for my Canon 5D and both Panasonics I own – the LX1 and the G1. Handy for those occasions when you forget how some rarely used setting works in the myriad of screens, dials and buttons which typifes modern gear. The 5D and LX1 come in at 5-6mB each but, for reasons only know to the twit who assembled the like-length one for the G1, that one comes in at a whopping 50.7mB! To compress this file before uploading it to the precious free space on your iPad, if you are using Snow Leopard on your Mac, download and install Apple’s Compress PDF Workflow utility to restore the PDF Compress option in the Print dialog which pops up when you load a PDF using Preview (not Adobe Reader) and hit Print – for some reason this option went missing from Snow Leopard.

Here’s the files sizes after and before – duh!:

I’ll leave it to you to figure out which one to upload to your iPad. The smaller one shows no quality deterioration and a keyword search is many times faster.

The beauty of the GoodReader app is that it has a search function, far more powerful than the miserable table of contents provided by camera makers.

Here’s the title page of the 5D’s manual:

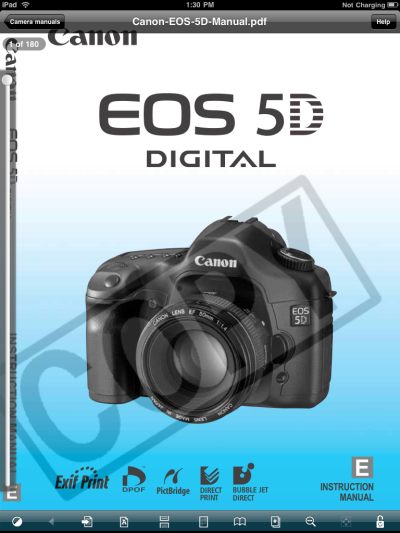
The Canon 5D’s 180 page manual on the iPad, viewed in GoodReader.

Goodness knows why Canon decided to label this ‘Copy’ – it’s not like it’s a Leonardo, after all, but whatever. The vertical scroll bar at left permits you to zip through the manual in GoodReader whereas the magnifying glass at the base permits word search.

Here’s a page search result in the G1’s manual where I searched for the word ‘Multiple’, highlighted in blue:

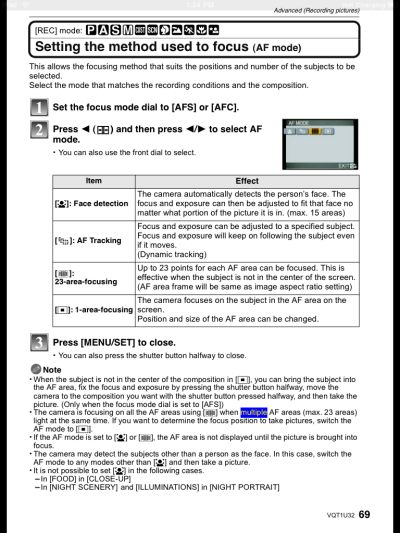
A keyword search in the G1’s manual.

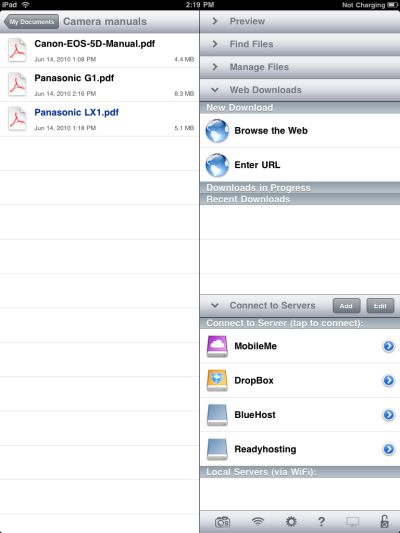
Here are all three manuals uploaded to GoodReader on my iPad. I keep them in a separate sub-folder to clean up the clutter:

Not, you understand, that I would ever forget how my camera works ….

A moment’s thought suggests the infinite number of uses this could be put to – machine repair manuals for field technicians, heart transplant manuals for doctors, legal tracts for scumbag lawyers, and so on. Heck, I may even keep my tax returns on mine when I want some really depressing reading.

Lightroom 3 grain

A useful addition.

One of the new features in LR3 is a set of sliders to add and manipulate the traditional effect of grain from film days of yore.

Here’s a straight, unprocessed snap:

Plane, graves and flowers. 5D, 1/350, f/11, 24-105mm at 24mm.

Here’s an enlarged section of the above – note the grain sliders at lower right:

And here it is with the grain sliders adjusted to emulate high speed color film grain – I have to use enlargements to show grain owing to the grain free nature of the 5D’s sensor:

The Roughness setting, here at 38, is a nice compromise. Too small and the effect is too artificial. Too high and it’s overdone. Much the same goes for the Size slider, which I prefer to keep low.

It’s a useful tool, especially if you hit one of those Sarah Moon faux impressionism periods.

To reset to default adjustments simply double click the ‘Amount’ slider.

Lightroom 3

Some outstanding improvements.

Lightroom 3 has exited the Beta test stage and is now available as a $99 upgrade to Lightroom 2 users. I tried the Beta version but when it choked converting my previews to the new version after an hour of grinding away I decided someone else could do the testing and spent my valuable time elsewhere. Clearly something was wrong as my catalog contains a modest 6,000 pictures. Well, the final version appears to have fixed the issue because after download, a meaty 75 gB, I fired it up and it converted the 1:1 preview files in 3 minutes.

Technical background:

The LR3 preview file is given the 2-2 name by default; change it at will.

The catalog of pictures is not changed in any way.

The hardware I am running this on is my HackPro with OS Snow Leopard 10.6.3, 2.83gHz Intel Core 2 Quad CPU, 8gB of 800 mHz DDR2 RAM and an Nvidia 9800GTX+ video card driving two Dell 2209 21.5″ monitors, so it’s a very fast setup, designed for photo processing. CPU and memory use is modest and I would guess that 4gB would be just fine – Lightroom has always been good in this regard, unlike Aperture.

CPU use for all four cores. I show the effect of paging through several full screen previews here.

Memory use with LR3, NetNewsWire, Mail, iStumbler and SpamSieve running

LR3 runs natively in 64-bit mode.

LR3 allows you to change to what Adobe calls the ‘2010 Process’ for your pictures; I avoided this in light of the warning, below, but LR3 will adopt this process for all future imports, which is fine with me. I don’t want to have to reprocess a lot of older snaps which I am happy with:

LR3 ‘2010 Process’ warning.

Click the ‘!’ logo on any picture in the Develop module and you get this message, meaning you can selectively update to the new process:

Perspective correction:

One of the biggest surprises for me is that LR3 has added perspective correction; I don’t recall seeing that in LR3 Beta. The application can automatically sense the lens used for a limited range of camera manufacturers:

Only a few cameras are supported

Loading up a Canon Fisheye snap from the 5D I see this:

Hearst Castle pool drained for maintenance. 5D. 15mm Fisheye.

Click the ‘Enable Perspective Correction’ box and you immediately get a perfectly corrected picture:

Hearst Castle pool straightened out.

You can make horizontal and vertical corrections but the ‘distort’ feature available in Photoshop is missing. Still, this adds a key tool to the LR application which removes one of the last few uses I have for Photoshop. In LR3 it is fast and perfectly implemented, right down to the remasking of the image to fill the frame after correction.

What if your camera is not listed? Simply click on ‘Manual’ and have at it – an approach which allows both lens distortion correction and correction of leaning verticals.

Here’s an uncorrected image from my Panasonic LX1 with leaning verticals (and leaning everything else owing to earthquake damage!):

Here it is after messing with the slider:

Next you use the Resize slider to fill the frame:

Then hit Enter and you are done:

Until now I have been using the excellent PTLens and round tripping images from LR2. Unless your lens cannot be corrected in LR3, PTLens seems obsolete, though it does boast a huge lens database so is worth keeping, just in case.

If you want to add an unlisted lens to Lightroom 3 rather than using the manual method, simply download Adobe Lens Profile Creator and follow the instructions.

LR3 does not include the useful ‘Distort’ function for dramatic corrections, so it still means round-tripping to Photoshop if that is needed, which is rarely in my case.

Tethered shooting:

I have addressed tethered shooting here on occasion and, frankly, it has been a pain to get it working correctly, what with the need to set up capture folders, tune LR2 just so, etc. That is all in the past. Tethered shooting is now beautifully integrated into LR3 and the following cameras are supported:

I plugged in my Canon 5D to a USB port on one of my Dell monitors and set up LR3 for tethered shooting thus, after which I named the capture folder:

LR3 displays the tethered shooting menu thus:

The big button on the right (it really should be colored red) is the shutter release, or you can use the one on the camera.

Snap, and the picture appears in LR3:

Click on ‘Develop Settings’ and you get the usual choice, together with any you may have saved:

This is a plug-and-play implementation, perfectly executed. Bravo Adobe! The sort of thing you expect from Apple ….

P.S. Adobe – you need to make your LR3 demo videos run on the iPad – face reality and get with the program.

There are lots of other improvements in LR3, including movie processing (not for me), allegedly better noise reduction (not needed with the Canon 5D or Panasonic G1 which are my daily snappers), but the two detailed above alone make the $99 upgrade worthwhile for this photographer. Speed has not been compromised, the interface remains as nice as can be and the improvements need no instruction book to learn.

Recommended. I just paid Adobe for mine!

Plex

A front end for the home theater.

Much as I am trying to simplify life with one remote, and the L5 Remote for the iPhone makes a huge step forward in fulfilling that goal, I have long been experimenting with a like approach to consolidate the front end for use of my TV.

If, like me, you rip your DVDs to external hard disk drives, then I’m afraid AppleTV or a MacMini running FrontRow do not work. For whatever arcane licensing issues that are involved, neither technology supports the TS/VOB file format resident on a DVD and I’m not about to spend half of my remaining years converting all my movies to a format Apple’s software supports. Further, I like the idea of storing movies in their native format as everything else is a compromise and, who knows, one day maybe 100″ LCD screens will become affordable and that original format will look great, whereas an iPad/ATV version will not. Plus storage is cheap, so I’m not about to start compressing my movies to save on a few bytes of space.

Having tried various front end applications which attempt to deliver all your content through one common interface, I have returned to Plex, one of the few which is written specifically – and only – for the Mac. The app is free and I have it running on my MacMini, attached to the TV. Before explain what Plex can do it is important to point out that it cannot accept encrypted cable company feeds delivered through a set top box, meaning you still have to switch to that input to watch TV. Also, it cannot access the iTunes Store for purchase of movies though there is an app for the Amazon Video On Demand store which is in alpha release. I have tried it and it works well, so it’s a good workaround for those occasions you want to rent or buy a movie rather than wait for Netflix.

Plex’s appearance can be varied using any number of downloadable ‘skins’, and I have opted for the ‘Alaska’ variant in the following snap of the home screen (literally a screenshot as I cannot figure out how to do this otherwise, OS X’s screenshot capability being rendered inoperative by Plex, so pardon the mediocre quality):

The Plex home screen.

While the L5 Remote folks figure out how to get the Apple Remote’s functions transferred to my iPhone (I have had no luck so far), I am using a downloaded Plex driver for the Apple remote (current aluminum model) which works well with the application. You can also use a wireless mouse which works even better, but neither approach obviates the need for yet one more control device.

My movies are all stored on a bunch of external servers and it is a moment’s work to tell Plex where to find these, using the built in Browse function. Thereafter, Plex can be asked to download movie cover art and synopses, which takes about thirty minutes per hundred movies and is about 80% correct – I had to manually change the remaining 20% as Plex looked up the wrong data. It’s a function of how accurately your movies are named, Plex suggesting that you shoud append the movie’s date in parenteses in the title. The approach I adopted is faster – download and fix the bad ones.

The Movies screen with clickable thumbnails.

Click and hold the Menu button on the Apple Remote and you have the option of looking at the synopsis:

Plot synopsis for a movie.

Movie quality delivered by Plex from locally stored movies is identical to the usual way of playing the movie in VLC or your app of choice.

Switch over to Videos and you can see some of the apps I have downloaded:

The Netflix streaming movie app is highlighted, two of my local movie file servers appear above.

The Netflix interface is far superior to that delivered by the OS X Netflix app – easier to navigate and easier to use.

Go to Pictures on the Home page and there are several photoblog apps from well known photographers and news media, downloadable through the Plex App Store, all waiting to be displayed in glorious color on your big screen TV:

The NYT’s excellent ‘Lens’ app is highlighted.

What’s so exciting about this product is that all content – movies, iTunes, iPhoto, photoblogs, etc. – is delivered through a common interface which is both very responsive and needs the simplest of remotes. The Apple Remote runs all of $19. If you don’t like the look of the interface there are lots of choices out there, including one which emulates AppleTV/Frontrow. I don’t much care for that one but you can almost certainly find something that works.

If you use a Mac to deliver content from multiple local and remote sources to your TV I recommend you take a hard look at Plex. The price is right, as in ‘free’. If your friends use Plex you can even access their libraries using Plex media Server though I have not yet tried that. The next thing I need to do is send a donation to the hard working programming team at Plex, which proves the power of distributed programming, if any proof were needed.

Update on the Apple Remote:

Plex works beautifully with the Apple Remote – either the original white plastic one or the current aluminum version.

The $19 Apple Remote.

This is a quite extraordinary feat of industrial design. While the down button is too close to the Menu and Pause buttons for those with large hands, the amazing thing about this device is that there is not a seam in sight, the only openings being the battery cover (CR2023) and the plastic cover for the IR emitter. It reminds me of Dr. Who’s spaceship the Tardis, which is famously bigger on the inside than on the outside! How did they get the components in there?

With the downloadable Plex driver the Apple Remote works beautifully with Plex but it argues with my core principle which is to have one remote do everything. So I tried programming the L5 Remote using the Apple Remote but so far without luck. Then it struck me that a Rube Goldberg approach might work so I programmed my RCA Universal Remote in ‘learning’ mode using the Apple Remote, then used the RCA to ‘teach’ the L5 Remote. Success!

I have corresponded with the L5 Remote folks on this (they stated that they have no such problem with the earlier white plastic Apple Remote) and they are looking into the issue once they have their hands on the new aluminum Apple Remote. Clearly it’s unrealistic to expect them to have tried each of the thousands of remotes out there, but the Apple Remote is a special case owing to its likely ownership by a significant percentage of Mac users. I’ll provide details when I have them and meanwhile want to add that my enthusiasm for the L5 Remote remains undimmed, especially given how responsive the manufacturer has been.

Meanwhile I am down to just one remote for everything – the L5!