Category Archives: Photography

Software of the Year

For anyone suffering from data overload.

There’s that old saw which has it that two workers turn up at your house to build a new wooden staircase. One is from the old world, makes a big pitch about how he only uses hand tools and the crafts he learned from his grandfather and probably has a missing digit to prove it. The other asks where he can plug in his saw bench. Which do you hire?

The investment world’s version of this tale is the old line manager who consults the paper copy of the Wall Street Journal, gets the Financial Times delivered for world news and reminds you that’s how they used to do it on Wall Street when he was learning the trade from his dad. The new kid refuses to meet with you, stating his time is too precious, and sets up a videoconference instead, during which he constantly consults one of a half dozen monitors to see how things are going in the markets.

Well, the answer is the same in both cases. The old guy loses the job. Time is money and he will end up costing you too much of both. And the young guy’s work will not only be faster and much more accurate, he can correct three mistakes while the old boy is still sharpening his hand tools.

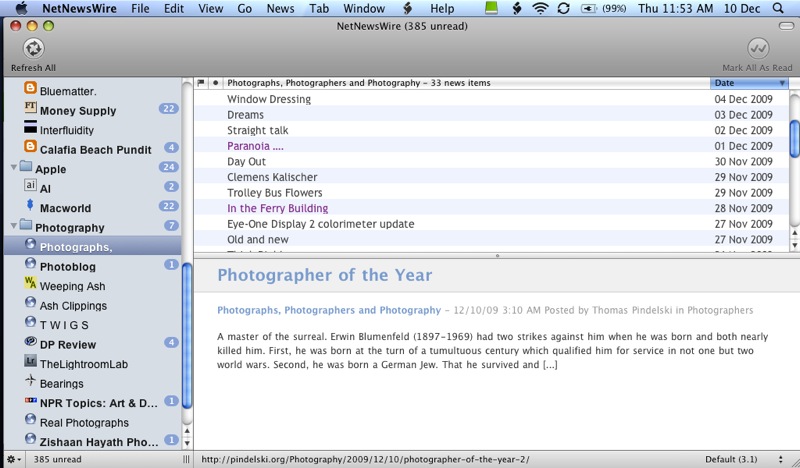
This preamble is perfectly in context of this year’s Software of the Year award which is for NetNewsWire.

NetNewsWire

No matter what your interest, NetNewsWire will leverage your time just as effectively as the electric saw leverages the carpenter’s.

A case in point is the increasing frequency with which camera and lens software is updated by manufacturers. New features are added and existing problems fixed. If you have NetNewsWire tuned in to any of the many web sites addressing these things, using an RSS feed you can be assured of not missing these important updates. For example, Panasonic and Canon – whose products I use – have released several camera and lens software updates this year alone. I may not need them all but it’s nice to know they are installed if I do. On a related topic, keen photographers read many web sites and can avoid wasting time checking for new articles through the simple process of using NetNewsWire and a site’s RSS feed. If the site lacks an RSS feed, why bother with it? Clearly, the author cares little whether you read it or not as he cannot be bothered to draw your attention to new content.

This year NetNewsWIre started using Google Reader as its feed engine and has, as a result, become much more reliable. In particular its syncing of feeds between multiple devices is greatly improved. Thus, when I read an article on, say, my netbook, I am assured that its ‘read’ status is updated on my desktop and iPhone. That’s worth a lot to me.

After a while you quickly filter your feeds, separating gold from dross. And if, like me, you manage money for a living, you are in seventh heaven, because that’s a business where dross is dominant.

NetNewsWire is a free download and is this photographer’s Software of the Year. It only runs on Macs but there are doubtless like products for users of other operating systems. Whether you are a photographer or a data fiend who values his time, this application deserves to be on your computer(s).

Once you have loaded NetNewsWire on your Mac, just click the RSS logo in the toolbar of your browser and the feed will be automatically added.

Paranoia ….

…. when it comes to backing up.

A while back a fellow photographer mentioned to me that he used Apple’s Time Machine utility and found it a blessing when trying to recover previous layered images in Photoshop, after accidentally flattening the current version and losing all layers of the photograph on his working hard drive. Unlike regular backups which overwrite a file with the latest version, Time Machine maintains an intact catalog of all the versions of a file as it changes. So if you need to recover from destructive edits, it’s just the ticket.

I confess I pooh-poohed the idea as I don’t believe in any back-up that you cannot boot from, and while Time Machine back-ups can restore to drives which are bootable, you cannot boot from the Time Machine back-up itself.

But as this bit of wisdom came from a person whose views I respect, I slept on it and concluded there was a place for Time Machine in my back-up strategy which, troublingly, does not include an off site back-up. My MacPro has a 1tB boot drive and a like internal clone, to which an incremental bootable back-up is made every night using a scheduled task in Carbon Copy Cloner. But both boot and back-up drives reside in the same location inside the same Mac Pro. Catastrophe at that location would wipe me out. And cloud computing storage for large photo files is still a thing of the future, as broadband speeds in the US are simply too slow to upload and download large files.

So I messed about a bit with Time Machine and while I care little for all the glitz and fireworks of the interface, the application is easy to use and after the first backup (very slow – 4 hours to backup 400gB – with some performance drag on the Mac) incremental back-ups are fast. Because the volume of data being backed up incrementally is small, there’s no noticeable performance penalty. Time Machine saves hourly backups for the past 24 hours, daily backups for the past month, and weekly backups for everything older than a month until the HDD is full. After that, it’s first-in-first-erased.

But I did not want to relocate a drive enclosure daily. I required something small and easily carried – the easier the better and the more likely I would actually behave and take it home! Backup strategies dictate paranoia and discipline. Discipline is sloth’s foe and we are all, by inclination, slothful.

The cheapest solution I could find was this:
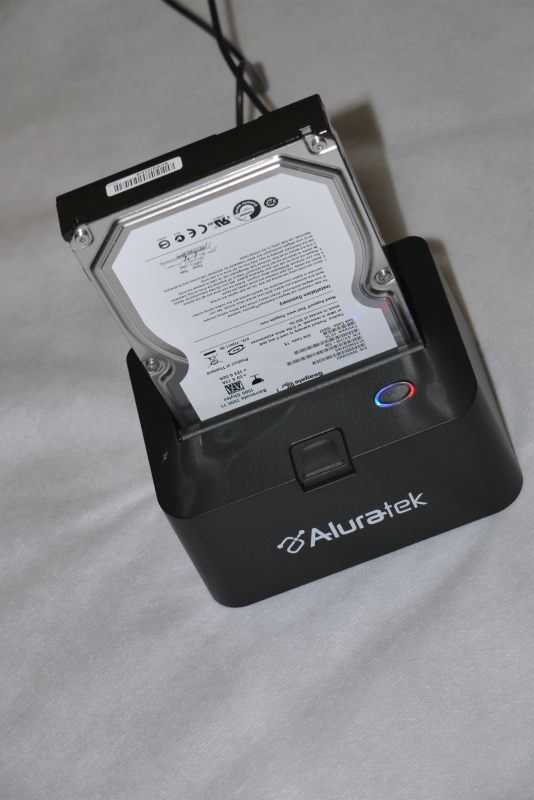
The Aluratek plug-in backup cradle. Blue means on, red means working.

For the grand sum of $24.95 from B&H, one of these Aluratek cradles was delivered, postage paid, and plugged into a USB port. Your naked drive of choice – it can be any 2.5″ or 3.5″ SATA drive – plugs into the top and is released by pressing the button, like on a toaster. While there’s no fan, the device sits in the open, so is reasonably ventilated and, given its light duty cycle after the first core backup, heat is not an issue. “Warm to the touch” describes it.

Opinions of the required size of Time Machine HDDs are all over the lot. Obviously, as a minimum the Time Machine HDD should be as large as the volume of data on your source HDD plus some space for historical back-ups of changed files. The more generations of data you want to store the larger the required TM HDD. On the other hand, I can’t see wanting to go back too far in time. This assumes I realize I have messed up before too much time passes, so that the last good version of whatever I messed up is still available. Further, as my internal HDD is relatively mature, meaning the rate of change of bytes in percentage terms is low, I tend to think too much excess capacity is a waste.

However, as my boot disk is 1.0tB I plugged in a 1.5tB 3.5″ SATA HDD into the Aluratek and let Time Machine do its thing. With only 400gB on the internal drive, 0.5tB – 0.75tB would have done fine, but the incremental cost of the larger drive, at some $30-50 more, is so low as to make no material difference in exchange for the peace of mind. The sledgehammer solution and almost certainly overkill.

Now I simply unplug the naked drive after ejecting it from the Desktop (right click on the mouse) and pop it in my shoulder bag before going home for the day. On reconnection, Time Machine recognizes it within 30 seconds and confers the appropriate green icon on the drive which appears on the Desktop.

I really suppose I should use a grounding strap when removing the HDD from the Aluratek cradle and an antistatic bag to transport it, but I am bothering with neither and all is well after a month of use. We’ll just see how it goes. With the internal redundant backup HDD in the MacPro I simply have iCal send me a monthly reminder to check that I can boot from the backup drive. But Time Machine backups are not bootable. So how do you check them? Well, there’s a clever Time Machine Buddy widget which tells you if everything ran smoothly – worth checking now and again. Typically, I’m finding incremental Time Machine runs are reported as no more than a minute or two in length by Time Machine Buddy, which provides a useful log of what was done by the application.

If the minimum 1 hour backup frequency of Time Machine is too frequent, you can use a free application named Time Machine Editor to extend it.

Another interesting point of discovery is determining how many remove/replace cycles the HDD and the Aluratek can handle. The HDD depends on contact strips and the Aluratek on wipers, both of which wear with use. If they survive a couple of years I will feel fine about my investment.

More paranoia:

I’m beginning to sound like Andy Grove of Intel fame (“Only the Paranoid Survive”) but my pictures are precious to me. So what if a large surge or electromagnetic wave takes out my two internal drives and the Time Machine drive simultaneously while the Time Machine drive is connected? I’m sunk. So I suppose I really should rotate two Time Machine HDDs with one always in the remote location.

Of course, the minute I adopt that strategy, some nut (or divine providence) will drop a Big One on Silicon Valley and then all my redundant drives are toast. But so am I. So in that case I do not care. On the other hand, if an earthquake takes out the Bay Area and I survive, maybe one of the two HDD locations gets lucky. Oh! boy, guess I need another 1.5tB HDD!

One note of caution. Time Machine software is also available packaged with an HDD in a white plastic box from Apple, named Time Capsule. This adds a hard disk to the software and, as is common with Apple products, places looks above longevity. Not only is the plastic case a very poor conductor of heat (in fact it acts as an insulator, trapping heat inside) the box has no fan, meaning it overheats. Further, it uses wireless for the data stream. You are going to trust your precious backup to flaky wireless? No wonder, then, that the web is replete with complaints of Time Capsules having high failure rates. Save your money. Buy your own properly ventilated, hard wired, external drive enclosure and have something that lasts longer than the warranty period, while saving money in the process.

The online backup alternative:

Why not just use an online backup service. In a word, because it’s useless for large files. Here’s why.

My upload speed on DSL is 0.64 megabits/second. At best. 1 megabyte=8 megabits, so that translates to 0.08 megabytes/second.

My Lightroom catalog is 87.66 gB, so it would take 87.66 x 1000/0.08/60/60/24 = 12.7 days to upload it for storage.

Now, apart from the fact that this would completely clog up my DSL, what do you think the chances are of an uninterrupted 12+ day period for this upload?

Then add another 53.2 gB for my iTunes library, and 28.4 gB for my iPhoto library and all the other things and …. well, you get the picture.

On line storage is simply not a practical answer with our slow broadband speeds. The cost is also high – $50-$100 a year and good luck getting more than a gigabyte or two in space. By contrast, the 1.5 terabyte hard drive I am using cost $140 and has a 5 year warranty, so the maximum cost is $28/year – and that’s for 1,500 gigabytes. Not to mention nearly instantaneous retrieval in the event of catastrophe. And by the way, what makes you so sure that the online service, operating in a competitive environment with razor thin margins, will be around tomorrow? Or that their backups are safe? Or what if some crook at their end steals your personal data? Sorry, this approach fails risk analysis on so many issues it is simply a non-starter for me.

* * * * *

On a related note, there’s something awe inspiring about having one or two terabytes in a jacket pocket. Doubtless, 2.5″ drives will have these capacities soon. They max out at 750gB currently, have very small 8mB buffers, are slow at 5400 rpm and expensive. Soon I expect that SDHC cards will take over. A terabyte in a stamp sized card. I still never cease to be amazed at what engineers and materials scientists have done with storage capacities. Imagine, your life’s achievements in exquisite detail on a postage stamp. Truly, modern storage technology is the hoarder’s dream come true.

Eye-One Display 2 colorimeter update

A fresh calibration.

It’s been a month since I first calibrated my two Dell 2209WA displays using the X-Rite Eye-One Display Two colorimeter and the Eye One software just reminded me to redo the calibration. I had set it to remind me in one month.

As usual I do this by near-noon daylight in my brightly lit office with no incandescent or fluorescent light sources. Time taken was 15 minutes per monitor.

Interestingly, both monitors were new when first profiled and have shown considerable drift. As before I am profiling for a screen brightness of 140 cd/m2 , a bit brighter than the recommended 120 cd/m2. That works for me in a bright ambient light setting.

Here are the original and revised settings – brightness had shifted little:

Monitor settings a month earlier and now.

The Blue drift in the right hand monitor is especially noticeable.

I’ll check back in a month to see if things have settled down. The only change from the initial calibration is that I have migrated to version 10.6.2 of Snow Leopard from 10.6.1.

PTLens

The easy way to fix distortions.

PTLens was recommended to me by a fellow photographer and proves to be one of the easiest ways of fixing four common problems:

  • ‘De-fishing’ fisheye images
  • Correcting common lens distortions
  • Perspective correction (leaning verticals, etc.)
  • Correcting chromatic aberration (color fringing) and vignetting – not tested here

It comes in Mac and Windows versions; on the Mac it runs in native 64-bit mode if invoked from Lightroom and is a Universal application, meaning no need for the buggy Rosetta application (which causes spontaneous reboots in Snow Leopard) and supports full 16-bit color TIFF and PSD file formats. It’s a free download permitting 10 uses, whereafter the price is $25 – a very sensible policy.

Up to now I have been using ImageAlign for de-fishing snaps on the 5D taken with the Canon fisheye and Photoshop CS2 (a Rosetta application) and for correcting leaning verticals and barrel and pincushion distortion from Canon’s poor wide-angle lenses. ImageAlign does not work in PS CS3 or CS4. Perspective correction has been done in Photoshop CS2. As for chromatic aberration and vignetting, Lightroom version 2.0 and later does all I need, so I do not touch on that aspect of PTLens here.

I downloaded the PTLens application and installed the the programs (PTLens and PTLensEdit), making the latter the choice in Lightroom under Preferences->External Editing.

Many common lenses are programmed in though not, for some reason, fisheyes. No matter – correcting distortion in the latter is child’s play using the slider.

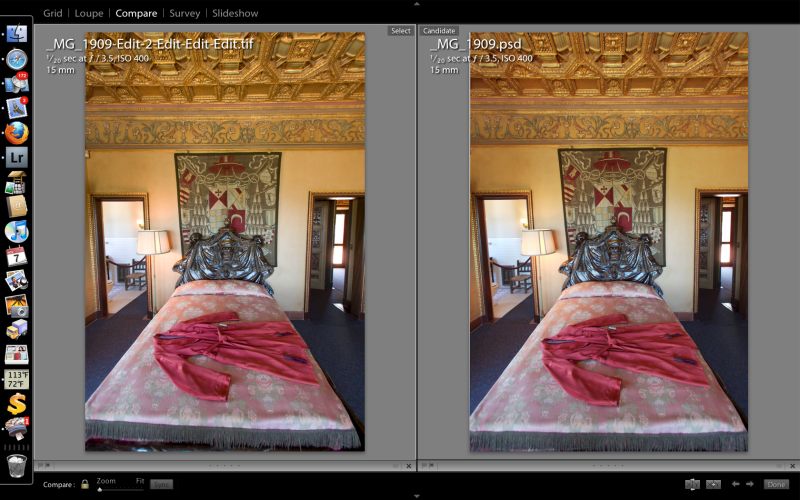
Here’s an original fisheye image of one of the bedrooms in Hearst Castle where I very much wanted to retain the ceiling in the final image:

Here is the same image ‘defished’ in both ImageAlign (left) and PTLens:

There is no practical difference, defishing rendering the field of view of a 12mm hyper-wide rectilinear lens. PTLens saves the processed file back into the image stack in Lightroom and is very fast, the preview reacting in real time as the sliders are worked. As ImageAlign has folded and the application/PS plugin are no longer available, PTLens is a viable and inexpensive modern alternative.

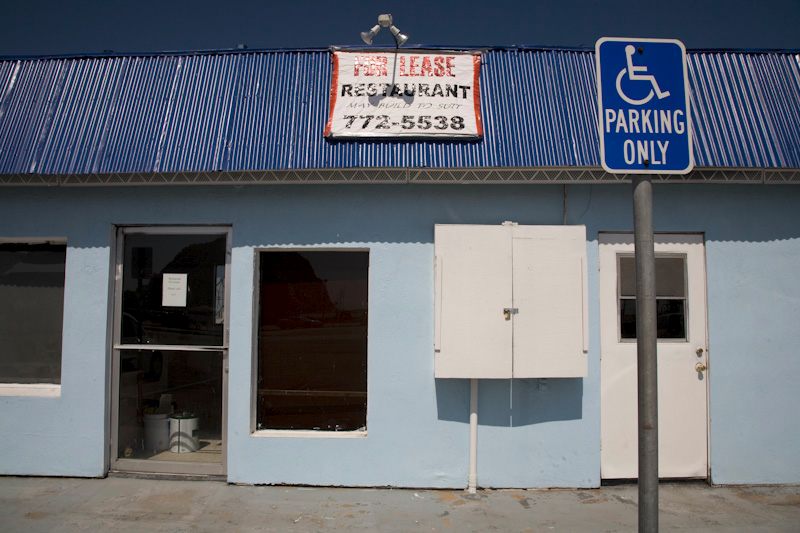
When it comes to correcting more regular lens distortions, PTLens is in its element, as it has a large database of lenses with all the settings stored for you, whereas Photoshop has none – you have to do everything manually. Here’s an example from the over-rated 24-105mm Canon L zoom which noticeable barrel distortion at 24mm as is clear in this picture:


Barrel time – 24-105mm Canon lens at 24mm.

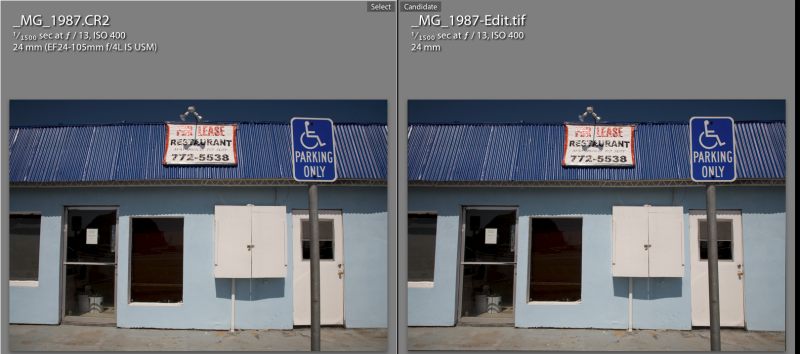
Here are the before and after images, the latter processed in PTLens using the programmed settings from PTLens with no other adjustments:


Take a good look at the handicapped parking sign before and after correction.

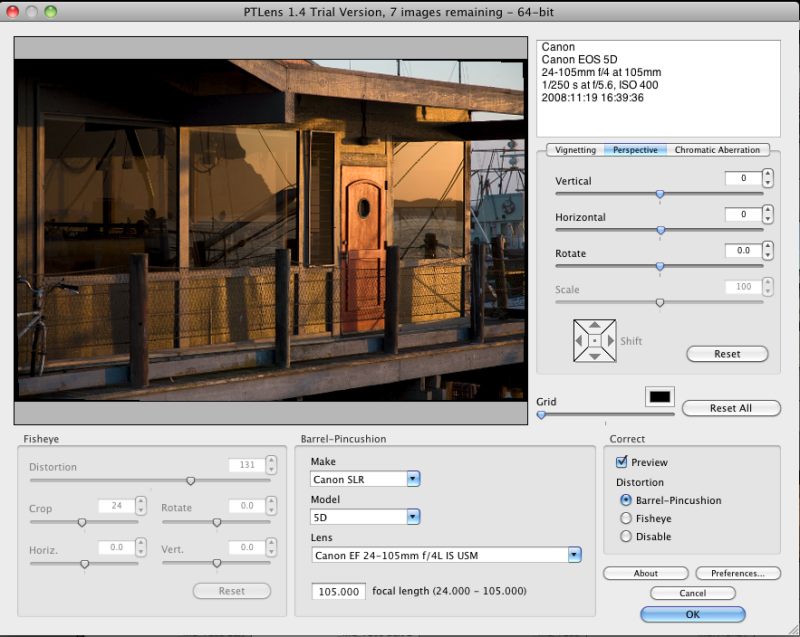
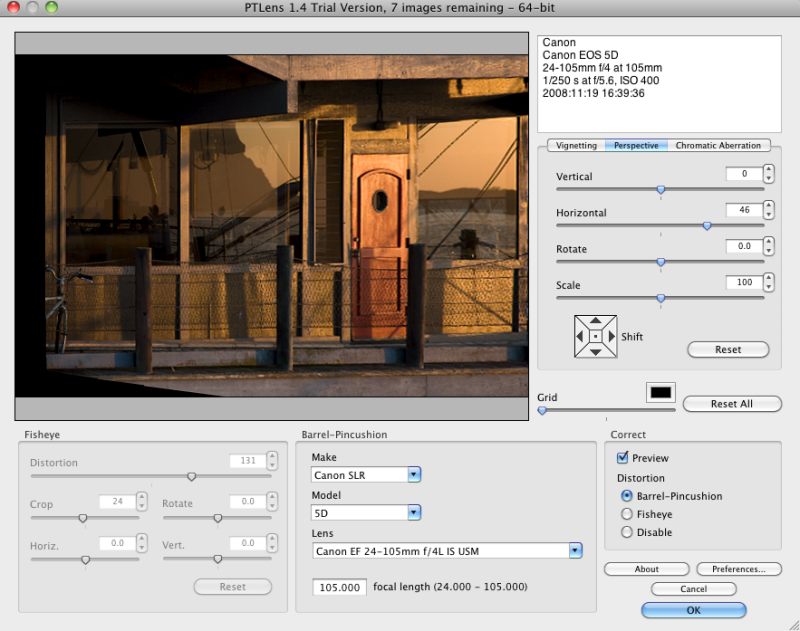
Finally, perspective correction – here’s the picture I published the other day showing the correction of perspective using GIMP; in PTLens it’s even easier.

Before PTLens

After PTLens

A slam dunk purchase at $25 and you can even make it use all four cores of your CPU if it has that many. Highly recommended. PTLens has finally consigned Photoshop to the trash, where I have long wanted to place it. Lightroom and PTLens does all this working photographer needs and neither needs Apple’s compromised Rosetta PPC CPU emulator whose repair is doubtless a low priority in Cupertino, though they do admit its existence:

.

GIMP

Great price beats Photoshop.

Stupidly named, GIMP, or “The GNU Image Manipulation Program”, this Mac application does itself no justice with that dumb name. It’s a fine alternative to Photoshop for users who, like me, detest the user interface of that Adobe application and like the ridiculous price asked even less.

One of the reasons I still make do with Photoshop CS2 (an older version of the current CS4 which runs under the Rosetta PPC emulator in Snow Leopard) is that the upgrade price makes no sense for this photographer who gets most of the tools he needs in Lightroom and basically roundtrips to Photoshop from Lightroom to fix converging verticals and pincushion and barrel lens distortion. (Try Canon’s 24-105mm at 24mm to see real barrel distortion).

The problem is that Snow Leopard suffers from a huge problem in the Rosetta emulator, as widely reported on Apple’s Discussion Forum. Rosetta applications are prone to spontaneously reboot your Mac! This has happened to me on all three I run – Quicken 2005, Excel v.X and Photoshop CS2. It has never happened with any Universal/Intel applications. Maybe Apple will admit error and fix this. Who knows? More likely they will just tell users to upgrade to Universal versions of the affected applications (impossible with Quicken where none exists, by the way).

GIMP fixes all of that. It’s a Universal application so there are no Rosetta issues. Exporting to GIMP from Lightroom is merely a question of setting Lightroom’s Preferences->External Editing to use GIMP as the external image editor. Then hitting Photo->Edit In->Edit in GIMP in LR moves a TIFF copy of your image to GIMP for distortion or perspective correction. Correction is applied in Filters->Distorts->Lens Distortions (for lens distortions) or in Tools->Transform Tools->Perspective to fix leaning verticals. Unlike in CS2, there is no need to create a Background Layer when doing the latter – it’s much easier in GIMP. When you tell GIMP to save the processed picture it will save it right back into Lightroom alongside the original, in a stack. Just like CS2.

GIMP can only handle 8-bit files. I have experimented with it and compared output to the 16-bit ones from Photoshop and cannot tell the difference in 30″ x 40″ prints. You can read lots of technical articles explaining why 16-bit is better but not a one of those will be illustrated with the only thing that matters – real pictures. The Label Drinkers are at work again.

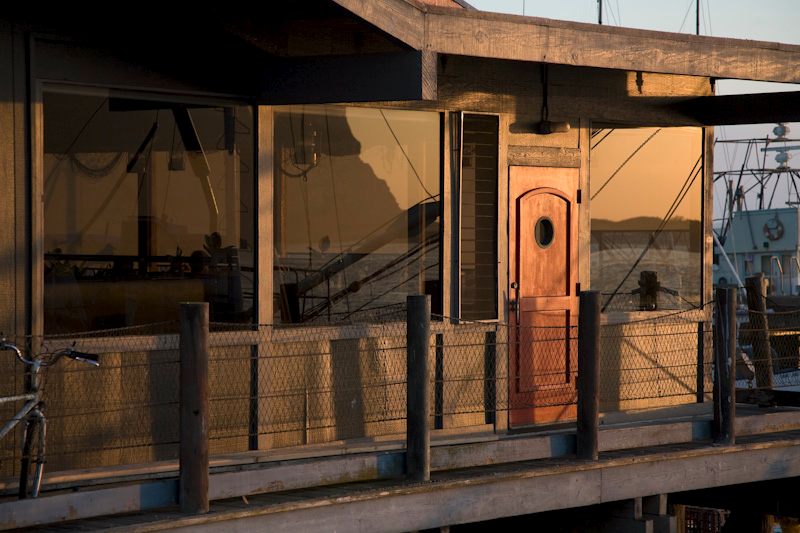
Here’s a ‘before’ and ‘after’ showing the use of perspective correction to get rid of extraneous detail on the right of the picture – I simply could not get into a better position from which to take this:

Original snap before applying perspective correction.

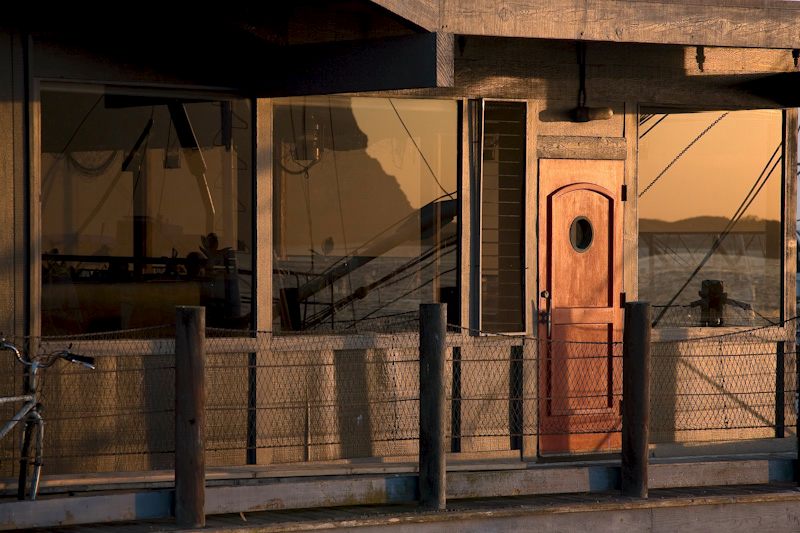
Here’s the ‘after’ image:

Morro Bay at sunset. 5D, 24-105mm @ 105mm. Perspective corrected in GIMP.

The price of GIMP? How about free?

You can download it here and it runs fine on Snow Leopard 10.6.1. If you need the Help file, that’s a separate download (strange) but it integrates nicely. Just use a keyword search to find what you need after invoking Help from within GIMP.

Friend of the blog Greg Littell has pointed me to a couple of useful links. To make GIMP feel more like Photoshop and to use your old Photoshop plug-ins, click here. For a complete directory of hundreds of GIMP plug-ins, click here.