Category Archives: Photography

The EPL theory of success

Check who gets there before you.

If you believe success is 99% perspiration and 1% inspiration, then I think you might agree with my Empty Parking Lot (“EPL”) theory of success.

The EPL theory states that if you arrive at, or leave, work and the parking is empty then the odds of success are strongly in your favor. In other words, hard work may not be the only answer but it certainly improves the odds.


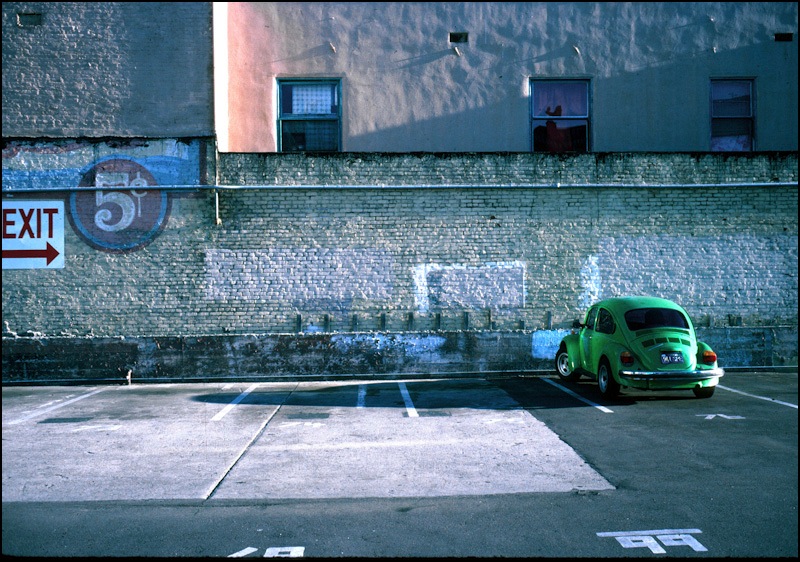
The EPL at work. Leica M2, 35mm Summaron. Kodak Gold 100.

When I first joined the labor force in 1976 it was abundantly clear that my personal interests – art, photography, music, fashion – came with long odds of success were I to try and make a living at them. Too competitive and too dependent on Lady Luck for the big break.

So I chose finance. A modicum of numerate skill (largely absent from the workforce at large, so less competition right there) and a solid work ethic nurtured by poverty and a poor choice of parents did not guarantee success, but certainly improved the odds. And it was not lost on me that there was only one Christian Dior, one David Hockney, one Cecil Beaton, one Irving Penn, one Annie Leibovitz and so on. Through a mixture of skill, good timing and luck they had succeeded. And, of course, they all shared a willingness to work hard. So at least we had the latter attribute in common!

By contrast, there were lots of gray haired – and gray – men making a more than decent living on Wall Street, unknown, unloved and unrepentant of their career choices. An easy option. Do what you have to for a living and what you like for fun.

All of which is a roundabout way of expressing my admiration for my nephew-in-law who, having recently graduated in the Northwest, decided to try his hand in the world of commercial photography in New York City. One of the toughest professions in America’s toughest city.

Here’s what he wrote me the other day:

“Hi Thomas –

It has been awhile, and I wanted to give you a brief update about what photography related business I’ve found myself in.

August has been a dry month, and is so for about everyone in photography, but September is beginning to look up. I’m not sure If I’ve told you about my official position at the Studio Shoot Digital over here on 23 E 4th street NY, NY, but at the risk of repetition I will venture on; I am the go to man for the location shoots that come to our studio.

We have a grip location truck, featuring a digital suite for editing onboard; the entire rig cost upwards of 600K and is quite sufficient for a large commercial shoot such as the Liberty Mutual insurance job I had last month where we had multiple crashed cars on set, fog machines, and models; we had to build a set that looked much like chaos, some insurance pitch about accident plans. I operate the 15 ton truck, drive it, and work with all the grip gear on board; most shoots I also operate as a direct assistant to the photographer, rigging lights, holding light boards etc.. I have become acquainted with most all of Profoto’s gear, from lights to power packs. Also, with terms of lighting a set, I have learned much of that as well …. Everything from using gels to get the right cast of light, to diffusion to soften, or harden light specific to each projects needs.

Over the past 5 months I have gained some confidence from my studio, and last week I was offered the opportunity to use one of our 6 studios to do a test shoot of my own; by my calculations I was using about $40,000’s worth of free cameras, lenses, and equipment, not to mention a free studio with a $1,300 day rate. I am in the process of retouching and you will certainly be on my list of people who sees these photos first. I shot with the new Canon 5D Mark II, which I’m not sure if you’ve had your hands on yet, but it is quite nice, and an impressive step up from it’s innovative predecessor; I’m interested to see Nikon’s answer before I make any purchases myself; although, most of the industry uses Canon …. Peter Lindbergh uses Nikon however, and Ari Hot lights that don’t flash but are constant, which is how he gets his feel. < .... >

I plan on doing more test shoots of my own in the near future, with a goal of building a book, and a website …. I’m still in need of a good scanner to transfer all my negatives over to digital files, as some of them are still my favorite images. My Canon G10 goes about everywhere with me, < .... >. It is a very flexible camera, and despite its small sensor size It has many advantages over a bulky DSLR; however, it does require an understanding of its limits, which are numerous in low- light scenarios, and I try not to shoot on it over 800 ISO, because of noise.

I have been on set 3 times for Ralph Lauren, for Lucky Magazine, Discover Card, Belk, Liberty Mutual, Clorox, and Pergo… Not a lot of fashion aside from the Ralph Lauren shoots which have been quite lavish; great food, fun people, and gorgeous models… The idea of my job is that me and The Coyote (the name of the truck, more info at shootdigital.com) can be anywhere within a hundred miles plus of NYC, and you’ll have all the equipment, power from generators, and digital capabilities to have a successful shoot. So far, it’s been going well, and I am going to begin training as a tech so when the season for the Coyote ends (sometime end of Fall) I can stay on at my studio as a freelance worker.

I bartend 4 days a week for my steady money, and when shoots come up, I take time away from my bar job, which has proven quite understanding and flexible. So, for the time being, that is what I have to tell. Let me know if you have any specific questions about any of these shoots or my job, as I’d be more than happy to indulge the topic further.

Speak with you soon Thomas, hope all is well.

Brad.”


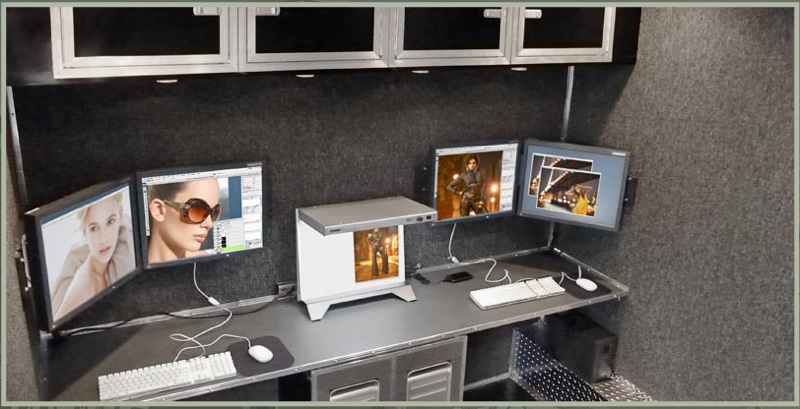
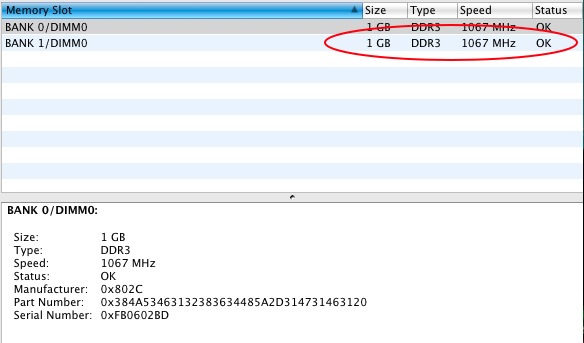
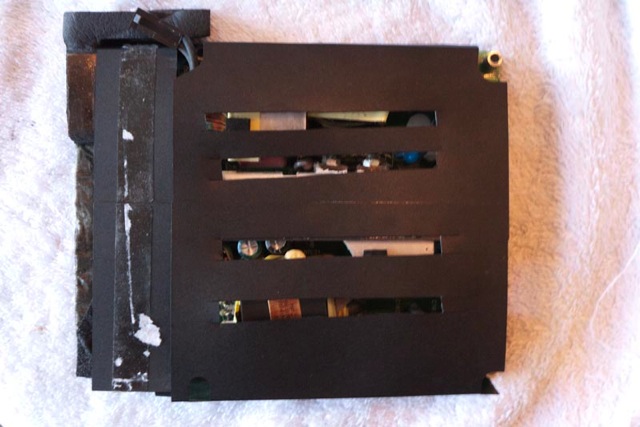
Inside the Coyote which Brad drives to locations – note the two MacPros.

Time will tell whether my nephew has the luck to succeed in his chosen field, but I do think you will agree that he has the EPL theory down pat. In the meanwhile, I hope he can blog for us on some of his shoots which sound quite thrilling.

Good luck, Brad!

The Leica X1 and street snaps

Some thoughts.

It’s 9/9/09 and Leica finally introduced its full frame digital M9. I won’t be dwelling on it here as I doubt there’s much need for, or interest in, a $10,000 camera (with lens) which comes with almost no automation, bulky lenses and a near total lack of weatherproofing. For that sort of money there are several rugged and capable DSLRs available from other makers and the specific situations in which a rangefinder camera excels are few and far between. Street snapping is probably the main genre where the r/f is most at home. A good reality check may be found here.

Leica has also introduced the X1, a fixed lens (35mm equivalent) APS-C body with a very appealing design. They deserve hearty congratulations on this as it’s not yet another rebadged Panasonic, though the premium price of $2,000 is hard to swallow. Plus you will need to add an optical viewfinder to make the thing workable in street situations which adds more cost. With v/f and with its non-detachable lens extended it’s much the same size as the G1 or GF1:


Leica X1

Note the full manual operation afforded by separate shutter and aperture dials.

So who needs this? Well, my perspective has altered significantly in the two short months during which I have owned the Panasonic G1. Having been a street snapper since childhood and having given up on film when the Canon 5D came along, I have been waiting for the ‘digital Leica’ a long time. And the G1 has changed how I think about street cameras.

In days of yore you would load up your little shoulder bag with a 35 and 90mm Leica lens, leave the 50mm on the M2 or M3 slung over your shoulder, and cram in a few rolls of film wherever you could stash them. After decades of use all the manual adjustments required became second nature – aperture, shutter speed, focus and the endless tedious changing of film in fair weather or foul (mostly foul in my London days). The results of those early efforts can be seen in all their monochrome splendor here. You didn’t complain because there not only was no alternative, no one saw digital coming. And SLRs were too loud and bulky and noisy to be an alternative for the truly unobtrusive and relatively quiet Leica M. You just learned to pre-visualize the image and would change lenses on the run to make sure the right one was in place by the time you pressed the button. And it made sense to have the right lens in place as film could only handle so much enlarging.

When the 5D came along you suddenly had medium format film quality at an affordable price with full automation thrown in. The bulk seemed modest compared to my Rollei 6003 and the ergonomics superior, but no one could accuse the 5D of being a street snapper. Landscapes, macro still lifes, portraits, QTVRs, HDR, all well and good, but unobtrusiveness is not that camera’s strong point.

So along came the Panasonic LX-1 with its host of compromises. Shutter lag, slow autofocus, an awful LCD screen replaced with a glued-on optical finder and too small to handle easily in a hurry, yet it was the best this street snapper could find at the time.

But the digital Leica did finally come along and the logo said ‘Lumix G1’.

After the first few hundred street exposures you realized that the craving for the rumored 20mm f/1.7 (now available) pancake lens was gone. I don’t need f/1.7 but I do occasionally like 35, 50 and 90mm focal lengths, much as I did in the M2/M3 film days. And the G1 went one better at the wide end, stretching to 28mm.

But it’s the total automation and that revolutionary Electronic View Finder which make the G1 the digital Leica. No need to change lenses. No need to excuse the quality of the kit lens or sensor, both small and superb. No need to wait for autofocus – in 1,200 exposures I have ‘beaten’ the AF just once. It’s that good. And as for the sensor, you may not want to make 30″ prints (who any longer makes these regularly?) but 13″ x 19″ is par for the course. And no need to set anything other than the aperture or squint into a dark finder trying to figure out what the camera is doing. The automation is outstanding and the EVF even better. In fact it’s pretty close to my wish list. Best of all, you can set the frame aspect ratio to 3:2, just like in that Leica of yore, and that’s how I use my G1.

So while Leica has done a fine aesthetic job (let’s just hope the shutter and focus delays are low) in designing the X1, I really question who needs a fixed focal length camera at such a price when you can have a more versatile tool with the same bulk for under one third of the cost? The only thing the G1 has which I have realized that I do not need is the interchangeable lens. The kit lens is this street snapper’s ideal.


Distraught. G1, kit lens, 14mm, f/5.6, 1/400, ISO100.

So yes, the digital Leica is here. It just happens to be made by someone else.

iMac engineers on Labor Day

What goes around ….

A friend with an iMac like mine, the easy-fry 24″ late-2006 model doomed to early death owing to poor heat management, sent me this top secret photo of iMac engineers driving to their Labor Day barbecue and I felt I simply had to breach the strict oath of privacy to which I was sworn and share it with similarly afflicted readers.


iMac engineers on the way to the barbecue

I am reliably informed that the driver of the pretty red Alfa is none other than Steve Jobs.

The Mac Mini upgraded – 2009

More memory and a bigger disk.

Given that it seems my life is doomed to cracking open seemingly impenetrable Macs, I opened up my new Mini to add memory and a larger hard disk. The base configuration ($580 mail order) includes but 1gB of RAM and a poncy 120gB HDD.

Quite why anyone would pay Apple $50 for another 1gB of RAM when I paid $12, or $100 for a 250gB HD when I paid $63, beats me but I can recommend MacSales as a reliable vendor of compatible parts, which is where I got mine. These are industry standard parts, just as used by every PC manufacturer, so don’t pay the Apple premium.

MacSales has a raft of installation videos showing how to upgrade your Mac and I strongly suggest anyone upgrading the Mini watch the relevant ones. The job is easy once you crack the case. Cracking the case is tricky. It is now quite clear to me that a whole department at Apple is devoted to making these machines as difficult to dismantle as possible and they were certainly on the ball when it comes to the Mini.

I have one substantial disagreement with the case opening video from MacSales. They show the use of a putty knife to separate the cover from the innards and the extremely fine seam on our Mini simply makes it impossible to insert such a tool without scarring or otherwise damaging the case. Instead, I used an unsheathed Stanley knife blade, sharp end inserted along its full length into the seam underneath – maybe to a 3/8″ total depth – and then levered outwards, using a handkerchief for protection, to start opening the case. Then I inserted a $2 plastic spreader (for glue and the like) in the crack thus revealed and proceeded to work around the periphery, popping the latches. A flat Stanley knife blade is both fine enough and strong enough to permit this approach, which will leave your Mini’s case undamaged. Apple specifically states that user mods to increase RAM and HDD size do not invalidate the warranty – a rare human weakness in a greedy corporation.

Once you have the cover off, the MacSales video is fine. The process of replacing the HDD with a nice new 250gB Toshiba and adding 1gB of RAM took me 20 minutes. Given the saving of $125 that values my time at $375/hour. I can live with that.

Now all I had to do was boot the Mini from the external (GUID formatted) Firewire drive back-up (USB would work also) and use Carbon Copy Cloner to make a complete back-up from the external drive to the internal one after first ‘initializing’ the internal one. Initialization is done using Disk Utility on your back-up drive, a process that takes 20 seconds. I opted for one partition only on the internal drive. While the backup executed, some 70gB of data, I made dinner!

I did consider installing a faster 7200 rpm drive for all of $6 more (the one I used is 5400) but as I am so sensitive about heat management in Macs I decided against it, reasoning that the 7200 must run warmer. Maybe that makes sense? Better safe than sorry.

After restarting, here is what the Mini reported:


Additional memory


Additional video memory


Additional storage

A couple of interesting points.

In the first picture the stock configuration is one 1gB RAM stick, so one slot is left open where you can add 1gB or 2gB. A total of 2gB is fine for my purposes. Forget about ‘matched pair’ memory and save your money. Just buy a 1gB stick, making sure it’s DDR3 and 1067mHz.

Note in the second picture that video RAM is reported at 256mB compared to the base 128mB with only 1gB of CPU RAM. The nVidia 9400M GPU ‘borrows’ video memory from CPU RAM and once you have 2gB or more of the latter (the limit is 4gB) the video RAM is maxed out at 256mB. That is the same as the amount on the nVidia 7600 GPU newly installed in my 24″ late-2006 imac – see yesterday’s column. Note also that the ‘Display Connector’ port reports no display is connected. The Mini is connected to a 17″ HP display (as shown) but the DisplayPort connector on the Mini is unused. The magic of this port is that, for the first time, the Mini can drive a 30″ dual-DVI display (like the Apple Cinema Display or HP 30″ screen) using a special cable from Apple ($100!). Until now that was a property limited to MacPros and the latest iMacs. It’s intriguing to speculate how well the 9400M card would drive a 30″ display. I would think it should be fine as the 9400M GPU is identical to that used in all but the costliest iMacs.

The third picture confirms that the 250gB Toshiba drive is correctly installed and working.

Intriguingly, the widely used performance measurement application, Geekbench, reports a score of 2781 for the Mini (2.0gHz C2D), thus equipped. My late-2006 24″ iMac (2.16gHz C2D) reports 2856, almost identical. While Geekbench is more CPU than GPU focused, this is encouraging and opens the possibility that the new Mini might make a fine photo processing platform. As a quick metric, Lightroom 2.4 pops up in 3-4 seconds (second and subsequent loads, the first takes 8 seconds), performance identical to that on my older iMac. Both Macs are using OS X Leopard 10.5.6.

As for cooling, the Mini is doing fine, even on GPU-intensive tasks. Maybe divorcing the LCD screen from the box really does help with cooling? That and cranking Fan Control up no sooner than the new Mini was removed from its shipping carton.

Timings and temperature readings:

Here are some timings using Lightroom 2.4, comparing the iMac with the Mini.

The machines are spec’d as follows:

iMac: Late-2006, 2.16gHz C2D, 7200rpm HDD, nVidia 7600 with 256mB GPU RAM, 3gB RAM.

Mac Mini: Early-2009, 2.0gHz C2D, 5400rpm HDD, nVidia 9400M with 256mB GPU RAM, 2gB RAM.

In each case 61 RAW files from the Panasonic G1 on a 2gB Class 4 Panasonic SD card (a pretty modest card) were first imported, 1:1 previews were generated with standard G1 Import Preset parameters conferred (sharpening, etc.) and then the same files were exported in JPG format (800 pixel maximum dimension) to the hard disk drive.

I used a Transcend SD/SDHC card reader (it came free with an SDHC card I bought a while back) which plugs directly into a USB slot on the computer – there are many faster readers on the market.

iMac 24″:

Import 61 RAW files and generate 1:1 previews: 719 seconds
Export: 271 seconds

Mac Mini:

Import 61 RAW files and generate 1:1 previews: 430 seconds
Export: 341 seconds or 288* seconds)

All in all a promising start – not that much to choose between the two.

The significantly better timing on importing with the Mini probably reflects the greater processing power of the 9400M GPU compared to the older 7600GT in the iMac (I ran the test twice to check my data).

* The Mini’s slower export time is attributable to its slower 5400rpm hard disk. Doing the same export to an external Firewire 400 7200rpm drive resulted in a time of 288 seconds, near-identical to that with the iMac’s 7200rpm internal hard drive. I would guess this could be further improved by using an external Firewire 800 drive. I did not bother testing this with a USB2 drive as USB2 is horribly slow. Let’s just be thankful Apple has seen the error of its ways and retained Firewire in the Mac Mini after trying to drop it from some of its notebooks.

I would counsel against paying the $150 premium Apple asks for the optional 10% faster 2.26gHz CPU available in the current Mini, if photo processing is your goal. I would also advise against buying the previous generation Mini which comes with the much slower Intel GMA950 GPU with a scant 64mB of video RAM. GPU performance is far more important in this sphere and you can only get the current Mini with one GPU, the nVidia 9400M. Save your money for a better lens for your camera.

As regards heat management, I’m focusing on those sensors which report the highest readings, and those are not the same sensors in the two machines being addressed here. Reporting readings from all the sensors confuses information with useless data.

Here are the related temperature readings – the CPU (green) rise reflects both the import and export phases:

iMac temperatures (internal fan at 1000 rpm fixed, two external cooling fans):


iMac temperature graph for import/export of 61 RAW files

Mac Mini (internal fan at 2200 rpm minimum, no external cooling):


Mac Mini temperature graph for import/export of 61 RAW files

No surprise that the iMac’s temperatures are well controlled, as it has massive external cooling, though it remains an object of frustration when one sees just how warm the GPU Diode gets despite all my additional cooling. The modest 6-9F temperature rise in the Mini (the fan spools up significantly, especially when exporting) indicates a well controlled thermal environment. This is very encouraging for not only is the temperature rise modest, the maximum temperature reached is still no higher than in the much modified iMac. I cannot find an ambient temperature sensor in the Mini but the room temperatures were similar for the two tests.

If the good thermal behavior of the Mini holds up in heavy use it may be a serious – and inexpensive – candidate to replace the iMac 24″ when it fails. Of course, I will have to find a good 24″ screen to go with it and it just kills me to think that the wonderful screen in the iMac will go to waste. Such is life.

One final note. Previous Minis have been poorly equipped compared to to costlier Macs. This is not the case with the current model which is the first to come with 802.11n high speed wireless and with a proper DVD/CD reader/burner, comically named ‘Superdrive’ by Apple when it’s the same $25 part to be found in every PC. So the machine is, at last, fully equipped once you add memory and a larger hard disk.

The military iMac

Cool at last.

I call my transformed iMac the Military Mac because it is so ugly that only the military could love it.

Simply stated, after replacing the nVidia 7300 graphics card with the 7600 I was no longer able to control the speed of the key fan of the three inside. The CPU fan. If you really feel the need to ask me if I connected it, please go elsewhere. That one cools the CPU, the GPU and GPU diode and the power supply. I tried a second card from ApplePalace.com with the same result, so there must be some deep seated incompatibility between the 7600 card and my 2.16gHz late-2006 C2D Intel iMac which came with the stock nVidia 7300 card. You know, the one Apple refuses to admit fries as soon as you look at it.

As earlier described here, I drilled 87 holes in the back of the iMac while it was gutted, covering them with wire mesh on the inside. These coincide with the placement of the GPU/GPU Diode radiators, the HDD and the power supply.

When I realized that I could not get the internal fan above the base speed of 1,000 rpm I placed a floor fan facing the holes and temperatures, as reported by Temperature Monitor, plummeted.

So I had two choices. Run a variable low voltage DC power supply to the internal fan which had lost variable speed control – a royal pain – or simply slap a couple of large fans on the rear to ventilate the radiators and power supply.

As dismantling the iMac was getting old, I decided on the latter, at least for now. $40 and four cable ties later, I had two small utility fans, running very quietly off the mains, pumping large volumes of ambient temperature air through the ventilation holes with fairly dramatic results.

While I had the case open I also added cooling slots to the power supply plastic sleeve, after first detaching it from the power supply, thus:


Slots in power supply sleeve.


The Military Mac reports key temperatures.
Circled area denotes export of 80 RAW files from LR2 to JPGs on the Desktop.

Easily the most demanding task I have found, as cooling goes, is the export of RAW originals to JPGs out of Lightroom. That works the CPU, GPU and especially the power supply mightily. Look at the stepped rise of the green CPU line circled on the graph – that coincides with the export of 80 RAW files to the Desktop. The rise is easily within spec. That green line falls once the export job is completed. Note also that the other temperatures are largely unaffected, especially the power supply and GPU-related ones. That is indicative of the success of my approach.

By the way, the HDD fan, which I can still control with Fan Control, is set at 2200 rpm and cools a 1tB Samsung 7200 rpm 3.5″ SATA drive, which replaces the bottom-of-the-line Western Digital 250gB one these machines were shipped with. Hey, Apple has to keep up those profit margins. The Sammy retails for around $100 – a great bargain. As you can see, it runs very cool.

Why do I go to all this trouble?

Well, first, I do not like to be cheated, and Apple Inc. has cheated me by selling a faulty machine whose design faults they deny. Back in my old school, when a boy behaved like that, we stuck his head down the toilet, after first making sure no monks were in sight, and flushed. The designer of these deserves no less. I was quoted almost $1,000 to (maybe) repair a 30 month old computer with a short warranty, only to have it fail again? That makes no sense and is a dishonest and a dishonorable business practice. The replacement card cost me $260 delivered to my home in California.

Second, the 24″ S-IPS LCD screen in the iMac is quite superb for photo processing, and I would like to keep using it for a while longer. And it is matte.

Third, based on the hundreds of these refurbished graphics cards ApplePalace.com told me they are selling there must be many other users of these machines who might benefit from reading this. ApplePalace.com told me there is no such thing as a new card – they came clean on that and stated these are all refurbished by Apple, despite their web site stating parts are ‘new’. Hard to know what to believe here.

I had to use two external fans as I could not find one large enough to cover all the ventilation holes. If I cooled only the GPU-related holes the power supply would go into thermal runaway, quickly reaching 160F regardless of room temperature. So I went wild, blew another $18 and added a second fan.

How does it look? From the front the modifications are invisible and the fans barely audible. From the rear? Ugh!


Military Mac, ready for desert duty.

Will it last? I see no reason why not. Do I want to do this again? Please. I have no doubt that I will eventually simply rewire the internal fan to a variable power source I can control and get rid of those ridiculous excrescences, but right now I am in the land of function over form.

Now do you mind? I would like to finally get down to processing some photographs as I joyfully anticipate a world with a fail safe OS and hardware to match, regardless of who actually makes the latter. One things for sure – there will not be a fruit on the front.