Category Archives: Photography

Lightroom and round trips

To Photoshop, that is.

While the slightly up-tilted camera distortion is not that bad here, a quick round trip (Command-E on a Mac) from Lightroom to Photoshop CS2 and a few seconds with the ImageAlign plug-in sets things dead straight. Command-S in CS2 saves the corrected version as a TIFF file in Lightroom. ImageAlign is not just for de-fishing fisheye snaps!


Cropping of the perspective-corrected result in Lightroom – a superbly implemented tool.

Here’s the before and after – a subtle change but worthwhile:

Here’s the final result. Magical late sunlight. California sky.


Tough neighborhood. 5D, 20mm, 1/750, f/11. ISO 250.

You can see some lens vignetting but I left it uncorrected as it heightens the center of interest. My shadow works – at least for me!

The power of RAW

Two stops under does the trick.

Because very high dynamic range pictures will result in burned out highlights, notwithstanding the fine CMOS sensor in the Canon 5D, I underexposed this one two stops (spot metered on the sky) then brought the detail in the foreground back with the processing controls in Lightroom. Here’s the Before and After – a very well engineered function in Lightroom allowing all sorts of comparisons.


Lone oak. 5D, 20mm. 1/4000, f/8, ISO 250. RAW.

As the controls in Lightroom indicate, I had to add substantial noise reduction and sharpening. As the sun was directly behind the tree, regular exposure would have made the branches unrecoverable – sort of like halation in films of days past. This magnitude of correction could not possibly be done in a Jpg file. The histogram testifies to the complete absence of burned out highlights – there’s no crowding at the right end.


Adjustments made in Lightroom.

I also boosted the Tone Curve substantially in the shadows – this control is perfectly implemented in Lightroom – I used the small pointer tool, which you can see at the top left of the following screen picture,allowed me to see the tone curve in the shadow range by placing the pointer in the foreground of the picture. This helped me determine where to adjust. The dotted line shows the reference starting point.

Here’s the final result after slight straightening of the horizon – the sunlight was quite blinding and it was not easy to see much in the viewfinder!

Once stopped down the rather ‘iffy’ Canon 20mm lens is free from color fringing, so no lens corrections were needed.

Lightroom defaults

Don’t forget to set these correctly.

One slightly frustrating thing about Lightroom’s menu structure is that preferred settings for how the application looks and behaves are all over the place. You would expect to see everything under Lightroom->Preferences, but that is far from the case. A last vestige of the truly frightful user interface enjoyed by Photoshop users for years.

I tend to prefer a really stripped down, minimalist look to the screen interface, opting for a minimum of distractions on the screen. Once you learn some of the most useful one-key short-cuts, then you will no longer need the top Apple menu or much of what clutters the side panels.

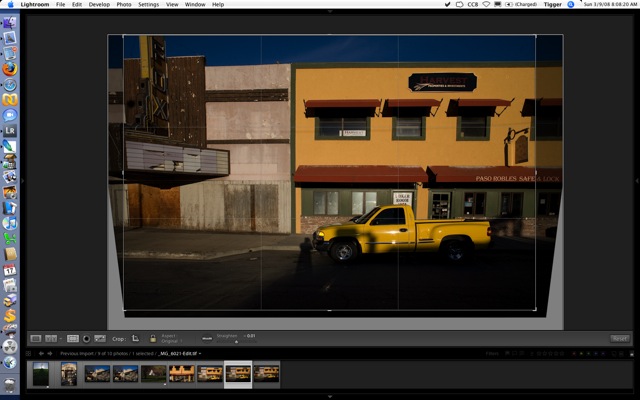
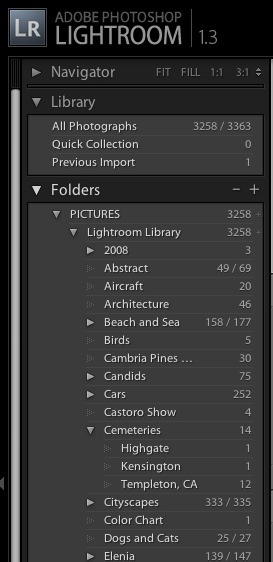
In the Develop module I right click on the left sidebar and choose to show only the Library and Folders. I have little use for Find, Collections, Keywords or Metadata Tags, so these are switched off. You cannot get rid of the Navigator selection at the top, but the very irritating flashing of the small picture preview as you go through pictures in the Grid view can be hidden by clicking on the small arrow to the left of the word ‘Navigator’. Because my photography is thematic, I do use Folders and sub-Folders named after the theme in question which, with my limited volume of pictures, works for me when trying to find something. Others will opt for keywording and dated folders. Here’s how my left panel looks in the Develop module:

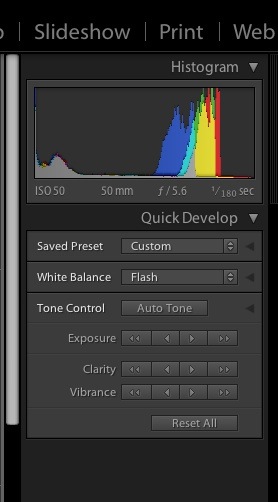
The right panel is similarly stripped down – I have little use for Keywording or Metadata:

Like ‘switching’ can be accomplished in the other modules.

Much as I laud and respect the team which authored Lightroom, I do not need to be reminded of their names each time I boot the product, so I switch the display panel off by unchecking the first box under Lightroom->Preferences->General, like so:

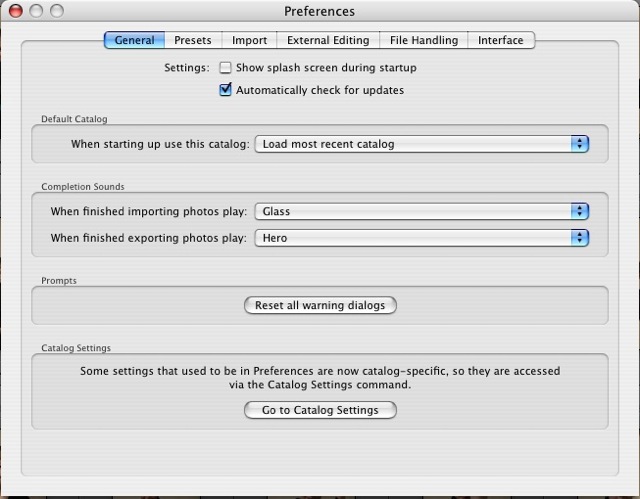
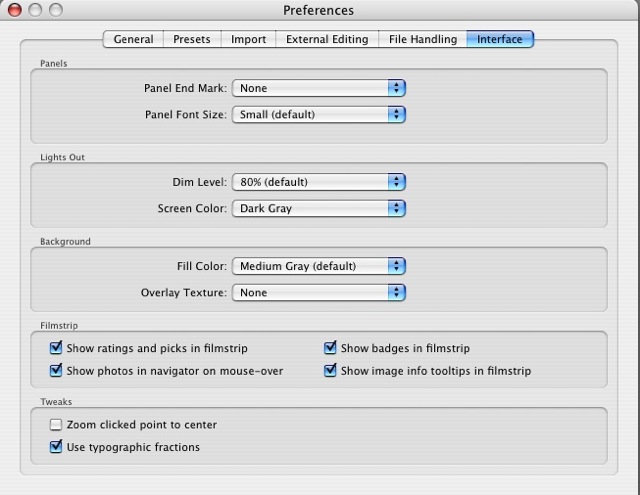
In Lightroom->Preferences->Interface I get rid of the bizarre antique ‘Panel End Mark’ which Lightroom shows by default at the base of each panel, thus:

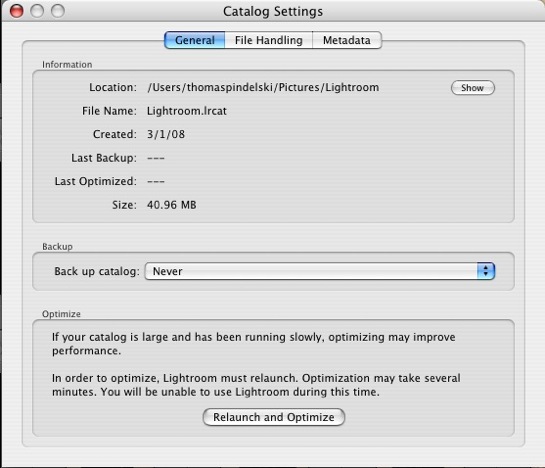
Now in File->Catalog Settings on the General tab, Lightroom comes with automatic file back-ups every thirty days switched on. First, 30 days makes no sense if you use the application more frequently. Your failing hard disk will not conveniently wait until your last back-up before blowing up. Second, if you are not making daily back-ups to a secure external drive, you are simply living dangerously. So I use SuperDuper! to make a daily bootable clone on an external Firewire disk and switch off this (now useless) choice, electing ‘Never’:

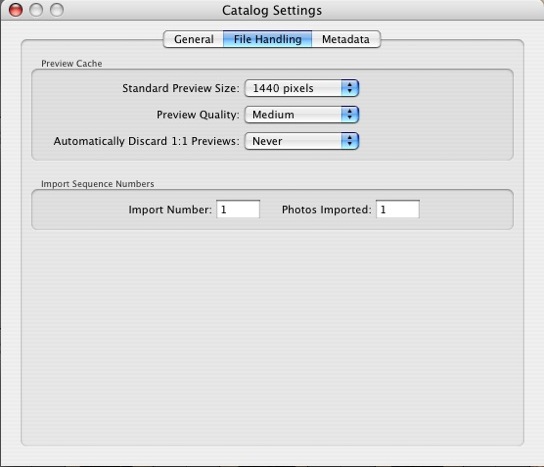
Still in the File->Catalog Settings menu choice in the Library (Grid) view, this time under the File Handling tab, Lightroom comes preset to discard 1:1 Previews after 30 days. Odd. It takes for ever to generate these when you import a lot of pictures and with the small increase in storage (my 40gB picture catalog creates a 6gB preview catalog) and given the vast increase in speed that 1:1 Previews add to the Develop process, you most certainly want to keep these. The third drop-down box is set to ‘Never’:

Next in File->Catalog Settings under the Metadata tab I leave the factory defaults for Metadata alone:

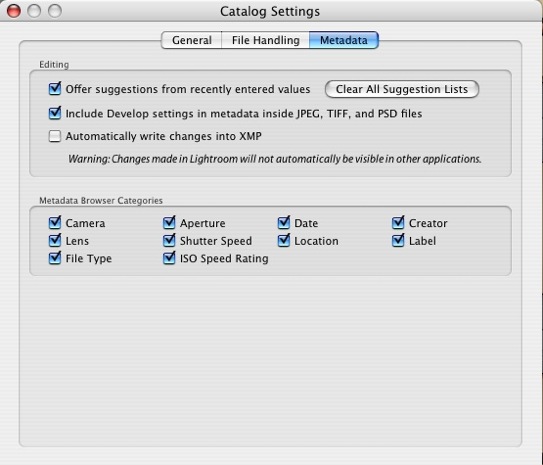
However, were I in the habit of frequent round trips to Photoshop and if I wanted my Lightroom edits to be automatically reflected in the Photoshop image, I would check the third box (‘Automatically write changes into XMP’) above. Otherwise, Photoshop will simply show the RAW unprocessed image in the database or the image as it was last saved. On those (rare) occasions where I do round trip to Photoshop I will do a file save (Command-S on a Mac) before round tripping, thus forcing Photoshop to show any Lightroom edits in its displayed image. If you check this box as a default, Lightroom will slow down as every change gets saved to disk. You don’t want that unless you are running on a Cray mainframe and work at Lawrence Livermore Labs. Meaning you have a super fast machine.

Finally, to get rid of the top white menu, I switch it off as explained here.

Now I have the lean and mean user interface I prefer.

A good try

But no cigar.

I have said it before.

Any self respecting photographer should have a subscription to Vanity Fair.

Sure, they confuse amateur hour politics with photography, but I don’t buy it for their perennial bashing of anything that is right of center. I can get that on the nine o’clock news, free.

No, the magazine is a great showcase for photography, never better than with their annual Hollywood Issue which comes out right before the Oscars.

This year the photo essay is an attempt to recreate the most famous scenes from Hitchcock’s movies – Dial M for Murder, Rear Window, Marnie, Rebecca, Strangers on a Train, Vertigo, To Catch a Thief, Psycho, Lifeboat, The Birds and my favorite, North by Northwest. You know the scenes.

The sets are fabulous, the evidence of hard work and attention to detail abundant. Astonishing in many ways.

Yet the whole thing is a failure and the reason is that the actors posing in the picture are – well, it’s really what they are not.

What they are not is Cary Grant, James Stewart, Kim Novak, Grace Kelly, Eve Marie Saint and so on.

That’s some sort of commentary on the lost era of glamour that was Hollywood. Just take a look at the snap of the North by Northwest recreation where the hero is being chased by the crop dusting plane. VF says they even tracked down the tailor who made the suit worn in the movie and had him make a replica. The actor has a spare tire of some 20lbs excess weight around his stomach and looks like nothing so much as an ad for a Big Mac and fries. Cary Grant must be spinning in his grave.

Nonetheless, a brave try by some fine photographers. Get the magazine. Whether you look at the commissioned photos or the advertisements, you are in for a treat. Just avoid the editorials.

Lightroom Tutorials

Go to the source.

I came across some outstanding tutorials on Lightroom in video format, authored by George Jardine, a member of the Lightroom development team at Adobe.

Click here for an index.

If you do nothing else, download and watch the one titled The Lightroom Catalog – Part 1, or “Where Are My Pictures?” which is definitive on how Lightroom stores files. Without a proper understanding of this you risk loss of files which are stored in disparate Lightroom catalogs.

There are also a lot of useful Podcasts from the Adobe team in the iTunes store, all free. Many are in video format and feature interviews with famous photographers like Peter Turner, Eric Meola, Jay Maisel and Jerry Uelsmann.

While we are at it, I have found an even simpler way of switching off all the panels that Lightroom displays to allow uncluttered picture preview. Simply hit the Tab key on a Mac. Tab again to restore. Finally, to remove the menu bar at the top, go into this menu selection and, henceforth, the menu bar will only appear on a mouse-over:

There does not appear to be a way of doing this from the keyboard. (A reader has corrected me – refer to Comment #1 – the ‘F’ key does this – thank you, Alastair).

Here is the result: