Soft proofing in Lightroom is easy.
I do not propose to address image cataloging and developing in Lightroom at any length in this journal as there are lots of tutorials and blogs out there that know a thousand times more than I ever will. Adobe even has a couple of video tutorials out there though they are really poor compared to Aperture’s slick offerings. While presented by real photographers, rather than blackshirts, Adobe opts for a folksy, joking style. The last thing I need in technical instruction materials, Adobe, is someone’s idea of what passes for humor. Just the facts, ma’am. You want humor, you read my blog, OK?
What I want to address here is soft proofing of your Developed Lightroom picture.
You do not need Photoshop for soft proofing if you use a Mac.
‘Experts’ will tell you that Lightroom does not offer soft proofing of the image, meaning the ability to preview the photograph on the screen with the relevant printer drivers invoked to show how the printed picture will look. (Aperture has soft-proofing built in, as does Photoshop).
A soft proof can look quite a bit different from the regular screen image as a print has a much narrower dynamic range than the regular screen image and also has its own color characteristics conferred by your printer and paper of choice.
If you are taking studio portraits then you really must use soft proofing as the eye is especially critical of accurate skin tones. The color differences are significant and easily noticed when switching between regular and soft-proofs.
Profiling your monitor:
The first problem is that monitors are rarely properly profiled – do this right and what you see in Lightroom is what the printer will print, allowing for the lower dynamic range of a print compared to a monitor.
Here’s how to properly profile your monitor:
1. If you can afford one, get a really good colorimeter like the Eye-One Display 2. If not, go to Apple System Preferences->Displays->Color->Calibrate. You must profile the monitor in the same light as you use to compare it to the print. Use daylight – artificial light will give erroneous results as it is missing many colors in the natural light spectrum.
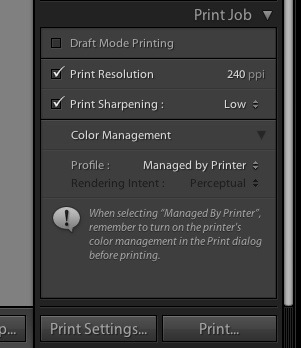
2. In Lightroom, make your adjustments to the image and make a test print. While there are two ways to work with printer profiles – Lightroom Managed or Printer Managed – I find that Printer Managed gives marginally truer colors – there’s little in it. So when in the Print module of Lightroom, you need to set the program up for Printer Managed colors, like so:
3. When you click on Print, set up the printer to use Colorsync, Apple’s color management utility.
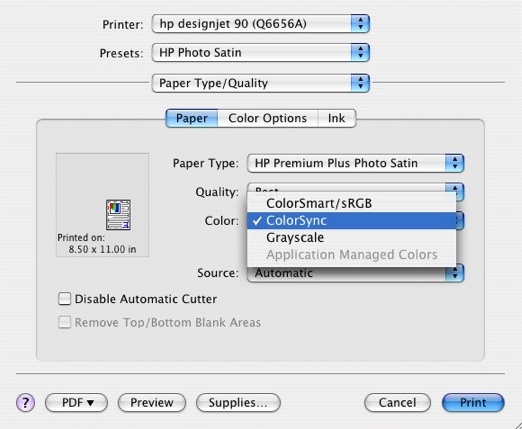
Make your test print (use a familiar person as a subject with flesh tones) after checking that you have chosen the printing paper you are using – this forces the application to use the relevant printer driver. The printer cannot know which paper profile to use if you do not tell it. That is what Lightroom means in the previous picture when it states “When selecting ‘Managed By Printer’ remember to turn on the printer’s color management in the Print dialog box before printing”. (Frustratingly, Lightroom defaults to ColorSmart/sRGB and I can find no way to permanently save the Colorsync choice in a Print Template – meaning you have to choose Colorsync every time you want to print).
4. Now compare your test print to the image in the Lightroom Print module. They will not match.
5. You must now fine tune your monitor color profile. The printer is doing what Lightroom is telling it, but the monitor is not properly profiled for your environment. It is still not displaying colors correctly. Go back into the Apple System Preferences->Displays->Color->Calibrate tool, making sure to choose the display profile you saved in step 1, above, while keeping the Lightroom screen display unchanged. Now work through the Apple software again until what you see on the screen matches the print you just made, wrong as it is – hold the print up to the screen. Doing this at night with incandescent lighting is a complete waste of time.
The key adjustments are Target White Point and Target Gamma. Forget everything you have read about setting your screen to a specific color temperature or to a gamma dictated by some academic. Academics do not make prints. Use your eyes to get the best color match. I ended up with a Target Gamma=1.75 and a Target White Point =6707K. Whatever. Meaningless numbers.
Save the revised profile – you have now matched the monitor profile to the test print.
6. We are done with the test print. Discard it.
Soft proofing:
a. Now go back to Lightroom, choose the Develop module, and adjust the tones to your satisfaction.
b. In the Print module choose Print->Preview. Check the Soft Proof box at the lower left of Preview. This refreshes the display in Preview, forcing the image to use the printer paper profile you elected earlier (see #3, above). To confirm you are using the right paper profile, hover the mouse cursor over the words “Soft Proof” and the driver will be disclosed as in the following screen picture.
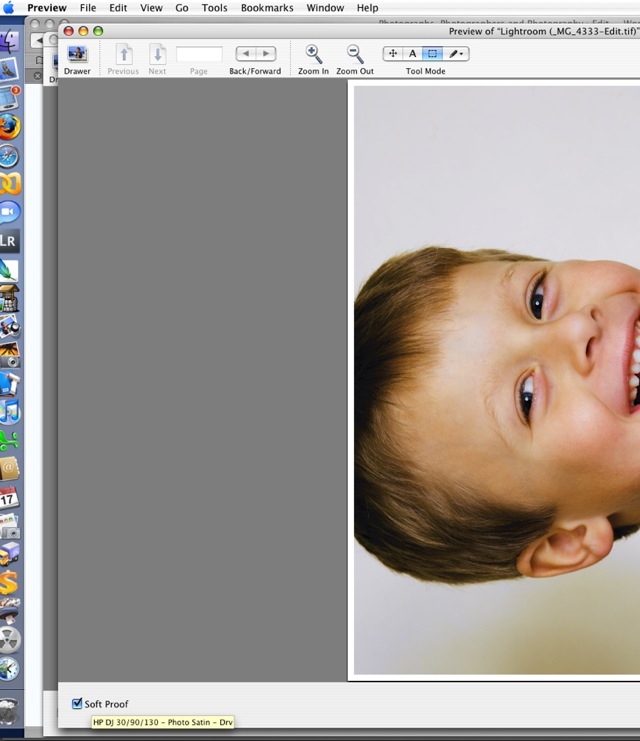
You are previewing a soft proof of your photograph which shows what the printer will print.
c. If you don’t like what you see, re-Develop the picture and try again. Do not even think of changing your monitor profile.
d. Make the final print. No need to return to Lightroom – just click on ‘Print’ at the lower right of the picture in Preview.
* * * * *
I get a near perfect match using this technique, and have no need of a colorimeter to effect proper display profiling – my eyes and Apple’s built in tools tell me what I see. In fact, I have found this method to be so powerful that I am going back and reprinting several 18″ x 24″ prints hanging on the wall which simply were not quite right with regard to color fidelity, contrast and brightness. Spot on results every time from originals of widely differing tonal and contrast ranges.
The monitor I use with my MacBook? No, not a mega-bucks Apple Cinema Display – a dirt cheap ($235 at the time of writing) Samsung 216BW, 21.6″ diagonally and with 1680 x 1050 pixel definition. Heck, the articulated wall arm I use to mount this on the wall ran me almost half the cost of the monitor.
The print module in Lightroom is really well implemented in most other respects, not least in its ability to support multiple disparate pictures on one sheet of paper (Command-click non-contiguous images to select them in grid view, then go into Print view, electing, say, the 2×2 template).
Bear in mind that Lightroom is just one year old and is still in its first commercial iteration at v1.3.1. And it’s not as if I am the first person to note the absence of soft proofing within Lightroom, so you can bet Adobe knows of the issue. I would expect them to offer soft proofing within the application in the next major release. But it is not essential if you adopt the approach above and it’s not like it’s a big deal if you use Colorsync.
Now all I will need PS for is to correct lens distortion (Adobe may even add that in Lightroom) and for de-fishing fish eye snaps – though Comment #8 here suggests CS3 can do this. As I use the ImageAlign plug-in in CS2, I’m happy to save my money. A round trip to PS CS2 from Lightroom takes 60 seconds.
And if you think Adobe will cut the price of Lightroom by $100 to $200 like Apple did with Aperture, don’t hold your breath. Apple’s move smacks of desperation. Adobe has no need to cannibalize its pricing if it’s the only game in town and selling like hot cakes, though if they do drop the price all photographers will cheer. Investors may not.