The touchstone of the photographer’s art.
Its been quite a while since I made glossy prints. In the darkroom days I would squeegee the print, face down, onto a high gloss sheet of chrome-plated steel then heat the thing in a press. If you got things right the resulting print would emerge with an indescribably high gloss (this was before awful RC papers ruined traditional printing) which was also quite incredibly fragile. Any moisture or fingerprints and the surface would be ruined. But the definition afforded the image was beyond compare.
This was not all good, of course. Every imperfection in the image was disclosed, every grain of Kodak’s unbeatable TriX emulsion revealed. Sometimes you wanted that. Sometimes not. And the whole process was a real pain in the nether regions but once you saw an unglazed, normally dried glossy print you never wanted to go there again.
Nearly all the many prints I have made on my HP DesignJet 90 dye ink jet printer have been on HP-branded Premium Plus Satin paper. This paper has a semi-gloss finish, retains detail well and is very easy to use. It has a swellable surface, meaning its pores open when sprayed with ink to absorb the dyes. After a few hours the swelling subsides and the print is less fragile and can be handled easily. Until then the surface is quite fragile. I always handle paper using cotton gloves because any grease from fingers on the surface can result in poor ink absorption, blotchiness and reduced life. Done carefully, HP’s Vivera inks are certified by Wilhelm Research for some 80 years longevity.
Well, take a look what arrived on my doorstep the other day:
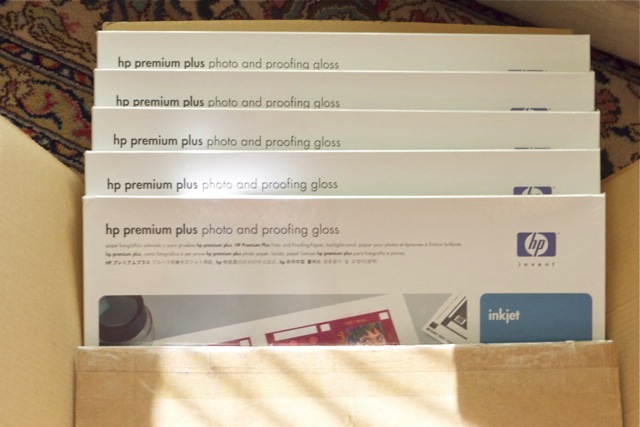
Nice things happen to nice people.
The buyer of a hefty chunk of my Canon 5D outfit found several goodies in the shipments I made. A few CF cards, a wired and wireless remote, an LCD protector, a CF-to-SDHC adapter and so on. He had been a pleasure to deal with, none of the usual game playing or nickel and dime nonsense so beloved of buyers of even fairly priced gear, that I felt it was the least I could do. Well, Barry B. dropped me a note saying that he no longer made prints and would I like some HP Glossy? Is the Pope a Catholic? It gets better. The small fortune in printing paper is not only the swellable type specific to my HP DesignJet, it was shipped to me at no charge! There are decent people left in the world …. thank you, Barry.
On receipt the first thing I did was to download the paper profile from HP and make it available to Lightroom. Then I took an image which would really benefit from the ability of glossy paper to render fine detail and ran a test print. In this image I had retouched some overhead wires using Photoshop CS5 and Content Aware Fill and it looked just fine on my Dell 2209WA display. But, oh! boy, the test print clearly displayed my retouching so I had to go back into PS and try harder. That’s glossy paper for you. Every imperfection, every pore, every blemish, is writ large to the world.
A second print – I have no fewer than 125 sheets of 13″ x 19″ to play with so I’m feeling a tad profligate – put all to rights and the quality is simply breathtaking. And this from the Panny G1’s poncy little MFT sensor!
A warning. Before these swellable papers dry, a matter of a few hours, they will show a mottled surface reflecting (!) disparate ink absorption across the surface. Give them a few hours and the surfaces returns to normal, meaning a high gloss almost as good as those monochrome prints from ages ago, but a lot easier to make.
Glossy is not for everyone. It’s hard to display, attracting reflections as it does. It’s fragile and really needs mounting behind glass. It’s unforgiving when it comes to the photographer’s technique. And it needs to be handled with kid gloves …. OK, cotton gloves. But, done right and displayed right, a glossy print remains the touchstone of the photographer’s art.
Why do you think that nice Mr. Jobs insists on those dumb glossy screens on all his computers? Because they plain look better on a casual acquaintance. That’s fine for prints. Not so good for computer screens.
HP Glossy is anything but water resistant, so keep it away from rain drops and the like:
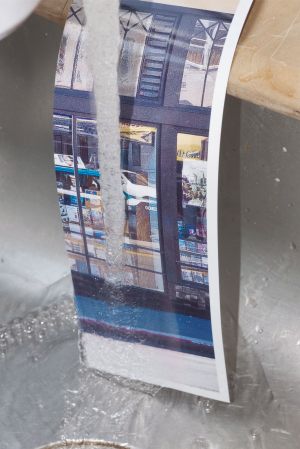
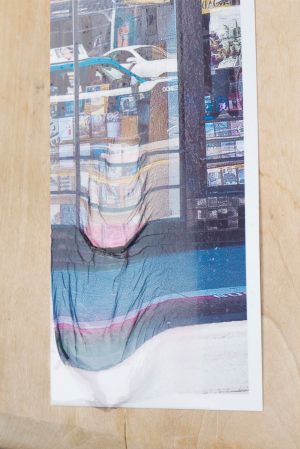
Two minutes under a tap and the emulsion starts to run.