Category Archives: Nikon bodies

About Nikon DSLRs

Some architecture

A great way to end the year.

Few things beat a crisp, sunny day in San Francisco, and the city’s propensity for preserving its old buildings means more subject matter for an itchy trigger finger.

These were all snapped today on three classic ‘metal era’ MF Nikkors from my copious inventory on the D3x – the 35mm f/2, the 85mm f/1.8 and an all time favorite, the 200mm f/4, an outstanding optic for picking out gorgeous period details.

The absence of autofocus for this type of subject matter is anything but a hindrance. If anything, the more contemplative approach required is a benefit.

Processed in LR6, some verticals straighened in PS CS5, some juice added here and there in Snapseed.

Nikkor 20mm f/2.8 AiS lens

Still in production.

The most remarkable thing about the Nikon Nikkor 20mm f/2.8 AiS lens is that Nikon continues to make it. It’s available new for some $650 – not cheap – and will work on just about any Nikon body, film or digital, since the groundbreaking Nikon F of the 1960s. This example belongs to a friend of the blog for whom I volunteered to create lens correction profiles for use with Lightroom or Photoshop to correct linear distortion and vignetting. As a general rule, the wider the lens the greater is the incidence of these aberrations.

My 20mm Nikkor of choice is the original and massive 20mm UD f/3.5 Nikkor which is nearly a half century old. Mint examples can be found for around $300; many are available and there is no excuse for buying a ‘beater’. It has outstanding center resolution at all apertures, with the edges catching up by f/8. You can read about it here. The current 20mm AiS is much smaller, and both lenses are manual focus only:


The old UD Nikkor is on the D2x at left.


The current 20mm AiS optic is on the D3x at right.

Where the UD adopts the early ‘all metal’ finish of the classic era, the AiS uses rubberized focus and aperture rings. Both lenses are manual focus.

Despite the high price, Nikon does not fit a CPU to the lens so the user has to manually dial in the aperture and focal length on the Nikon body if any lens profile is to be automatically recognized in LR or PS; the CPU I have fitted to the UD dispenses with this need. You can always tell LR which profile to use if you forget to dial it into the body or dial in the wrong one.

The owner of the 20mm f/2.8 AiS shown here advises that Lightroom CC (the cloud version) no longer permits profiles to be dialed in manually, but Photoshop CC does. So if you are solely a Lightroom user and need to manually input profiles, I recommend you use the stand alone Lightroom 6 desktop version, still available. Adobe really does no want you to do that, preferring to steer you to the rental model of the CC version, but follow my guide here and you can download it easily. Given that PS and LR are pretty much stalled and at the end of their development cycles, there’s little justification for buying the CC version with its purported ‘constant updates’. A disingenuous business model if ever there was one, but that’s Adobe for you.

CPU on the UD is arrowed.

Given the narrow rear flange of the AiS, installation of a CPU would be a trivial process, and I describe that here.

I created the lens profile for the AiS using Adobe Lens Profile Creator in the usual way, at f/2.8, f/4, f/5.6 and f/8. After f/8 nothing changes. Here is the profile invoked in the Develop module of Lightroom 6 – LR 3-5 will work just as well. The profile is placed in the User’s Library directory as explained in the above link. To ‘see’ the directory in Finder be sure to hit the ‘Option’ key when in Finder->Go as the fools at Apple have seen fit to hide it in recent releases of OS X.


Profile invoked in LR.

While the profile says ‘D3x’ in the title it is non-body specific and will work with any Nikon digital image, FX or DX (APS-C). In practice the profile does an outstanding job of correcting the fairly pronounced vignetting at wider apertures, as well as correcting the minor but very complex linear distortion which is of the ‘wave’ or ‘moustache’ type common in Nikkor 20mm lenses – both my UD and my (now sold) 20mm f/3.5 Ai lens exhibit it. The vignetting is slightly less pronounced – uncorrected – than in the old UD, but there is little in it between the two and after applying the respective profiles there is no difference in this regard.


Top right corner at f/2.8 – no profile.


Top right corner at f/2.8 – with profile.

The profile cannot correct for chromatic aberration and the AiS exhibits red fringing (the UD displays green fringing, by contrast):


Red fringing in the AiS at f/2.8.

A quick tweak in LR removes the fringing:

Here are the settings:


Removing the AiS’s red fringing in LR6.

How does the extreme corner definition compare with the UD? As my earlier UD review discloses, the UD is optimized for center sharpness at full aperture (f/3.5) so the corners suffer. Yet despite that the UD is clearly superior in the extreme corners as the image below shows. This would make a 72″ print and was taken in very overcast, low contrast conditions, a very challenging environment for any lens:


Extreme top left corner – AiS on the left, UD on the right. Both with lens profiles and color correction applied.

So maybe not all progress is forward. You get two thirds of the bulk and weight but lose corner resolution at full aperture with the newer lens. The UD maintains an advantage in corner resolution at all apertures, though the difference falls as the lenses are stopped down. While I do not publish them here, center resolution of the UD is 1 stop better than for the AiS through f/5.6, after which the two lenses are identical.

You can download the lens correction profile for the 20mm AiS Nikkor by looking for it here.

Here’s a far better illustration of how the ‘wave distortion’, seemingly common to 20mm Nikkors, is corrected. These were taken by the lens’s owner:


No profile – see how the lintel drops then rises – top right hand corner.


With profile. Red chromatic aberration remains to be corrected but the ‘wave’ is gone.

A tale of two sensors

‘Good enough’ is better than good enough.

A clear thinking friend of mine has a simple philosophy when it comes to consumer durable purchases, and he calls it the ‘good enough’ concept. If it’s good enough, forget spending the extra for the top of the line model, the one with the bells and whistles. The marginal return is …. marginal, the incremental cost ruinous and the depreciation far higher. (This reminds me of Lord Chesterfield on the subject of sex: “The pleasure momentary, one’s position ridiculous and the cost? Damnable.”)

And I’m here to declare that Micro Four-Thirds is more than ‘good enough’. My standard for comparison? The full frame sensor in my Nikon D3x, the MFT one being that in my Panny GX7. For all of you who prefer wasting your money see my my product review of the Leica M240. Be assured that I not only do not own two of these, I don’t even own one. Nor will that change.

Some recent sensor history. Panny started with a 12mp design in the ground breaking G1, upping it later to 16mp which my G3 enjoyed. The practical change was that whereas 13″ x 19″ nosey prints were easy with the G1, the easy size grew to 18″ x 24″ with the G3 and later bodies. Nosey? It’s when your viewer sticks his schnozzer in the print and you have to get the cotton balls out to clean the surface. In the GX7 they tweaked the software a bit and got the marketing boys to do some writing, but to all intents it’s much the same as the one in the G3 and others, which is to say very good indeed.


The fabulous Panasonic GX7 – the best street snapper ever made.

Nikon delegates sensor manufacture to Sony, claiming credit for the design (eh?) and perhaps the best full frame sensor they made for the money was the one in the D3/D700. The D3x doubled the pixels to 24mp, trading the increased resolution for more noise at higher ISOs, especially noticeable in the dark bits of the image. The D4’s sensor improved a bit more on the low pixel count one in the superb D700 and the one in the D800 blew everyone out of the water where they remain to this day. But that’s pixel peeper stuff. In the real world of large prints, it’s irrelevant.

Why do I say this? Because I constantly print my images for display in the moveable feast which is the wall displays at the old manse. Coming on a round of spring changes, I have had ample opportunity to tweak and print images at 13″ x 19″ and, better, at 18″ x 24″ from both the D3x full frame body and the GX7 MFT one. In both cases I am using my favored focal length of 35mm FFE. The exceptional Sigma 35mm f/1.4 behemoth on the no less porky D3x, and the magnificent Olympus Zuiko 17mm f/1.8 on the GX7, with AF speed which leaves FF lenses in the dust. I suppose the weight and bulk ratio is some 3:1, yet I enjoy both.

Were cameras dogs (Leica’s M would instantly qualify for inclusion in the latter species, a frou frou toy breed, fragility redefined, constantly in need of attention), then the big pro-body Nikon would be a Golden Retriever. Immensely dependable, lumbering and stolid, it will never let you down, can take a battering from the kids and still emerge with an all-weather smile on its face. And it keeps going longer than you can. The GX7 could scarcely be more different. It’s the terrier of the camera world. Small, fast, high-strung, sharp as a tack, it demands a little more care and attention in the relationship but rewards out of all proportion to its diminutive size. And it burns out (its battery) pretty fast.

Those printed images? I rattled off a handful of 18″ x 24″ on the ever dependable HP DesignJet 90 dye printer the other day and, blow me down, I simply could not tell which were taken on the Nikon compared with the Panny. We are talking nosey examination of micro detail here. Which is another way of saying that the Panny is ‘good enough’, for the Nikon is way better than almost anyone needs. And my rule of thumb has long been if it can print at 18″ x 24″ it can print at any size you want, as the viewer is forced further back as size increases, mitigating resolution loss.

Ah! you say. But no way the MFT system can match the big, fast zooms available to Nikon and Canon snappers, the classic 24-70mm and 70-200 f/2.8 fixed maximum aperture zooms and the like. Think again. Have you seen what Panny and Olympus has been up to recently? How about Panny’s 12-35mm f/2.8 zoom?

Panasonic 12-35mm f/2.8.

Or their 35-100 f/2.8?

Panasonic 35-100mm f/2.8.

Olympus has hardly been asleep, either. In addition to their wonderful 17mm and 45mm f/1.8 Zuikos which I use, there are such exciting conceptions like these:


The Zuiko 12mm f/2.


The Zuiko 75mm f/1.8.

And don’t even think of asking about size, weight and price, because that’s a losing proposition for the Big Boys.

Finally, modern MFT ‘pro’ bodies like the Olympus EM1 can offer all the framing rates and weather resistance you need, once again at a fraction of the price. And so can the tiny GX7 though no one will take you seriously. Which is possibly the best feature of all.

Do yourself a favor. Put the fun back in your snapping and pick up something which says Panasonic or Olympus on the body and whose lens detaches.

Early MF Nikkor lenses

Nikkors in a bunch.

Here is my completed ‘metal era’ user set. I have installed CPUs in each and all have been converted to Ai indexing for the modern DSLR.

The designs are much of a muchness here, sharing looks and ergonomics, with but two anomalies. The 24/2.8 uses a diamond patterned aperture ring rather than the scalloped standard, reflecting the presence of a Nikon Ai conversion kit. The 35/2 and 85/1.8 use the original factory aperture rings which came with fluted machining for some reason. Otherwise all lenses use scalloped focusing and aperture collars. The 24mm and 28mm are the only multi-coated optics here. Color rendering across the range is especially notable for its uniformity, and I have published lens correction profiles for each lens, available for free download here.

Average cost was $166 plus $30 for the CPU installed in each. The total spent would buy you one ‘pro’ grade plastic fantastic current lens and will leave you desperately searching for repair parts when the internal motors fail a few years hence.

Age in years in parentheses. Click any link for the related review.

Front row:

Rear row:

The only significant one missing from the era is the 35/1.4. I have the latest 35/1.4 Sigma which is superior to the Nikkor. Also, I have avoided the more pedestrian variants – 35/2.8, etc. – as the faster optics add optical quality and performance. I use no lens hood on the 20mm, where it is useless, or on the 55mm where it is redundant.


Data for the lenses shown.

Each is used extensively, each is a joy to hold and behold and each is wonderful in a special way. No hood on the 20mm (useless) or the 55mm (not required).

Does anyone need all of these? Of course not. Three at most will suit any particular snapping style. For me it would be the 20mm, the 35mm and the 85mm. Yet I adore what the 24 and 28mm can do, would miss the 50mm horribly, the 105mm is frequently just the ticket, as is the 135mm and who could live without that simply divine 200mm? I would, however, warn you never to get one of these, because once you do, you will sell the garbage that passes for your current set of lenses and start getting pre-Ai metal era Nikkors, from the good old days when men were men, closet doors remained firmly bolted and women were pregnant and in the kitchen.

All of these are abundantly available used – mine came from KEH and eBay over a two year period, CPU installation is easy on all but the 50mm optic, the 20mm requires that you fabricate an aperture follower, and handling, performance and build quality are the best anyone ever accomplished. None is collectible, so you will not be competing with white trash collectors for these, nor should you have any qualms about gluing on a CPU and removing the useless aperture claw from the bad old days of film. Manufacturers would have you believe that modern lens designs are specifically for the digital era and if you believe that you can drop me an email and bid on my bridge for sale in Brooklyn.

To see my snaps taken with all of these on the D700, D2x and D3x, simply enter “Nikkor”, the focal length and aperture in the Search box.

Nikkor 55mm f/3.5 Micro lens

A high definition macro lens.
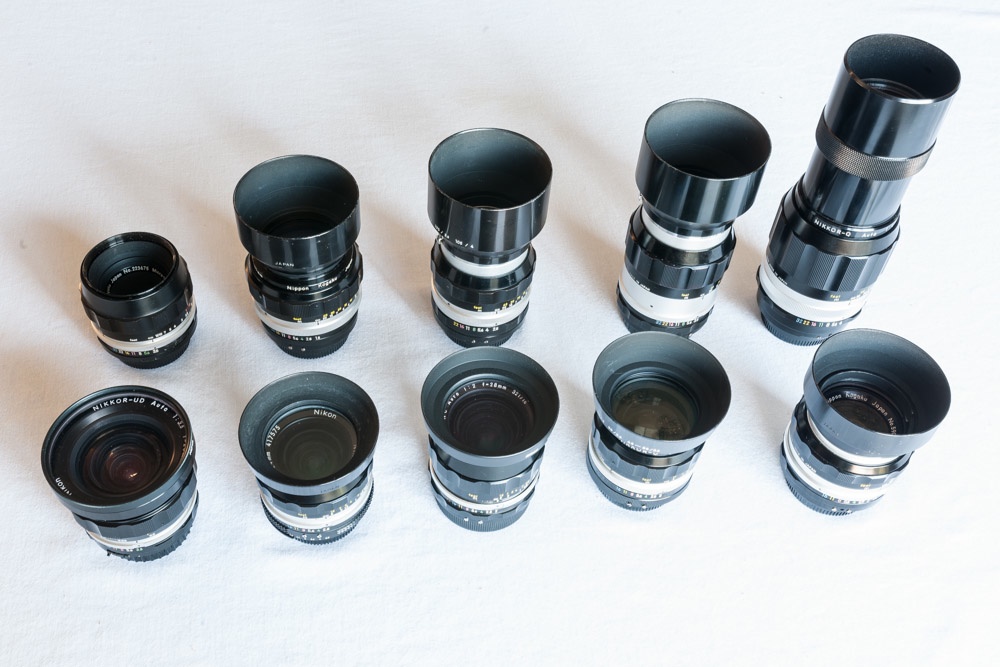
Choices:

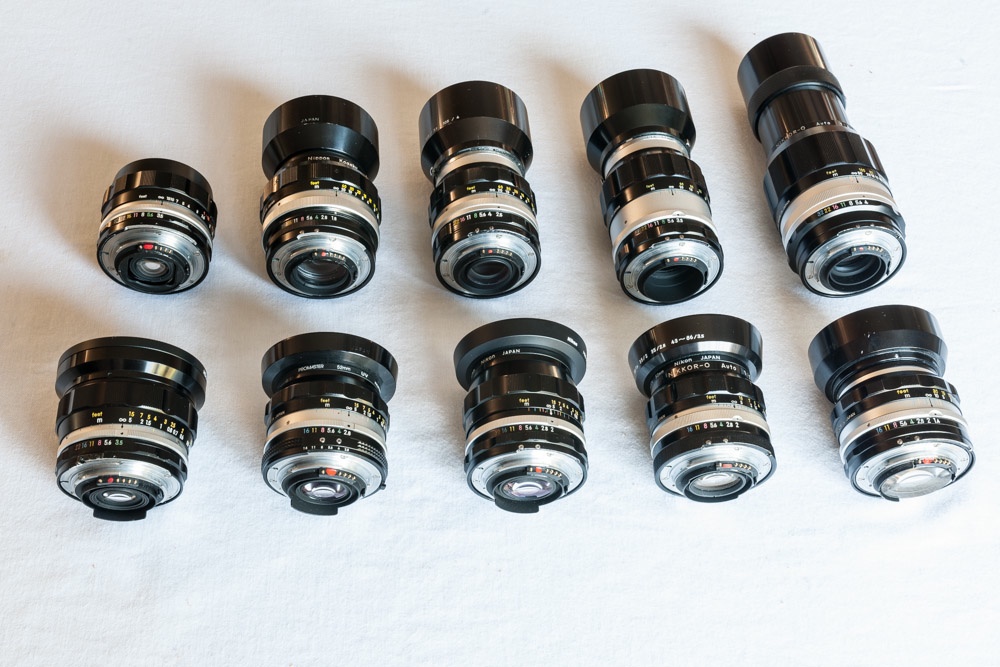
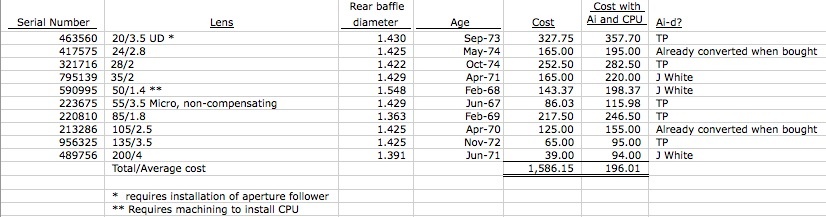
After the 50mm f/2 Nikkor, this is quite possibly one of the commonest Nikon lenses ever made. The 55mm f/3.5 Micro Nikkor is abundantly available in many variants:

  • Metal focus barrel, compensating aperture, pre-Ai
  • Metal focus barrel, non-compensating aperture, pre-Ai
  • Rubber focus barrel, pre-Ai
  • Rubber focus barrel, Ai
  • Rubber focus barrel, Ai, multi-coated

The later 55mm f/2.8 Ai-S MF optic is not recommended, owing to widespread reports of oil migrating from the focus mechanism to the aperture blades. Overhauling the lens to replace lubricants makes no economic sense owing to the high cost of labor. The even later 60mm f/2.8 versions, all AF, have the benefit of extending the focus range to life-size without the need to use an extension tube. But the construction quality of the 55mm f/3.5 was never equalled.

Ai conversion:

Spare no thought of destroying ‘collectible value’ by doing the Ai conversion. First, collectors are scum who serve only to drive up used gear costs. People who put gear in storage – be it camera or Ferrari – are beyond contempt in my book. Second, Nikon made hundreds of thousands of these lenses and you can always find any version in any condition on the used market, at very short notice. There is no such thing as a ‘collectible’ 55mm Micro Nikkor.


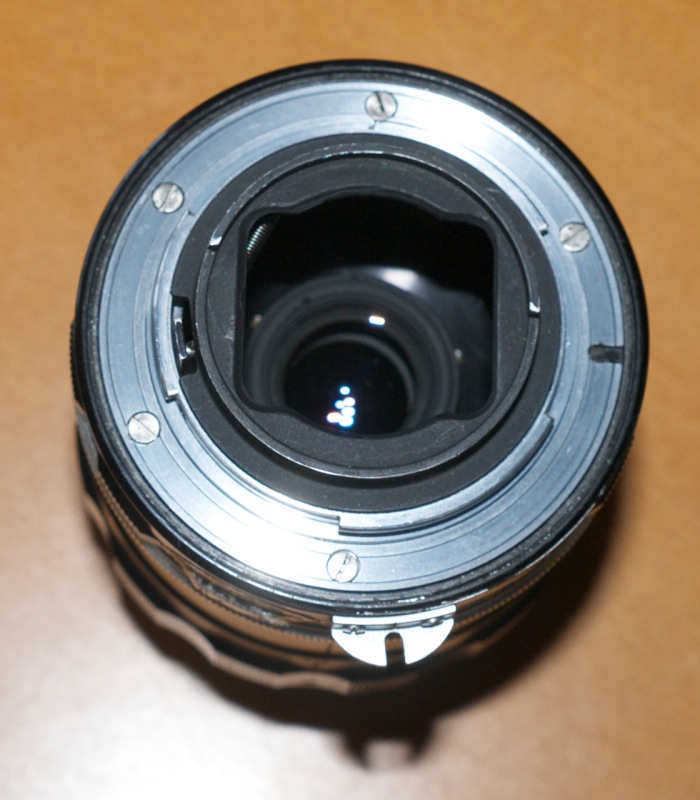
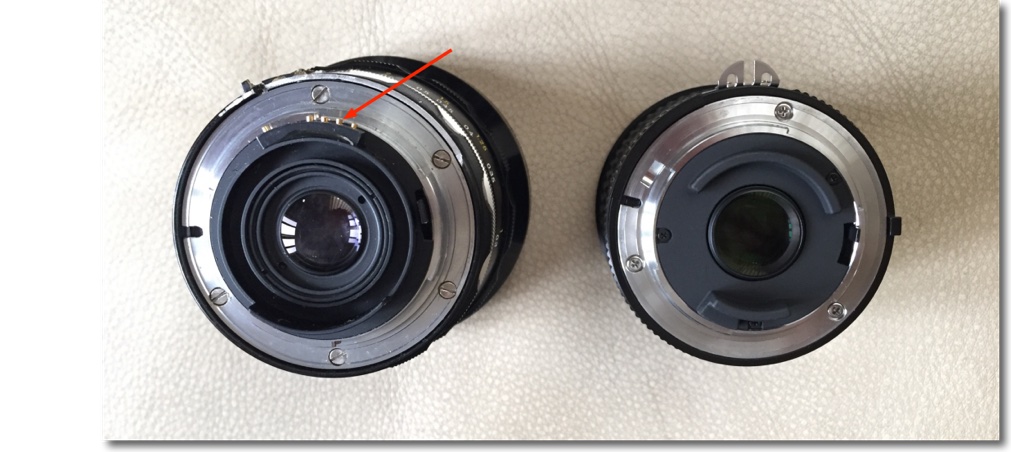
The rear of the lens is exceptionally well baffled.

This means that the usual work will have to be done to file away an arc of alloy to permit clearance of and proper engagement with the aperture follower on the Nikon’s body. Not doing this will damage your camera. This work has yet to be done in the above illustration.

The snag is that the aperture collar where the filing has to be done cannot be removed by simply removing the bayonet flange – the five slotted screws shown. No, removing the small radial aperture ring indexing screw does not help. Don’t bother trying. So to work around this, after removing the bayonet flange, I placed some heavy-duty tape over the rear of the lens and scribed around carefully with a sharp knife to produce a thoroughly sealed interior which resisted any ingress of metal filings.


With the bayonet flange removed, 3M clear Scotch tape is placed in position, ready for filing.

Be sure to keep the lens focused at its closest distance – the protruding rear element will otherwise contact the adhesive tape, a move not calculated to enhance definition. Filing can now proceed in the usual way, using my guide here. All filings are blasted away with compressed air after which the Scotch tape can be discarded and the bayonet flange replaced.

CPU installation is as easy as it gets. No changes are needed, the CPU simply being glued in place in the usual way as I indicate here.

In use:


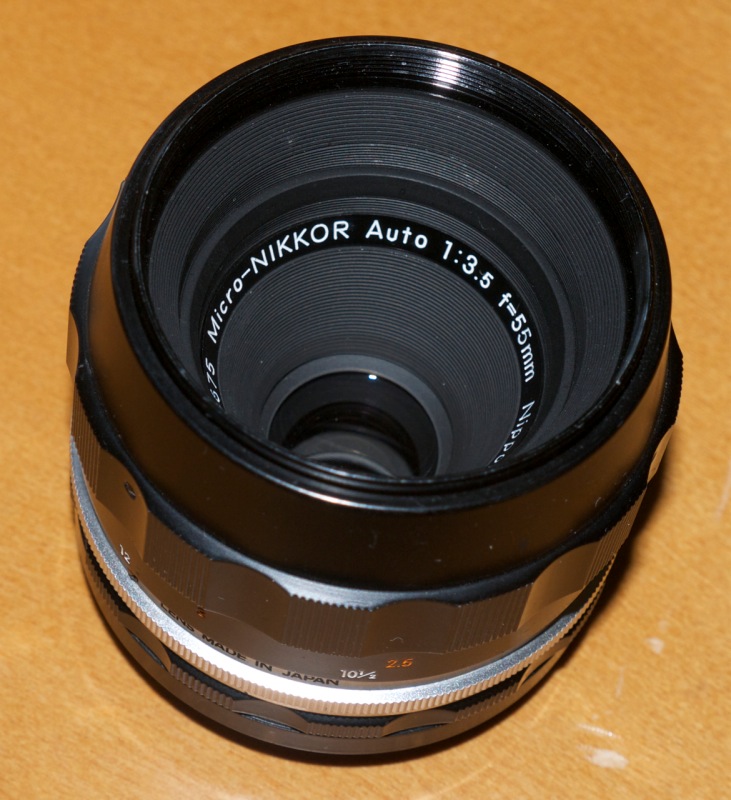
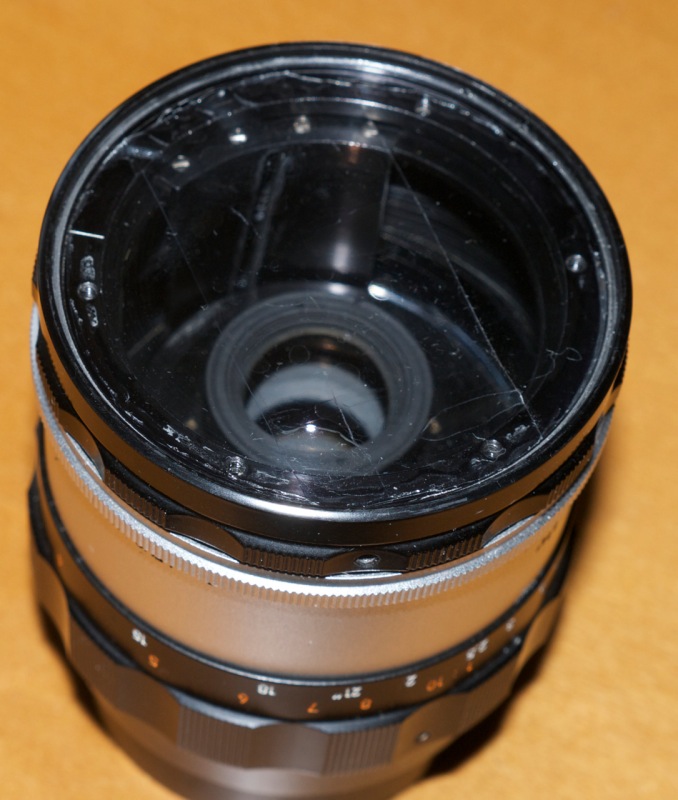
Deeply recessed front element.

The front element of the Micro Nikkor is deeply recessed within the barrel, so it’s unlikely that adding a lens hood will make any difference to results. Some reports indicate that the Micro Nikkor has poor performance at infinity, only really coming into its own at 1:10 and greater reproduction ratios. I have no idea where these urban myths were perpetrated – perhaps the results of a bad sample or two? – but mine is tack sharp at all apertures and subject distances, with optimum resolution being at f/5.6 through f/11 in the center and f/8 through f/11 in the extreme corners. Minor diffraction resolution losses become apparent at f/16 and f/22, and by f/32 these are noticeable, so I would avoid using the smallest aperture.

I do not recommend using a protective UV filter. It will serve only to attract light reflections, especially as it will be situated a considerable distance from the front element.

The lens is very light and the focusing helicoid exceptionally well designed, so that there is no play in the barrel even with the lens fully extended at its closest focus distance.

f/3.5 is not especially fast so how is focusing? I use the focus confirmation display in the D3x and hitting the illuminated central LED is very sensitive, meaning focus is very accurate. The infinity setting is exceptional, as the combination of 55mm Micro Nikkor and D3x body can easily distinguish between 250 feet and infinity. For reference, the same focus module is used in the D700, D3 and D3s bodies. So even at close focus distances, getting critical focus is trivial, though a tripod is strongly recommended in the close-up range where even minor movement of the camera can significantly upset focus.

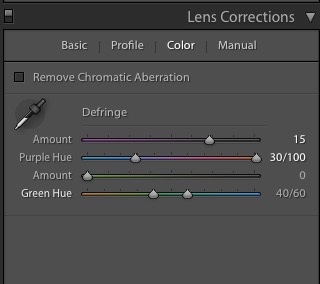
Lens correction profile:

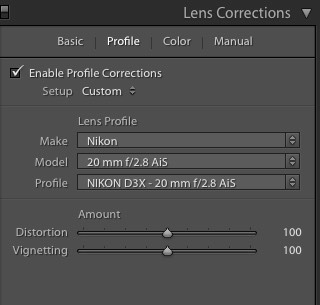
The lens is pretty close to perfect as is. There is very minor vignetting at f/3.5, and very low barrel distortion at all apertures. Chromatic aberration is almost non-existent. Nonetheless, I have made a lens correction profile which you can download here. This corrects these very minor aberrations, and if you add a CPU then you can have this profile automatically invoked and applied in Lightroom or Photoshop when downloading images from your camera’s storage card.


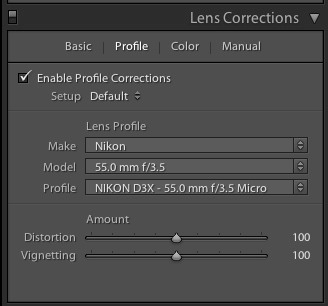
A CPU allows the correct profile to be automatically
loaded in Lightroom and Photoshop.

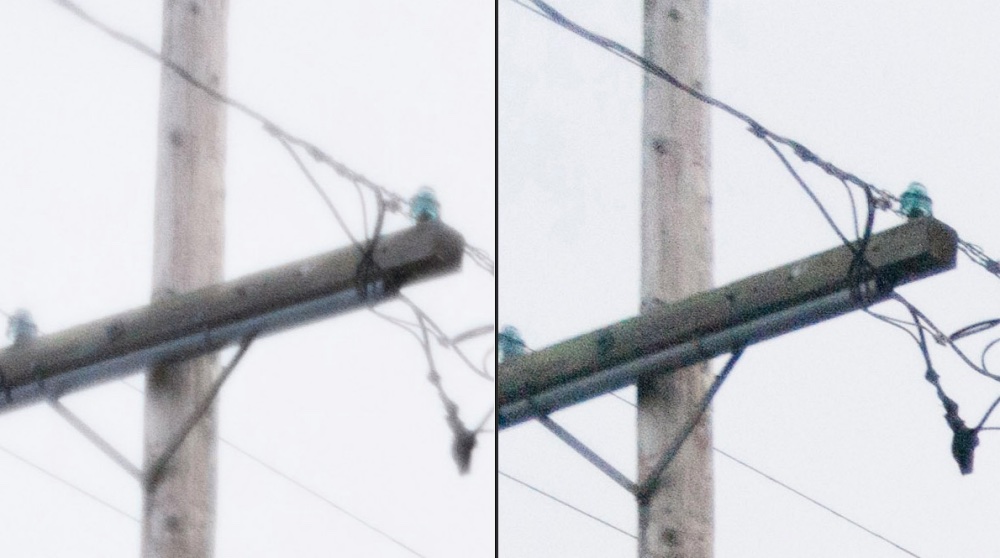
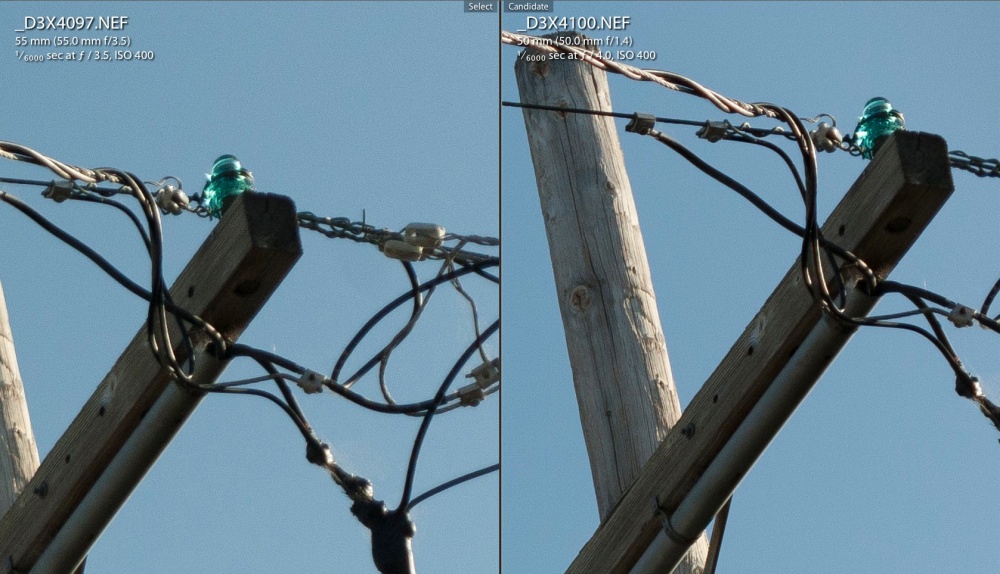
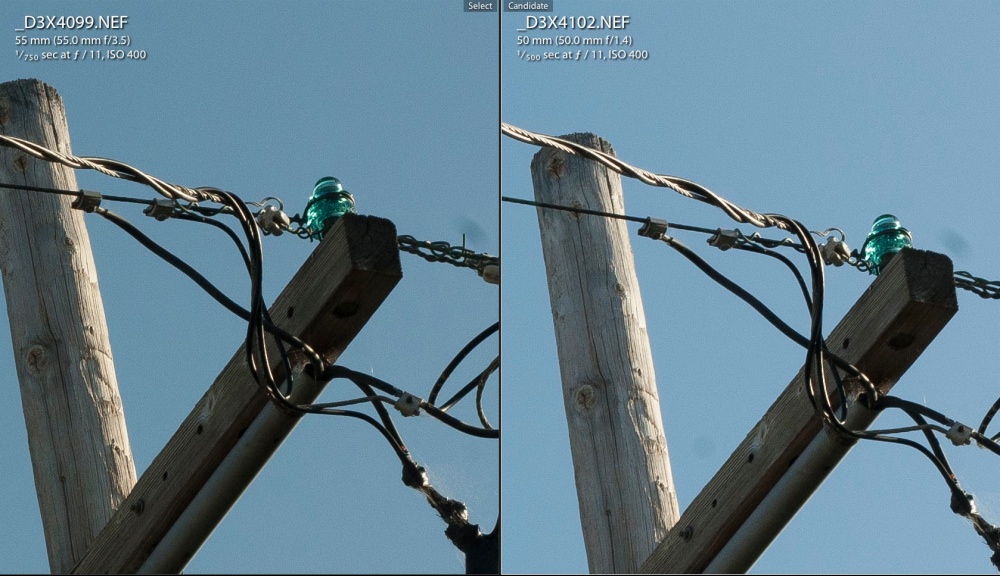
Comparison with the 50mm f/1.4 Nikkor:

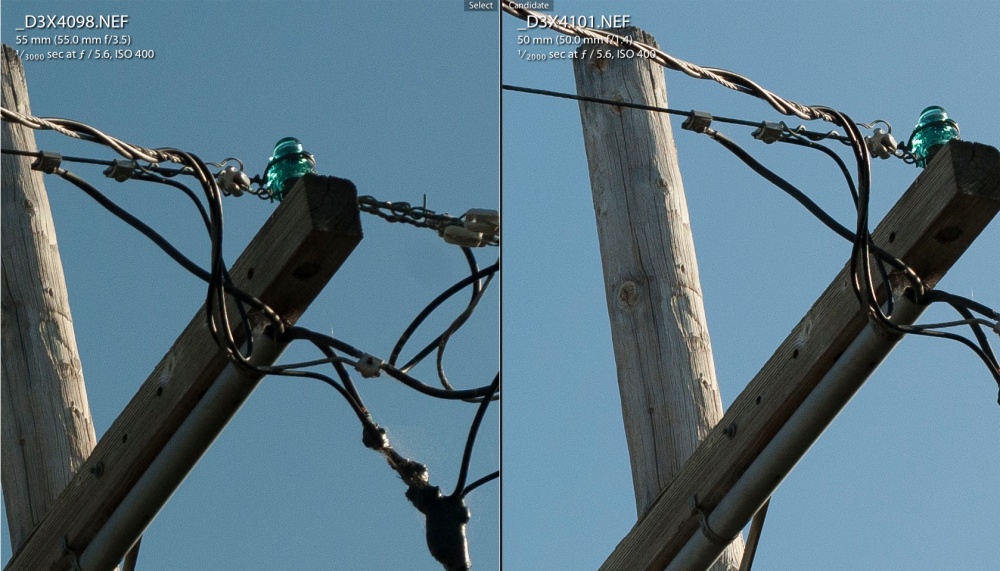
The 50mm f/1.4 Nikkor of the same era is a firm favorite of mine and both optics are absolute classics from the period when Nikon’s mechanical and optical designs peaked. It’s hard to put in words the tactile pleasure of using these lenses. How do they compare? At f/3.5, f/5.6 and f/8 the Micro Nikkor has the edge in errr…. edge performance, but you would need to make a 40″ print to prove it. The 50mm of course opens up to F/1.4 and the Micro Nikkor goes down to 50% life-size, so it’s horses for courses. Neither will let you down.

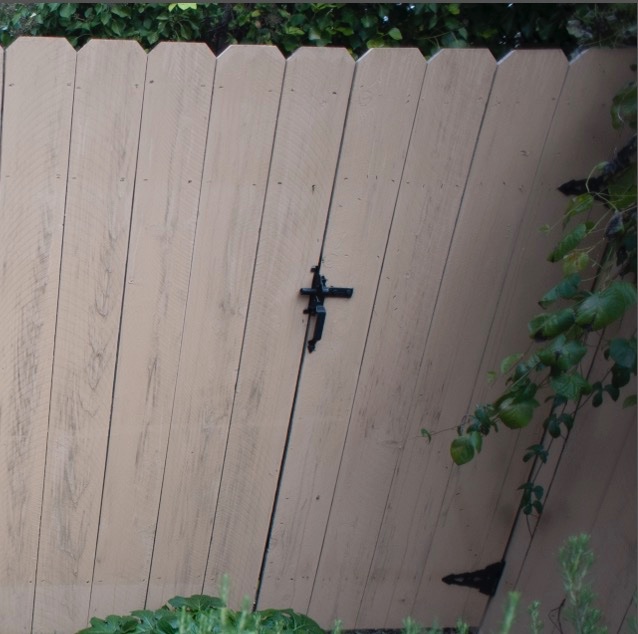
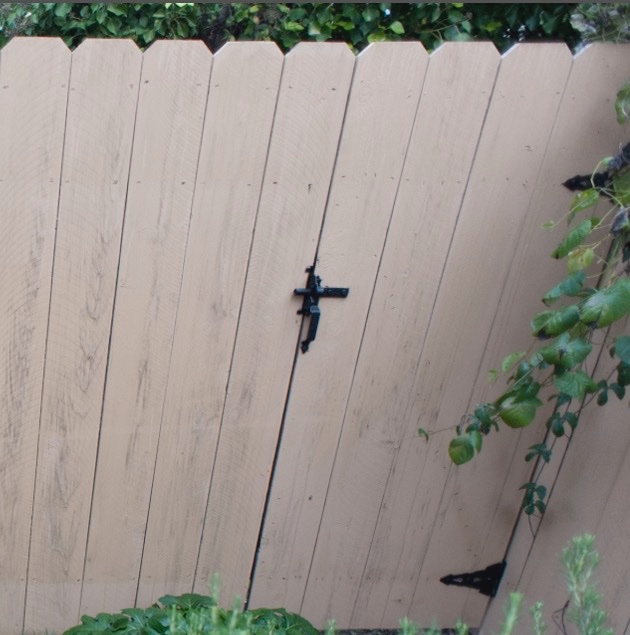
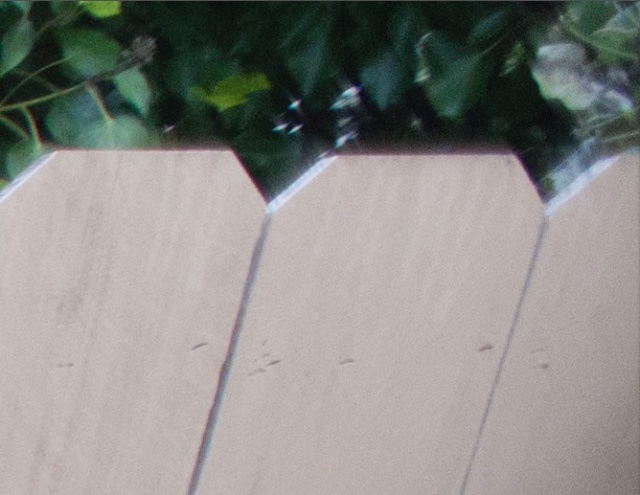
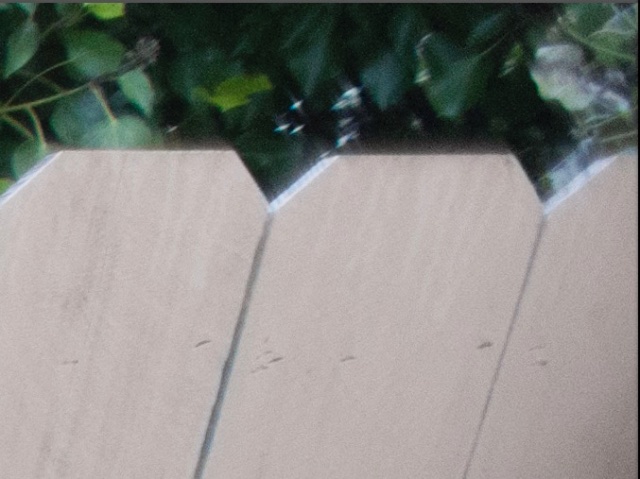
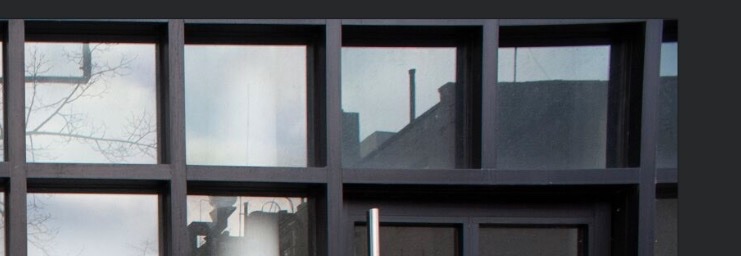
The following images are of a 27x enlargement of the top right corner of the frame:

At 1:2 closest focus distance:

This image of a wristwatch was exposed at f/3.5, full aperture, at the closest focus distance:


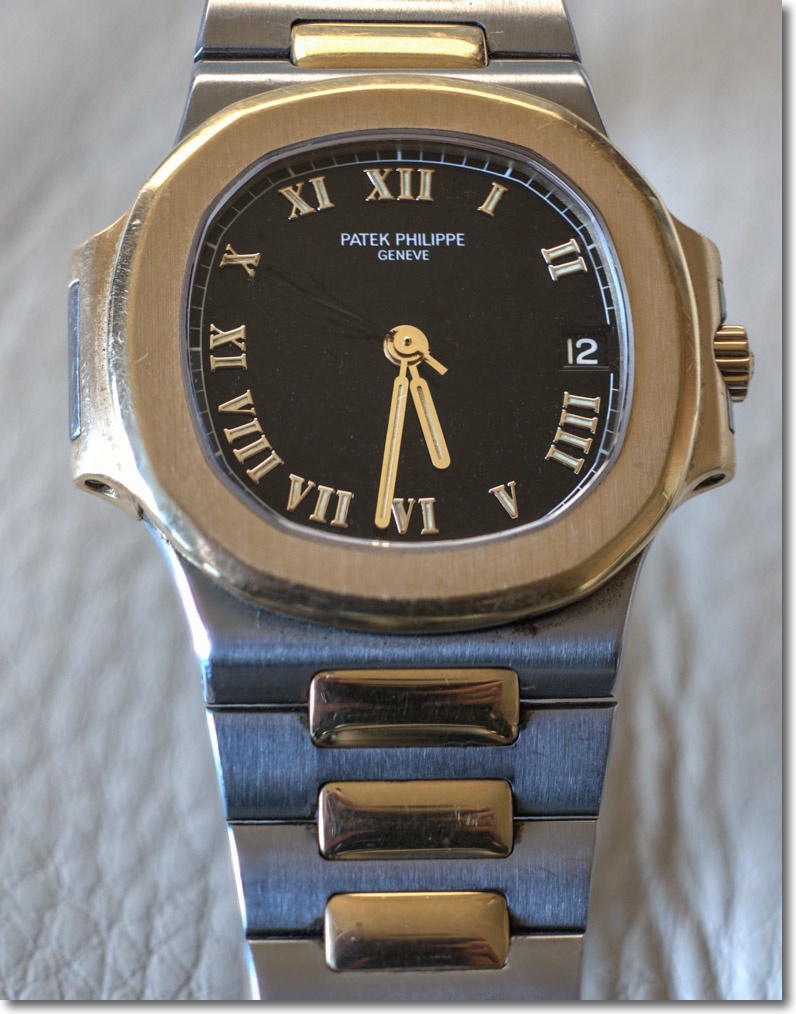
Helicon Focus focus stacking of 14 images.


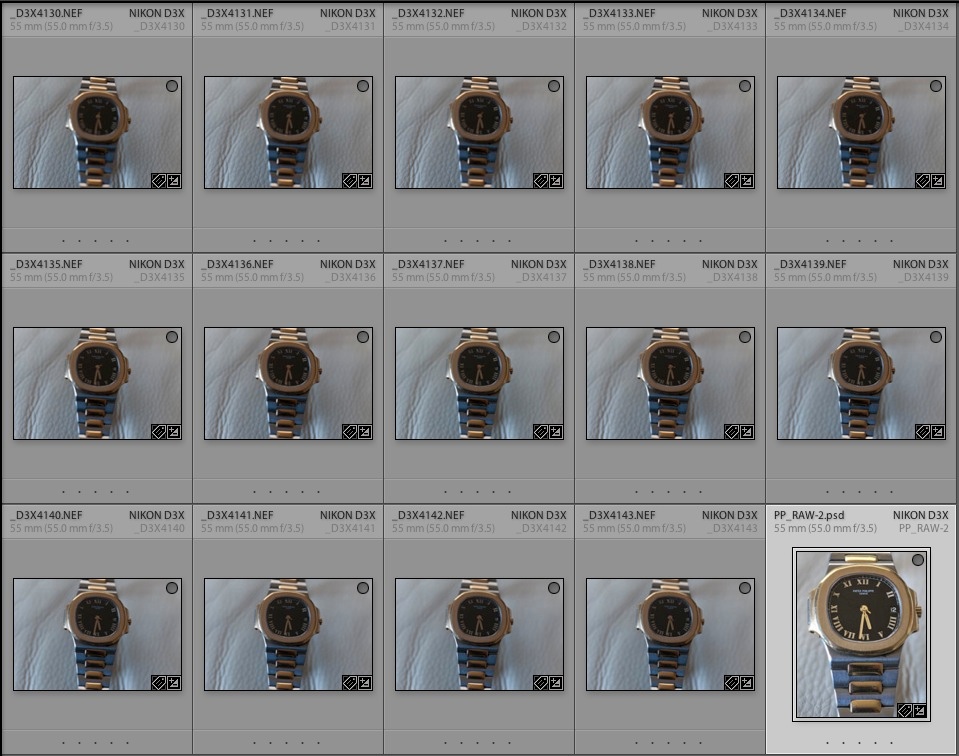
The 14 differentially focused images and the Helicon composite.

This gives you a sense of the maximum image size at the 1:2 closest focus distance. The image was created using Helicon Focus focus stacking software, and is a composite of no fewer than 14 differentially focused images, all taken at f/3.5. Because it takes a few seconds to take all the constituent images, refocusing a bit between each, I have removed the blur of the seconds hand using Photoshop.

The 55mm Micro Nikkor is recommended without reservation and at current market prices it’s almost offensively inexpensive.