Two years of use
3/3/2011: For a comprehensive update to what follows, click here. I have also extensively annotated one of the illustrations below and provided a click-through to an HP print quality document which helps with diagnosis of printing problems.
This article is of use solely to those using or contemplating purchase of one of the Hewlett Packard 30/90/130 DesignJet dye ink printers. Actually, even if you do not have one but enjoy pithy comments, read on in any case, as it gives me a chance to unload on a brilliant engineering company that couldn’t organize a drink-fest in a brewery when it comes to diagnostic information.
It is now two years since I placed the HP Designjet 90 printer in service, and I remain delighted with this device. Sure, it only uses six ink cartridges compared to eight or twelve found in more recent printers, but there’s no arguing with the quality of the prints this fine machine makes.
I’m on my second or third set of print cartridges (depending on color) and when reprinting one of my pictures I ran into a snag.
Here’s the problem:

Doubly irritating as I had just wasted a 24″ x 18″ piece of paper – I had set the job to print while taking a shower and this is what rewarded my return. I thought it might be a glitch in Aperture 2.0 so I printed from Photoshop CS2 and everything was pink, so suspicion fell on the printer.
The DesignJet series of printer (30, 90, 130) include a useful status panel telling you about ink levels:
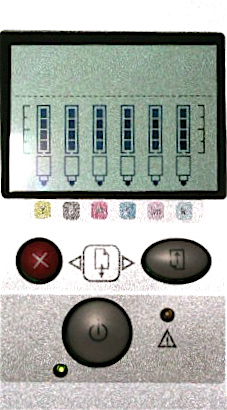
The vertical black bars denote ink level and the symbols that look like a felt-tip pen tell you about the status of the print heads – one head per ink color. If one of these is blinking it means the head is faulty and needs replacement. Or not – read on. They don’t cost too much in the US – $35 – but it’s not the sort of thing you stock as a spare if you, like me, are an amateur low volume printer.
However, the status screen on my DJ90 showed all the ink levels were fine and none of the ‘felt tips’ was blinking, so I checked the HP web site. Now HP, you must know, is an engineering company which means they have one of the worst web sites imaginable. It wouldn’t do for great engineers to write clear instructions now, would it, (real men do not need instructions and God help women) and the HP Systems Maintenance Utility resolutely refuses to run on my MacBook. Eventually I came across HP’s printer head cleaning instructions and applied these rigorously.
First, open the printer ink cartridge flap then open the cover for the printer heads when they have ceased moving. Pull the power cord now, then remove all the heads. They are color coded so no mix-up is possible. I believe they are actually identical but, once loaded with dye, you don’t want to switch these!
Using a coffee filter (these are lint free) and distilled water (not dirty tap water) wipe each head.
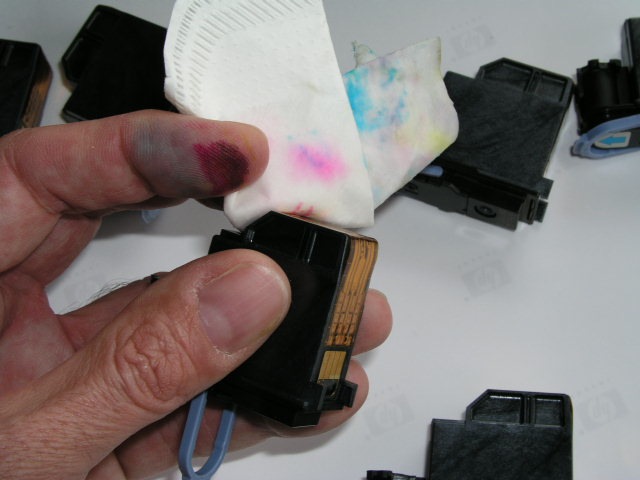
You want to keep wiping with a moist (not wet) filter until you get two clean ink streaks from the base of the head – the part that goes down into the well. That denotes good dye flow. You can see the twin tracks from the Magenta head in the picture above. Then wipe the contacts on the rearward facing (when in the printer) part of the head.
Next, wipe the receptor contacts in the printer as shown below.
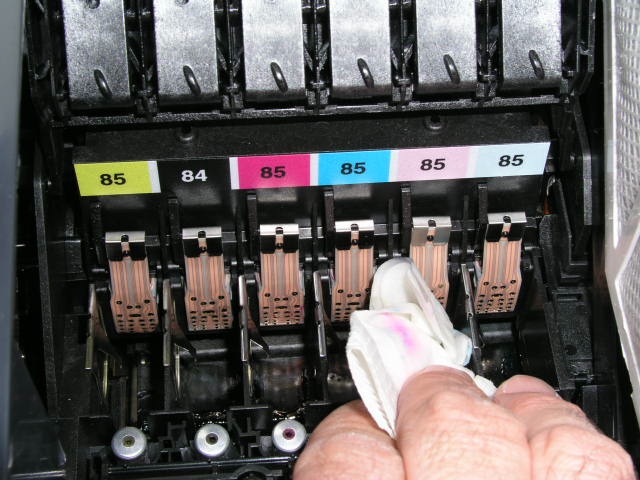
A lot of gunk comes out. I would guess I have made one hundred 13″x19″ and thirty 18″x24″ prints since I bought the printer, to give you an idea of the use it has had. I was actually surprised to have this failure as HP keeps the heads warm even when the printer is off (as long as it’s plugged into the mains) and I have not had any of the repeat clogging that I experienced with the Epson 1270. This is important as I tend to print in batches and with this last print run the printer remained idle for three months. (I was working for the US Government, filling out income tax returns and sending them 50% of my 2007 income the better to feed the losers who increasingly dominate our once free country, hence the inactivity).
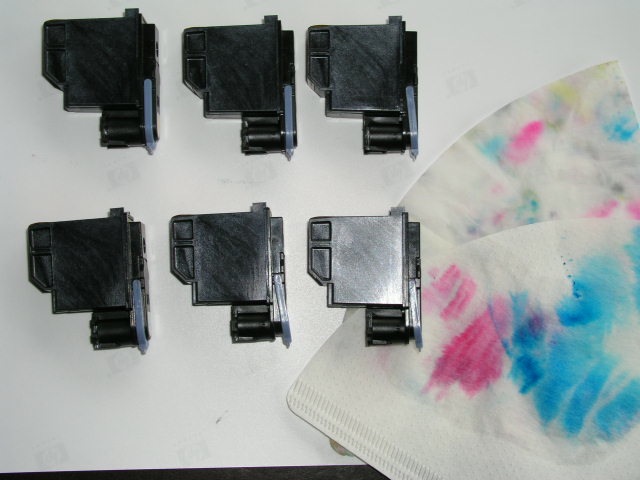
A first print test showed a repeat of the problem (the print was as sharp as can be) but after a second cleaning the problem persisted. Additionally, I got three blinking head errors second time around, but removal and reinsertion of the relevant heads fixed the problem.
Don’t make my mistake and let the ink dry on your fingers. I couldn’t get it off with isopropyl alcohol and had to resort to an abrasive Scotch pad. I now have no fingerprints, a status that equips me for a life of crime. Maybe I should run for Congress?
Head alignment and diagnostics
OK, so despite manual cleaning of the heads I was still having the ‘pink part way through the print’ issue.
Once Apple’s OS X Tiger (10.4.x) was introduced HP failed to properly update its System Maintenance Utility for Mac OS X, meaning that when you fire it up you will get an error message. (But see ‘Follow up’, below). Don’t even think of calling HP for help. First, they will charge you for fixing their errors and second, the chances of finding someone who has the answer is slim to none. Don’t believe me – check their chat board. A lot of unhappy Apple users there. Maybe HP hasn’t heard that creative people use Apple computers?
However, you can do everything that’s needed using the three buttons on the control panel by referring to this document. Though it says it’s for the 100, 110, 120 and 130 printers, it also works fine with the 90 model I have. And I’ll bet it works for the 30 model, too, as the 30/90/130 range share the same ink cartridges and print heads. Too bad HP does not know about it!
Using this document you can run usage and information reports, clean the print heads (in addition to the technique illustrated above), lock the heads for transport, align the print heads and – wait for it – switch off that piercing end-of-job buzzer which has irritated me from day one of ownership.
So by holding the Power button down and pressing the OK button thrice, I aligned the heads. Then, holding the Power button down I pressed the Cancel button twice to force a ‘Soft’ Printhead Recovery (HP speak for flushing the heads). Sure enough, the printout disclosed that the Light Cyan head was not performing properly (the color bars were either discontinuous or completely missing and came with a big black ‘X’ at the bottom right on the all three pages of the report). So I ran the ‘Hard’ Printhead Recovery cycle by pressing both the Cancel and OK buttons sequentially twice while holding the Power button down. Now all was well. You are looking for a cyan check (UK: tick) mark on the bottom right of the report and continuous tone in the test patterns. You can run these reports on regular 8.5″ x 11″ letter size paper – save your photo paper for pictures. The process takes several minutes, so be patient.
In case some yo-yo at HP deletes it, here’s what you need to know for future use:
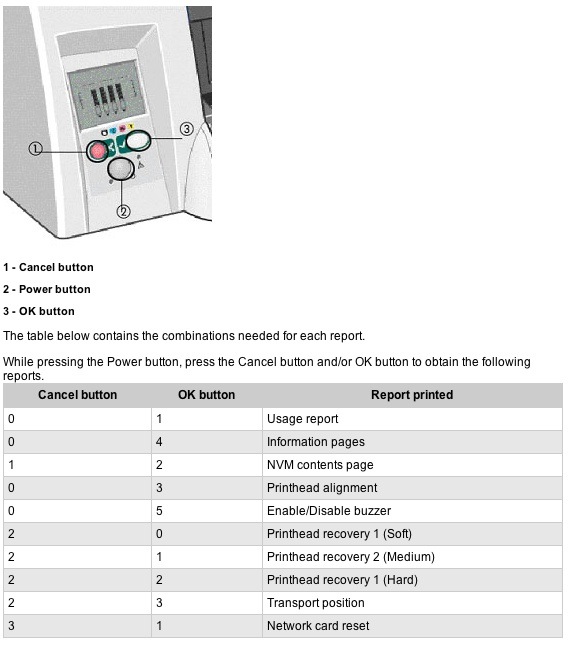
The ink use report is far more accurate than the one provided by the LCD status bars on the front panel of the printer.
Mine is not a network-capable version so the last choice is inapplicable.
Interpreting test print results is addressed in this very poorly written document on HP’s site. Have patience – they use some of the slowest servers in the world and the page takes a while to appear. That’s when their servers are not down, which seems to be much of the time.
Yes, I do have an engineering degree and, no, I do not have dirty fingernails (just dirty fingers after this job), facial hair or an inability to communicate clearly. Let’s leave the last three to HP’s engineers.
Follow-up:
Well, my ‘repair’ lasted a couple of prints then the problem resurfaced. I determined the Light Cyan head was at fault and ordered a replacement. Now all is well. No thanks to HP and it’s poorly documented diagnostics. Hopefully this will help others using this fine printer who run into problems.
To run color test prints run the HP Designjet System Maintenance utility going to Calibrate Color->Image Quality on the web page that will load (if you are lucky; if not, reboot and try again).
Here are the ‘Before’ and ‘After’ test prints – the second after installing a new Light Cyan print head. As you can see, light cyan is largely missing in cell D3 and the Green has trended to yellow in cell C3, leading me to conclude that the Light Cyan head is at fault. Not that you can divine that from HP’s on line ‘diagnostic’ illustration.
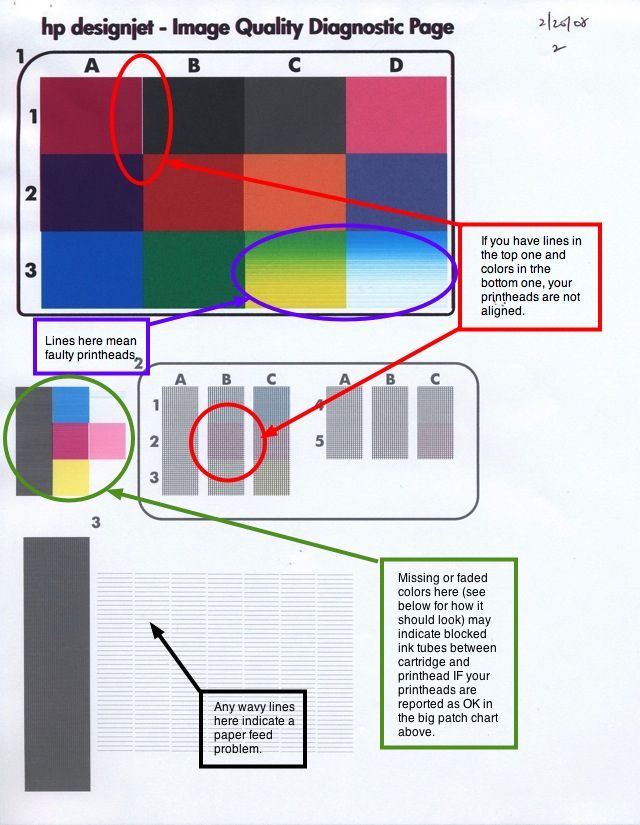
Before – faulty Light Cyan cartridge diagnosed. Plus head alignment is needed.
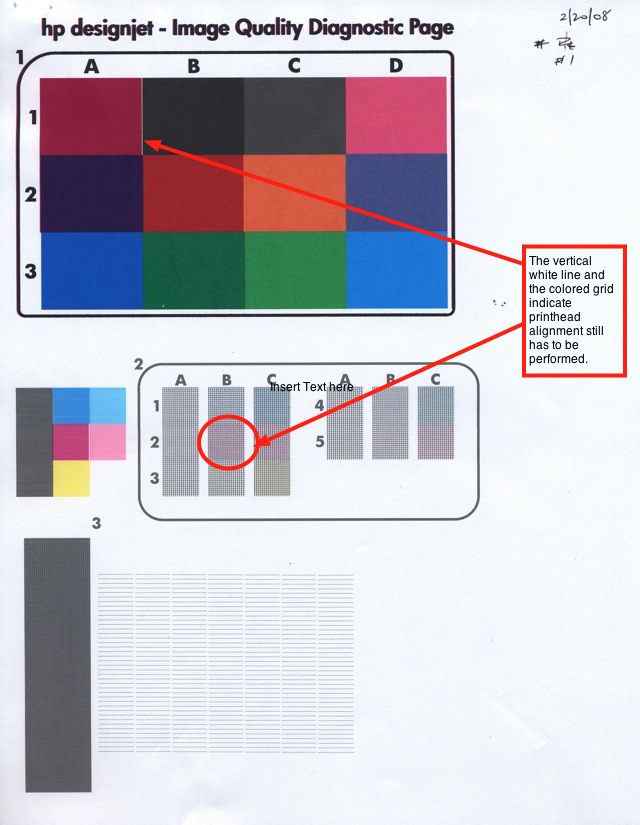
After – faulty Light Cyan cartridge replaced. Head alignment still needed.
HP says to align heads after any printhead change; in practice, run the above report first and if you see problems in the areas annotated, above, run the printhead alignment routine then. No point in running it if not needed. In the above picture, the white vertical line in the big color chart and the magenta shading in cell B2 indicate that head alignment is needed.
Had cell D1 been flaky, I would have replaced the Light Magenta head. The other cells and their respective error conditions are addressed in HP’s referenced diagnostic document, which largely seems to forget about its six head printers. I don’t know but I would bet that the 100, 110 and 120 models they reference use four heads and inks.
Once the new LC head was in place the printer ground away for a good five minutes before being ready to print, with the hour glass displayed on the LCD screen on the front panel.
Here is a later illustration from HP’s web site which is a bit clearer:

There’s also a print quality manual which you can download by clicking the image below:
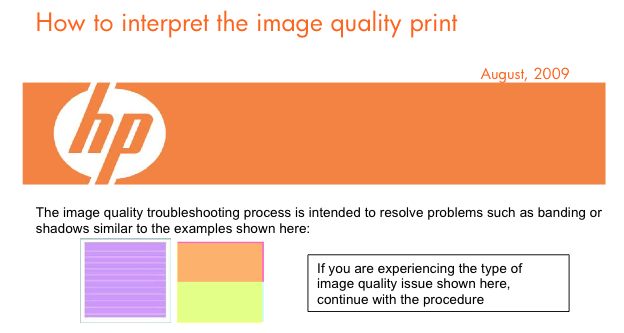
Click to download
Making Systems Maintenance work on a Mac:
I finally got the HP System Maintenance Utility to run on my MacBook. I first erased all the HP files in MacBook->Library->HP and in User->Library->HP, downloaded the utility and reinstalled it. If your Mac fails to respond to this approach the hard key method described above is every bit as good and a lot less frustrating as you are not confronted with HP’s constant page errors caused by mistakes in their code. The only thing that will not work is the firmware upgrade, but then we Mac users are just so much scum to the brilliant engineers at HP, no?
After changing the print head it is necessary to run the HP System Maintenance->Calibrate Color utility for each type of paper you propose using. If you cannot get the HP System Maintenance Utility to run you are out of luck. I did this for HP Premium Plus Photo Satin Best (bi-directional printing) and for HP Premium Plus Photo Satin Best Maximum Detail (mono-directional printing – slower). HP Premium Plus Photo Satin is the only paper I use in this printer as it looks great when mounted and has a slight sheen which allows retention of a decent contrast range without the specular reflections of glossy paper. The utility uses the HP’s built-in spectrometer to maximize color accuracy by comparing a test print to what it ideally should be – a feature generally found on printers costing several times as much – like the new, and very costly, Z3100 series. Each calibration run takes some 10-12 minutes and you must not mess with the printer while it is doing this. You must use test sheets (letter size) of the paper you are calibrating the printer for something, amazingly, that HP’s on-screen instructions never mention.
Conclusion:
Suffice it to say that all ended well, and the 18″ x 24″ annual birthday snap of our son is ready for mounting and framing, after a 24 hour drying period to let the inks firm up nicely. Oh! and one other thing – it was printed out of Lightroom, Aperture being softwara non grata in the Pindelski household.
Despite HP’s lousy diagnostic instructions I still remain over the moon delighted with the DesignJet 90 printer.
Update – 4/2009:
Another head gave out – the banding in cells C2, D1 and D2 pointing to a faulty Light Magenta printhead. It’s nice to have HP’s good diagnostic tools, even if the instructions are so poor.
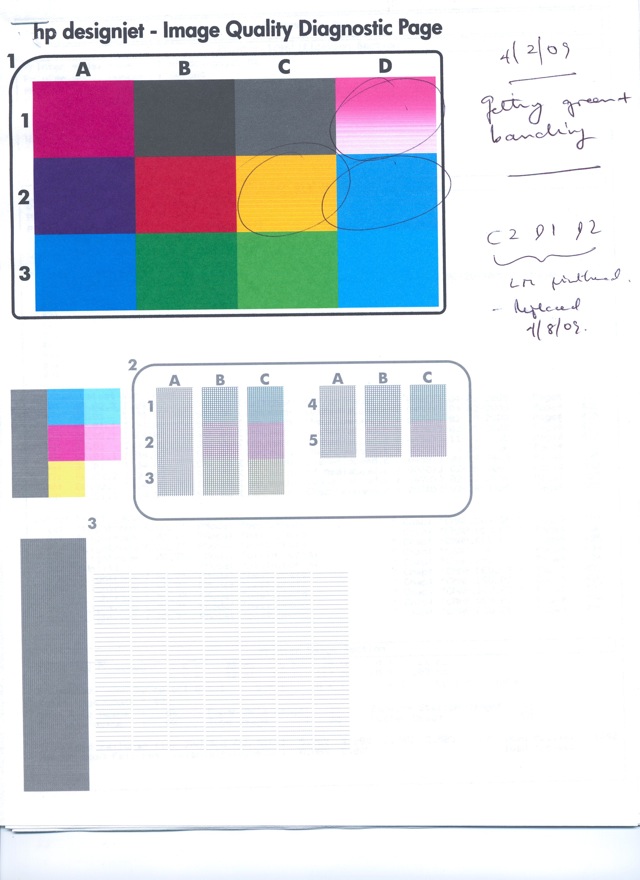
Here’s the full troubleshooting table for printheads in case you cannot access the web-based utility offered by HP: