Category Archives: Technique

HP DesignJet 90 ink use

Frugality is thy name.

I did some arithmetic to show just how inexpensive ink and paper are when it comes to a large exhibition print using the DJ90 here.

Well, it’s coming up on my first anniversary of ownership of the HP DesignJet 90 printer and it finally came time to replace one of the ink cartridges as the Light Magenta indicator started blinking, showing the ink was about to run out. Replacement is literally a 10 second afffair – pull the old, plug in the new.

An appropriate time to point out that the DesignJet should never be unplugged from the mains; even when switched off with the front panel push-button, the DJ keeps the ink cartridges warm to prevent clogging. The front panel light attests to the fact the printer is getting power and the warmth of the ink cartridge area confirms the clever warming feature, something sorely needed on my older Epson 1270 which would clog up if not used for a month or so. I just came back to the DJ after six weeks of not using it and the first print was as perfect as any other. Why HP doesn’t shout about this feature from the rooftops beats me, but then it’s always been a company more about engineering than marketing.

Here are the ink meters right after replacing that Light Magenta cartridge:

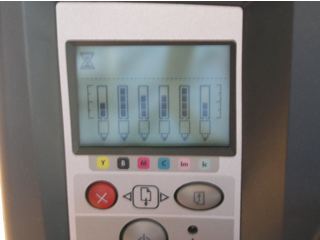
My best estimate is that over the past year I have made twenty 18″ x 24″ prints and fifty 13″ x 19″ ones, before that first cartridge gave up the ghost. As the picture shows, the other cartridges are between 1/2 and completely full. Do the math and that works out at less per square inch than those great instant 6″ x 4″ prints from the local drug store at 19 cents each. And you get fade resistant inks into the bargain – suffice it to say that Wilhelm’s test say 82 years or something silly, meaning I won’t care when these start fading! Wilhelm Research is the leader in testing ink longevity.

HP seems to be continuing with the dye ink based DJ series, even though the new pigment ink based DesignJet Z series with built-in colorimeters would appear to be their latest thing. The Z series uses pigment inks. Pigments rest on the surface of the paper like paint on a wall, whereas dyes need a porous medium as they are absorbed, like stain on wood, meaning that the paper you use with the DJ90 has to be suitable for dye based inks – not all papers are absorbent.

I have read tests on the Z series which suggest that there is nothing to choose between dyes and pigments (heretofore dyes were generally regarded as superior for color fidelity) though I have not seen Z prints for myself. Given the target user market for the new Z printers – professionals – I doubt that HP would supercede the DJ dye printers with something inferior. These are very costly printers and not something you would really want to use for small prints.

Anyway, after almost a year the honeymoon with the Hewlett Packard DesignJet 90 printer continues untroubled – no breakdowns, no lockups, no cryptic messages. Should these ever get remaindered and you like big prints, do consider one if you can make the space for it at home. That’s with a Mac, of course. I can’t see how any Windows user could write objectively about up time given that he or she is busy rebooting most of the time….

A good snort

Or not – but isopropyl alcohol does the trick when it comes to a clean screen.

I have used Kodak’s Lens Cleaning solution from time to time to clean my iMac and iBook LCD screens and, frankly, it’s been an exercise in frustration as it seems nearly impossible to leave a screen with no drying marks. Same result when you use it to clean camera lenses, which makes you wonder what Kodak is thinking about. If, that is, anyone at Kodak ever thinks anymore.

So, the other day, on a whim, I tried Isopropyl Alcohol, the large bottle selling for under $2 at the local drug store. Now be warned. You really want to try this on a discreet spot before going crazy, in case plastic parts you apply this to start to melt. I had no such problems (it cleans the case and keyboard of the iBook nicely too) and after a couple of swipes with a clean tissue (no perfumed or lotion soaked varieties – just plain old Kleenex) I was rewarded with crystal clear screens on both computers.

I have tried it on my lenses – these always use UV filters, so it’s those I actually clean, and it works every bit as well, though in that case I do use lens cleaning tissues rather than Kleenexes.

Oh! yes, it’s also one fifth of the price of the Real Thing.

Just don’t drink or inhale – it’s a poison and no substitute for a martini.

Second fifteen

Enough mounting, framing and hanging for a while.

The goal for my one man show in April, 2007, is to have thirty, framed and glassed large prints on display, maybe supplemented by a couple dozen matted but unframed ones in the saw horses in the gallery.

The first fifteen have been shown here before.

Once the QuickTime image loads – click below – cursor over any of the pictures on the walls and the cursor will change to a finger pointing to a globe. Click and you will be take to a high quality image of the picture. Click the ‘back’ button on your browser to return to the panorama.

Click here

I ran out of conventional wall space in the home and the theater so I had to resort to hanging the final fifteen, now that they are framed, in the garage, which offers lots of unused white walls. Not the greatest display space, perhaps, but it beats having the framed pictures standing up against various walls, waiting to be accidentally kicked.

Here’s a fish eye snap of the ‘gallery’ – not high quality but you get the idea:

The production line process I mentioned in my piece on framing made this a reasonably efficient proces, fourteen steps in all, viz:

Cut the mounting tissue* (30 minutes)
Mat* (30)
Name and sign all the prints* (15)
Build frames (33)
Install glass (7)
Clean glass (60)
Install print/mount/mat sandwich* (7)
Insert framing points (15)
Drill holes for wire eyes (15)
Install wire eyes (30)
Install hanging wire (60)
Mark wall at standard heights – 70″ for the landscape prints, 73″ for the portrait format ones (30)
Knock in hangers (15)
Hang prints (7)

* Cotton gloves are worn in the asterisked steps, all of which involve print/hand contact.

Aggregate time for each step is shown in parentheses, above. The total of three hours and 21 minutes does not include the time taken to make the prints – reckon on 15-30 minutes per print. Excluding the printing time, the time per mounted and framed print is around 21 minutes with this production line approach, which is not as bad as you would think, considering that the final product is a professionally mounted and framed print with real glass. (Lucite or perspex may be lighter and less fragile, but attracts dust horribly and just looks cheap with large prints).

Each step is done 15 times before moving on to the next. Phew! It may be tedious but going through this process print by print would take infinitely longer. If you need to make a lot of exhibition prints, I commend this approach to you.

Why all this focus on time? Because time spent framing is time not spent taking pictures.

HP ink costs

The old HP 12C helps out.

In my piece on framing Really Big Prints I guessed at the cost of ink used by that frugal beast, the Hewlett Packard DesignJet 90 printer.

Well, in the HP engineering spirit, I whipped out the old 12C and set to work.

Checking the ink levels on the printer showed the following:

Yellow 3/4 full
Black Full
Magenta 3/4
Cyan 3/4
Light Magenta 1/2
Light Cyan 1/2

Now as the level in each cartridge is reported in one quarter steps, I averaged 3/4 full to mean 5/8 full (i.e. half way between 3/4 and 1/2) and so on, making for ink use aggregating 2.5 cartridges.

Production?

13 18″ x 24″ prints and 27 13″ x 19″ prints, or 12,285 sq. in.

With cartridges averaging $35 (the prices differ, strangely, according to color), that works out to $87.50 in ink, or $1.75 for a 13″ x 19″ and $3.07 for an 18″ x 24″.

So my $4 ink cost-per-print estimate in that earlier journal entry was a tad high. You can make an 18″ x 24″ print with the HP DesignJet, paper included, for the price of a hamburger-and-fries at the local fast food joint.

The HP DesignJet dye-based series of printers (30, 90, 130) are frugal, indeed, when it comes to ink use. I cannot express how pleased I am with this large printer and, in truth, rather regret not having bought the 24″ carriage model, though how I would handle mounting and framing 24″ x 36″ monsters in 32″ x 42″ frames boggles the mind.

The Christmas snap

It cannot get any simpler than this.

Almost a year ago I wrote why I believe it makes no sense for a photographer to process his own small prints.

I am more convinced than ever that this is true.

Here’s a time line for this year’s annual family picture mailed to all our friends:

11:30 am – Family commences donning decent clothing. No jeans allowed!
11:40 am – Old Olympus 5050 digital is placed on the tripod and a test shot is made. This camera, despite the horrible shutter lag, boasts a fine wireless remote which is easily hidden in the palm.
11:47 am – The first picture is taken
12:06 am – The last of 22 pictures is taken – you try to get all five people, including a dog and cat known to conspire, looking good at the same time
12:10 am – The best snap is chosen in iPhoto and cropped to 3:2 to match the 6″ x 4″ prints we will order
12:15 am – The picture of choice is uploaded to Walgreens and forty ordered at 19 cents a print
12:25 am – Walgreens emails that the prints are ready for collection
12:35 am – The family, having strolled down the road, picks up the pictures at Walgreens and hands over $8.23
12:36 am – We cross the road to the greasy spoon for lunch and share the pictures with the nice Koreans who run it so well

1 hour and 5 minutes start to end. Meanwhile, the home printer is wondering why his print heads are clogged, the colors are wrong, and then runs out of ink. Walgreens uses a superb Fuji printer which renders lovely skin tones and runs it with Kodak paper, interestingly. They told me it works better that way.


Sixty-five minutes, $8.23 and forty prints later