Category Archives: Technique

Second fifteen

Enough mounting, framing and hanging for a while.

The goal for my one man show in April, 2007, is to have thirty, framed and glassed large prints on display, maybe supplemented by a couple dozen matted but unframed ones in the saw horses in the gallery.

The first fifteen have been shown here before.

Once the QuickTime image loads – click below – cursor over any of the pictures on the walls and the cursor will change to a finger pointing to a globe. Click and you will be take to a high quality image of the picture. Click the ‘back’ button on your browser to return to the panorama.

Click here

I ran out of conventional wall space in the home and the theater so I had to resort to hanging the final fifteen, now that they are framed, in the garage, which offers lots of unused white walls. Not the greatest display space, perhaps, but it beats having the framed pictures standing up against various walls, waiting to be accidentally kicked.

Here’s a fish eye snap of the ‘gallery’ – not high quality but you get the idea:

The production line process I mentioned in my piece on framing made this a reasonably efficient proces, fourteen steps in all, viz:

Cut the mounting tissue* (30 minutes)
Mat* (30)
Name and sign all the prints* (15)
Build frames (33)
Install glass (7)
Clean glass (60)
Install print/mount/mat sandwich* (7)
Insert framing points (15)
Drill holes for wire eyes (15)
Install wire eyes (30)
Install hanging wire (60)
Mark wall at standard heights – 70″ for the landscape prints, 73″ for the portrait format ones (30)
Knock in hangers (15)
Hang prints (7)

* Cotton gloves are worn in the asterisked steps, all of which involve print/hand contact.

Aggregate time for each step is shown in parentheses, above. The total of three hours and 21 minutes does not include the time taken to make the prints – reckon on 15-30 minutes per print. Excluding the printing time, the time per mounted and framed print is around 21 minutes with this production line approach, which is not as bad as you would think, considering that the final product is a professionally mounted and framed print with real glass. (Lucite or perspex may be lighter and less fragile, but attracts dust horribly and just looks cheap with large prints).

Each step is done 15 times before moving on to the next. Phew! It may be tedious but going through this process print by print would take infinitely longer. If you need to make a lot of exhibition prints, I commend this approach to you.

Why all this focus on time? Because time spent framing is time not spent taking pictures.

HP ink costs

The old HP 12C helps out.

In my piece on framing Really Big Prints I guessed at the cost of ink used by that frugal beast, the Hewlett Packard DesignJet 90 printer.

Well, in the HP engineering spirit, I whipped out the old 12C and set to work.

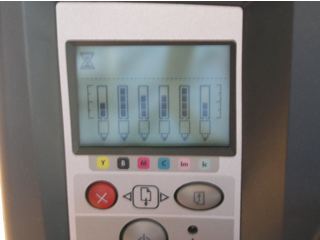
Checking the ink levels on the printer showed the following:

Yellow 3/4 full
Black Full
Magenta 3/4
Cyan 3/4
Light Magenta 1/2
Light Cyan 1/2

Now as the level in each cartridge is reported in one quarter steps, I averaged 3/4 full to mean 5/8 full (i.e. half way between 3/4 and 1/2) and so on, making for ink use aggregating 2.5 cartridges.

Production?

13 18″ x 24″ prints and 27 13″ x 19″ prints, or 12,285 sq. in.

With cartridges averaging $35 (the prices differ, strangely, according to color), that works out to $87.50 in ink, or $1.75 for a 13″ x 19″ and $3.07 for an 18″ x 24″.

So my $4 ink cost-per-print estimate in that earlier journal entry was a tad high. You can make an 18″ x 24″ print with the HP DesignJet, paper included, for the price of a hamburger-and-fries at the local fast food joint.

The HP DesignJet dye-based series of printers (30, 90, 130) are frugal, indeed, when it comes to ink use. I cannot express how pleased I am with this large printer and, in truth, rather regret not having bought the 24″ carriage model, though how I would handle mounting and framing 24″ x 36″ monsters in 32″ x 42″ frames boggles the mind.

The Christmas snap

It cannot get any simpler than this.

Almost a year ago I wrote why I believe it makes no sense for a photographer to process his own small prints.

I am more convinced than ever that this is true.

Here’s a time line for this year’s annual family picture mailed to all our friends:

11:30 am – Family commences donning decent clothing. No jeans allowed!
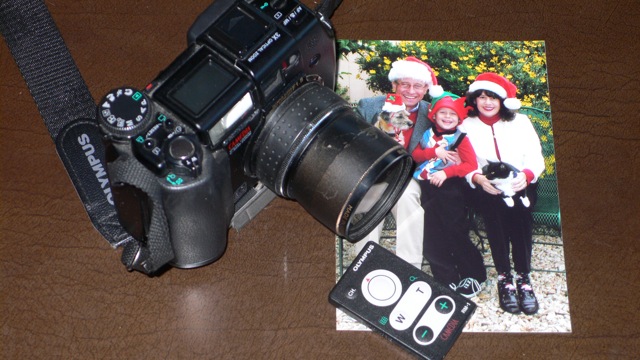
11:40 am – Old Olympus 5050 digital is placed on the tripod and a test shot is made. This camera, despite the horrible shutter lag, boasts a fine wireless remote which is easily hidden in the palm.
11:47 am – The first picture is taken
12:06 am – The last of 22 pictures is taken – you try to get all five people, including a dog and cat known to conspire, looking good at the same time
12:10 am – The best snap is chosen in iPhoto and cropped to 3:2 to match the 6″ x 4″ prints we will order
12:15 am – The picture of choice is uploaded to Walgreens and forty ordered at 19 cents a print
12:25 am – Walgreens emails that the prints are ready for collection
12:35 am – The family, having strolled down the road, picks up the pictures at Walgreens and hands over $8.23
12:36 am – We cross the road to the greasy spoon for lunch and share the pictures with the nice Koreans who run it so well

1 hour and 5 minutes start to end. Meanwhile, the home printer is wondering why his print heads are clogged, the colors are wrong, and then runs out of ink. Walgreens uses a superb Fuji printer which renders lovely skin tones and runs it with Kodak paper, interestingly. They told me it works better that way.


Sixty-five minutes, $8.23 and forty prints later

Framing Really Big Prints

It’s not fun, but it has to be done.

2023 Update: For an update with new vendors, much cheaper and every bit as good, click here.

Henry Ford, genius that he was, determined that it’s better to get a semi-skilled worker to do one task many times than to try and train him to do many tasks once. And, I’m afraid, when it comes to framing lots of prints, that a production line mentality is consonant with productivity and low error rates. Let’s face it. Only an assembly line worker, could find this work interesting.

I have previously illustrated how I Mount and Mat Really Big Prints. In this pictorial I will walk through the framing process.

The time had come when I finally had to frame the last 15 prints for my one man show – some 18″ x 24″, the rest 13″ x 19″ – all mounted on 22″ x 28″ stock. Marty Paris, the UPS man, sadist that he is, had dropped off the framing supplies from the fine folks at Redimat, so there was little excuse but to get down to it and get through the drudge of framing. Earlier, glass had been procured from the nice people at Paso Robles Glass down the road, so no excuses remained.

I use classic black frames.

You need a clean, well lit, flat workspace, some Titebond II wood glue and a moist rag to clean up glue squeeze out. While wet, this glue is water soluble. Once dry – don’t even think about it.

No sledgehammer needed. A drop of glue on the two mitred surfaces, pop in a corner piece, and tap it in gently with a soft blow mallet.

Wipe off any glue squeeze out and move the frame to a safe place. The matt surface is fragile and easily scratched. I delegated custodial and security duties to my regular assistant, Bertram the Border Terrier. If you use one of these, do make sure the chap is comfortable, as in the picture above. Guard duty is stressful, diligence essential.

Thirty-three minutes of indescribable tedium later, fifteen frames are assembled. Note the unceasing diligence of the faithful hound.

When you buy glass this large – these sheets are 21 15/16″ x 27 15/16″ – do ask the glazier to pack them in groups of five, or you will be risking a hernia. Glass is heavy! While the frames accommodate 22″ x 28″ mats, I have the glass undercut by 1/16″ as the glazier cannot guarantee tight dimensional tolerances.

Now for the toughest and most dangerous bit. Tough because cut sheet glass is coated with fine polymer granules to prevent abrasion between adjoining surfaces. These must be cleaned off. Dangerous because you can easily cut yourself on the unpolished edges (ever seen a glazier’s hands?) – polishing these is God’s way of telling you that you have too much money. You need to get the glass crystal clear and lint free. Any dirt will show like you wouldn’t believe if you use black mats, which I prefer.

Rather than using an ammonia-based glass cleaner like Windex, which is prone to leaving streaks, I prefer Sprayaway, which is ammonia-free and simply does a better job. The lint-free cloths are from Griot’s Garage, a superb business which really cares for its customers. You can wash and reuse these until they fall apart. Forget the paper towel rolls from the local Home Depot – these have so much grease and oil in them as to be useless.

You will find it far easier – and safer – to clean the glass by placing it in the frame. That way you are protected from the sharp edges and it doesn’t slide around dangerously because of those polymer granules. I do this on a black marble table top for the simple reason that the black background discloses every piece of dirt and lint.

Once clean, drop the mat/print/mounting board sandwich in.

Now, do yourself a favor. There is only one effective way of installing framing points in a frame, and that is using the right tool for the job. This superb tool, available from Blick Art Materials in the fine state of Texas, goes by the name of the Fletcher FlexiMaster Framing Tool. Expensive, you say, at some $80? Nonsense. How about perfect point installation, all sixteen of them, in thirty seconds?

Thirty seconds later. What is your time worth?

I leave drilling of holes for the wire eyes until the end for the simple reason I can never remember how many prints are portrait and how many landscape in my ‘production run’ and, of course, the placement is either on the long, or short, frame sides, respectively. Use a drill size that allows you to torque the screw down easily but not so large that it’s sloppy. If you are struggling and your Phillips screwdriver is jumping out of the screw, your drill is too small. This has to be right. The completed frame + glass + print is heavy and you do not want the screw coming out in the next California earthquake or whatever natural disaster your location is prone to.

I drill the holes six inches down for both portrait and landscape prints. Why the pedantry? Because if you make everything uniform, hanging a bunch of prints dead level becomes easy if everything is identically placed. Old H. Ford taught me well.

The wire eyes can now be attached.

Once again, if you are fighting that screwdriver, use a bigger drill for the hole. And please repeat after me: “I will not use an electric drill to insert the screw”. Unless you want to split the wood frame, that is.

Attach the hanging wire – I use 20 lb wire which is more than strong enough. Don’t even think of using synthetics like nylon. They will rot with age and …. well, I leave the rest for you to figure out. Tension the wire identically for each picture and the degree of sag you will get when you hang them will be …. identical. Hanging pictures is right up there with framing – I suspect more practitioners have been driven to chemical dependency by this process than through doing their annual tax returns. And the eye is incredibly sensitive to improperly aligned prints – or horizons. It’s something God seems to have built in to our genetic make-up.

Finally, place one of the provided bumpers at each corner to protect the wall.

What does all this cost?

A sheet of paper sized 18″ x 24″ for the Hewlett Packard DesignJet 90 printer costs $4. Inks probably add another $4. The mat is $14, the mounting board some $7, the glass $18 and the frame $26. Add $2 for the wire, hook and mounting tissue, and you are in for $75 for each framed print. So my show, with thirty of these, plus a couple of dozen unframed prints in the saw horses on the side, adds up to some serious money.

But is it worth it, or what?

Aaah!

Remote strobe trigger

How does $20.39 delivered sound?

When, with the help of that merry boulevardier, Bert the Border Terrier, I wrote about my happy times with studio flash I grumbled about the cost of a wireless connector between camera and power pack. This obsoletes one cord, making for one less thing to trip over, but I couldn’t find anything reasonably priced, so I put the idea out of my mind. Canon makes a unit called the ST-E2, for some $210, which will trigger their Canon flash units only, and that price is for the transmitter only! And that’s an optical transmitter, meaning your receiving flash gun has to be in line of sight of the transmitter. No way, José. B&H also lists many units from other makers. My only interest is in radio transmitters, which do not require line of sight, and the cheapest receiver-transmitter I can find on their site is some $125 and that requires mains power. Ugh! Lose a cord, gain a cord. Too much money, too little gain.

The other night, thinking about that strobe piece, and preparing mentally for the annual Christmas family snap which requires strobes as often as not, I was reminded of a conversation with a nerdy friend. You know, the one who thinks nothing of dismantling his computer to convert it to a faster chip or ripping apart his motorcycle in the quest for two more horsepower. This fellow had bought an el cheapo radio receiver-transmitter from eFraud, excuse me, eBay, and was singing its praises to the high heavens.

Now, truth be told, he was visiting from Crime Central, a.k.a. Baltimore, and the libations were flowing freely, so I dismissed this as so many ramblings of a too active brain. But that strobe piece caused something of a flashback to that discussion so I checked eCheat, sorry, eBay, to see what was out there, dialing in the words “flash remote”. Well, seemingly hundreds of choices presented themselves so I went for the cheapest, smallest, battery powered radio unit, going for the startling sum of $4.95. OK, OK, plus $14.99 postage. So $20.39 all in, counting 41 cents to the serial larcenists and pant droppers in Sacramento, CA for sales tax. My unit of choice goes under the splendid name of “New Wireless Remote Radio Slave Strobe Flash Trigger AA”. No prizes for originality, but five days later my good friend Greg Littell, who doubles as the mail man, dropped off a small package which must have cost the vendor all of $1.99 to mail. Hey, whatever, I was only in for $20.39 all told.

And here it is.

You get the receiver, with a 1/4″ mono plug, which plugs into your strobe’s power pack, a mini-jack adapter, a transmitter-to-camera cable if you have no hot shoe, and the transmitter. The whole things weighs – well, about $1.99 in postage.

The instructions are written in Chinglish. “Trigger flash lamp in long distance and in all around way without barrier”. Let Dr. Pindelski, your Sino-studies expert, translate. “Radio remote strobe transmitter and receiver, not requiring line-of-sight”. They also say you need a 12 volt 23A battery for the transmitter, the bit that goes on the camera, and two “Size No. 7” batteries for the receiver, the part that is plugged into the strobe’s power supply. That’s “AA” to you. I popped the small Phillips screw in the transmitter, and the 23A battery was already there.

By contrast, the receiver was sans AAs, excuse me, No. 7s, so I dropped in a couple rechargeables.

Now, there’s a bit of a snag. My Novatron power pack, being Texan, has little in the way of effete connectors. When Texans decide you need to connect a camera to their power pack, they make the connector a household ‘H’ plug, which is designed to transmit some 15 amps of power. So, off to Radio Shack for a pair (they wouldn’t sell me one) of their 274-340 1/4″ coaxial jacks and to Home Depot for a household H plug. Solder the two together, glue the bodies for a nice look and this is what you have at an additional cost of some $7. The Dr. Pindelski 1/4″ Mono Plug To H Socket Adapter. Available from me at $99.95 + $30 shipping, should you need one. Order early as I expect to be inundated with Christmas and Hannukah orders.

Time to test this little rig. We don’t need the 1/4″-to-mini-jack adapter, so that goes in the cardboard box in the corner of the garage which the black beetles call home, together with the coax cable, as my Canon 5D has a hot shoe. This is how it looks on the 5D:

Let me stress, my 5D can sustain 250 volts, so I’m safe. You should conduct your own test before use if you are unsure.

Finally, here is the receiver plugged into the Novatron power pack, the same one those good Texans use to fry the miscreants on Death Row.

So does it work?

You bet.

As reliable as the Texas Electric Chair. I measured the range at an astonishing 75 feet on my 5D. At 76 feet it fails to trigger the flash.

Not bad for some $28 all told, huh? And one less cable to trip over.