As an HTPC – or a Photoshop machine.
For an index of all my Mac Pro articles, click here.
Surely, you are thinking, a Mac Pro tower as a Home Theater PC is massive overkill.
Well, maybe so, but the economics and functionality are compelling, if you can find the space.
Your basic MacMini will run you $600, with another $100 for an external Blu-Ray reader/burner and another $100-200 for drive enclosures. Want an SSD? Better be prepared to gut and remodel that sealed little toy because Apple will not sell you one with an SSD in basic trim. You have to go to the costlier Core i7 model which, with 8GB of RAM and a 256GB SSD will run you $1,200. Call it $1,500 with Blu-Ray and enclosures. Ridiculous. The only good thing to be said for it is that it comes with a working HDMI socket, allowing video and sound to be conveyed on just one cable. Nice, but at a price.
Now let’s look at the competing, used Mac Pro. I bought a 2009, 4-core, lightly used one from Stanford University (now that’s a pedigree) for $700 with 8GB of RAM and a 500GB HDD. It even included a stock Airport wi-fi card already installed – a pig of a job if you DIY. The HDD went on eBay and was replaced by the Intel 128GB SSD from my failing HackMini (a replacement for a 2009 MacMini which I sold, disgusted with its constant overheating). This SSD runs $100 and provides all the space needed for the OS and fast loading of applications. Rather than waste money on a backup SSD, I clone the SSD to a small 120GB partition on one of the internal 4TB HDDs.
Another $50 and ten minutes with a screwdriver saw the underwhelming (not so) Superdrive DVD burner swapped for an LG Blu-Ray reader/burner. Apple may never have adopted Blu-Ray but the technology works fine with OS Mountain Lion and either a tailored version of VLC (free) or Mac BluRay Player ($40). For ripping Blu-Ray discs, look here.
With four HDD bays inside the Mac Pro’s case there’s no need for external enclosures unless your storage needs are huge – like mine! The GT120 stock GPU is useless for HTPC applications as neither its Mini DisplayPort nor its DVI socket can convey sound. Off to eBay, replaced by the immensely capable EVGA nVidia GT430 which can be found used for $30. Get the one with the HDMI/VGA/DVI sockets. A perfect card for an HTPC, with 1GB of memory and its own silent cooling fan. And that’s it. After sales proceeds, the tab came to just $575, or well under half the price of the MacMini, the latter just waiting to overheat the minute you toss it a Blu-Ray ripping task.
And the Mac Pro is much more than just an HTPC. With little effort it can be enhanced to act as a whole home media and file server. Try that with your Mini.
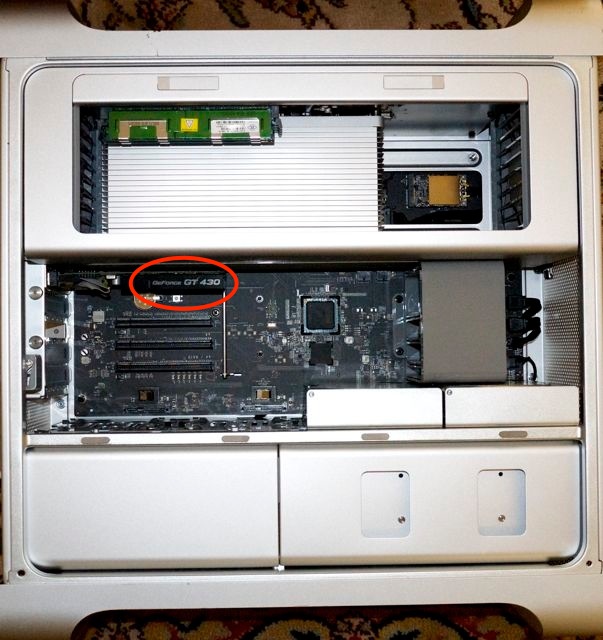
2009 4-core Mac Pro – simplicity itself, with the nVidia GT430 GPU.
The massive heat sink at the top for the single CPU is total
engineering overkill, and let’s all be grateful for that.
To make the Mac Pro work with HDMI, apply the quick driver installation described here. It takes less time to do than to describe. To apply this patch, first ensure that your user account in OS X is password protected – my setup is for an HTPC with no password protection. The patch will ask you for a password and without one you cannot complete the installation. After patching you can remove the password in System Preferences->Users & Groups. Once you reboot, your HDMI-connected TV will display an HDMI option in System Preferences->Sound thus:
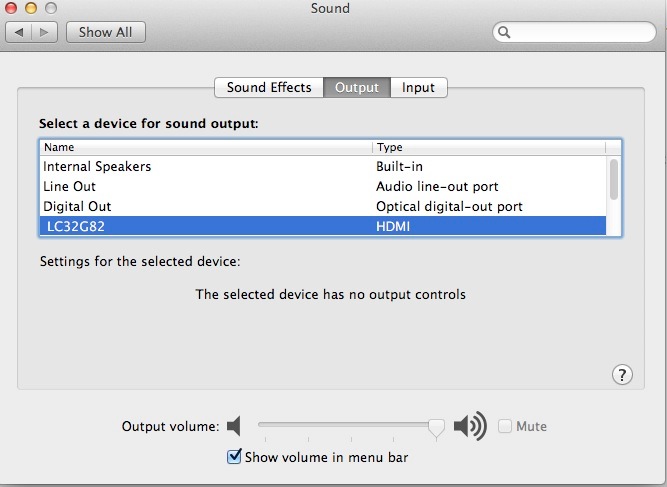
HDMI added.
Which Mac Pro to use? I recommend either the 2008 or 2009 4-core machines at $500 and $700, respectively. Both can run Blu-Ray ripping apps speedily owing to their 64-bit architecture, something denied earlier machines. Further, apply the 4,1->5,1 firmware upgrade (2009 only) I describe here for the latest functionality. While the 2007 and earlier Mac Pros are immensely capable machines, the savings in cost versus the lost functionality do not solve. 2010 and later machines are overpriced and any 8-core dual processor Mac Pro is total overkill for this use.
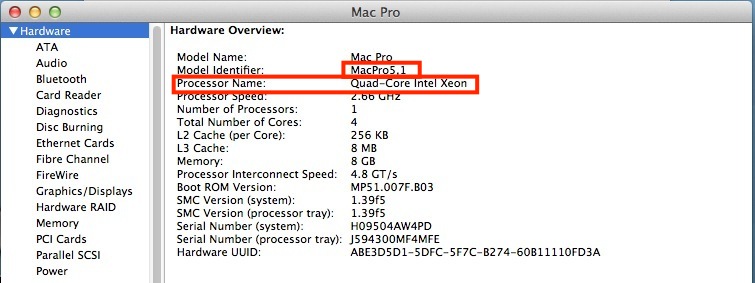
The 5,1 firmware upgrade in place.
Space? I had no issues. The big case fits neatly behind the big screen TV and my two 4-bay Mediasonic boxes with the Airport Extreme wi-fi router perch neatly on top. The base of the Mac Pro rests on the foot of the TV, conferring additional stability to what is not the most stable of arrangements at the best of times.

Mac Pro behind the TV. Note the
orientation of the DVD slot for ease of use.
Performance? Exemplary in every way.
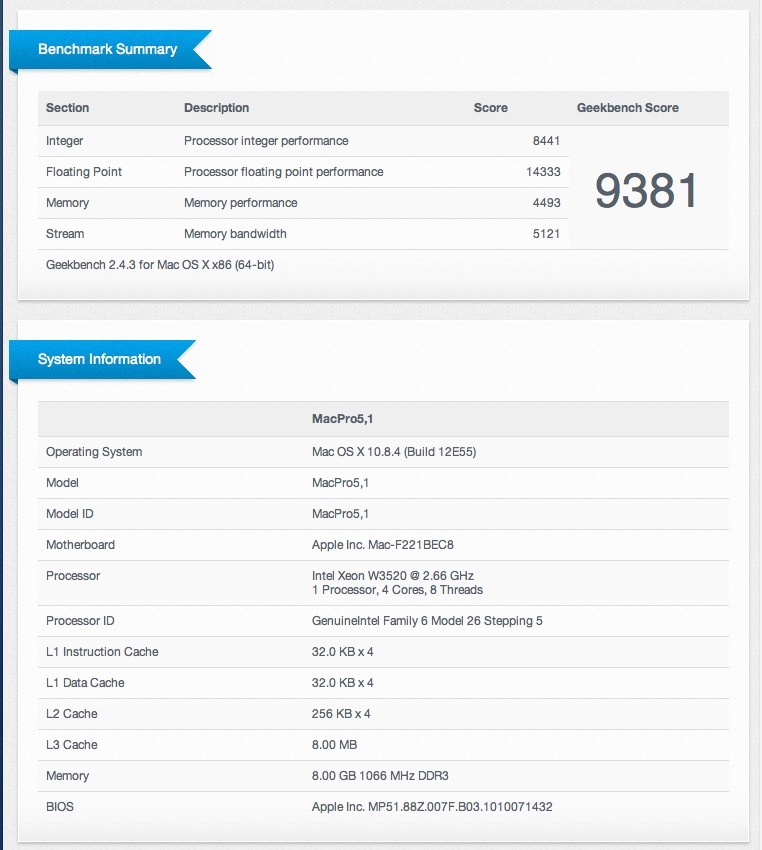
Geekbench for the stock 2.66GHz Intel Xeon 4-core processor.
That’s 50% faster than the Sandy Bridge Core i3 in the HackMini which the Mac Pro replaced. If you want to go crazy, blow $575 or so on a new Xeon W3680 6-core 3.33GHz CPU which will drain your pocket-book but stoke your ego, returning a Geekbench score of 15,500 – close to the base 12-core dual processor 2012 Mac Pro which starts at $3,500 …. This would make an immensely capable photo processing rig for the Lightroom/Aperture/Photoshop set. The overpriced current i7 MacMini returns a Geekbench score of 8,500, by comparison.
Ah, you say, those internal drives – I have two 4TB ones for my Blu-Ray movies – are only SATA2, owing to the Mac Pro’s dated technology. True. Yet on test they render read and write speeds near-identical to external USB3 enclosures. (My external USB2 drives are too slow for Blu-Ray movies; they would need a $25 USB3 card in the Mac Pro for that use). If you must have faster, though I doubt that is needed, you can run the data connection through a $20 SATA PCIe internal card, and double your speed with SATA3 drives. So much for the Mac Pro’s purported obsolescence.
The MacMini has one other questionable advantage, in that it supports external Thunderbolt devices. That’s of no use in an HTPC, and have you checked the prices of TB cables and enclosures recently?
My OS and applications SSD is tucked away in the optical drive enclosure, making use of the provided available cable/socket, as illustrated here, a five-minute job.
USB3 vs. USB2:
If you propose ripping your Blu-Ray movies to external drives, these must be connected using USB3. USB2 is fine for regular definition movies but has insufficient bandwidth for the much larger Blu-Ray files. My 4-core Mac Pro movie machine has a 4-port USB3 Orico card (with the Fresno chip which is recognized natively by Mac OS 10.8.3 and later) and I show how to install the card here. You must provide power to the card from the optical drive bay and will experience great frustration and will waste much time if you do not. Simply stated, an unpowered card does not work.
As usual, the proof lies in the data:
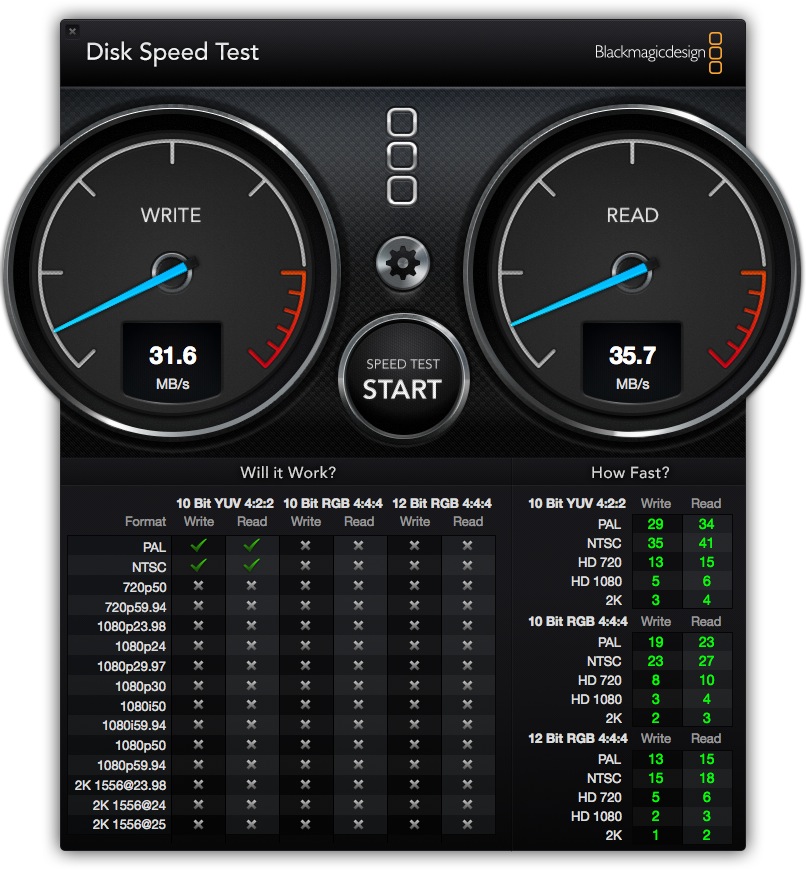

USB2 disk speeds compared with USB3 disk speeds – external 4-bay Mediasonic enclosures.
Conclusion:
The single processor Mac Pros are far easier to find in mint, used condition than the dual processor machines. Do not pay more than $700 – there are many out there. Be patient.
In conclusion, the case will accommodate 4 x 4TB HDDs in stock trim and another four of these monsters if you piggyback them on the stock fittings and run SATA data and power cables. 32TB is a lot of storage.
Down the road when ultra-HD 4K TVs become affordable, you can install a better graphics card to drive the display. MacMini? You are going to be buying a new one to do that.
I cannot think of better value for your dollar than this rig, and all in a case which is as near silent as you can get. That’s an important consideration for an HTPC.