No time like the present.
Ask the average consumer to recommend an insurance company and you will get saccharine encomiums about his local broker. Ask how they handled the most recent claim and you will get a blank stare, for chances are all the consumer has ever done is hand over premium payments to the smiling broker whose newly whitened teeth testify to the industry’s profit margins.
Simply stated, insurance companies are in the business of not paying claims. That’s how they make money.
So the consumer has to try that bit harder to prove loss and recover payment and in a modern digital world nothing could act as a greater antidote to an inherently morally challenged industry than photographs. Pictures not only beat a thousand words, they also beat the crook at the corner fronting for an industry whose morals are comparable to those of Wall Street.
Collecting and collating all the data relating to your personalty is, let’s face it, a pain in the nether regions, but it sure beats sifting through the ashes of a fire or the trauma of a burglary. I am as guilty as most of procrastinating on the awful job of making a good home inventory but a simple database application named Bento makes it a lot more fun than a root canal.
Bento is a database program wrapped in a glossy coat which requires no technical skill from the user. An included Home Inventory template makes it instantly usable and all I did to mine is add a second picture field. Each item (or ‘record’ in database-speak) has two pictures (or fields) – one for a snap of the item, the other for one of the related purchase invoice. A few other text fields add information for description, serial number, location and so on, but the the pictures will include most of what you need to fight the forces of evil when it comes to making a successful claim for loss recovery.
Here’s an example from my Bento home inventory file:
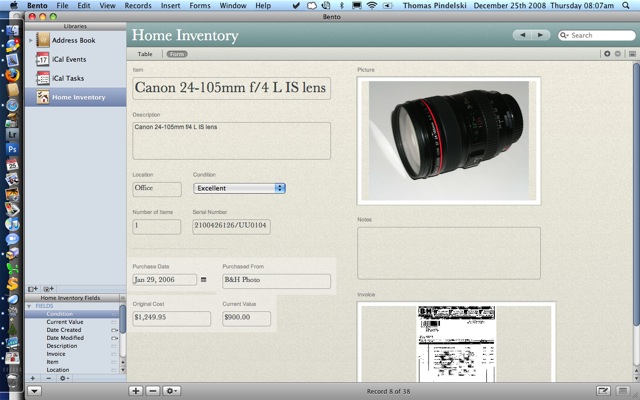
The invoice was scanned on my ancient Epson 2450 flat-bed scanner and simply dragged and dropped into the invoice picture area. Click on it and a full size version opens in Preview for review or printing. Same with the picture of the lens.
What was surprising to me is not only how little time all this takes but also just how much valuable junk I have lying around. Just like you.
So here’s a good project for those post-turkey lazy hours. Get your camera out, snap away at anything of value and scan all those invoices. Of course, Bento only runs on Macs but you are smart enough to have one of those already, right?
Once you are done, export the database to your remote file server and you are safe. Or at least better prepared for the scum bag the insurer will confront you with when you make your claim. Appropriately, he calls himself a “loss adjuster”. It’s a classic bait-and-switch. The guy with the teeth takes your money and the one without makes sure you do not get any back.
For movies and books I use Bruji’s products as they are more tailored to these assets and you can see the related databases for these on my ISP’s file server by clicking the related links on the right. These are more aimed at retrieval of favorite titles but serve equally well for insurance battles. Mac only, of course.