Updating classic Nikkors.
Why pre-Ai Nikkors?
Few would disagree that the ‘pre-Ai’ Nikkor lenses for the Nikon F and subsequent film camera bodies were mechanically among the best ever made by anyone. Aesthetically they are a joy to look at, with their scalloped metal focus collars, and ergonomically a dream to use with smooth focus actions and beautifully detented aperture clicks. Optically, most – as I have shown here many times – can hold their best with the latest ‘plastic fantastic’ lenses, and while there’s no AF or VR, there are no motors to fail, either. Many of my prints made using these testify to their outstanding optical qualities. Later ‘pre-Ai’ lenses adopted rubberized focus collars, and while their optics are largely unchanged, the look and feel – for this snapper – are just not the same. The common nomenclature is to refer to the single-coated metal scalloped ring optics as the ‘F series’, the later multi-coated ones as the ‘C series’ and the yet later pre-Ai lenses with the rubberized focus rings as the ‘K’ series. All mine are either F or C.
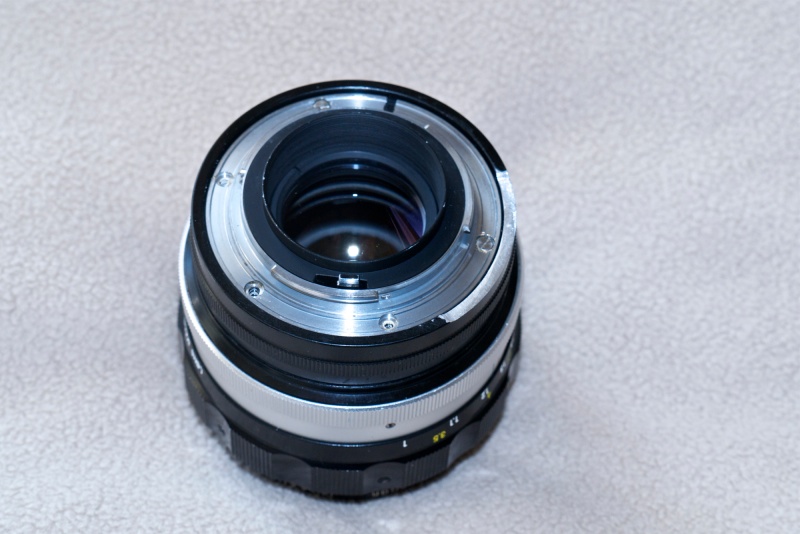
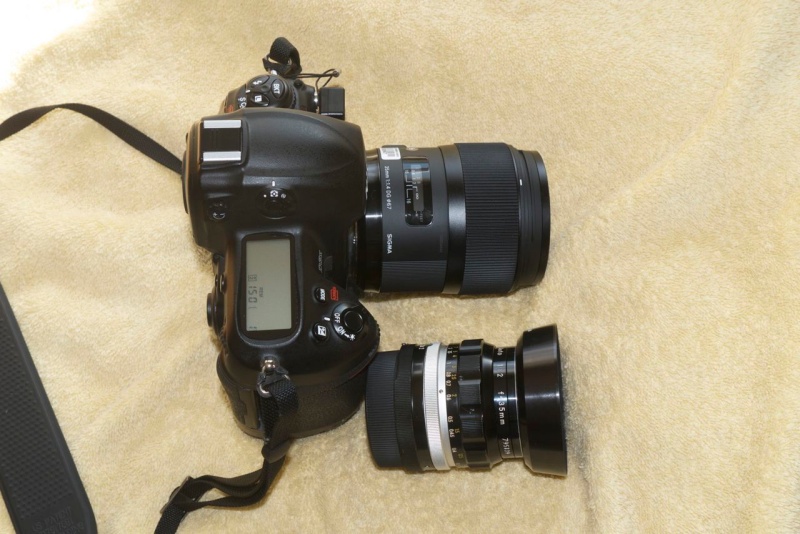
A newly Ai converted lens, in this case the 85mm f/1.8 Nikkor-H.
Incidentally, while the oldest pre-Ai lenses nearly always come with scalloped focusing collars, the design of the aperture ring seems to be without rhyme or reason. Some are scalloped (my 20/3,5 UD, 28/2, 28/3.5, 50/1.4, 105/2.5, 135/3.5 and 200/4) whereas others dispense with scallops and adopt fluting only (24/2.8 and 35/2). No matter. All are a delight to use.
Drawbacks:
The snag with pre-Ai lenses is that, if you can live with manual focusing, they will not fit a modern Nikon film or DSLR body. That’s actually an advantage, as the need to make this modification mostly keeps used prices of ‘pre-Ai’ lenses down, as they cannot be used on newer bodies in the absence of the Ai conversion. The work required to ‘Ai’ the lens (meaning it will fit) is very easy as either a DIY project or sub-contracted to a skilled machinist who will charge you $30 or so.
There are two aspects to updating classic Nikkors to work on modern DSLR and late film Nikon bodies.
One is to add a $29 CPU to allow proper recording of EXIF data, something I described at length here. You do not have to do this but I strongly recommend that you do. If you, like me, are a student of your EXIF data from which much can be learned and if you like matrix metering and such great features like shutter block for action photography, adding a CPU makes sense.
The other, and this has to be done first, is to relieve an arc on the rear of the aperture setting ring on the lens to provide the required clearance for the aperture feeler tab on the body. Later bodies dispensed with the spigot on the body which couples with the claw on the lens, opting for a rotating, sprung feeler, concentric with the bayonet flange. If the aperture ring on a pre-Ai lens is not machined down, it will damage the aperture feeler, rendering the camera inoperable.
Exceptions:
To effect manufacturing economies for their less costly bodies, Nikon deleted the Ai feeler and the screwdrive focus motor coupling for AF-D Nikkors. The good news is that these bodies allow a non-Ai lens to be mounted without modification (no feeler tab to foul) but the trade-off is that metering does not work. Use an iPhone app like Photometer for manual exposure measurement. And forget AF with AF-D lenses.
The bodies thus designed include:
D40, D40x, D60, D3000, D3100, D3200, D3300, D5000, D5100, D5200,D5300, D5500.
Sub-contracting the work:
When I first started buying pre-Ai lenses I sent them for Ai conversion to John White who does an excellent job for modest cost.
Do it yourself:
Later, as I got braver, I started doing the conversions myself and what I describe below is what John White refers to as the Type A conversion on his site. This works with newer film bodies such as the FM, FE, F4, F5, F6, N90, FM10, F100 and FM3A and digital SLRs such as the D1, D2, D3 and D4 series and the D200, D300 series, D600, D700, D7000 and D800. If your camera body is an “Electronic Only” body such as the N80, D100, D70, D70s, D50, D80 and D90 I recommend you send your lens to John White to have the work done. There’s a little more to it and I cannot advise never having done a Type B conversion, as all my bodies are of the ‘non-electronic’ kind.
Now ‘machined down’ is a rather high falutin’ way of saying that you use a small flat file to remove a sliver of alloy from the rear of the aperture ring of the lens. The process is very simple and easily done by all but the truly cack handed. The latter should use one of the commercial machinists like John White to ‘Ai’ the lens.
You will need a jeweler’s screwdriver to remove the five (sometimes four) rear chromed flange retaining screws. These are either slotted or Philips, depending on the lens. You want the screwdriver to be a really tight fit to avoid trashing the screws. Sometimes screws are frozen in place – after all these optics are mostly over 35 years old – so a miniature soldering iron, applied to the screw for a few seconds, can help loosen them. A broken screw head is not going to make your day. The several lenses on which I have removed the rear flange have been all over the place with regard to the use of thread locker on the screws. Some have none, some a light application and some gobs. As a generalization, the older the lens, the more thread locking compound is used. This dictates the use of large handled screwdrivers which permit far more force to be applied when engaging the screw’s head, minimizing the risk of a damaged screw. Those poncy little screwdriver sets passing as jeweler’s screwdrivers are a waste of money. Check the link in the picture below for the real thing, made by Wiha. Curiously, I have never encountered any thread locker on the two small slotted screw retaining the old aperture follower claw. Go figure.
Once the chromed flange is removed, the aperture ring can be slipped off. A few lenses attach the aperture ring with a short spring to the aperture actuator inside – like the 50mm f/1.4 Nikkor S and SC – but most do not. The 85mm Nikkor-H, illustrated below, retains the aperture ring to the aperture actuator with a small, radial slotted screw which has to be removed to allow the ring to come off. Once the chromed flange is removed, the aperture ring can be slipped off. It has to be replaced in the same orientation as when removed, so do not fiddle with aperture settings when the ring is off. If you replace the ring oriented incorrectly you will lose the ability to change apertures. Don’t panic. Remove and replace correctly. A little experimentation and you will get it. Force is never involved here. Some lenses (like the 50mm f/1.4) use a claw on the removable flange and this must mesh with the aperture tab inside the lens. Miss the tab and you lose aperture control. Others (like the 85mm f/1.8) use a small radial screw to lock the aperture ring in the correct position. The screw must be replaced so that it enters the thread in the lens barrel.
You will need a small, fresh (meaning not blunt from use) flat file with square edges. Triangular ones work well to if you have decent filing skills. I say ‘square edges’ because you really want the slot you file away to have perpendicular sides.
There are three aspects to making the slot.
- How deep it should be
- Where it should start – the left hand end
- Where it should stop – the right hand end
Depth is very easy. Remove the aperture claw (two small slotted screws). You want to file the slot down to a point where the screw holes just remain intact. You do not want to go down so deep that the screw holes are compromised. There’s no loss of function if you do but your work will look ugly.
The starting point means the left end of the slot when the lens is viewed from behind. This one is critical as it tells the camera the maximum aperture of the lens, and it changes with the maximum aperture of the lens you are working on. But there’s an easy way to avoid making a mistake here by the simple expedient of making the slot too short, then gradually working the end point back with subsequent applications of the flat file. Simply refit the aperture ring and the flange (you need only use a couple of the 4 or 5 screws you removed earlier to retain it, temporarily) and see if the LCD display on the camera’s body will reach maximum aperture (camera set to M or A Mode) when you turn the aperture collar. If not, remove and extend the slot a little more on the left hand side.
This table illustrates where the left end of the slot should be relative to the engraved apertures on the aperture ring of the lens which you have just removed.
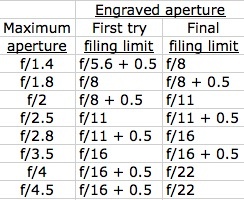
Nikkor pre-Ai filing limit
for Ai conversion, maximum aperture.
The focal length of the lens is irrelevant. The maximum aperture is the dependent variable here.
All data in this table are based on lenses I have personally converted or were converted for me by John White. All converted lenses work correctly on Nikon D700, D2x and D3x bodies I own or owned. I can also attest that these data are correct for an F6 film body owned by a friend.
How to use this table:
- Determine the maximum aperture of your lens
- File down the rear of the aperture ring to the engraved aperture position in the ‘First try’ column, above
- Extend the length of the slot around the circumference for a length of approx. 1.5″
- Reinstall the aperture ring on the lens
- Fasten the chrome bayonet flange with two opposed screws
- Insert lens in camera and set to maximum aperture
- If maximum aperture is indicated in finder or on the LCD you are done on the left end of the slot; if the LCD shows apertures higher than dialed in on the lens, your left slot side needs to be extended
- Check you can get the finder or LCD to show the lens’s minimum aperture. Once it does you are done with the right end of the slot
- Reinstall and fasten, re-test.
When an entry in the table states + 0.5 it means you are filing to a half-stop to the left of the stop indicated. For example, ‘f/11 + 0.5’ means filing to a position midway between the f/11 and f/16 engraved aperture settings.
The identical data for f/4 and f/4.5 are not typographical errors. These are based on multiple observations of lenses I own.
Here’s my 105mm f/2.5 Nikkor pre-Ai lens with the slot machined (the focal length is irrelevant, only the maximum aperture matters) – the two claw-retaining screws were replaced after the machining was completed:
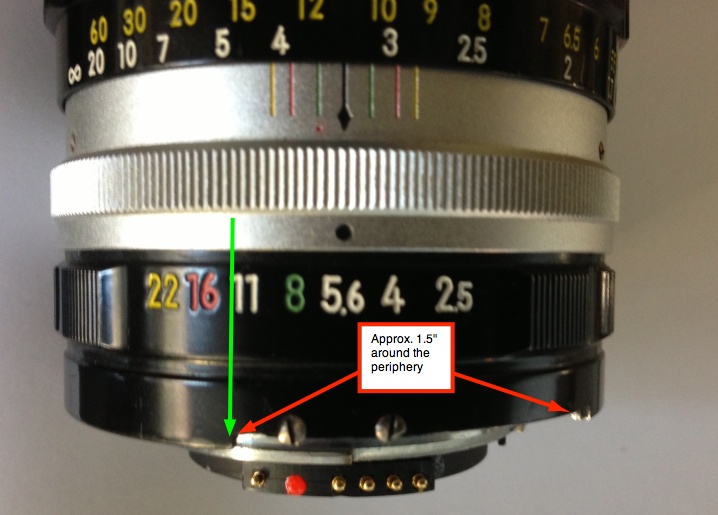
As you can see the slot extends at the left to a position between f/11 and f/16 (‘f/11 + 0.5’ in the table, above) and extends around the periphery of the aperture ring for approximately 1.5″.
The right hand end of the slot is not critical. The slot must have a certain minimum length but too long on the right hand end does not matter. The right hand stopping point for the slot is non-critical and needs only be far enough to the right to clear the feeler on the camera’s body with the lens at its minimum aperture. Typically 1.5″ around the circumference is fine. Make the slot too short and the lens cannot be stopped down to minimum aperture (or fitted at minimum aperture, for that matter) as the movement of the aperture collar will be constrained (or blocked) by the feeler on the camera’s body. Make it too long and no biggie. You cannot set the lens beyond its minimum aperture owing to the limit stop in the lens, so making too long a slot makes no difference. It just means you are doing too much work. The limit stop in the lens will make sure that the correct minimum aperture is not exceeded with the lens on the body.
Some paint the machined surface black. That serves only cosmetic needs, as the exposed alloy is not ‘seen’ by the film or sensor in the camera’s body.
The 20mm UD Nikkor: This is the odd man out. Rather than relieving an arc of alloy from the rear of the aperture ring, you must fit a small extension piece to effect contact with the aperture feeler on the body. I reverse and cut down the stock aperture claw to do this. Click here for details.
Proof of the pudding:
Here I illustrate the process of adding the Ai slot on my latest ‘pre-Ai’ lens acquisition, the magnificent 85mm f/1.8 Nikkor-H Auto optic, made in the early 1970s.
The alloy of the aperture ring is fairly soft and little time or effort are needed to do the work. I do not advise the use of power tools like a Dremel. They are far too aggressive and you run the risk of removing too much alloy. When testing the limit point of the left hand (the maximum aperture) end of the slot, by refitting the aperture ring and bayonet flange for fitting of the lens to the camera, I make sure to use compressed air to clear any remaining filings from the aperture ring. Getting these into the lens or camera will not make your day.
My first lens took me an hour (nervy-dervy!) but I can crack these out in about 15 minutes now, no stress.
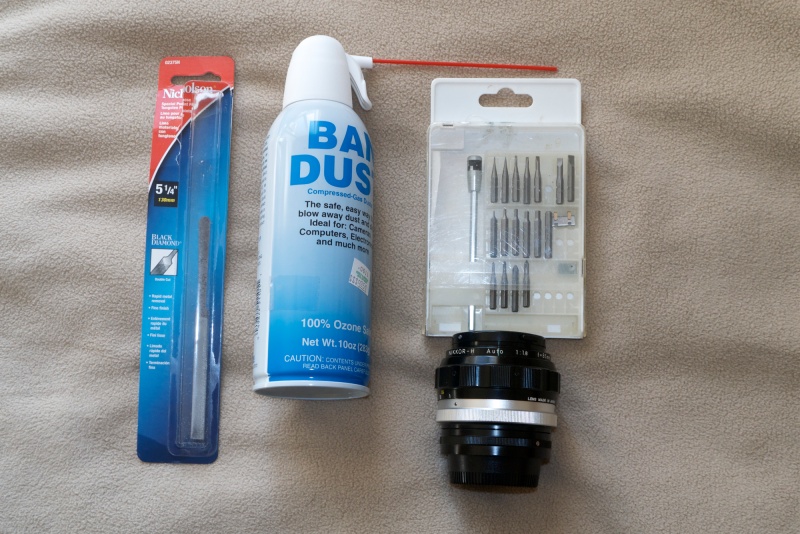
Tools of the trade. Flat file, compressed air,
Wiha miniature screwdriver kit, Nikkor awaiting surgery.
Magnetic screwdrivers sometimes help, but Nikkors do not consistently use magnetized screws.
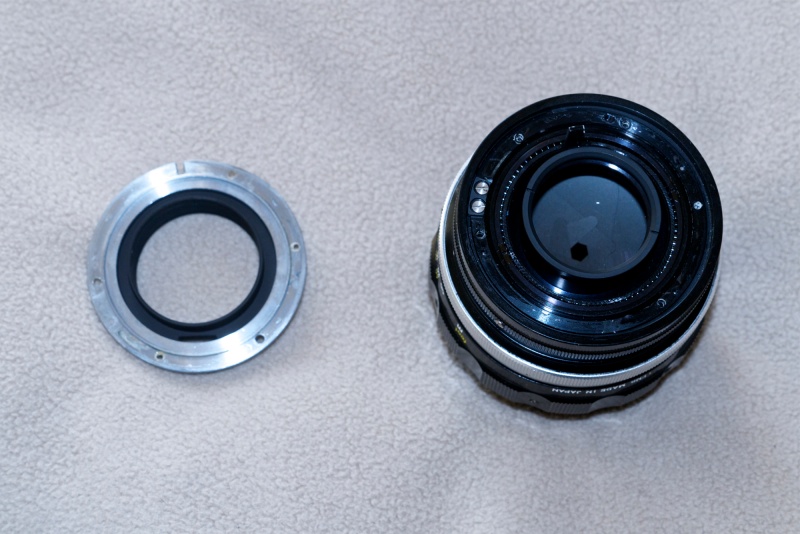
The screws and the bayonet flange removed.
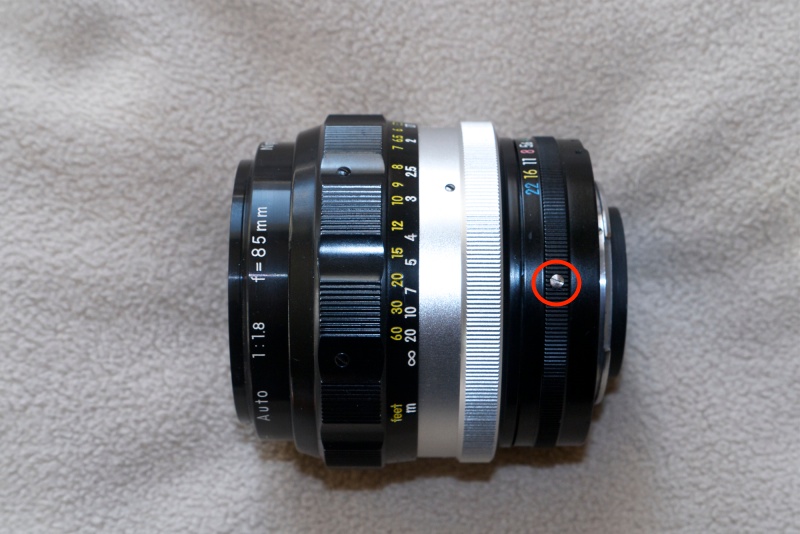
Some lenses, like the 20mm f/3.5 UD and this 85mm f/1.8, have an aperture ring retaining screw. Remove it.
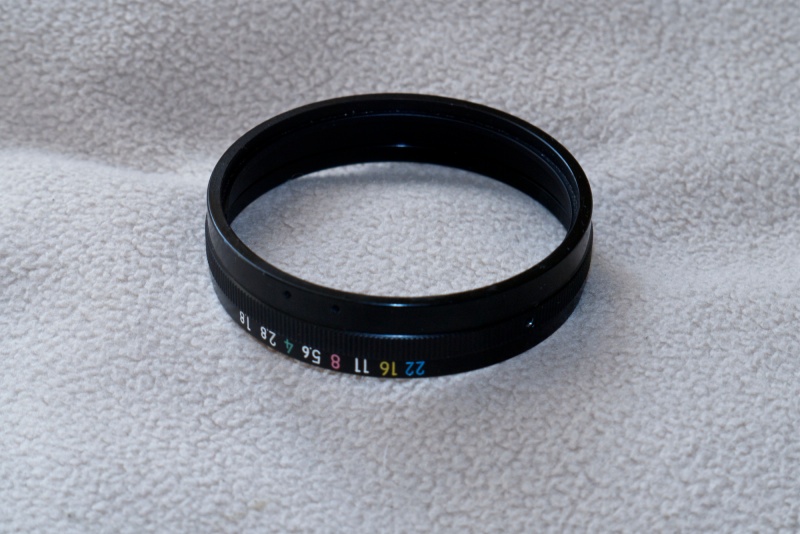
The aperture ring removed, ready for machining.
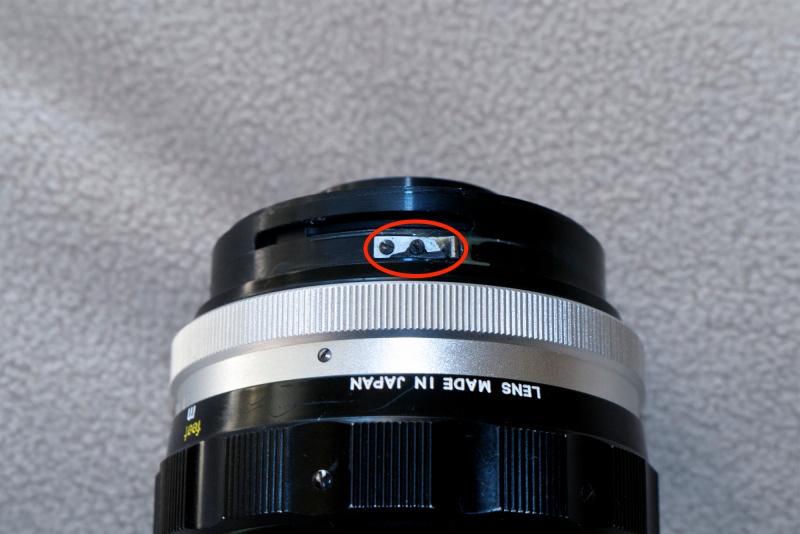
With the aperture ring removed, the spring spigot which engages
the detents inside the aperture ring, conferring ‘click stops’ on the action,
is accessible. If you wish to convert the lens for movie use – meaning no noisy
click stops – remove this spigot, retained by two screws.
15 minutes with a flat file and the machining is completed. The aperture ring is
first blasted with compressed air to make sure any trace of metal filings is removed.
The small aperture ring retaining screw is replaced followed by the flange.
The flange screw holes are not evenly spaced so the flange can only be replaced correctly.
Two flange retaining screws are used here to test the fit on the camera body.
When reinstalling the flange retaining screws tighten them in two stages in a criss-cross pattern, much as you would a car’s wheel. Tightening each down first time with massive torque risks distorting the flange, meaning the lens will not sit dead parallel to the body. I do not advocate the use of threadlocker and Nikon’s more recent MF lenses use none, bearing this out. A properly torqued screw will not come out.
The CPU can now be installed if required.
Factory Nikon Ai conversion kits: Nikon used to make ‘plug-and-play’ conversion kits, consisting of a replacement aperture ring. Most are long sold and it’s unlikely you will find the one you need. You can see which ring your lens needs in this database. If you can find them, they generally run $30-35 and invariably have the awful, non-matching diamond machined texture which will not match the look and feel of the original lens, which is why I avoid them. (My 24mm pre-Ai Nikkor came thus converted and it kills me every time I use it).
Claw replacement: When you are done you can replace the old aperture claw if you like the look or if it helps you key the lens to the body. It serves no other useful purpose. I replace the screws but leave the claw off. In the many lenses I have modified, these screws have always responded to a magnetic screwdriver which makes an almost impossible task easy. Hardware stores carry small gadgets to allow a screwdriver’s head to be magnetized or demagnetized. A few bucks and highly recommended. Be sure to demagnetize your screwdriver if you contemplate using it on sensitive electronic components.
Final touch – color mounting index for protection:
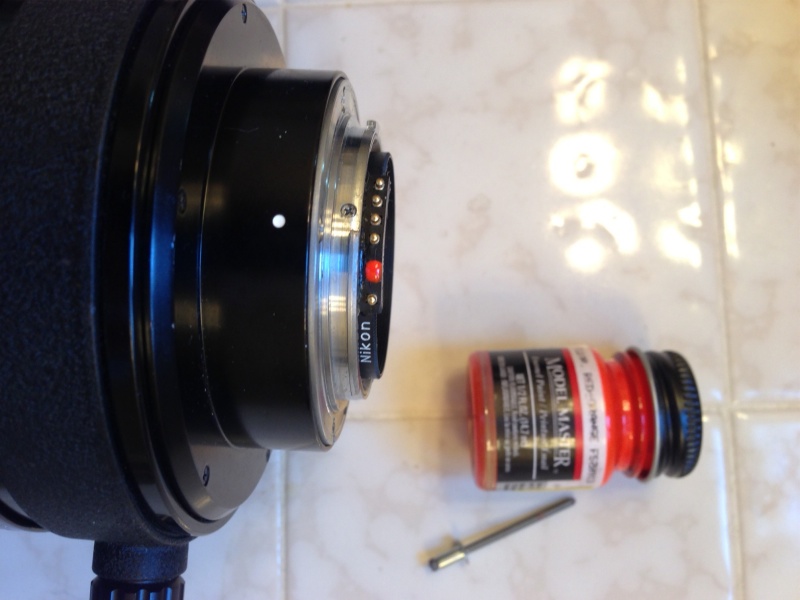
I add a spot of fluorescent orange paint between the fourth and fifth CPU pins (very little, to avoid run off into the pins) which I find greatly helps with indexing the lens when mounting it on the camera body. For those lenses which accept a simple glue-on CPU installation, this also lessens the chance of striking the edge of the fairly exposed CPU on the camera’s bayonet throat, something I once did, managing to damage the CPU in the process, necessitating replacement. Only Leica ever got this right with its red, raised plastic buttons on their lenses which permitted mounting by feel only. Later, Pentax with their M series did the same, though the plastic hemisphere was white and hence less visible. It’s so simple, it mystifies me why others have not done this. My paint dot does not help with feel, but it helps greatly when aligning the lens with the camera’s bayonet mount.
The collector’s dilemma: I have little time for gear collectors. If I do not use something I sell it. Nevertheless, there’s a body of believers out there who will tell you that machining classic Nikkors to make them work on modern bodies is some sort of sacrilege as it impugns the ‘collector value’ of the lens. Utter rot. Most Nikkors of all types were made by the tens and hundreds of thousands – not my idea of scarcity value. The only ‘rare’ lens I would not consider converting is the 13mm f/5.6 (one just sold for $100,000 at auction – only 51 were made!). The other rarity, the $4,000 58mm/1.2 Noct came in Ai and Ai-S versions only, so no conversion is needed.