Category Archives: Technique

Sound memories

Sounds add greatly to memories.

The very first column in these pages spoke about the nostalgia of family albums. I could not but help being reminded of it the today when a singularly unusual thing happened.

I was rummaging about in the desk drawer looking for something when my old Sony microcassette dictaphone surfaced from the dark recesses. Seeing it brought memories flooding back. Not of all the times I had used it in business to dictate cover-your-rear memoranda in the world of corporate politics. No, that is mercifully forever behind me now. Rather, I recalled that the last time I had put this great, if now very dated, analog tape recorder to use was some three years ago when our son was but one year old. He used to hang out in his crib and merrily squeal to himself as he discovered his vocal chords. So I had switched it on ‘record’ and placed it in his room under the crib, so he could chat away undisturbed.

Coming back half an hour later, sure enough, there were several minutes of squealing and general joie de vivre on the tape. I put it back in the desk drawer and pretty much forgot about it until it surfaced again today. Now with my new awareness of the value added by sound to my photographic efforts, it immediately occurred to me that the tape had to be somehow recovered and placed on the family web site, next to the snaps of our son. This proved trickier than you would think.

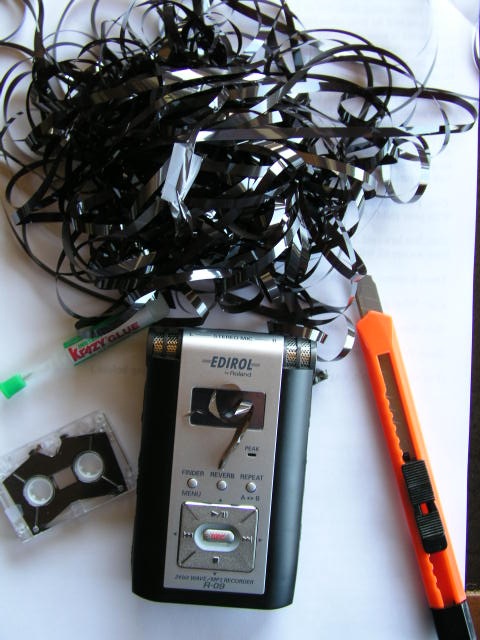
You see, the tired old tape, used who knows how many times, decided to come off the end spool when I rewound it. Now these cassettes are not rebuildable, being heat sealed, unlike in days of yore when they were actually screwed together. And the idea of somehow transplanting the precious tape to another microcassette was a prospect I dared not contemplate. Why not buy a regular tape cassette and splice in the tape from the microcassette? And she was right – the tape sizes are identical and I had always used the 1 7/8 inches/second tape speed on the Sony for best quality. That’s the same speed regular cassettes run at.

Off to the local Target store where, to my dismay, I was hosed down for no fewer than ten cassette tapes, individual ones no longer being sold. Still, at $7, the damage was bearable, particularly given the importance of my mission. Back home, I pulled out enough tape to make room for the spliced section coming from the microcassette, managed to get hold of the tape pigtail in the latter, and glued in the whole tape with superglue, winding it in laboriously with a pencil through the hub….analog to digital was never so difficult.

The next step was to track down a tape cassette player – our tape cassettes exited stage left years ago. Then it occurred to me that I had an old boom box in a guest room and before you could say ‘yipee’ I had the tape playing on the boom box with my Edirol digital recorder placed nearby.

Into Audacity with the MP3 file, a few moments later a noise sample was made and the noise filtered out (Audacity is great!) and our happy son made his way to the family web site for all to enjoy. They’re just squeals to you, so I will not repeat them here, but for us it’s a wonderful enhancement to our memories of Winston when he was but one year old.

So when you take pictures of your kids, why not record the sounds they make too?

A related lesson is to digitize all your old media – records, tapes, pictures, because before long it will be impossible to get the playback devices these need. Plus, backing-up of digital is very easy.

Always carry …. a sound recorder?

A new twist on an old saying.

Which of us has not heard “Always carry a camera”? The exhortation is rarely informed, of course. Any Englishman will tell you that it never rains when you carry an umbrella, and for most, the same applies to cameras. You never see good pictures if you just happen to have one along for the ride. Good pictures are made, not found.

However, just to put a new twist on it, how about “Always carry a sound recorder”?

This past weekend I was with our four year old at a local park and, as is the case with kids, Winston made straight for the play area. This, you must understand, is fenced. Not to keep anyone out but rather to keep all those threats to society, little children, in. And no, this was not in the Bronx or Brixton. The reality, I suspect, is that one of the city councilmen just happened to have a relative in the fencing business and …. well, you know how the rest of it goes.

Well, Winnie was struggling with the latch to the gate so I gave him a hand, only to be met with the most appalling squeaking as the gate opened. Payola for the gate oiling program must have been missed this year, I suppose. But the emotion I felt most was one of excitement. This was a fantastic sound effect! So I whipped out the Edirol sound recorder (from its newly acquired 99 cent canvas case found at Target – Roland being too cheap to supply one) and had at it with the gate, much to Win’s amusement. We whanged the gate back and forth a few times and had a jolly old time doing it, I must say. Creepy! Adults like funky sounds too!

I had already added wind howl sounds to the Piedras Blancas motel QTVR picture but this project just called out for a creaky gate sound to complete the feeling of desolation. It was a moment’s work in Audacity to superimpose the squeaky gate on the wind howl and then to parcel the whole thing up in CubicConnector.

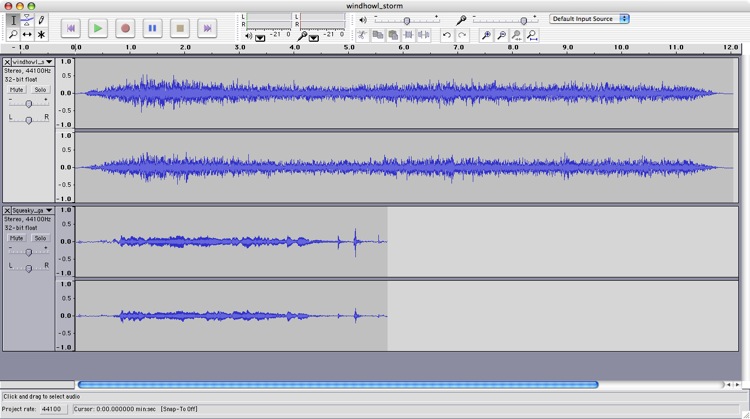
Here’s how the sound tracks look in Audacity – the wind howl is at the top. Subequently I copied and pasted the squeaky gate to match the length of the wind howl then told CubicConnector to loop the whole thing:

Now I’m not about to lug the Canon 5D/KingPano head/Linhof tripod with me wherever I go, in the search of new panoramas. But the Edirol may just make the trip.

* * * * *

A few words about this old motel. It has been on Highway One, close to Hearst Castle for as long as I remember. Back when I first saw it on my inaugural drive up the most beautiful road in California – that would have been 1979 or so – it was replete with gas pumps and was a hive of activity. A half decent restaurant and those same jolly white and electric blue colors. Then over the years it began to fail. Nothing wrong with the location, just lousy management and marketing. Finally, last year, the State of California bought it for an obscene amount of taxpayers’ money and promised to convert it to an educational institution, whatever that means. After all, this is the state that made America’s best public schooling system into the worst in a short twenty years, so it’s not as if they can claim to know anything about the subject.

A year later what you see is what is in my picture. A couple of old paint buckets sit outside the deserted main entrance. Weeds grow everywhere. The gas pumps are long gone and a couple of abandoned cars soil the parking lot. It’s an incredibly sad scene. Desuetude and detritus in this otherwise pristine area, with a brown State of California sign ‘Closed for Restoration’ tacked by the doorway. That’s a sign that needs to be posted on the Capitol in Sacramento.

Enhanced QTVR interactive features

CubicConnector does the trick.

That rather intimidating title is nothing more than the addition of ‘click here’ functionality to a QTVR movie/panorama.

This is best illustrated by the enhanced version of the 360 degree panorama of my home theater which has graced these pages before.

Once the QuickTime image loads – click below – cursor over any of the pictures on the walls and the cursor will change to a finger pointing to a globe. Click and you will be take to a high quality image of the picture. Click the ‘back’ button on your browser to return to the panorama.

Click here

This is done using CubicConnector which allows ‘hotspots’ to be defined in a panorama. Each hotspot can then be connected to an image – not good as the file size swells and the image is distorted – or to the URL of an image on your web site. I used the latter approach as it maintains the relatively small size of the QTVR movie and gives you complete control over the size and quality of the image displayed in response to the mouse click. The CubicConnector software is so well designed that the process is intuitive and the whole thing – including learning time – took me one hour to do, which involved creation of fifteen hotspots, one for each hanging picture.

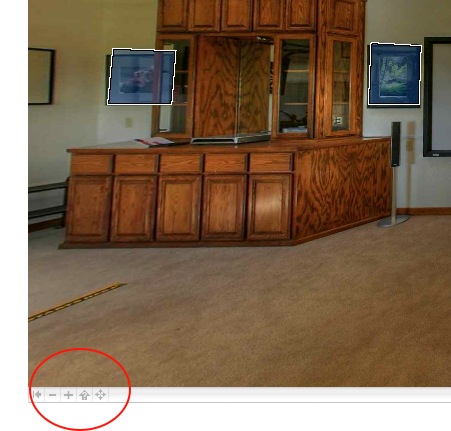
Click on the arrow at the lower left of the QuickTime screen and you can toggle hotspots on or off so that you can see where they are:

You can still zoom in or out in the QuickTime panorama using the Shift and Control keys on your keyboard. The panorama was made using HDR techniques; the photographs on the walls are all straight prints as I had no idea what HDR was when I took them!

In addition to a hotspot for every picture on the walls, try clicking on the snuggle ball to the lower right of the projection screen. The owner was away when this was taken. And, yes, the box he is sitting on contained none other than the Canon 5D used to take the pictures for the panorama, but not one of those on the walls.

QTVR on the big screen

100″ of forest glory!

I wrote the other day about displaying QTVR pictures on the TV screen.

Today, using the same connecting cables with my iBook I plugged the computer into the ‘Video 1’ input on the AV unit in our home theater and what do you think I got?

Surround sound quality from the MP3 soundtrack – which you can listen to here – was excellent, even if only in two channel stereo. Visual quality was marginal, probably accounted for by the fact that I used a fairly modest quality setting on the Canon 5D when snapping the images. Further, I constrained the quality of the Quicktime movie to keep file size small for speedy loading from my web site. On the other hand, we are talking a 100″ diagonal screen here – now that’s an enlargement!

The screen is 16:9 format (1.78:1) which suits most movies. The QTVR is 2.55:1 which is standard widescreen, and the difference in aspect ratios accounts for the black bars at the top and base of the screen area. I could save the QTVR image in CubicConverter to match this format if desired, thus filling the screen.

For my upcoming one man show at a local winery in April 2007, I hope to get in a couple of big screen TVs as an advertising promotion with a local TV vendor and will thus have QTVRs running throughout the show in addition to the display of framed, static photographs.

QTVR on the TV screen

A couple of cables, a smart friend and the iBook do the trick.

My eventual goal for the QTVRs + sound that I am making is to show them on the big screen, meaning the 100″ screen in the home theater on which I project movies.

Well, my iBook, a nice portable source for all of this, is a rather dated G4 model so the first port of call was my trusty nerdy friend, a man of great erudition and wisdom when it comes to things computer. As usual, he did not disappoint.

As advised, I bought an adapter from Apple for some $25 for the video signal – its output end looks like this:

Apple calls it the ‘iBook Video Adapter’ and it connects to the mini-VGA socket on the side of the keyboard. If you want to do this make sure you get the right adapter for your iBook – they vary from model to model.

Those outputs are, respectively, S video and Composite video. As I have a few composite video cables lying around terminated with standard RCA phono plugs, I connected the adapter to the iBook and thence to one of the yellow video inputs on the front of my TV and, hey presto!, the image appeared on the screen, easily controllable with the track pad on the iBook.

For sound, my nerdy friend advised that the only way to do things with this older iBook (meaning it’s completely obsolete, being 3 years old….) was to rout a stereo minijack cable from the low level headphone output using an RCA phono plug-terminated cable to attach the sound feed to the ‘Tape’ input on my receiver. The latter is an ancient Onkyo bought used for very little and produces great sound. Sure enough, the oracle did not let me down, as sounds of birds twittering proceeded to emanate from the speakers. Once inserted the poor quality internal speakers in the iBook were silenced.

It may not look pretty but it works:

I also tried connecting the red and white phono plugs from the iBook to the sound terminals on the TV and there was more than enough signal to drive the TV’s speakers at adequate volume, even if the fidelity was lower than through the speakers attached to the stereo system.

The next step, then, is to try this same setup with the home theater system. This panorama used HDR photography to prevent the bright outdoors from burning out.